


利用TensorFlow2,实现:识别狗狗的113个品种
我是在公众号上看到一个关于使用Python+keras实现狗狗品种分类的推文感觉挺有意思这个是他的博客(https://blog.csdn.net/woshicver/article/details/108505674),这个推文实现起来还不错的,所以就动手做了。但是,真正做的时候,我发现代码什么的,掐头去尾,我搞了半天都没有复现成功,所以,我按照他的意思,数据集,开发的步骤,自己进行开发。他用resnet50实现模型精度能高达82%,他的博客中具体的没写出来。但是,我自己实现了精度只有70%多。预测狗狗种类的结果极差。但是,我在使用相同的超参数及其他配置,换了densenet121,模型精度有80%,图片预测准确度极高97~99%,mobilenet,模型精度虽然只有70%,但是,预测狗狗品种极为准确resnet121,模型精度有76%,图片预测准确度也和resnet50一样极地。后续我会将densenet121,mobilenet实现的代码发布出来。
我的开发环境是
- Ubuntu18.
- TensorFlow2
狗狗品种的数据集是: https://s3.cn-north-1.amazonaws.com.cn/static-documents/nd101/v4-dataset/dogImages.zip
狗狗种类识别的开发流程
-
加载相关的Python库
-
加载数据图片
-
对数据进行预处理
-
使用预训练网络进行训练
-
测试模型的精度
# 引入相关的库
import tensorflow as tf
from tensorflow.keras.preprocessing import image
import pathlib
import os
import numpy as np
import random
import glob
from tensorflow.keras.preprocessing.image import ImageDataGenerator
import pandas as pd
import matplotlib.pyplot as plt
添加GPU的内存分配情况
- 我的GPU是2080max,内存是7642 ,我将GPU设置成7000 ,最大利用我自己GPU使用的
- 如果不设置,会报UnknownError: Failed to get convolution algorithm. This is probably because cuDNN failed to initialize, so try looking to see if a warning log message was printed above. [Op:Conv2D]
解决图片字节丢失
- 不添加 6,7行代码,在训练时我会报image file is truncated (150 bytes not processed)
gpus = tf.config.experimental.list_physical_devices('GPU')
tf.config.experimental.set_visible_devices(gpus[0], 'GPU')
tf.config.experimental.set_virtual_device_configuration(
    gpus[0],
    [tf.config.experimental.VirtualDeviceConfiguration(memory_limit=7000)])
from PIL import ImageFile
ImageFile.LOAD_TRUNCATED_IMAGES = True
对图片进行数据的预处理
-
获取到图片的路径
-
定义超参数
-
对训练数据,验证数据,测试数据进行数据增强()
# 获取图片路径
train_root = '/home/hyb/狗狗识别/dogImages/train'
test_root = '/home/hyb/狗狗识别/dogImages/test'
valid_root = '/home/hyb/狗狗识别/dogImages/valid'
# 定义超参数,避免在编译,训练的代码中进行硬编码,方便调整超参数
weigth = 224
heigth = 224
channels = 3
batch_size = 28
num_classes = 133
# 数据增强
train_datagen = tf.keras.preprocessing.image.ImageDataGenerator(
    # 使用resnet50对数据进行处理
    preprocessing_function = tf.keras.applications.resnet50.preprocess_input,
    rotation_range= 40,
    width_shift_range= 0.2,
    height_shift_range= 0.2,
    shear_range= 0.2,
    zoom_range= 0.2,
    horizontal_flip= True,
    fill_mode= 'nearest'
)
# 主要是读取到图片目录下的所以狗狗种类和图片,对图片进行预处理
train_generator = train_datagen.flow_from_directory(
    train_root,
    target_size=(weigth,heigth),
    batch_size=batch_size,
    seed = 7,
    shuffle= True,
    class_mode = "categorical"
)


valid_datagen = tf.keras.preprocessing.image.ImageDataGenerator(
    preprocessing_function = tf.keras.applications.resnet50.preprocess_input,
)
# 主要是读取到图片目录下的所以狗狗种类和图片,对图片进行预处理
valid_generator = train_datagen.flow_from_directory(
    valid_root,
    target_size=(weigth,heigth),
    batch_size=batch_size,
    seed = 7,
    shuffle= False,
    class_mode = "categorical"
)

train_num = train_generator.samples
valid_num = valid_generator.samples
print("训练集中的图片数量:",train_num)
print("验证集中的图片数量:",valid_num)

test_datagen = tf.keras.preprocessing.image.ImageDataGenerator(
    preprocessing_function = tf.keras.applications.resnet50.preprocess_input,
)
# 主要是读取到图片目录下的所以狗狗种类和图片,对图片进行预处理
test_generator = train_datagen.flow_from_directory(
    test_root,
    target_size=(weigth,heigth),
    batch_size=batch_size,

)
test_num = test_generator.samples
print("训练集中的图片数量:",test_num)

模型
- 加载resnet50
- 改变输出层,将神经元设置成超参数的133,对应狗狗的种类
- 模型编译
- 模型训练
# 使用预训练模型 resnet50,是因为 使用预训练模型训练速度快,多层的神经网络压缩成了2成,训练好的+输出层,节约时间。
resnet50_fine_tune = tf.keras.models.Sequential()
resnet50_fine_tune.add(tf.keras.applications.ResNet50(include_top = False,
                                                   pooling = 'avg',
                                                   weights = 'imagenet'))
# 修改输出神经元对应狗狗种类
resnet50_fine_tune.add(tf.keras.layers.Dense(num_classes, activation = 'softmax'))
resnet50_fine_tune.layers[0].trainable = False

# 对模型进行编译
resnet50_fine_tune.compile(loss="categorical_crossentropy",
                           optimizer="Adam", metrics=['accuracy'])
resnet50_fine_tune.summary()

# 设置哨兵,用来存储quan# 设置哨兵,用来存储权重模型,和数据收敛,模型再也学习不到新内容的时候及时收敛
checkpoint_path = "/home/hyb/狗狗识别/dogImages/saved_models/checkpoint/cp.ckpt"
checkpoint_dir = os.path.dirname(checkpoint_path)
checkpoint_filepath = tf.keras.callbacks.ModelCheckpoint(filepath=checkpoint_path,
                                                 verbose= 1,
                                                 save_weights_only= True,
                                                  save_best_only=True)
callback_dog=tf.keras.callbacks.EarlyStopping(patience=5,min_delta=1e-3)
history = resnet50_fine_tune.fit(train_generator,
                              steps_per_epoch=train_num // batch_size,
                             epochs=50,
                             validation_data=valid_generator,
                             validation_steps= valid_num // batch_size,
                             callbacks=[checkpoint_filepath,callback_dog])
对模型进行测试
- 测试模型的精度
- 存储模型,进行反向推理
# 加载权重
resnet50_fine_tune.load_weights(checkpoint_path)

# 评估模型
loss,acc = resnet50_fine_tune.evaluate(test_generator,verbose=1)
print("Restored model, accuracy: {:5.2f}%".format(100*acc))

# 存储模型
resnet50_fine_tune.save('/home/hyb/狗狗识别/dogImages/saved_models/model_h5/my_model.h5')
# 重新创建完全相同的模型,包括其权重和优化程序
new_model = tf.keras.models.load_model('/home/hyb/狗狗识别/dogImages/saved_models/model_h5/my_model.h5')

# 显示网络结构
new_model.summary()
# 获取狗狗种类,以便后续对狗狗进行识别
files = sorted(os.listdir('./dogImages/test/'))
print(files)
# 狗狗的133个种类
files=['001.Affenpinscher', '002.Afghan_hound', '003.Airedale_terrier', '004.Akita', '005.Alaskan_malamute', '006.American_eskimo_dog', '007.American_foxhound', '008.American_staffordshire_terrier', '009.American_water_spaniel', '010.Anatolian_shepherd_dog', '011.Australian_cattle_dog', '012.Australian_shepherd', '013.Australian_terrier', '014.Basenji', '015.Basset_hound', '016.Beagle', '017.Bearded_collie', '018.Beauceron', '019.Bedlington_terrier', '020.Belgian_malinois', '021.Belgian_sheepdog', '022.Belgian_tervuren', '023.Bernese_mountain_dog', '024.Bichon_frise', '025.Black_and_tan_coonhound', '026.Black_russian_terrier', '027.Bloodhound', '028.Bluetick_coonhound', '029.Border_collie', '030.Border_terrier', '031.Borzoi', '032.Boston_terrier', '033.Bouvier_des_flandres', '034.Boxer', '035.Boykin_spaniel', '036.Briard', '037.Brittany', '038.Brussels_griffon', '039.Bull_terrier', '040.Bulldog', '041.Bullmastiff', '042.Cairn_terrier', '043.Canaan_dog', '044.Cane_corso', '045.Cardigan_welsh_corgi', '046.Cavalier_king_charles_spaniel', '047.Chesapeake_bay_retriever', '048.Chihuahua', '049.Chinese_crested', '050.Chinese_shar-pei', '051.Chow_chow', '052.Clumber_spaniel', '053.Cocker_spaniel', '054.Collie', '055.Curly-coated_retriever', '056.Dachshund', '057.Dalmatian', '058.Dandie_dinmont_terrier', '059.Doberman_pinscher', '060.Dogue_de_bordeaux', '061.English_cocker_spaniel', '062.English_setter', '063.English_springer_spaniel', '064.English_toy_spaniel', '065.Entlebucher_mountain_dog', '066.Field_spaniel', '067.Finnish_spitz', '068.Flat-coated_retriever', '069.French_bulldog', '070.German_pinscher', '071.German_shepherd_dog', '072.German_shorthaired_pointer', '073.German_wirehaired_pointer', '074.Giant_schnauzer', '075.Glen_of_imaal_terrier', '076.Golden_retriever', '077.Gordon_setter', '078.Great_dane', '079.Great_pyrenees', '080.Greater_swiss_mountain_dog', '081.Greyhound', '082.Havanese', '083.Ibizan_hound', '084.Icelandic_sheepdog', '085.Irish_red_and_white_setter', '086.Irish_setter', '087.Irish_terrier', '088.Irish_water_spaniel', '089.Irish_wolfhound', '090.Italian_greyhound', '091.Japanese_chin', '092.Keeshond', '093.Kerry_blue_terrier', '094.Komondor', '095.Kuvasz', '096.Labrador_retriever', '097.Lakeland_terrier', '098.Leonberger', '099.Lhasa_apso', '100.Lowchen', '101.Maltese', '102.Manchester_terrier', '103.Mastiff', '104.Miniature_schnauzer', '105.Neapolitan_mastiff', '106.Newfoundland', '107.Norfolk_terrier', '108.Norwegian_buhund', '109.Norwegian_elkhound', '110.Norwegian_lundehund', '111.Norwich_terrier', '112.Nova_scotia_duck_tolling_retriever', '113.Old_english_sheepdog', '114.Otterhound', '115.Papillon', '116.Parson_russell_terrier', '117.Pekingese', '118.Pembroke_welsh_corgi', '119.Petit_basset_griffon_vendeen', '120.Pharaoh_hound', '121.Plott', '122.Pointer', '123.Pomeranian', '124.Poodle', '125.Portuguese_water_dog', '126.Saint_bernard', '127.Silky_terrier', '128.Smooth_fox_terrier', '129.Tibetan_mastiff', '130.Welsh_springer_spaniel', '131.Wirehaired_pointing_griffon', '132.Xoloitzcuintli', '133.Yorkshire_terrier']
# 对狗狗种类进行预测:我这张是哈士奇,对应的是5号,虽然只有3%,但都比绝大多数的评分要多
from keras.preprocessing.image import load_img, img_to_array
pic_dog = '/home/hyb/下载/f4e72bb4d99229c63223364a094c6f03.jpg'
pic_dog = load_img(pic_dog,target_size=(224,224))
pic_dog = img_to_array(pic_dog)
pic_dog = pic_dog/255
pic_dog = pic_dog.reshape(1,224,224,3)
result = resnet50_fine_tune.predict(pic_dog)
# print(result)
count = 0
for i in result[0]:
    percent = '%.3f%%'%(i*100)
    print("{}的概率:{}".format(files[count],percent))
    count += 1

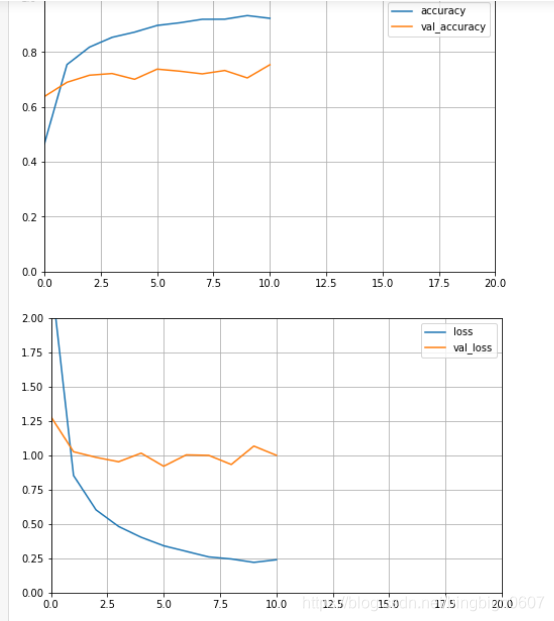
# 模型学习曲线
def plot_learning_curves(history, label, epcohs, min_value, max_value):
    data = {}
    data[label] = history.history[label]
    data['val_'+label] = history.history['val_'+label]
    pd.DataFrame(data).plot(figsize=(8, 5))
    plt.grid(True)
    plt.axis([0, 20, min_value, max_value])
    plt.show()

plot_learning_curves(history, 'accuracy', 20, 0, 1)
plot_learning_curves(history, 'loss', 20, 0, 2)


 948
948


 被折叠的 条评论
为什么被折叠?
被折叠的 条评论
为什么被折叠?
 到【灌水乐园】发言


