


目录
本文首发于DFRobot论坛:MQTT Plus用户库:对Mind+的MQTT功能进行增强 DF创客社区。
引言
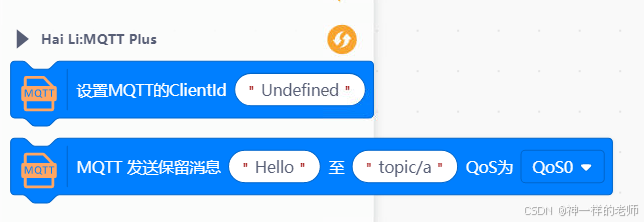
前面的博文介绍过,Mind+的MQTT模块接入华为云是因为MQTT模块不能设置clientid,它是随机生成的,而华为云的clientid和用户名、密码构成加密三元组,随便设置clientid是不行的。所以需要找到一种办法能够设置clientid。我提出用手工编写代码的方式实现华为云的接入(【行空板K10】如何用手工修改代码的方法实现Mind+代码接入华为云IoTDA-CSDN博客)。这种方法虽然验证了我的想法,但是不是一个很好的方法,因为每次积木生成代码之后都要改,比较麻烦。今天介绍一个我编写的用户库MQTT Plus,它可以创建两个积木:设置Clientid的命令块和发送保留消息的命令块,可以增强官方MQTT模块的能力。后面,也会继续对这个用户库进行增强。
Mind+ MQTT功能实现的分析
通过阅读Mind+自带的Arduino库的代码,可以看到MQTT相关的功能存在在DFRobot_Iot类和PubSubClient类中。
DFRobot_Iot类主要负责WiFi联网和MQTT服务器的连接工作。MQTT初始化积木调用init函数,其中又调用SetConfig函数,此时将clientid赋给DFRobot对象的_clientid成员。MQTT连接的积木调用connect函数,它改变状态机的状态。在状态机内部实现了连接MQTT服务器的功能。要实现对MQTT的clientid的修改,就需要再SetConfig函数之后,而在connect之前完成clientid的修改,所以我增加的MQTT修改clientid的积木需要放在这两个系统提供的积木中间。
/*alculate the connection username and password, etc.*/
void DFRobot_Iot::setConfig(){
    if(this->_UseServer == ONENET){
        String tempSERVER = this->_MQTTSERVER;
        uint8_t len = tempSERVER.length();
        if(this->_mqttServer == NULL){
            this->_mqttServer = (char *) malloc(len);
        }
        strcpy(this->_mqttServer,tempSERVER.c_str());
        String tempID = this->_DeviceID;
        len = tempID.length();
        if(len == 0)
        {
            this->_clientId = "";
        }
        else{
            if(this->_clientId == NULL){
                this->_clientId = (char *) malloc(len);
            }
            strcpy(this->_clientId,tempID.c_str());
        }
        String tempName = this->_ProductID;
        len = tempName.length();
        this->_username = (char * )malloc(len);
        strcpy(this->_username,tempName.c_str());

        String tempPass = this->_ApiKey;
        if(this->_password == NULL){
            this->_password = (char *) malloc(tempPass.length());
        }
        strcpy(this->_password,tempPass.c_str());
    }else if(this->_UseServer == ALIYUN){
        String tempSERVER = (this->_ProductKey + "." + this->_MQTTSERVER);
        uint8_t len = tempSERVER.length();
        uint16_t timestamp = 49;
        if(this->_mqttServer == NULL){
            this->_mqttServer = (char *) malloc(len);
        }
        strcpy(this->_mqttServer,tempSERVER.c_str());
        String tempID = (this->_ClientId +
                         "|securemode=3"+
                         ",signmethod=" + "hmacsha1"+
                         ",timestamp="+(String)timestamp+"|");
        len = tempID.length();
        if(this->_clientId == NULL){
            this->_clientId = (char *) malloc(len);
        }
        strcpy(this->_clientId,tempID.c_str());
        String Data = ("clientId" + this->_ClientId +
                         "deviceName" + this->_DeviceName +
                         "productKey" + this->_ProductKey +
                         "timestamp" + (String)timestamp);
        BYTE tempPassWord[20];
        char tempSecret[this->_DeviceSecret.length()];
        char tempData[Data.length()];
        String tempName = (this->_DeviceName + "&" + this->_ProductKey);
        len = tempName.length();
        this->_username = (char * )malloc(len);
        strcpy(this->_username,tempName.c_str());

        strcpy(tempData,Data.c_str());
        strcpy(tempSecret,this->_DeviceSecret.c_str());
        MyHmac_Sha1.HMAC_SHA1((BYTE * )tempData,Data.length(),(BYTE * )tempSecret,this->_DeviceSecret.length(),tempPassWord);
        String tempPass = byteToHexStr(tempPassWord,sizeof(tempPassWord));
        if(this->_password == NULL){
            this->_password = (char *) malloc(tempPass.length());
        }
        strcpy(this->_password,tempPass.c_str());
    }else if(this->_UseServer == ONENET_NEW){
        String tempSERVER = this->_MQTTSERVER;
        uint8_t len = tempSERVER.length();
        if(this->_mqttServer == NULL){
            this->_mqttServer = (char *) malloc(len);
        }
        strcpy(this->_mqttServer,tempSERVER.c_str());

        String tempID = this->_DeviceID;
        len = tempID.length();
        if(this->_clientId == NULL){
            this->_clientId = (char *) malloc(len);
        }
        strcpy(this->_clientId,tempID.c_str());

        String tempName = this->_ProductID;
        len = tempName.length();
        this->_username = (char * )malloc(len);
        strcpy(this->_username,tempName.c_str());
        char authorization[128];
        String pid = this->_ProductID;
        pid += "/devices/";
        pid += this->_DeviceID;
        char buf1[pid.length()+1];
        pid.toCharArray(buf1, pid.length()+1);
        char buf2[this->_ApiKey.length()+1];
        this->_ApiKey.toCharArray(buf2, this->_ApiKey.length()+1);
        token.TOKEN_Authorization("2018-10-31",buf1,1767077900,buf2,authorization,128);
        String tempPass = String(authorization);
        if(this->_password == NULL){
            this->_password = (char *) malloc(tempPass.length());
        }
        strcpy(this->_password,tempPass.c_str());
    }

}
       switch(currentMqttStatus){
            case iotStatusProtocol::MqttConnectStart:
                mqttPt->iotDebug.message = "Start connecting mqtt";
                mqttPt->iotDebug.error = 0;
                currentMqttStatus = iotStatusProtocol::MqttConnecting;
                executeCallbackTask();
                timeOut = millis();
                while(!client.connect(mqttPt->_clientId,mqttPt->_username,mqttPt->_password)) {
                    if(millis() - timeOut > 3000)
                        break;
                    delay(10);
                }
                subscribe();
PubSubClient类主要负责连接MQTT云,并完成发布和订阅工作。它其实提供了一个publish函数,第3个参数就是retain。只是这个函数没有对应的积木。
boolean PubSubClient::publish(const char* topic, const char* payload, boolean retained) {
    return publish(topic,(const uint8_t*)payload,strlen(payload),retained);
}
好在PubSub类有个全局变量client,所以可以在我的用户库里面直接调用client.publish实现发布保留消息的功能。
PubSubClient client(espClient);


WiFiClient espClient;
功能增强
对Clientid的支持
在setClientId函数中实现了设置Clientid功能,采用的方法是直接修改了DFRobot对象的_clientid成员。
/// @brief 设置MQTT的Clientid
/// @param myIot
/// @param clientID
void setClientId(DFRobot_Iot * myIot, String clientID)
{
   int len = clientID.length();
   printf("len = %d\r\n", len);
   if(len == 0)
   {
      return;
   }
   if(myIot == NULL)
   {
      return;
   }
   printf("clientid = %s\r\n", clientID.c_str());
   // if(myIot->_clientId != NULL)
   // {
   //    free(myIot->_clientId);
   //    myIot->_clientId = NULL;
   // }
   myIot->_clientId = (char *) malloc(len + 1);
   if(!myIot->_clientId)
      return;
   strcpy(myIot->_clientId, clientID.c_str());
   return;
}
对保留消息的支持
在sendRetainedMessage函数中实现发送保留消息,调用了官方库函数的client.publish,把第3个参数设置成1即可。
/// @brief MQTT 发送保留消息
/// @param myIot DFRobot_Iot实例
/// @param topic 主题
/// @param message 消息内容
/// @param qos QoS
void sendRetainedMessage(DFRobot_Iot * myIot, String topic, String message, int qos)
{
   if(myIot == NULL)
   {
      return;
   }
    if(!myIot->wifiStatus() || !myIot->connected())
        return;
    client.setPublishQos(qos > 0 ? MQTTQOS1: MQTTQOS0);
    client.publish(topic.c_str(), message.c_str(), 1);
    delay(250);
    return;
}
用户库的编写
完整的代码参见:ext-mqtt-plus: Mind+的用户扩展库,增强了MQTT的能力。
有关用户库编写的基本规则,可以参考:Mind+软件用户扩展库详细教程 - Mind+教程。这里仅谈谈我的具体实现。
基本结构
用户库的基本结构如下图所示。其中mpext文件是导出结果,如果不想修改代码,直接安装库,选这个文件即可。
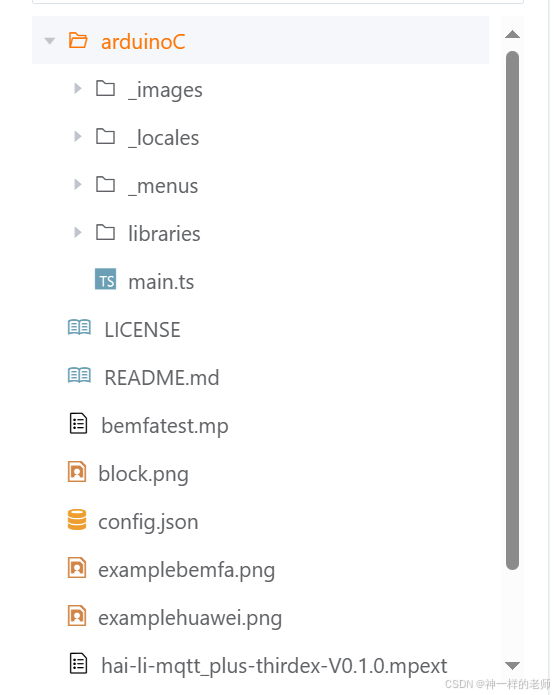
config.json
config.json文件是库的基本配置文件,如果修改了代码,就要导入这个文件,而不是mpext文件。
文件的主要内容如下:
{
  "name": {
    "zh-cn": "MQTT Plus",
    "en": "MQTT Plus"
  },
  "description": {
    "zh-cn": "增强MQTT的能力。",
    "en": "Enhance the capabilities of MQTT"
  },
  "author": "Hai Li",
  "email": "zealsoft@gmail.com",
  "license": "MIT",
  "isBoard": false,
  "id": "mqtt_plus",
  "platform": ["win", "mac", "web"],
"version": "0.1.0",
  "asset": {
    "arduinoC": {
      "dir": "arduinoC/",

      "board": [
        "esp32s3bit"
      ],
      "main": "main.ts"
    }
  }
}
main.ts
main.ts是定义每个积木块的,是用户库的核心。
//% color="#007FFF" iconWidth=40 iconHeight=40
namespace mqtt_plus {
  //% block="MQTT set ClientId [CLIENTID]"  blockType="command"
  //% CLIENTID.shadow="string"   CLIENTID.defl="Undefined"
  export function setClientId(parameter: any, block: any) {
    let cid = parameter.CLIENTID.code;
    Generator.addInclude("includeMqttPlus", "#include <mqtt_plus.h>");
    // Generator.addObject("IotObject", "DFRobot_Iot",`myIot;`);
    Generator.addCode(`setClientId(&myIot, ${cid});`);
  }

  //% block="MQTT Send retained message [DATA] to the topic [TOPIC] with QoS [QOS]" blockType="command"
  //% DATA.shadow="string"   DATA.defl="Hello"
  //% TOPIC.shadow="string"   TOPIC.defl="topic/a"
  //% QOS.shadow="dropdown"  QOS.options="QOS"
  export function sendRetainedMsg(parameter: any, block: any) {
    let msg = parameter.DATA.code;
    let topic = parameter.TOPIC.code;
    let qos = parameter.QOS.code;
    Generator.addInclude("includeMqttPlus", "#include <mqtt_plus.h>");
    Generator.addCode(`sendRetainedMessage(&myIot, ${topic}, ${msg}, ${qos});`);
  }

}
libraries
此文件夹是放置生成代码需要调用的arduino库文件。注意:不要讲C++文件直接放在这个目录,必须先建一个子目录(名字任意),然后把代码放到子目录中,否则会出现ardiuno builder找不到文件的问题。
示例程序
巴法云
巴法云登录时设置clientid会比较简单。巴法云支持保留消息。示例文件bemfatest.mp,运行例子前请设置自己的WiFi密码和巴法云的Clientid。
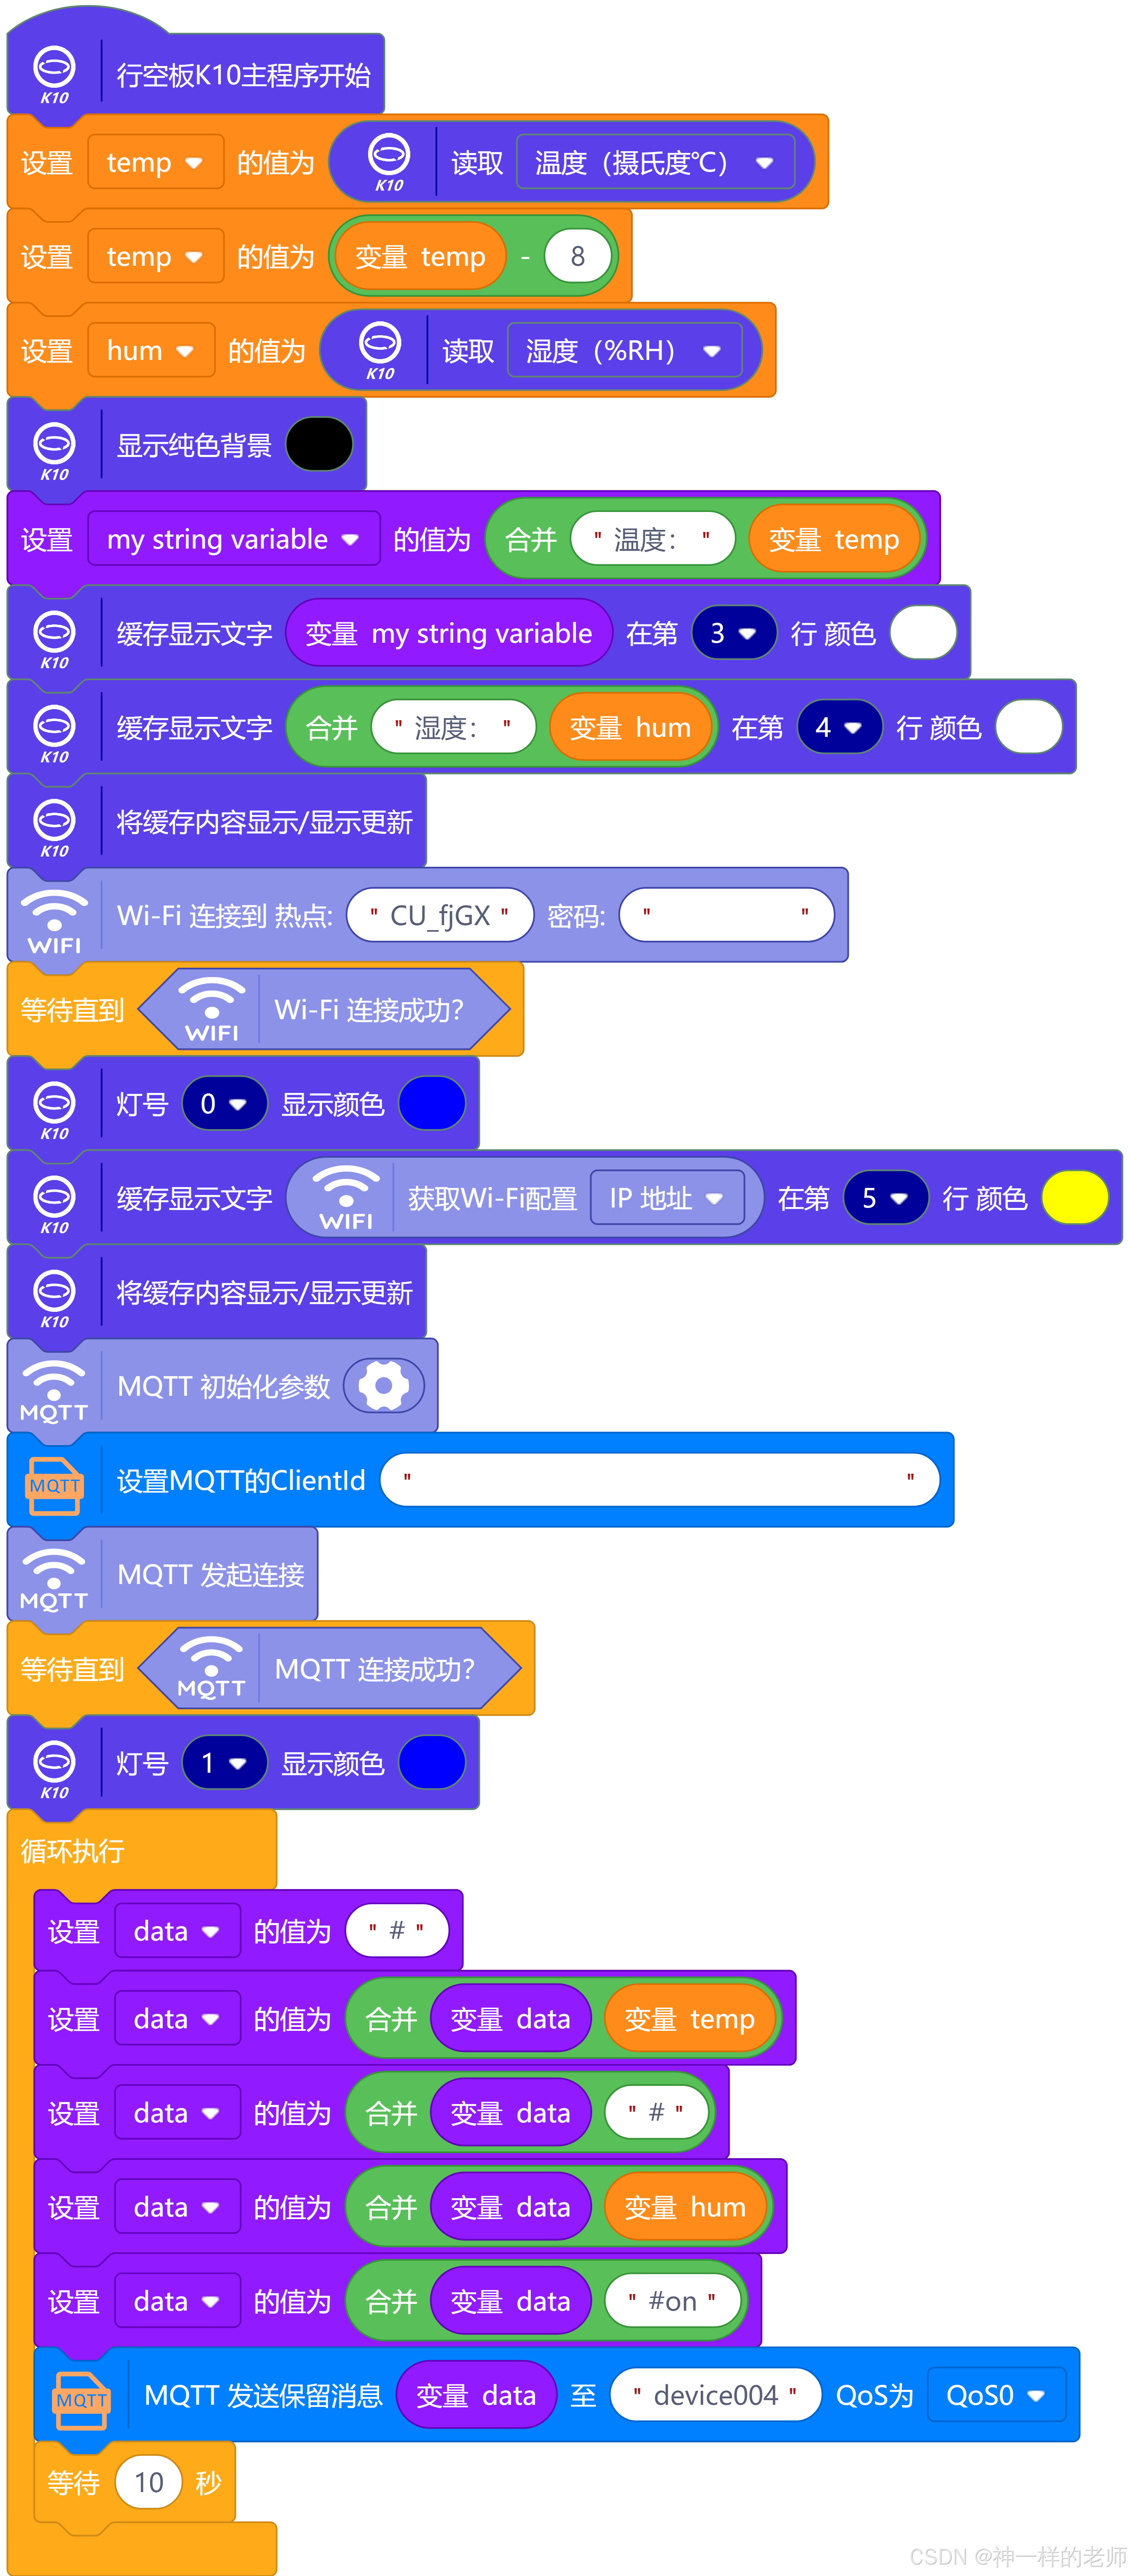
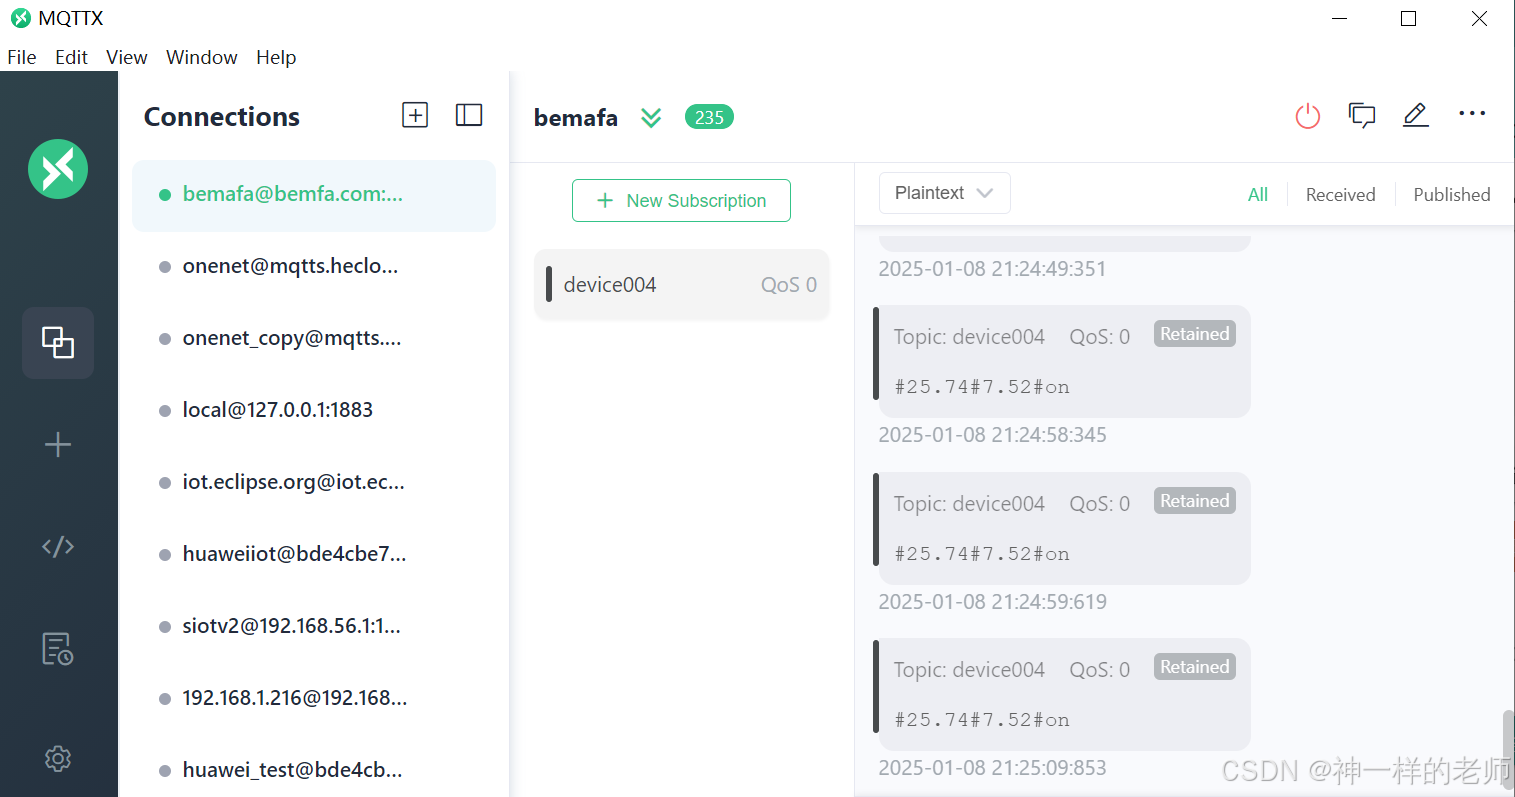
使用MQTTX订阅device004主题,可以看到办法云转发的消息都带有Retained字样。
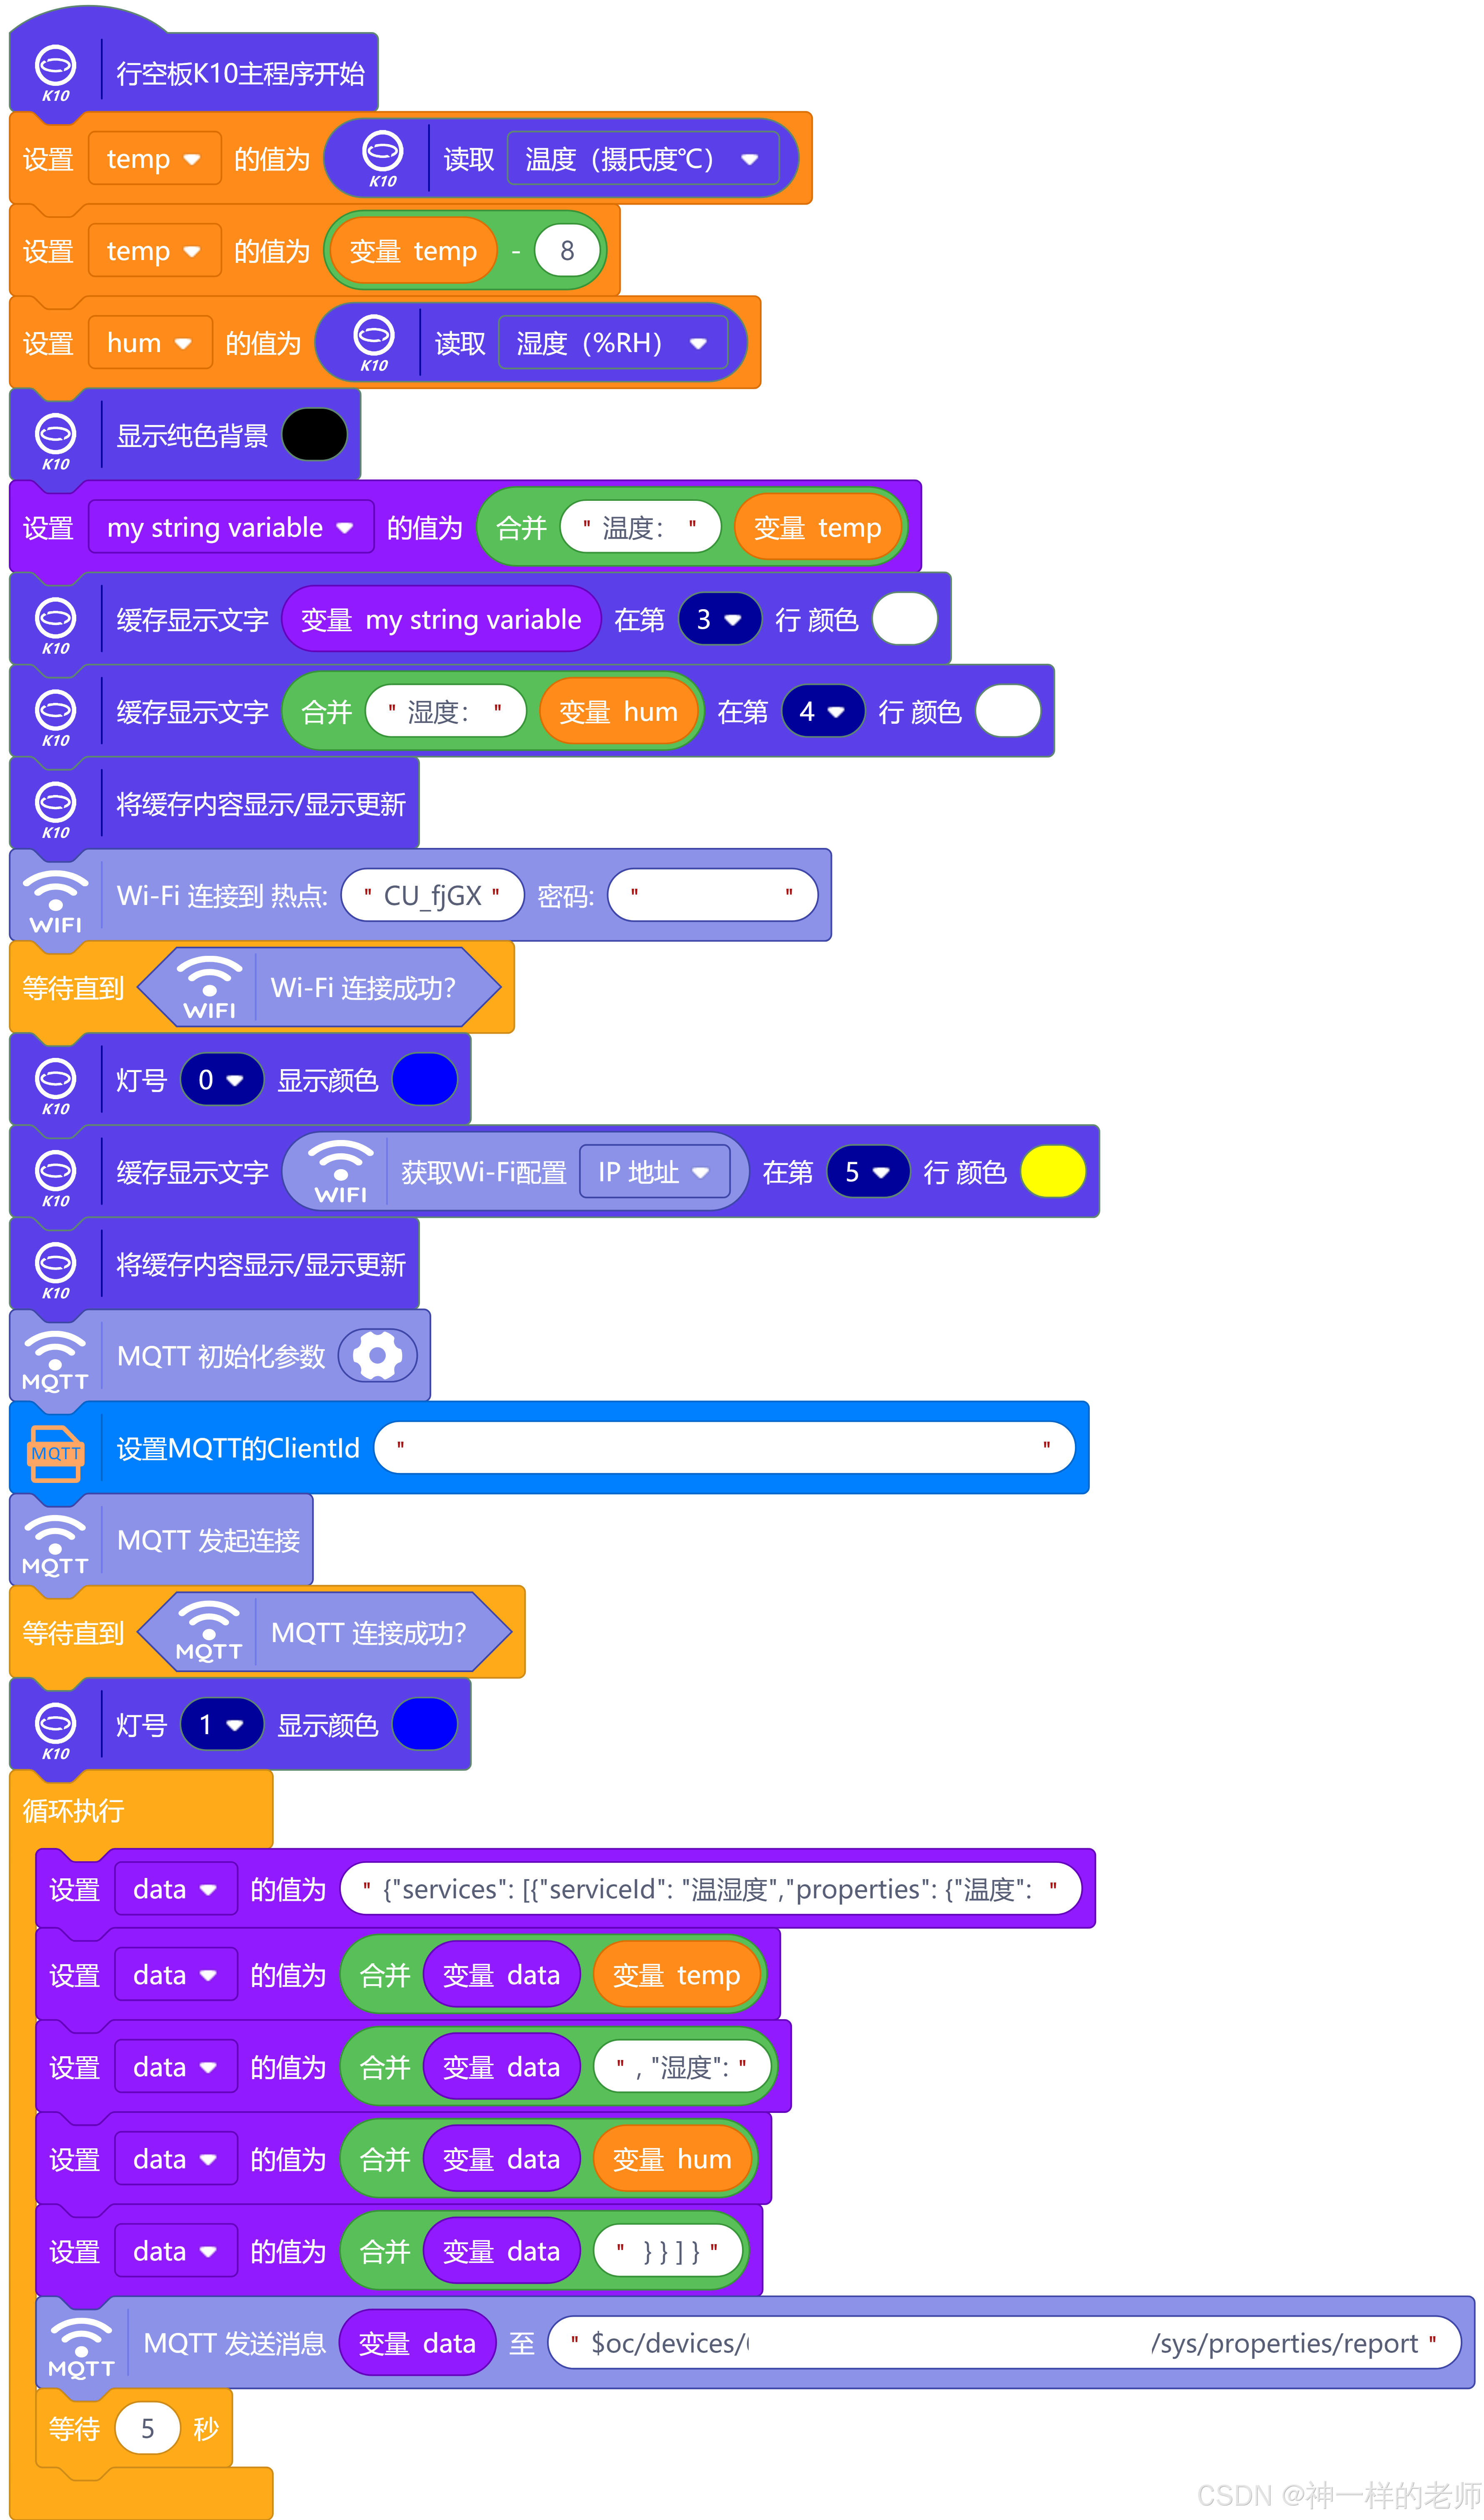
华为云
华为云登录时必须要设置clientid,否则无法成功。华为云不支持保留消息,仅当作普通消息处理。示例文件huaweitest.mp,运行例子前请设置自己的WiFi密码和华为云的接入参数Clientid。
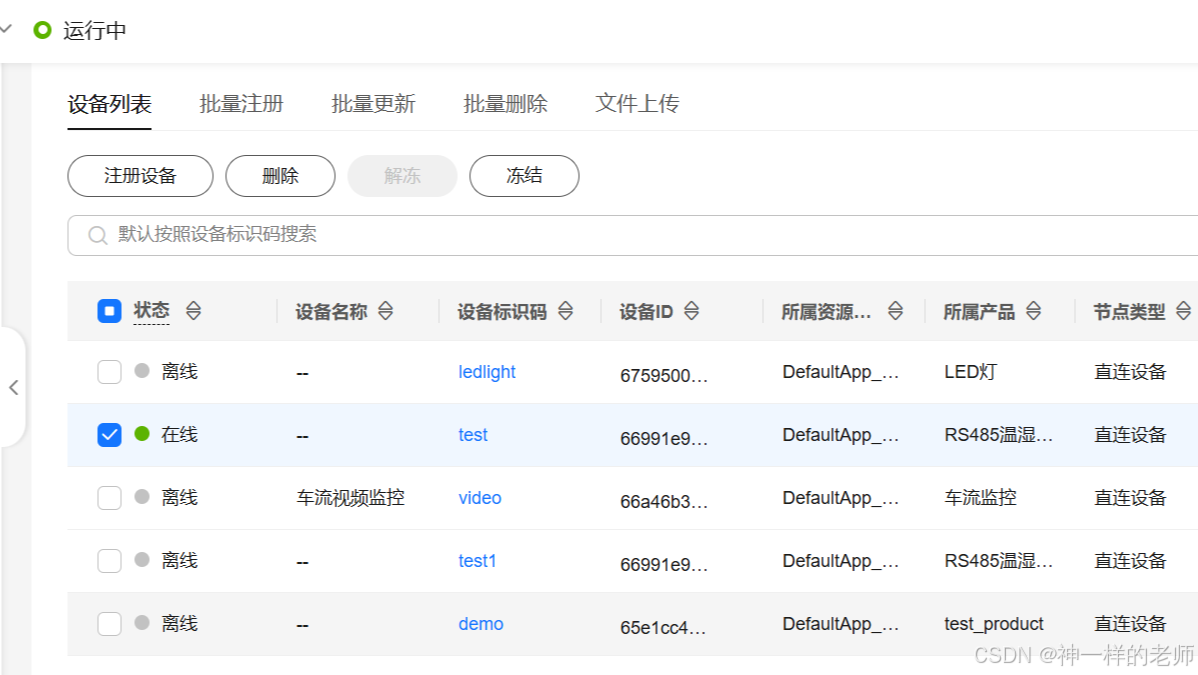
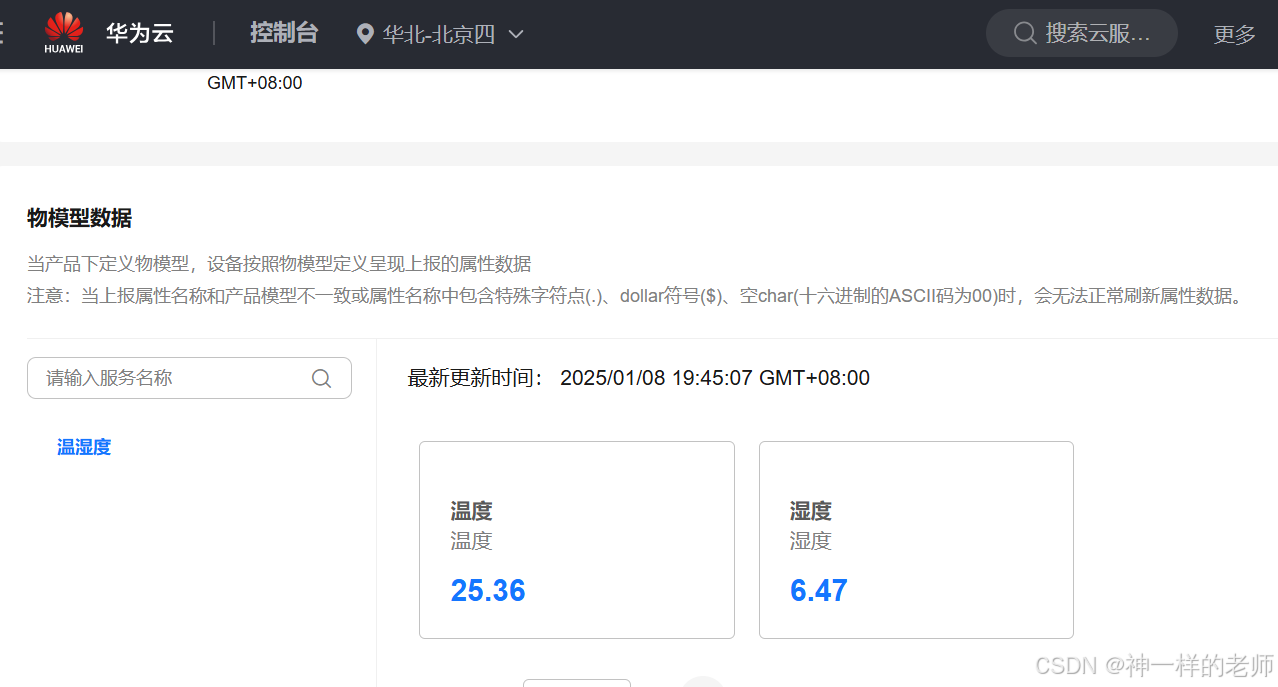
从华为云的控制台可以看到客户端已经成功登录,并上传数据。
结语
这是我第一次为Mind+写用户模块,感觉还比较容易。不过写用户模块,要求开发者熟悉C++语言,要求还是比写Scratch高很多。


 被折叠的 条评论
为什么被折叠?
被折叠的 条评论
为什么被折叠?
 到【灌水乐园】发言


