


结合作者多年的移植经验,尽量简单的为大家描述一个uboot 的移植过程。希望通过描述,给初入移植行道的你带来美好的希望。接下来,我们通过以下几个方面来描述。
1. arm soc 的启动方式
在描述soc 前,我们先看下一个简单的arm soc:

ARM soc 里包含arm cpu + 其他外设controller, 其中arm cpu 是ARM 公司的专利,其它soc厂商拿过来,加些外设controler 就变成自己的arm soc了。
1.1 arm soc 基本构件解释
- iRAM + iROM:
soc 内部的 ROM 和RAM 简称iROM and iRAM.
iROM 里面存放了著名的ROM CODE,和一些配置。Rom Code 是CPU 上电后第一个执行的程序,由它负责初始化基本外设和加载第二阶段boot loader。因此ROM code 也叫第一阶段的boot loader.
iRAM 就是CPU ROM CODE 和第二阶段bootloader 执行的场所。 - external DDR interface
内部的IRAM 一般只有64K,128K,或者256KB 大小,无法执行大型程序,我要跑大的操作系统,就需要外部RAM 的支持,外部RAM 一般从1GB~8GB 不等,具体看CPU的spec. - external IO interface(emmc/sd/spi/USB/net…)
我们的OS image 一般放在CPU 外部的存储介质里,一般是emmc/SD/nand/spi/usb 等接口的存储设备。ROM code startup 后,会自动初始化这些接口,然后去这些存储设备的固定位置(固定大小)/固定分区(固定文件名)寻找OS 的启动镜像,也就是我们说的第二阶段bootloader(简称SPL).
因为此时DDR 还未做初始化,SPL 仍然在iRAM 里运行,所以注定SPL 镜像的尺寸要小于iRAM 的尺寸. 不同ARM 的TRM 手册里会有不同的限制。
不同的ARM 会有不同的启动方式,有些通过ARM 的PIN 脚的上下拉来决定,ROM CODE 是从EMMC,SPI, USB,还是从nand 启动。有些则是固定的轮训一遍,如,先从EMMC 找,找不到合法的image, 在从SPI 找,依次类推,找到最后一个设备。具体从参考对应ARM的TRM 手册。
1.2 ROM code 的简要描述
章节1.1里,我们其实已经介绍很多ROM code 的关键细节,下面我们来看ROM code 的一个大致的启动流程:

大致流程描述如下:
- 系统上电(POR),ROM CODE 启动
ARM 要能上电,需要外部电路为其提供一组特定的上电时序,一般情况有PMIC 提供。PMIC 芯片一般和具体的ARM CPU 搭配使用。
一般地PMIC 为ARM 启动提供最基础的电源,一般需要在SPL/uboot 里对电源做微调。 - 开启CPU watchdog,一旦超时就会重启;
- 开启boot 所需要的Clock,初始化一些基本的IO接口,如GPIO,UART,USB等.
- 进入boot 流程
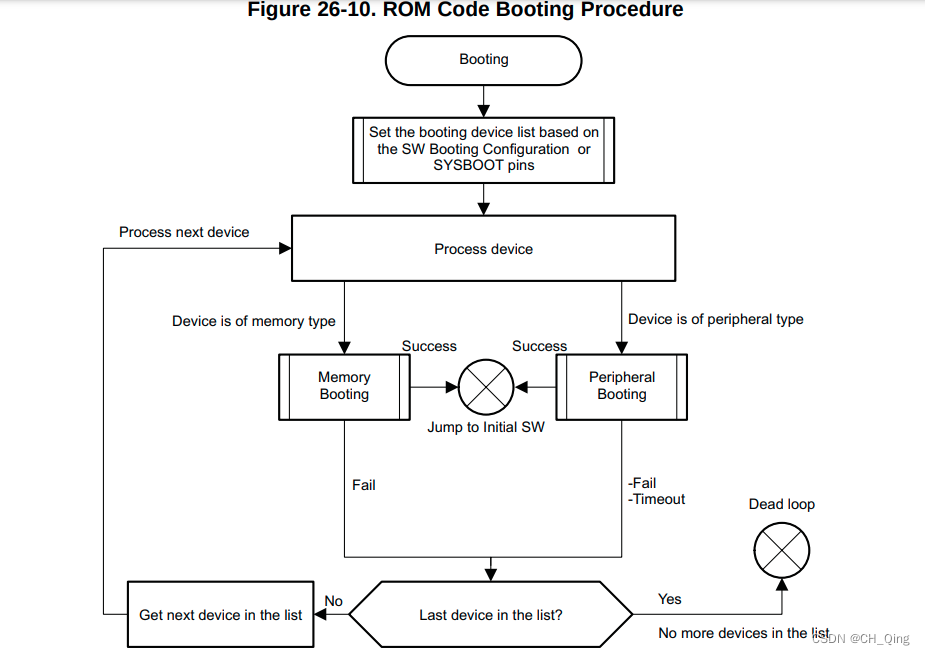
- 根据外部IO PIN 的设定,决定从哪个外部设备启动或者从哪个设备列表启动(具体从参考TRM 手册).
- 有些设备有 从存储设备启动 还是 从IO口启动 的能力
从外部存储设备启动(emmc/SD/Nand/norflash) 的启动逻辑大致如章节1.1 的external IO interface 部分描述。
从IO口启动的逻辑(uart/net/usb) 的启动逻辑大致是ROM code 向特定的IO 口发送特定的指令,IO口的另一端需要根据指令,向ROM code 发送对应的image 数据,从而完成启动。 - 加载对应的启动image(SPL)进iRAM, 程序跳入SPL阶段
2. uboot 源码的基本结构
$ ls
api    cmd        configs  drivers  examples  Kbuild   Licenses     net     scripts     test    u-boot.bin          u-boot.dtb      u-boot.elf      u-boot.img  u-boot-nodtb.bin
arch   common     disk     dts      fs        Kconfig  MAINTAINERS  post    spl         tools   u-boot.cfg          u-boot-dtb.bin  u-boot-elf.lds  u-boot.lds  u-boot.srec
board  config.mk  doc      env      include   lib      Makefile     README  System.map  u-boot  u-boot.cfg.configs  u-boot-dtb.img  u-boot-elf.o    u-boot.map  u-boot.sym
- arch: CPU 架构相关的目录,包含CPU 相关& 初始化的一些代码
- board: 板子目录,是移植的核心目录,我们移植大部分都在这个路径添加自己的板子相关代码。
- common: uboot 的通用逻辑。
- driver: 驱动目录
- scripts: uboot Kbuild的编译规则存放目录
- 其他目录: 就不再一一介绍了。
2.1 uboot 的编译机制
- uboot 使用kbuild 机制
不知从何时起(大概17,18年吧), uboot 的编译机制从.boardcfg 转向了kbuild机制。基本都是folow kernel,越follow 越像,现在已经区分不出来了。
有了kconfig,就有defconfig, 文件位于 configs/xxxx_defconfig,用来添加一些编译配置项目。
当然过时的配置头文件(include/configs/xxx_config.h),也可以添加一些配置,不过uboot 不再推荐,可以加些宏定义进去。 - 一套源码,两次编译
前面讲过,uboot 分成两个SPL和正常的uboot。
由于SPL 是ROM code 加载进内部RAM 里面,所以尺寸较小,里面只能一些必要的动作,如关闭看门狗,初始化DDR,设置电源PMIC等。
正常uboot会做一些更丰富的初始化和引导动作。
ALL-y += u-boot.srec u-boot.bin u-boot.sym System.map binary_size_check
ALL-$(CONFIG_SPL) += spl/u-boot-spl.bin

all:		$(ALL-y)
   ........
u-boot.bin 就是uboot,spl/u-boot-spl.bin 就是SPL 的image,一次编译,生成两个image.
- CONFIG_SPL_BUILD 区分uboot & SPL
我们经常在uboot 里能看到这样的宏,该宏主要区分代码是属于SPL还是属于uboot. 细节请参考该连接.
2.2 uboot 和SPL 的使命
| 项目 | 使命 |
|---|---|
| SPL | 1. 初始化&使能DDR 2.将PMIC 调整到一个良好的状态 3. 是能一些基本的Clock 4.后期使能debug console. 5. 加载uboot |
| uboot | 1. 做板子的一些基础设置(pinmux,io状态等)2. 加载设备树或者修改它 3.修改bootargs 改变bootloader 的启动方式 4.加载kernel 及确定kernel 加载的rootfs等 |
3. 如何移植
进行uboot 移植前,一定需要以下几个文档:
- 电路板硬件原理图
- CPU 的TRM, datasheet, & Errata
如果没有以上文档,移植是没有办法进行的,如果可以,也是一头雾水,山水蒙的状态!
你需要通过TRM 手册获取到当前CPU的支持的启动方式,从硬件原理图获取当前板子支持的启动方式。同时要理解硬件原理图里的电源供应,DDR参数,复位等问题。
3.1 创建板子
移植一定要创建板子!!!
移植一定要创建板子!!!
移植一定要创建板子!!!
重要的话说三遍!否则从别人的板子上直接改,会后患无穷!让后来维护者难以维护!
怎么创建板子呢?
直接查看doc/README.kconfig, 我们把重要内容列出来:
When adding a new board, the following steps are generally needed:

 [1] Add a header file include/configs/<target>.h
 [2] Make sure to define necessary CONFIG_SYS_* in Kconfig:
       Define CONFIG_SYS_CPU="cpu" to compile arch/<arch>/cpu/<cpu>
       Define CONFIG_SYS_SOC="soc" to compile arch/<arch>/cpu/<cpu>/<soc>
       Define CONFIG_SYS_VENDOR="vendor" to compile board/<vendor>/common/*
         and board/<vendor>/<board>/*
       Define CONFIG_SYS_BOARD="board" to compile board/<board>/*
         (or board/<vendor>/<board>/* if CONFIG_SYS_VENDOR is defined)
       Define CONFIG_SYS_CONFIG_NAME="target" to include
         include/configs/<target>.h
 [3] Add a new entry to the board select menu in Kconfig.
     The board select menu is located in arch/<arch>/Kconfig or
     arch/<arch>/*/Kconfig.
 [4] Add a MAINTAINERS file
     It is generally placed at board/<board>/MAINTAINERS or
     board/<vendor>/<board>/MAINTAINERS
 [5] Add configs/<target>_defconfig

When removing an obsolete board, the following steps are generally needed:

 [1] Remove configs/<target>_defconfig
 [2] Remove include/configs/<target>.h if it is not used by any other boards
 [3] Remove board/<vendor>/<board>/* or board/<board>/* if it is not used
     by any other boards
 [4] Update MAINTAINERS if necessary
 [5] Remove the unused entry from the board select menu in Kconfig
 [6] Add an entry to doc/README.scrapyard
说的很详细了吧,参照你的参考板,对照这个步骤添加板子接可以了。后续你的修改,都是基于这个板子在修改!尽量不要把代码修改成全局的,影响其他平台的编译。
3.2 具体的移植工作
创建完板子后,就可以开始根据板子做具体的移植了,有以下几个重要的点需要关注:
SPL 里需要关注以下内容:
- DDR 参数是否需要调试
DDR 是否稳定是一个系统稳定的基石,如果DDR 参数不好,系统就可能无明显原因死机,严重者系统无法正常启动。所以DDR 稳定是新设计板子考虑的重要因素。
DDR 参数的调试一般根据CPU 厂商提供的方法的进行,不同的厂商调试方法不一样。 - 电源PMIC是否需要适配
电源供应也是一个系统稳定的基石,如果电源供电不足,或者没有设置到合适的工作范围,也会导致一些其奇怪让人奔亏的现象。
电源的设定是要根据CPU 等芯片的datasheet 来进行。 - 有些模块的clock 是否需要打开
clock 是数字电路运行的心脏,没有clock, CPU里的数字逻辑时没有办法运行的。比如IIC,SPI, GPIO 需要在后面使用,首先得确认Clock是否打开,如果clock 都没有打开,是操作不了这些接口的。 - 和板子相关的移植
比如板子上CPU 管脚的复用配置,功能使能等。
uboot 里需要关注以下内容:
- 环境变量要在那里保存
uboot 有一个核心的知识点就是环境变量,环境变量要保存到那里,这是一个优秀的移植人员应该考虑的问题。 - uboot 启动kernel 的方式
uboot 要如何启动kernel 呢,要根据板子的需求来做定制,主要还是修改boot_args & boot_command 的环境变量 来完成。 - uboot 对kernel设备树的修改
是不是需要根据uboot 中读到的信息,对kernel 设备树里的内容做一些修改等,如MAC 地址,console 信息等,以及向kernel 传递那些信息等。 - 其他初始化
如一些基本IO的初始状态,网络,pinmux,和其他一些重要逻辑实现等。
4. uboot 环境变量
要学习uboot,大概uboot 的环境变量是一个绕不开的课题。因为它时在太重要了,它在uboot 里是全局的一个Hash table, 以key:value的方式存储。基本上控制了uboot 的整个启动方式,以及决定了给kernel 传递那些参数。一些通常重要的行为,都可以通过控制环境变量来实现。
4.1 uboot 环境变量保存位置
int env_init(void)
{
	struct env_driver *drv;
	int ret = -ENOENT;
	int prio;

 从存储介质中查找环境变量
	for (prio = 0; (drv = env_driver_lookup(ENVOP_INIT, prio)); prio++) {
		if (!drv->init || !(ret = drv->init()))
			env_set_inited(drv->location);

		debug("%s: Environment %s init done (ret=%d)\n", __func__,
		      drv->name, ret);
	}

	if (!prio)
		return -ENODEV;

	if (ret == -ENOENT) {
	  //没有找到,使用默认环境变量
		gd->env_addr = (ulong)&default_environment[0];
		gd->env_valid = ENV_VALID;

		return 0;
	}

	return ret;
}
uboot 环境变量是一个内存的Hash table, 由于它非常重要,所以需要把它存储在一个存储介质里。uboot 启动后会从存储介质里获取之前存储的环境变量,将其加入到内存的hash table 中,用来控制本次loader 的逻辑。
uboot 命令行下使用以下命令操作环境变量
$ printenv # 打印所有环境变量
$ setenv key value # 设置环境便但不保存
$ saveenv  #保存环境变量到存储介质
4.2 uboot 默认环境变量
在没有saveenv 前,uboot 一直使用着默认环境变量,该默认环境变量位于:
// 环境变量初始化
static int initr_env(void)
{
..........
		env_set_default(NULL, 0);
..........
}
/设置默认的环境变量 default_environment
void env_set_default(const char *s, int flags)
{
	.......
	if (himport_r(&env_htab, (char *)default_environment,
			sizeof(default_environment), '\0', flags, 0,
			0, NULL) == 0)
		pr_err("## Error: Environment import failed: errno = %d\n",
		       errno);

	.....
}
//include/env_default.h
const uchar default_environment[] = {
#ifndef CONFIG_USE_DEFAULT_ENV_FILE
#ifdef	CONFIG_ENV_CALLBACK_LIST_DEFAULT
	ENV_CALLBACK_VAR "=" CONFIG_ENV_CALLBACK_LIST_DEFAULT "\0"
#endif
#ifdef	CONFIG_ENV_FLAGS_LIST_DEFAULT
	ENV_FLAGS_VAR "=" CONFIG_ENV_FLAGS_LIST_DEFAULT "\0"
#endif
#ifdef	CONFIG_USE_BOOTARGS
	"bootargs="	CONFIG_BOOTARGS			"\0"
#endif
#ifdef	CONFIG_BOOTCOMMAND
	"bootcmd="	CONFIG_BOOTCOMMAND		"\0"
	.....
default_environment是默认的环境变量,这里定义了默认的许多变量,uboot 在env_init 后的仍何一个地方都可以使用env_get/env_set 来获取和设置环境变量。
bootargs 和bootcmd 就是其中两个非常重量级的。
bootargs: 顾名思义,启动的参数,启动kernel 的参数,启动kernel 时,bootargs 里面的所有内容,会作为参数传递给kernel,例如传给kernel 的rootfs 参数,用以确定kernel 如何加载rootfs,传给kernel 的debug 参数debug,用来打开kernel 的debug信息等。
bootargs 传递给kernel 的参数会被kernel 一一处理, 系统启动后,可用以下命令来查看uboot 传给kernel 的bootargs:
cat /proc/commandline
uboot 如何将bootargs 传递给kernel,有两种方式,TAGS 和DTS 的中console传递。 其中TAGS 是一种uboot 故有的参数传递方法,自从引入设备树,比较推荐的方式就是修改DTS 中的console 参数.
bootcommand: 意思就是uboot 启动kernel 时的启动命令,我们定制uboot 的启动方式,大致从这里入手,下一章节,我们会详细介绍bootcommand。
4.3. uboot 启动 boot_command
我们随便来看一个CONFIG_BOOTCOMMAND 的定义,值得注意的时CONFIG_BOOTCOMMAND 其实就是一个简单的shell 命令合集,uboot 是支持HASH shell 的。在uboot 运行的最后阶段,其实就是用shell 执行一个个程序,最终完成启动。其实就是一个简单的shell 脚本。
....
# MMC args 会将root rootfstype等重要参数设置进bootargs
"mmcargs=run bootargs_defaults;" \
		"setenv bootargs ${bootargs} " \
		"root=${mmcroot} " \ # 指定rootfs 的安装路径
		"rootfstype=${mmcrootfstype} ip=${ip_method}\0"
# 从ext文件系统加载kernel image
"loaduimage=ext2load mmc ${mmcdev}:${mmcpart} ${kloadaddr} /boot/${bootfile}\0" \
# MMC boot 启动指令
"mmcboot=echo Booting Linux from ${mmcdevice} ...; " \
		"run mmcargs; " \
		"if run loadfdt; then " \ # 加载device tree
			"echo device tree detected; " \
			"bootm ${kloadaddr} - ${fdtaddr}; " \ # bootm 启动内核,uboot 结束。
		"else " \
			"bootm ${kloadaddr}; " \
		"fi; \0" \
.....
# define CONFIG_BOOTCOMMAND \
    #扫描MMC0
	"if mmc dev 0; mmc rescan; then " \
		"run sd_setup; " \
	"else " \
		"echo ERROR: SD/MMC-Card not detected!; " \
		"panic; " \
	"fi; " \
	# MMC扫描到了,加载kernel image
	"if run loaduimage; then " \
		"echo Bootable SD/MMC-Card inserted, booting from it!; " \
		# 运行mmcboot 指令
		"run mmcboot; " \
	"else " \
		"echo ERROR: Unable to load uImage from SD/MMC-Card!; " \
		"panic; " \
	"fi; "
5. uboot 源码分析
5.1 从start.S 讲起
从Makefile 看, uboot生成时需要链接脚本,链接脚本的目的是将程序的各个模块组成一个文件输出,并确定改程序在内存中的加载布局。一般的程序在链接时都需要链接脚本,如果没有显式指定,会使用链接器默认的链接脚本。对uboot这种特殊的程序,链接脚本是必不可少的。
cmd_u-boot__ ?= $(LD) $(KBUILD_LDFLAGS) $(LDFLAGS_u-boot) -o $@ \
      -T u-boot.lds $(u-boot-init)                             \
      --start-group $(u-boot-main) --end-group                 \
      $(PLATFORM_LIBS) -Map u-boot.map;                        \
      $(if $(ARCH_POSTLINK), $(MAKE) -f $(ARCH_POSTLINK) $@, true)

u-boot:	$(u-boot-init) $(u-boot-main) u-boot.lds FORCE
	+$(call if_changed,u-boot__)
我们来粗略地看一个lds 脚本
OUTPUT_FORMAT("elf32-littlearm", "elf32-littlearm", "elf32-littlearm")
OUTPUT_ARCH(arm)
ENTRY(_start)  /*程序入口点:程序执行的第一条指令称为入口点。
你可以使用' ENTRY '链接脚本命令来设置入口点。参数是一个符号名,
_start 为程序的入口,该符号一般位于cpu 目录的start.S 中*/
SECTIONS
{
	. = 0x00000000;

	. = ALIGN(4);
	.text : //代码段
	{
		__image_copy_start = .;
		*(.vectors)
		CPUDIR/start.o (.text*)  //CPUDIR/start.o 放在最前面。
		*(.text*)
		*(.glue*)
	}

	. = ALIGN(4);
	.rodata : { *(SORT_BY_ALIGNMENT(SORT_BY_NAME(.rodata*))) }

	. = ALIGN(4);
	.data : {  //数据段
		*(.data*)
	}

	. = ALIGN(4);
	.u_boot_list : { //uboot 连表
		KEEP(*(SORT(.u_boot_list*)));
	}

	. = ALIGN(4);
	.binman_sym_table : {
		__binman_sym_start = .;
		KEEP(*(SORT(.binman_sym*)));
		__binman_sym_end = .;
	}

	. = ALIGN(4);

	__image_copy_end = .;  //这里uboot 的实际内容结束,之后防止BSS段等一些加载器分配的段。

	.rel.dyn : {
		__rel_dyn_start = .;
		*(.rel*)
		__rel_dyn_end = .;
	}

	.end :
	{
		*(.__end)
	}

	_image_binary_end = .;

	.bss __rel_dyn_start (OVERLAY) : {
		__bss_start = .;
		*(.bss*)
		 . = ALIGN(4);
		__bss_end = .;
	}
	__bss_size = __bss_end - __bss_start;
	.dynsym _image_binary_end : { *(.dynsym) }
	.dynbss : { *(.dynbss) }
	.dynstr : { *(.dynstr*) }
	.dynamic : { *(.dynamic*) }
	.hash : { *(.hash*) }
	.plt : { *(.plt*) }
	.interp : { *(.interp*) }
	.gnu : { *(.gnu*) }
	.ARM.exidx : { *(.ARM.exidx*) }
}
通过粗略地阅读lds 脚本,我们发现其程序的入口位于arch/arm/cpu/ 目录下的某个start.S 中。如果arm32 的 CPU, 常见的是armv7 架构, arm64 现在常见的是armv8 架构。比如imx8 的start.S 就位于arch/arm/cpu/ armv8/start.S.
接下来,我们正是进入start.S 中
(SPL & uboot 共用统一分start.S)
.globl	_start
_start:
  b	reset  //跳到reset 的标号

reset:
	/* Allow the board to save important registers */
	b	save_boot_params //保存ROM code 传给我们的参数
 ......
 /*
	 * Could be EL3/EL2/EL1, Initial State:
	 * Little Endian, MMU Disabled, i/dCache Disabled
	 */
	switch_el x1, 3f, 2f, 1f
3:	set_vbar vbar_el3, x0
	mrs	x0, scr_el3
	orr	x0, x0, #0xf			/* SCR_EL3.NS|IRQ|FIQ|EA */
	msr	scr_el3, x0
	msr	cptr_el3, xzr			/* Enable FP/SIMD */
#ifdef COUNTER_FREQUENCY
	ldr	x0, =COUNTER_FREQUENCY
	msr	cntfrq_el0, x0			/* Initialize CNTFRQ */
#endif
	b	0f
2:	set_vbar	vbar_el2, x0
	mov	x0, #0x33ff
	msr	cptr_el2, x0			/* Enable FP/SIMD */
	b	0f
1:	set_vbar	vbar_el1, x0
	mov	x0, #3 << 20
	msr	cpacr_el1, x0			/* Enable FP/SIMD */
0:
........

	/* Apply ARM core specific erratas */
	bl	apply_core_errata

	/*
	 * Cache/BPB/TLB Invalidate
	 * i-cache is invalidated before enabled in icache_enable()
	 * tlb is invalidated before mmu is enabled in dcache_enable()
	 * d-cache is invalidated before enabled in dcache_enable()
	 */

	/* Processor specific initialization */
	bl	lowlevel_init  //地水平的初始化

.........
	/*
	 * Slave CPUs
	 */
slave_cpu:
	wfe
	ldr	x1, =CPU_RELEASE_ADDR
	ldr	x0, [x1]
	cbz	x0, slave_cpu
	br	x0			/* branch to the given address */
.....
master_cpu:
	bl	_main  //进入_main 标号,start.S 的任务就结束了。
其他的代码都不用看,我们只看lowlevel_init 标号的实现:
其位于arch\arm\mach-imx/lowlevel.S。
ENTRY(lowlevel_init)
#ifdef CONFIG_SPL_BUILD
	mrs	x0, CurrentEL
	cmp	x0, #12
	b.eq	1f
	ret
1:
	msr daifclr, #4
	isb
	ret
#else
	mrs	x0, CurrentEL
	cmp	x0, #8
	b.eq	1f
	ret
1:
	msr daifclr, #4

	/* set HCR_EL2.AMO to catch SERROR */
	mrs	x0, hcr_el2
	orr	x0, x0, #0x20
	msr	hcr_el2, x0
	isb
	ret
#endif
ENDPROC(lowlevel_init)
这段代码干了个啥,看注释,我也不懂!
接下来就是到_main 函数入口了,其位于arch\arm\lib/crt0_64.S,
ENTRY(_main)

/*
 * Set up initial C runtime environment and call board_init_f(0).
 */
#if defined(CONFIG_TPL_BUILD) && defined(CONFIG_TPL_NEEDS_SEPARATE_STACK)
	ldr	x0, =(CONFIG_TPL_STACK)
#elif defined(CONFIG_SPL_BUILD) && defined(CONFIG_SPL_STACK)
	ldr	x0, =(CONFIG_SPL_STACK)
#elif defined(CONFIG_INIT_SP_RELATIVE)
	adr	x0, __bss_start
	add	x0, x0, #CONFIG_SYS_INIT_SP_BSS_OFFSET
#else
	ldr	x0, =(CONFIG_SYS_INIT_SP_ADDR)
#endif
	bic	sp, x0, #0xf	/* 16-byte alignment for ABI compliance */
	mov	x0, sp
	bl	board_init_f_alloc_reserve
	mov	sp, x0
	/* set up gd here, outside any C code */
	mov	x18, x0
	bl	board_init_f_init_reserve

	mov	x0, #0
	bl	board_init_f

#if !defined(CONFIG_SPL_BUILD)
/*
 * Set up intermediate environment (new sp and gd) and call
 * relocate_code(addr_moni). Trick here is that we'll return
 * 'here' but relocated.
 */
	ldr	x0, [x18, #GD_START_ADDR_SP]	/* x0 <- gd->start_addr_sp */
	bic	sp, x0, #0xf	/* 16-byte alignment for ABI compliance */
	ldr	x18, [x18, #GD_NEW_GD]		/* x18 <- gd->new_gd */

	adr	lr, relocation_return
#if CONFIG_POSITION_INDEPENDENT
	/* Add in link-vs-runtime offset */
	adr	x0, _start		/* x0 <- Runtime value of _start */
	ldr	x9, _TEXT_BASE		/* x9 <- Linked value of _start */
	sub	x9, x9, x0		/* x9 <- Run-vs-link offset */
	add	lr, lr, x9
#endif
	/* Add in link-vs-relocation offset */
	ldr	x9, [x18, #GD_RELOC_OFF]	/* x9 <- gd->reloc_off */
	add	lr, lr, x9	/* new return address after relocation */
	ldr	x0, [x18, #GD_RELOCADDR]	/* x0 <- gd->relocaddr */
	b	relocate_code

relocation_return:

/*
 * Set up final (full) environment
 */
	bl	c_runtime_cpu_setup		/* still call old routine */
#endif /* !CONFIG_SPL_BUILD */
#if !defined(CONFIG_SPL_BUILD) || CONFIG_IS_ENABLED(FRAMEWORK)
#if defined(CONFIG_SPL_BUILD)
	bl	spl_relocate_stack_gd           /* may return NULL */
	/* set up gd here, outside any C code, if new stack is returned */
	cmp	x0, #0
	csel	x18, x0, x18, ne
	/*
	 * Perform 'sp = (x0 != NULL) ? x0 : sp' while working
	 * around the constraint that conditional moves can not
	 * have 'sp' as an operand
	 */
	mov	x1, sp
	cmp	x0, #0
	csel	x0, x0, x1, ne
	mov	sp, x0
#endif

/*
 * Clear BSS section
 */
	ldr	x0, =__bss_start		/* this is auto-relocated! */
	ldr	x1, =__bss_end			/* this is auto-relocated! */
clear_loop:
	str	xzr, [x0], #8
	cmp	x0, x1
	b.lo	clear_loop

	/* call board_init_r(gd_t *id, ulong dest_addr) */
	mov	x0, x18				/* gd_t */
	ldr	x1, [x18, #GD_RELOCADDR]	/* dest_addr */
	b	board_init_r			/* PC relative jump */

	/* NOTREACHED - board_init_r() does not return */
#endif

ENDPROC(_main)
CPU 刚启动后,只能运行汇编代码,C代码运行不了,为什么? C 不会直接操作CPU 的通用寄存器,汇编是专门干这个的。要运行C 代码,就要先设置C 的运行时环境,像SP 什么的。
反正前面一大堆代码都是干这个的,设置好后, 主要的第一C函数是 board_init_f,等board_init_f 干完事后,如果能返回来的话, 后面又会执行第二个重要的函数board_init_r. 你发现并没有执行relocate_code,各位想想为什么?
5.2 board_init_f 中执行的动作
board_init_f 通常是SPL/uboot 执行的最早的C 代码,它一般会做关闭watchdog, debug console 的初始化& 使能,PMIC 电压的重新调整, DDR 的初始化等。我们先来看SPL 代码的 board_init_f。
void board_init_f(ulong dummy)
{
	int ret;

	/* Clear the BSS. */
	memset(__bss_start, 0, __bss_end - __bss_start);

	arch_cpu_init();  //disable wdg, 初始化一些早期的Clock

	//配置pinmux, 初始化一些clock 等
	board_early_init_f();
  //timer init
	timer_init();
  //这是一个重要的点, 在此之前,是不能打印debug message, 因为debug 对应
  // 的uart 还没有初始化, 这个函数之后,就可以轻松的使用printf 打印了。
	preloader_console_init();

  // spl 协议栈的通用初始化
	ret = spl_init();
	if (ret) {
		debug("spl_init() failed: %d\n", ret);
		hang();
	}

	enable_tzc380();

	/*PMIC 电压 Adjust pmic voltage to 1.0V for 800M */
	setup_i2c(0, CONFIG_SYS_I2C_SPEED, 0x7f, &i2c_pad_info1);
  //PMIC 的电压在调整
	power_init_board();

	//DDR 初始化,初始化好后,就可以将uboot 等其他image copy 到外部DDR了,
	// 当前SPL 在 iRAM 里执行。 DDR 的初始化很关键,一般使用memtest 在高低温
	// 下确认 DDR 的参数是否okay。
	/* DDR initialization */
	spl_dram_init();

	//直接跳向board_init_r 函数,这种情况下,就不会返回到arch\arm\lib/crt0_64.S 的汇编代码里了。
	board_init_r(NULL, 0);
}
我们看到了SPL 中的board_init_f 不会返回到arch\arm\lib/crt0_64.S, 它直接跳到了board_init_r。关于该函数,我们在章节5.3 中再详细描述。
我们再来看下uboot 中的board_init_f, 它通常位于common/Board_f.c
static const init_fnc_t init_sequence_f[] = {
	setup_mon_len,
#ifdef CONFIG_OF_CONTROL
  //uboot 设备树的支持解析
	fdtdec_setup,
#endif
#ifdef CONFIG_TRACE_EARLY
	trace_early_init,
#endif
  //为malloc 设置好堆空间
	initf_malloc,
	log_init,
	initf_bootstage,	/* uses its own timer, so does not need DM */
#ifdef CONFIG_BLOBLIST
	bloblist_init,
#endif
	setup_spl_handoff,
	initf_console_record,
#if defined(CONFIG_HAVE_FSP)
	arch_fsp_init,
#endif
	arch_cpu_init,		/* basic arch cpu dependent setup */
	mach_cpu_init,		/* SoC/machine dependent CPU setup */
	initf_dm,
	arch_cpu_init_dm,
#if defined(CONFIG_BOARD_EARLY_INIT_F)
  //这是个重要的函数,一般板子早期的初始化,就是在这里进行的, 此时debug console 还没有打印
	board_early_init_f,
#endif
#if defined(CONFIG_PPC) || defined(CONFIG_SYS_FSL_CLK) || defined(CONFIG_M68K)
	/* get CPU and bus clocks according to the environment variable */
	get_clocks,		/* get CPU and bus clocks (etc.) */
#endif
#if !defined(CONFIG_M68K)
	timer_init,		/* initialize timer */
#endif
#if defined(CONFIG_BOARD_POSTCLK_INIT)
	board_postclk_init,
#endif
  //环境变量初始化, 从配置的存储设备里读取环境变量,如果没有读到对应的环境变量,
  // 则使用默认的环境变量, 详细参考章节4.1
	env_init,		/* initialize environment */
	init_baud_rate,		/* initialze baudrate settings */
#ifndef CONFIG_ANDROID_AUTO_SUPPORT
	serial_init,		/* serial communications setup */
#endif
  //uboot 在这个函数之前不能打印,打印必须位于该函数之后。
	console_init_f,		/* stage 1 init of console */
	display_options,	/* say that we are here */
	display_text_info,	/* show debugging info if required */
	checkcpu,
#if defined(CONFIG_SYSRESET)
	print_resetinfo,
#endif
#if defined(CONFIG_DISPLAY_CPUINFO)
	print_cpuinfo,		/* display cpu info (and speed) */
#endif
#if defined(CONFIG_DTB_RESELECT)
	embedded_dtb_select,
#endif
#if defined(CONFIG_DISPLAY_BOARDINFO)
	show_board_info,
#endif
	INIT_FUNC_WATCHDOG_INIT
#if defined(CONFIG_MISC_INIT_F)
  //这也是一个常用的函数入口,通常用来在自己的板子里实现
	misc_init_f,
#endif
	INIT_FUNC_WATCHDOG_RESET
#if defined(CONFIG_SYS_I2C)
  //IIC 总线初始化
	init_func_i2c,
#endif
#if defined(CONFIG_VID) && !defined(CONFIG_SPL)
	init_func_vid,
#endif
	announce_dram_init,
	dram_init,		/* configure available RAM banks */
#ifdef CONFIG_POST
	post_init_f,
#endif
	INIT_FUNC_WATCHDOG_RESET
#if defined(CONFIG_SYS_DRAM_TEST)
	testdram,
#endif /* CONFIG_SYS_DRAM_TEST */
	INIT_FUNC_WATCHDOG_RESET

#ifdef CONFIG_POST
	init_post,
#endif
	INIT_FUNC_WATCHDOG_RESET
	/*
	 * Now that we have DRAM mapped and working, we can
	 * relocate the code and continue running from DRAM.
	 *
	 * Reserve memory at end of RAM for (top down in that order):
	 *  - area that won't get touched by U-Boot and Linux (optional)
	 *  - kernel log buffer
	 *  - protected RAM
	 *  - LCD framebuffer
	 *  - monitor code
	 *  - board info struct
	 */
	setup_dest_addr,
#ifdef CONFIG_PRAM
	reserve_pram,
#endif
	reserve_round_4k,
#ifdef CONFIG_ARM
	reserve_mmu,
#endif
  //预留memory, 为uboot 做一个大致的内存规划
	reserve_video,
	reserve_trace,
	reserve_uboot,
	reserve_malloc,
	reserve_board,
	setup_machine,
	reserve_global_data,
	reserve_fdt,
	reserve_bootstage,
	reserve_bloblist,
	reserve_arch,
	reserve_stacks,
	dram_init_banksize,
	show_dram_config,
#if defined(CONFIG_M68K) || defined(CONFIG_MIPS) || defined(CONFIG_PPC) || \
	defined(CONFIG_SH)
	setup_board_part1,
#endif
#if defined(CONFIG_PPC) || defined(CONFIG_M68K)
	INIT_FUNC_WATCHDOG_RESET
	setup_board_part2,
#endif
	display_new_sp,
#ifdef CONFIG_OF_BOARD_FIXUP
	fix_fdt,
#endif
	INIT_FUNC_WATCHDOG_RESET
	reloc_fdt,
	reloc_bootstage,
	reloc_bloblist,
	setup_reloc,
#if defined(CONFIG_X86) || defined(CONFIG_ARC)
	copy_uboot_to_ram,
	do_elf_reloc_fixups,
#endif
	clear_bss,
#if !defined(CONFIG_ARM) && !defined(CONFIG_SANDBOX) && \
		!CONFIG_IS_ENABLED(X86_64)
	jump_to_copy,
#endif
	NULL,
};

void board_init_f(ulong boot_flags)
{
	gd->flags = boot_flags;
	gd->have_console = 0;

	if (initcall_run_list(init_sequence_f))
		hang();

#if !defined(CONFIG_ARM) && !defined(CONFIG_SANDBOX) && \
		!defined(CONFIG_EFI_APP) && !CONFIG_IS_ENABLED(X86_64) && \
		!defined(CONFIG_ARC)
	/* NOTREACHED - jump_to_copy() does not return */
	hang();
#endif
}
当uboot board_init_f 执行完成后,SPL/uboot 的都跳向了一个函数,那就是board_init_r, 它通常是common/Board_r.c.
5.3 board_init_r 中执行的动作
SPL 中 board_init_r 函数如下:
void board_init_r(gd_t *dummy1, ulong dummy2)
{
  ...........

#if CONFIG_IS_ENABLED(BOARD_INIT)
	spl_board_init();
#endif

#if defined(CONFIG_SPL_WATCHDOG_SUPPORT) && CONFIG_IS_ENABLED(WDT)
	initr_watchdog();
#endif

	if (IS_ENABLED(CONFIG_SPL_OS_BOOT) || CONFIG_IS_ENABLED(HANDOFF))
		dram_init_banksize();

	bootcount_inc();

	memset(&spl_image, '\0', sizeof(spl_image));
#ifdef CONFIG_SYS_SPL_ARGS_ADDR
	spl_image.arg = (void *)CONFIG_SYS_SPL_ARGS_ADDR;
#endif
	spl_image.boot_device = BOOT_DEVICE_NONE;
	//读取CPU ROMCODE 留给BOOTLOADER 的register, 确定设备从哪个device 启动起来的
	board_boot_order(spl_boot_list);

  //从对应的设备列表加载uboot image 进外部DDR
	if (boot_from_devices(&spl_image, spl_boot_list,
			      ARRAY_SIZE(spl_boot_list))) {
		puts(SPL_TPL_PROMPT "failed to boot from all boot devices\n");
		hang();
	}

	spl_perform_fixups(&spl_image);
  .................

	switch (spl_image.os) {
	case IH_OS_U_BOOT:
		debug("Jumping to U-Boot\n");
		break;
#if CONFIG_IS_ENABLED(ATF)
	case IH_OS_ARM_TRUSTED_FIRMWARE:
		debug("Jumping to U-Boot via ARM Trusted Firmware\n");
		spl_invoke_atf(&spl_image);
		break;
#endif
#if CONFIG_IS_ENABLED(OPTEE)
	case IH_OS_TEE:
		debug("Jumping to U-Boot via OP-TEE\n");
		spl_optee_entry(NULL, NULL, spl_image.fdt_addr,
				(void *)spl_image.entry_point);
		break;
#endif
#if CONFIG_IS_ENABLED(OPENSBI)
	case IH_OS_OPENSBI:
		debug("Jumping to U-Boot via RISC-V OpenSBI\n");
		spl_invoke_opensbi(&spl_image);
		break;
#endif
#ifdef CONFIG_SPL_OS_BOOT
	case IH_OS_LINUX:
		debug("Jumping to Linux\n");
		spl_fixup_fdt();
		spl_board_prepare_for_linux();
		jump_to_image_linux(&spl_image);
#endif
	default:
		debug("Unsupported OS image.. Jumping nevertheless..\n");
	}
..................
	debug("loaded - jumping to U-Boot...\n");
	spl_board_prepare_for_boot();
	jump_to_image_no_args(&spl_image); # 记住,这个是不传递参数的
}
对于ARM64, 一般都会SPL 加载trust.img, 由trust.img 再去加载uboot.img. 在这里,你可以认为它是加载uboot 的,因为trust.img 加载uboot 的流程也大同小异。
uboot 中 board_init_r 函数如下:
/*
 * We hope to remove most of the driver-related init and do it if/when
 * the driver is later used.
 *
 * TODO: perhaps reset the watchdog in the initcall function after each call?
 */
static init_fnc_t init_sequence_r[] = {
	initr_trace,
	initr_reloc,
......
	initr_reloc_global_data,
#if defined(CONFIG_SYS_INIT_RAM_LOCK) && defined(CONFIG_E500)
	initr_unlock_ram_in_cache,
#endif
	initr_barrier,
	initr_malloc,
	log_init,
	initr_bootstage,	/* Needs malloc() but has its own timer */
	initr_console_record,
#ifdef CONFIG_SYS_NONCACHED_MEMORY
	initr_noncached,
#endif
#ifdef CONFIG_OF_LIVE
	initr_of_live,
#endif
#ifdef CONFIG_DM
  //uboot 设备驱动框架初始化
	initr_dm,
#endif
#if defined(CONFIG_ARM) || defined(CONFIG_NDS32) || defined(CONFIG_RISCV) || \
	defined(CONFIG_SANDBOX)
	//board 关键的实现函数之一
	board_init,	/* Setup chipselects */
#endif
#ifdef CONFIG_CLOCKS
	set_cpu_clk_info, /* Setup clock information */
#endif
#ifdef CONFIG_EFI_LOADER
	efi_memory_init,
#endif
	initr_binman,
#ifdef CONFIG_FSP_VERSION2
	arch_fsp_init_r,
#endif
	initr_dm_devices,
	stdio_init_tables,
	initr_serial,
	initr_announce,
#if CONFIG_IS_ENABLED(WDT)
	initr_watchdog,
#endif
	INIT_FUNC_WATCHDOG_RESET
#ifdef CONFIG_NEEDS_MANUAL_RELOC
	initr_manual_reloc_cmdtable,
#endif
#if defined(CONFIG_PPC) || defined(CONFIG_M68K) || defined(CONFIG_MIPS)
	initr_trap,
#endif
#ifdef CONFIG_ADDR_MAP
	initr_addr_map,
#endif
#if defined(CONFIG_BOARD_EARLY_INIT_R)
  //记住这个重要的函数入口点
	board_early_init_r,
#endif
	INIT_FUNC_WATCHDOG_RESET
#ifdef CONFIG_POST
	initr_post_backlog,
#endif
	INIT_FUNC_WATCHDOG_RESET
#if defined(CONFIG_PCI) && defined(CONFIG_SYS_EARLY_PCI_INIT)
	/*
	 * Do early PCI configuration _before_ the flash gets initialised,
	 * because PCU resources are crucial for flash access on some boards.
	 */
	initr_pci,
#endif
#ifdef CONFIG_ARCH_EARLY_INIT_R
	arch_early_init_r,
#endif
  //板子电源设置, 一般好像也没有用,因为我们我们在SPL 中已经做了必要的设定。
	power_init_board,
#ifdef CONFIG_MTD_NOR_FLASH
	initr_flash,
#endif
	INIT_FUNC_WATCHDOG_RESET
#if defined(CONFIG_PPC) || defined(CONFIG_M68K) || defined(CONFIG_X86)
	/* initialize higher level parts of CPU like time base and timers */
	cpu_init_r,
#endif
.........
#ifdef CONFIG_MMC
  //MMC 初始化
	initr_mmc,
#endif
  //env 的重定位,我们没有重定位的必要
	initr_env,
..........
	console_init_r,		/* fully init console as a device */
#ifdef CONFIG_DISPLAY_BOARDINFO_LATE
	console_announce_r,
	show_board_info,
#endif
#ifdef CONFIG_ARCH_MISC_INIT
	arch_misc_init,		/* miscellaneous arch-dependent init */
#endif
#ifdef CONFIG_MISC_INIT_R
	misc_init_r,		/* miscellaneous platform-dependent init */
#endif
	INIT_FUNC_WATCHDOG_RESET
#ifdef CONFIG_CMD_KGDB
	initr_kgdb,
#endif
	interrupt_init,
#ifdef CONFIG_ARM
	initr_enable_interrupts,
#endif
#if defined(CONFIG_MICROBLAZE) || defined(CONFIG_M68K)
	timer_init,		/* initialize timer */
#endif
#if defined(CONFIG_LED_STATUS)
	initr_status_led,
#endif
	/* PPC has a udelay(20) here dating from 2002. Why? */
#ifdef CONFIG_CMD_NET
  //网口初始化
	initr_ethaddr,
#endif
#if defined(CONFIG_GPIO_HOG)
	gpio_hog_probe_all,
#endif
#ifdef CONFIG_BOARD_LATE_INIT
  //board late init 是uboot 在mainloop 之前
  //最后一个可以实现的接口。
	board_late_init,
#endif
#ifdef CONFIG_FSL_FASTBOOT
	initr_fastboot_setup,
#endif
#if defined(CONFIG_SCSI) && !defined(CONFIG_DM_SCSI)
	INIT_FUNC_WATCHDOG_RESET
	initr_scsi,
#endif
#ifdef CONFIG_BITBANGMII
	initr_bbmii,
#endif
#ifdef CONFIG_CMD_NET
	INIT_FUNC_WATCHDOG_RESET
#ifdef CONFIG_MACADDR_FROM_SPIROM
  //获取MAC 地址
	boardcfg_get_mac,	/* Get MAC address from SPI */
#endif
  //初始化网络协议栈
	initr_net,
#endif
#ifdef CONFIG_POST
	initr_post,
#endif
#if defined(CONFIG_IDE) && !defined(CONFIG_BLK)
	initr_ide,
#endif
#ifdef CONFIG_LAST_STAGE_INIT
	INIT_FUNC_WATCHDOG_RESET
	/*
	 * Some parts can be only initialized if all others (like
	 * Interrupts) are up and running (i.e. the PC-style ISA
	 * keyboard).
	 */
	last_stage_init,
#endif
#ifdef CONFIG_CMD_BEDBUG
	INIT_FUNC_WATCHDOG_RESET
	initr_bedbug,
#endif
#if defined(CONFIG_PRAM)
	initr_mem,
#endif
#if defined(CONFIG_M68K) && defined(CONFIG_BLOCK_CACHE)
	blkcache_init,
#endif
#if defined(AVB_RPMB) && !defined(CONFIG_SPL)
	initr_avbkey,
#endif
#ifdef CONFIG_IMX_TRUSTY_OS
	initr_tee_setup,
#endif
#ifdef CONFIG_FSL_FASTBOOT
	initr_check_fastboot,
#endif
#ifdef CONFIG_DUAL_BOOTLOADER
	initr_check_spl_recovery,
#endif
#ifdef CONFIG_ADV_RECOVERY
	initr_adv_recovery,
#endif
	//进入mainloop, uboot 的初始化的主要代码基本完成
	//等待命令行输入或者直接启动。
	run_main_loop,
};

void board_init_r(gd_t *new_gd, ulong dest_addr)
{
	...........

	if (initcall_run_list(init_sequence_r))
		hang();

	/* NOTREACHED - run_main_loop() does not return */
	hang();
uboot 进入mainloop 后,基本就相当于已经初始化完成,接下来如果没有其他异常打断,就会准备进入启动kernel 的流程。
5.4 mainloop 中执行的动作
首先来看下mainloop 的核心实现,其主要内容如下:
static int run_main_loop(void)
{
	/* main_loop() can return to retry autoboot, if so just run it again */
	for (;;)
		main_loop();
	return 0;
}

void main_loop(void)
{
	const char *s;

  //初始化命令行接口
	cli_init();

	//从环境变量中获取bootdelay & bootcmd
	//其中bootcmd 就是启动的命令。
	s = bootdelay_process();
	//如果设备树中包含bootcmd, 则可以重写bootcmd,
	//如果设备树中包含/config/bootsecure, 则使用cli_secure_boot_cmd 启动内核
	if (cli_process_fdt(&s))
		cli_secure_boot_cmd(s);

  //等待uboot 超时, 执行bootcmd 指定的启动命令
  // 如果过程中,有人按下中止健, uboot 进入命令行, 循环执行命令行输入的命令
	autoboot_command(s);

	cli_loop();
	panic("No CLI available");
注意bootdelay_process() 会读取bootcmd 环境变量,这是一个核心的点,如果读到该环境变量,且在一定的时间内没有人中止,uboot 将会bootcmd 中的命令,去启动kernel. 关于bootcmd 的描述,请看章节4.3.
至此,uboot 的执行流程就描述完了。
5.5 do_bootX中的一些重要函数
do_bootX 是一类函数, 例如do_bootm, do_booti, do_bootz 等。他们最终都会根据OS 的不同选择不同的OS 启动函数,下来我们以启动linux 为例来说明。
static boot_os_fn *boot_os[] = {
	[IH_OS_U_BOOT] = do_bootm_standalone,
#ifdef CONFIG_BOOTM_LINUX
	[IH_OS_LINUX] = do_bootm_linux,
#endif
#ifdef CONFIG_BOOTM_NETBSD
	[IH_OS_NETBSD] = do_bootm_netbsd,
#endif
.......
do_bootm_linux 我们以arm 的实现为例:
int do_bootm_linux(int flag, int argc, char * const argv[],
		   bootm_headers_t *images)
{
	/* No need for those on ARM */
	if (flag & BOOTM_STATE_OS_BD_T || flag & BOOTM_STATE_OS_CMDLINE)
		return -1;

	if (flag & BOOTM_STATE_OS_PREP) {
		boot_prep_linux(images);
		return 0;
	}

	if (flag & (BOOTM_STATE_OS_GO | BOOTM_STATE_OS_FAKE_GO)) {
		boot_jump_linux(images, flag);
		return 0;
	}

	//启动linux 前的准备,
	//如果设备树使能,将环境变量bootargs 中的内容添加进设备树的相应位置, 同时提供修改相应的设备树修改接口(ft_board_setup, ft_system_setup 等),修改设备树中的内容,以供kernel当作参数使用
	//如果设备树没有使能, 将环境变量bootargs 中的内容添加进TAGS 链表,以供kernel当作参数使用.
	boot_prep_linux(images);
	//启动linux,为linux 传递参数
	boot_jump_linux(images, flag);
	return 0;
}
我们已经把boot_prep_linux的实现原理讲的很详细了,回头你按照这个逻辑去看代码就对了。
接下来,我们粗略地看下boot_jump_linux 的实现:
static void boot_jump_linux(bootm_headers_t *images, int flag)
{
#ifdef CONFIG_ARM64
	void (*kernel_entry)(void *fdt_addr, void *res0, void *res1,
			void *res2);
	int fake = (flag & BOOTM_STATE_OS_FAKE_GO);

	kernel_entry = (void (*)(void *fdt_addr, void *res0, void *res1,
				void *res2))images->ep;

	.......
	//ARM64 的启动方式和ARM32 的思路大致相同,不过ARM64 的跳转通过汇编代码实现,
	// 这是因为ARM64 在跳转前,需要ARM64的异常等级进行切换,
	// armv8_switch_to_el2 就是真正的启动linux 的汇编函数,它会将ARM64的异常等级切换到
	// EL2,然后通过汇编 br x4 来启动linux.
	// 当启动linux时会将异常级别降低到el2或者el1来启动linux,根据具体设置来切换,
	// 而处于el3时则会将异常级别切换到el2,是否真实的能切到el2还要根据自己当前的级别,
	// 如果已经是el1了自然无法切换到el2。
	if (!fake) {
#ifdef CONFIG_ARMV8_PSCI
		armv8_setup_psci();
#endif
		do_nonsec_virt_switch();

		update_os_arch_secondary_cores(images->os.arch);

	........
		//只传递fdt 的地址 & kernel 的入口地址,machineID 已经退出
		//历史舞台!
	  armv8_switch_to_el2((u64)images->ft_addr, 0, 0, 0,
					    images->ep,
					    ES_TO_AARCH64);

	}
#else
  //这是ARM32 的启动方式
  //这个很好理解,就是把kernel image 的入口地址读出来,赋给一个函数变量,
  //这个函数需要两个参数, 第一个是MACHINE ID, 这个就是CPU 的型号ID,传给
 //kernel 让kernel 知道它是那个CPU 的型号,第二个参数,如果设备树使能,
 //就是用的是设备树的加载地址,否则,使用的TAGS 链表的地址,也就是前面讲的
 // boot_prep_linux 修改过的devicetree/ TAGS。 内核就是根据r2 去获取
 // uboot 传递给它的参数,慎之慎之!
  unsigned long machid = gd->bd->bi_arch_number;
	kernel_entry = (void (*)(int, int, uint))images->ep;
	s = env_get("machid");
	strict_strtoul(s, 16, &machid)
	..........
	if (IMAGE_ENABLE_OF_LIBFDT && images->ft_len)
		r2 = (unsigned long)images->ft_addr;
	else
		r2 = gd->bd->bi_boot_params;

......
    //执行kernel 入口,kernel 启动, uboot 结束!
		kernel_entry(0, machid, r2);
#endif
}
至此我们已经讲完了uboot 启动流程中的所有内容,可能还有一些重要的概念还没有涉及例如uboot 的驱动框架, uboot 的的command, 相信你把这个启动流程完完整整的研究一遍后,这些重要的内容研究就很简单了。
如果你能认真地看完,恭喜你, 你知道了! 事实上这边文章已经比很多培训机构的课程详细了。这些内容适合初学者了解整个启动的流程,同样使用正在做移植工作的你。
希望带领每一个刚做移植的人走出迷茫!祝你好运!
2022.05.31


 399
399


 被折叠的 条评论
为什么被折叠?
被折叠的 条评论
为什么被折叠?
 到【灌水乐园】发言


