


1、主要参考
(1)官网介绍
Colored point cloud registration — Open3D 0.16.0 documentation
2、原理和实现
2.1原理
本教程演示了使用几何形状和颜色进行配准的ICP变体。实现了[Park2017]算法。颜色信息锁定沿切平面的对齐。因此,该算法比以往的点云配准算法精度更高,鲁棒性更强,运行速度与ICP配准算法相当。本教程使用来自ICP的符号。
2.2 辅助显示工具类
为了演示彩色点云之间的对齐,draw_registration_result_original_color使用原始颜色呈现点云。
def draw_registration_result_original_color(source, target, transformation):
    source_temp = copy.deepcopy(source)
    source_temp.transform(transformation)
    o3d.visualization.draw_geometries([source_temp, target],
                                      zoom=0.5,
                                      front=[-0.2458, -0.8088, 0.5342],
                                      lookat=[1.7745, 2.2305, 0.9787],
                                      up=[0.3109, -0.5878, -0.7468])
2.3待测试的点云数据
下面的代码从两个文件读取一个源点云和一个目标点云。使用单位矩阵作为注册的初始化。
注意:np.identity(4),相当于没有选择平移变换
(1)测试代码
import open3d as o3d
import numpy as np
from copy import deepcopy
# import time


def draw_registration_result_original_color(source, target, transformation):
    # source_temp = copy.deepcopy(source)
    source_temp = deepcopy(source)
    source_temp.transform(transformation)
    o3d.visualization.draw_geometries([source_temp, target],
                                      zoom=0.5,
                                      front=[-0.2458, -0.8088, 0.5342],
                                      lookat=[1.7745, 2.2305, 0.9787],
                                      up=[0.3109, -0.5878, -0.7468])


if __name__ == "__main__":
    print("1. Load two point clouds and show initial pose")
    demo_colored_icp_pcds = o3d.data.DemoColoredICPPointClouds()
    source = o3d.io.read_point_cloud(demo_colored_icp_pcds.paths[0])
    target = o3d.io.read_point_cloud(demo_colored_icp_pcds.paths[1])

    # draw initial alignment
    current_transformation = np.identity(4)
    draw_registration_result_original_color(source, target, current_transformation)
(2)下载的文件
(3)显示的结果图
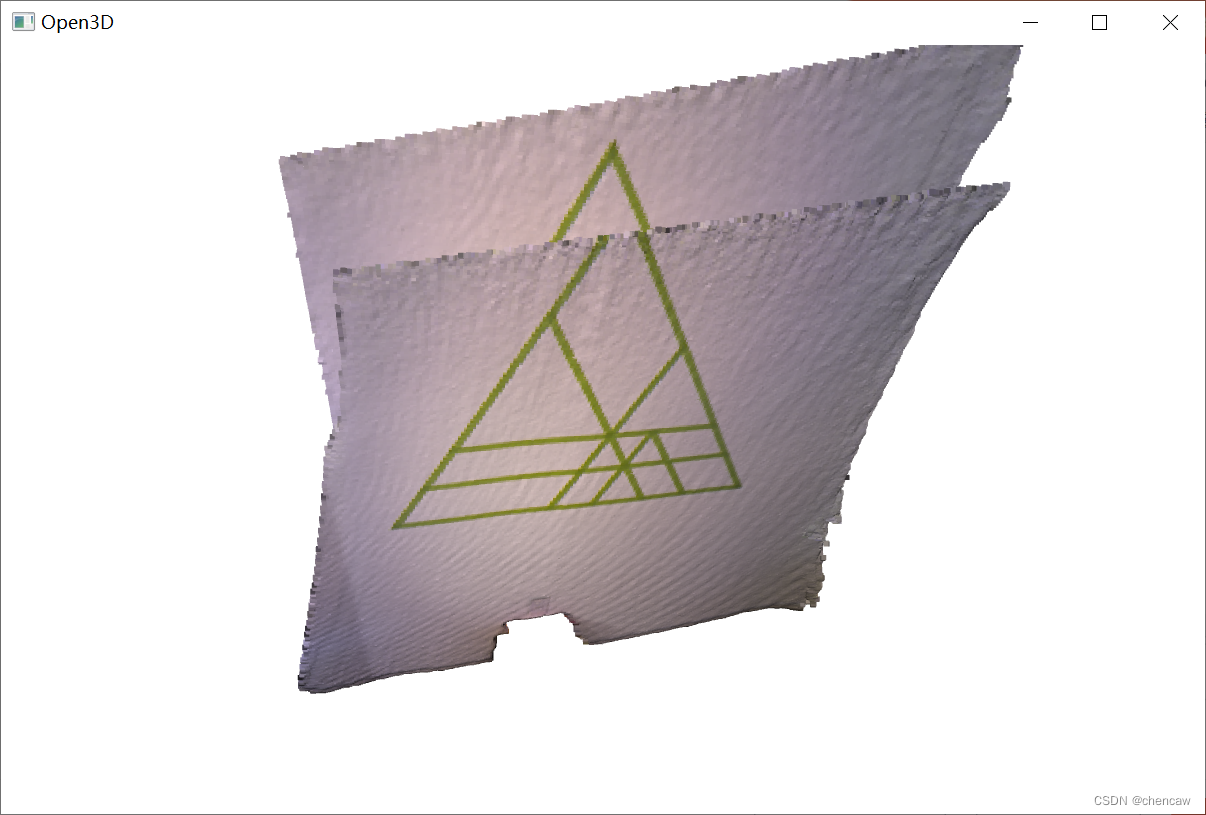
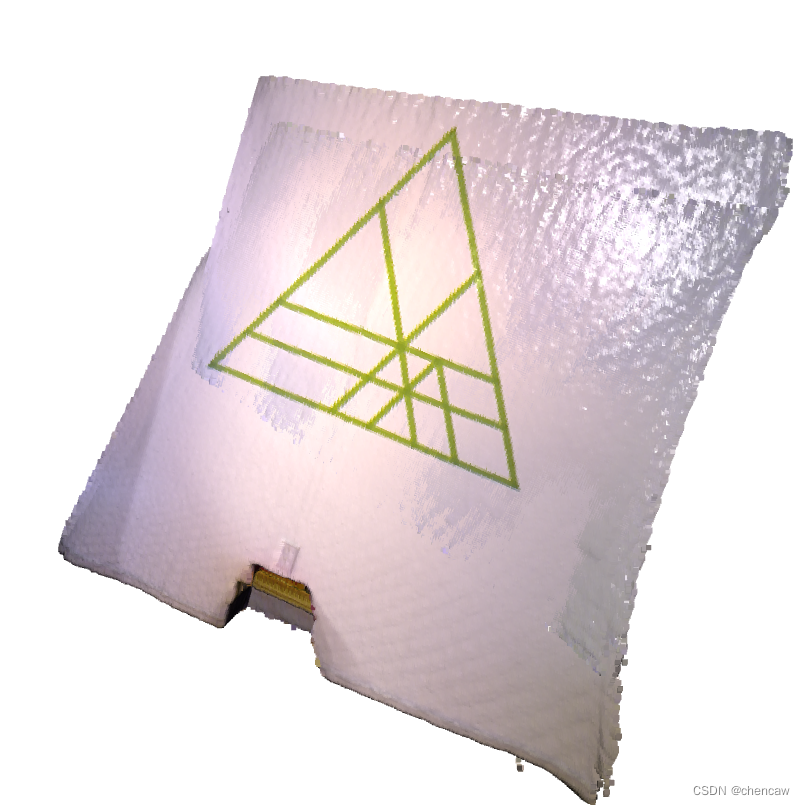
2.4 点对面ICP对齐测试(Point-to-plane ICP)
我们首先使用点到平面ICP作为基线方法(baseline approach)。下面的可视化显示了未对齐的绿色三角形纹理。这是因为几何约束不能防止两个平面滑动
(1)测试代码
import open3d as o3d
import numpy as np
from copy import deepcopy
# import time


def draw_registration_result_original_color(source, target, transformation):
    # source_temp = copy.deepcopy(source)
    source_temp = deepcopy(source)
    source_temp.transform(transformation)
    o3d.visualization.draw_geometries([source_temp, target],
                                      zoom=0.5,
                                      front=[-0.2458, -0.8088, 0.5342],
                                      lookat=[1.7745, 2.2305, 0.9787],
                                      up=[0.3109, -0.5878, -0.7468])


if __name__ == "__main__":
    print("1. Load two point clouds and show initial pose")
    demo_colored_icp_pcds = o3d.data.DemoColoredICPPointClouds()
    source = o3d.io.read_point_cloud(demo_colored_icp_pcds.paths[0])
    target = o3d.io.read_point_cloud(demo_colored_icp_pcds.paths[1])

    # draw initial alignment
    current_transformation = np.identity(4)
    draw_registration_result_original_color(source, target, current_transformation)

    # point to plane ICP
    current_transformation = np.identity(4)
    print("2. Point-to-plane ICP registration is applied on original point")
    print("   clouds to refine the alignment. Distance threshold 0.02.")
    result_icp = o3d.pipelines.registration.registration_icp(
        source, target, 0.02, current_transformation,
        o3d.pipelines.registration.TransformationEstimationPointToPlane())
    print(result_icp)
    draw_registration_result_original_color(source, target,
                                            result_icp.transformation)
(2)测试结果
测试的参数如下:
clouds to refine the alignment. Distance threshold 0.02.
RegistrationResult with fitness=9.745825e-01, inlier_rmse=4.220433e-03, and correspondence_set size of 62729
Access transformation to get result.
3、彩色点云注册(Colored point cloud registration)
彩色点云配准的核心函数是registration_colored_icp。在[Park2017]之后,它运行了一个联合优化目标的ICP迭代(详见点到点ICP)。

其中T是要估计的变换矩阵。EC和EG分别是光度项和几何项。δ∈[0,1]是经经验确定的权重参数。几何术语EG与点对面ICP相同。
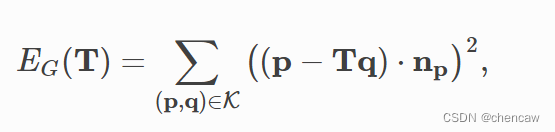
其中K为当前迭代中的对应集。Np是点p的法线。颜色项EC测量点q(记为C(q))的颜色与其在p的切平面上的投影颜色之间的差值。
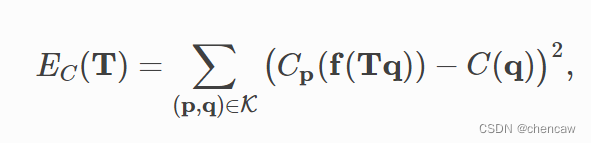
其中Cp(⋅)是一个预先计算的函数,连续定义在p的切平面上。函数(⋅)将一个3D点投影到切平面上。详情请参考[Park2017]。为了进一步提高效率,[Park2017]提出了一个多尺度注册方案。这已在以下脚本中实现。
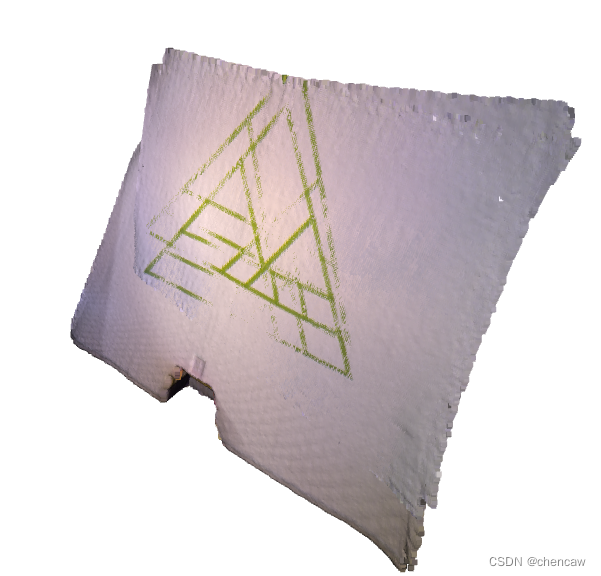
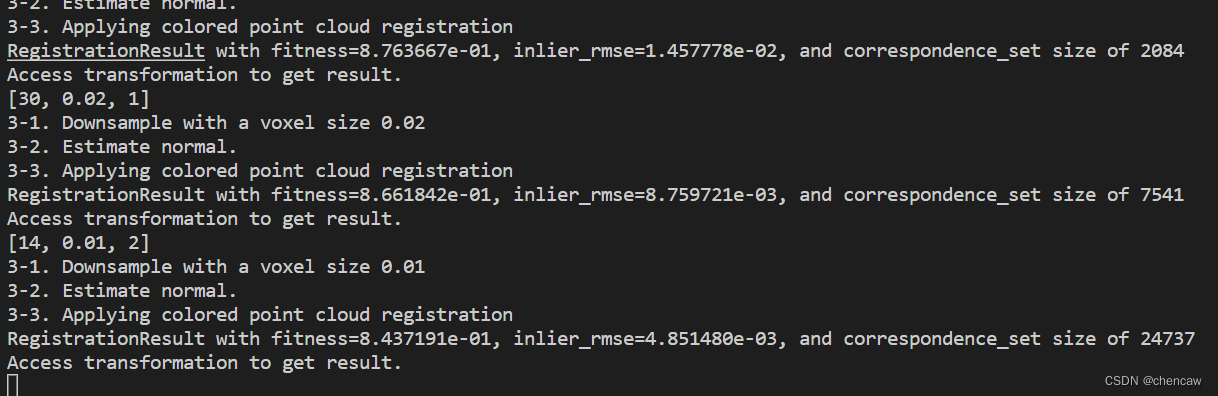
3.1 彩色对齐的代码测试
PS:注意,逐步收敛!注意,体素逐渐变小!!!
(1)代码
import open3d as o3d
import numpy as np
from copy import deepcopy
# import time


def draw_registration_result_original_color(source, target, transformation):
    # source_temp = copy.deepcopy(source)
    source_temp = deepcopy(source)
    source_temp.transform(transformation)
    o3d.visualization.draw_geometries([source_temp, target],
                                      zoom=0.5,
                                      front=[-0.2458, -0.8088, 0.5342],
                                      lookat=[1.7745, 2.2305, 0.9787],
                                      up=[0.3109, -0.5878, -0.7468])


if __name__ == "__main__":
    print("1. Load two point clouds and show initial pose")
    demo_colored_icp_pcds = o3d.data.DemoColoredICPPointClouds()
    source = o3d.io.read_point_cloud(demo_colored_icp_pcds.paths[0])
    target = o3d.io.read_point_cloud(demo_colored_icp_pcds.paths[1])

    # draw initial alignment
    current_transformation = np.identity(4)
    draw_registration_result_original_color(source, target, current_transformation)

    # point to plane ICP
    current_transformation = np.identity(4)
    print("2. Point-to-plane ICP registration is applied on original point")
    print("   clouds to refine the alignment. Distance threshold 0.02.")
    result_icp = o3d.pipelines.registration.registration_icp(
        source, target, 0.02, current_transformation,
        o3d.pipelines.registration.TransformationEstimationPointToPlane())
    print(result_icp)
    draw_registration_result_original_color(source, target,
                                            result_icp.transformation)


    # colored pointcloud registration
    # This is implementation of following paper
    # J. Park, Q.-Y. Zhou, V. Koltun,
    # Colored Point Cloud Registration Revisited, ICCV 2017
    voxel_radius = [0.04, 0.02, 0.01]
    max_iter = [50, 30, 14]
    current_transformation = np.identity(4)
    print("3. Colored point cloud registration")
    for scale in range(3):
        iter = max_iter[scale]
        radius = voxel_radius[scale]
        print([iter, radius, scale])

        print("3-1. Downsample with a voxel size %.2f" % radius)
        source_down = source.voxel_down_sample(radius)
        target_down = target.voxel_down_sample(radius)

        print("3-2. Estimate normal.")
        source_down.estimate_normals(
            o3d.geometry.KDTreeSearchParamHybrid(radius=radius * 2, max_nn=30))
        target_down.estimate_normals(
            o3d.geometry.KDTreeSearchParamHybrid(radius=radius * 2, max_nn=30))

        print("3-3. Applying colored point cloud registration")
        result_icp = o3d.pipelines.registration.registration_colored_icp(
            source_down, target_down, radius, current_transformation,
            o3d.pipelines.registration.TransformationEstimationForColoredICP(),
            o3d.pipelines.registration.ICPConvergenceCriteria(relative_fitness=1e-6,
                                                            relative_rmse=1e-6,
                                                            max_iteration=iter))
        current_transformation = result_icp.transformation
        print(result_icp)
    draw_registration_result_original_color(source, target,
                                            result_icp.transformation)
(2)显示的结果
(3)测试的参数
 (4)说明
(4)说明
总的来说,使用voxel_down_sample创建了3层多分辨率点云。法线是用顶点法线估计来计算的。从粗到细,每个层都调用核心配准函数registration_colored_icp。lambda_geometric是registration_colored_icp的一个可选参数,它决定了λ eg +(1−λ)EC在总能量中的λ∈[0,1]。
输出是两个点云的紧密对齐。注意墙上的绿色三角形。


 被折叠的 条评论
为什么被折叠?
被折叠的 条评论
为什么被折叠?
 到【灌水乐园】发言


