


一 生命周期步骤
bean被载入到容器中时,他的生命周期就开始了:
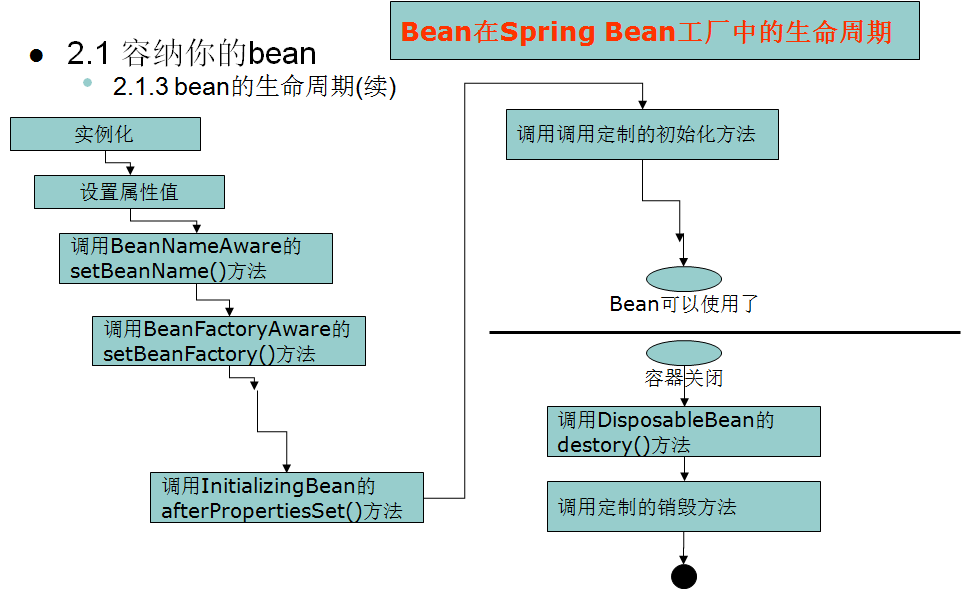
1、容器寻找bean的定义信息并实例化。
2、使用依赖注入,spring按bean定义信息配置bean的所有属性。
3、若bean实现了BeanNameAware接口,工厂调用Bean的setBeanName()方法传递bean的ID。
4、若bean实现了BeanFactoryAware接口,工厂调用setBeanFactory()方法传入工厂自身。
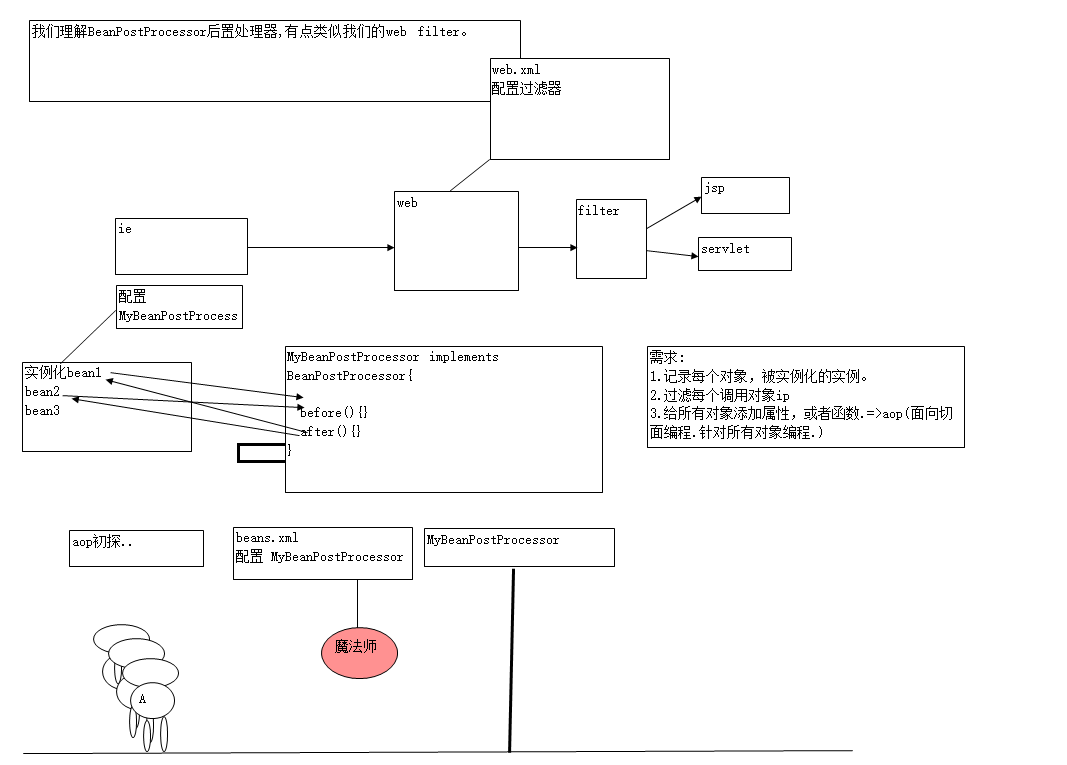
5、若BeanPostProcessor(bean后置处理器)和bean关联,则它们的postProcessBeforeInitialization()方法被调用。
6、如果你实现InitializingBean 接口,则会调用 afterPropertiesSet()方法。
7、若bean指定了ini-method方法,它将被调用。
8、最后,若有BeanPostProcessor和bean关联,则它们的postProcessAfterInitialization()方法被调用。
9、使用我们的bean。
11、容器关闭。
12、可以通过实现DisposableBean接口来调用方法destory() 。
13、可以在<bean destory-method=”fun1”/> 调用定制的销毁方法。
我们实际开发中往往没有用的这么的过程。
二 生命周期图
1 针对ApplicationContext

2 针对BeanFactory
通过BeanFactory来获取bean对象,bean的生命周期和Applicationcontext是不一样的,bean是工厂中创建的生命周期会简单一些。
三 代码示例
1 PersonService
package com.hsp.beanlife;
import javax.annotation.PostConstruct;
import javax.annotation.PreDestroy;
import org.springframework.beans.BeansException;
import org.springframework.beans.factory.BeanFactory;
import org.springframework.beans.factory.BeanFactoryAware;
import org.springframework.beans.factory.BeanNameAware;
import org.springframework.beans.factory.DisposableBean;
import org.springframework.beans.factory.InitializingBean;
import org.springframework.beans.factory.config.BeanPostProcessor;
import org.springframework.context.ApplicationContext;
import org.springframework.context.ApplicationContextAware;
public class PersonService implements BeanNameAware,BeanFactoryAware,ApplicationContextAware,InitializingBean,DisposableBean {
        private String name;
        private Integer age;
        public Integer getAge() {
                return age;
        }
        public void setAge(Integer age) {
                this.age = age;
        }
        public String getName() {
                return name;
        }

        public PersonService(String abc){
                System.out.println("PersonService 函数");
        }

        public PersonService(){
                System.out.println("PersonService 函数");
        }
        public void setName(String name) {
                System.out.println("setName(String name) 函数");
                this.name = name;
        }

        public void sayHi(){
                System.out.println("hi "+ name);
        }
        //该方法可以给arg0表示正在被实例化得bean id
        public void setBeanName(String arg0) {
                // TODO Auto-generated method stub
                System.out.println("setBeanName 被调用 值"+arg0);

        }
        //该方法可以传递beanFactroy
        public void setBeanFactory(BeanFactory arg0) throws BeansException {
                // TODO Auto-generated method stub
                System.out.println("setBeanFactory "+arg0);
        }
        //该方法传递ApplicationContext
        public void setApplicationContext(ApplicationContext arg0)
                        throws BeansException {
                // TODO Auto-generated method stub
                System.out.println("setApplicationContext"+arg0);

        }
        public void init(){
                System.out.println("我自己的init方法");
        }

        //
        public void afterPropertiesSet() throws Exception {
                // TODO Auto-generated method stub
                System.out.println("afterPropertiesSet()");
        }
        //定制我们的销毁方法
        @PreDestroy
        public  void mydestory(){
                System.out.println("释放各种资源");
        }
        @Override
        public void destroy() throws Exception {
                // TODO Auto-generated method stub
                System.out.println("关闭各种资源");
        }
}
2 MyBeanPostProcessor
package com.hsp.beanlife;
import org.springframework.beans.BeansException;
import org.springframework.beans.factory.config.BeanPostProcessor;
public class MyBeanPostProcessor implements BeanPostProcessor {
    public Object postProcessAfterInitialization(Object arg0, String arg1)
            throws BeansException {
        // TODO Auto-generated method stub
        System.out.println("postProcessAfterInitialization 函数被调用");

        return arg0;
    }
    public Object postProcessBeforeInitialization(Object arg0, String arg1)
            throws BeansException {
        // TODO Auto-generated method stub
        System.out.println("postProcessBeforeInitialization 函数被调用");
        System.out.println(arg0+" 被创建的时间是"+new java.util.Date());
        return arg0;
    }
}
3 beans.xml
<?xml version="1.0" encoding="utf-8"?>
<beans xmlns="http://www.springframework.org/schema/beans";
                xmlns:xsi="http://www.w3.org/2001/XMLSchema-instance";
                xmlns:context="http://www.springframework.org/schema/context";
                xmlns:tx="http://www.springframework.org/schema/tx";
                xsi:schemaLocation="http://www.springframework.org/schema/beanshttp://www.springframework.org/schema/beans/spring-beans-2.5.xsd
http://www.springframework.org/schema/contexthttp://www.springframework.org/schema/context/spring-context-2.5.xsd
http://www.springframework.org/schema/txhttp://www.springframework.org/schema/tx/spring-tx-2.5.xsd";>
<bean id="personService"  destroy-method="mydestory"   class="com.hsp.beanlife.PersonService" init-method="init">
<!-- 这里注入我们属性,前提就是有setName才能ok -->
<property name="name">
<value>xiaoming</value>
</property>
</bean>
<!-- 配置我们的自己后置处理器(有点类似我们的filter) -->
<bean id="myBeanPostProcessor" class="com.hsp.beanlife.MyBeanPostProcessor" />
</beans>
4 App1
package com.hsp.beanlife;
import org.springframework.beans.factory.BeanFactory;
import org.springframework.beans.factory.xml.XmlBeanFactory;
import org.springframework.context.ApplicationContext;
import org.springframework.context.support.ClassPathXmlApplicationContext;
import org.springframework.core.io.ClassPathResource;
public class App1 {
    /**
     * @param args
     */
    public static void main(String[] args) {
        // TODO Auto-generated method stub
        ApplicationContext ac=new ClassPathXmlApplicationContext("com/hsp/beanlife/beans.xml");

        PersonService ps1 = (PersonService) ac.getBean("personService");
        ps1.sayHi();
    }
}
四 运行结果
PersonService 函数
setName(String name) 函数
setBeanName 被调用 值personService
setBeanFactory org.springframework.beans.factory.support.DefaultListableBeanFactory@c573aba: defining beans [personService,myBeanPostProcessor]; root of factory hierarchy
setApplicationContextorg.springframework.context.support.ClassPathXmlApplicationContext@532cc66f: display name [org.springframework.context.support.ClassPathXmlApplicationContext@532cc66f]; startup date [Fri Oct 27 22:28:31 CST 2017]; root of context hierarchy
postProcessBeforeInitialization 函数被调用
com.hsp.beanlife.PersonService@39c9eaf8 被创建的时间是Fri Oct 27 22:28:32 CST 2017
afterPropertiesSet()
我自己的init方法
postProcessAfterInitialization 函数被调用
hi xiaoming


 3796
3796


 被折叠的 条评论
为什么被折叠?
被折叠的 条评论
为什么被折叠?
 到【灌水乐园】发言


