


第十九章 Shadow Mapping
本章,我们将会学习如何渲染阴影(shadows)。同时还会介绍depth maps(深度纹理,2D纹理中存储了深度值而不是颜色值)和projective texture mapping(投影纹理映射,想像下Batman(蝙蝠侠) signal)。另外,在渲染阴影时还会遇到一引起常见的问题,我们需要确定如何解决这些问题。
Motivation
阴影我们视觉感观的一部分,但是你可能根据不会感觉到在你身边的阴影,除非你正在玩皮影。但是如果删除阴影,一些感觉就会消失。对于视频游戏和阴影模拟这是一个难解的问题,因为生成现实的阴影是非常困难的,而且需要高昂的计算成本。这些阴影是非常细微的并且几乎是不自觉就感觉到了,但是如果不要阴影,那么游戏玩家就会发现场景不那么真实。本章,我们将会讨论一种用于生成阴影的常用技术 shadow mapping。在这个过程中,我们还会介绍一种将2D纹理投影到任意几何形状物体上的技术 projective texture mapping(投影纹理映射)。此外,还将会讨论投影纹理映射和阴影映射的各种缺点,并探讨如何解决这些问题。Projective Texture Mapping
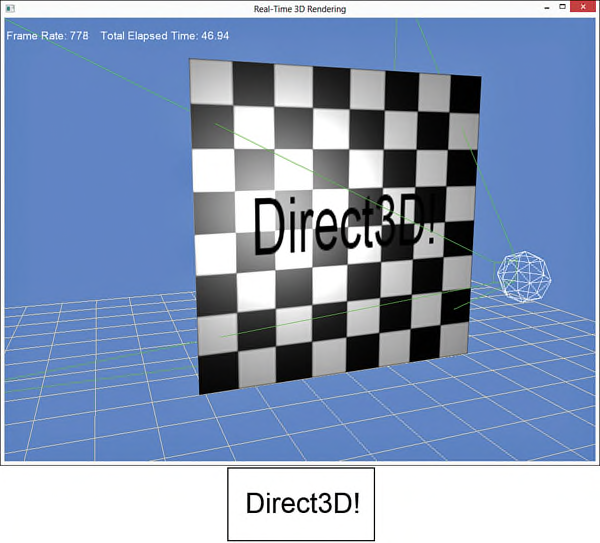
实现Shadow mapping需要先生成了一个 depth map,这是一种2D纹理用于存储与光源距离最近的objects的深度值,并把该纹理映射到用于显示阴影的几何物体上(也就是阴影的接收方)。因此,理解阴影映射的第一步是讨论投影纹理映射。投影纹理映射类似于一个幻灯片或者电影放映机。类似于一个虚拟camera,也可以使用一个视锥体(frustum)定义一个 projector(投影仪),并使用该投影仪生成纹理坐标用于投影图像的采样。图19.1显示了一个投影纹理映射shader的输出结果,其中把一个带有文字“Direct3D!”的纹理投影到一个棋盘样式的平面上。图中的绿色线条描述了投影仪的视锥体,白色的sphere表示场景中的一个point light。
在投影纹理映射中将会使用三个辅助类:Projector,Frustum和RenderableFrustum,图19.2显示了这三个类的结构图。在书中没有列出这三个类的代码,但是在配套网站上提供了完整的代码。

Projective Texture Coordinates
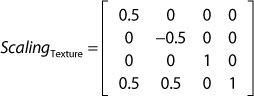
Projector类与Camera类基本相同,并且输出一个ViewProjection变换矩阵。该矩阵把一个object从投影仪视角变换到projection space,而不是从一个camera视角。然后就可以使用变换后的坐标位置(x和y分量)作为投影纹理的采样坐标位置。但是,该坐标需要被规范化到设备坐标空间 normalized device coordinate space(NDC space,或屏幕空间),范围为[-1, 1],而一个纹理映射的范围是[0, 1]。因此,需要使用如下方程式调整投影纹理坐标:u = 0.5x + 0.5
v = −0.5y + 0.5
该方程式可以使用矩阵形式表示:
A Projective Texture-Mapping Shader
列表19.1中列出了projective texture mapping的shader代码。其中使用了point light shader作为基础代码,包括了表示point light,ambient light以及specular highlights的变量。新增了ProjectiveTextureMatrix和ProjectedTexture变量。列表19.1 An Initial Projective Texture-Mapping Shader
#include "include\\Common.fxh"

/************* Resources *************/
static const float4 ColorWhite = { 1, 1, 1, 1 };

cbuffer CBufferPerFrame
{
    float4 AmbientColor = { 1.0f, 1.0f, 1.0f, 0.0f };
    float4 LightColor = { 1.0f, 1.0f, 1.0f, 1.0f };
    float3 LightPosition = { 0.0f, 0.0f, 0.0f };
    float LightRadius = 10.0f;
    float3 CameraPosition;
}

cbuffer CBufferPerObject
{
    float4x4 WorldViewProjection : WORLDVIEWPROJECTION;
    float4x4 World : WORLD;
    float4 SpecularColor : SPECULAR = { 1.0f, 1.0f, 1.0f, 1.0f };
    float SpecularPower : SPECULARPOWER  = 25.0f;

    float4x4 ProjectiveTextureMatrix;
}

Texture2D ColorTexture;
Texture2D ProjectedTexture;

SamplerState ProjectedTextureSampler
{
    Filter = MIN_MAG_MIP_LINEAR;
    AddressU = BORDER;
    AddressV = BORDER;
    BorderColor = ColorWhite;
};

SamplerState ColorSampler
{
    Filter = MIN_MAG_MIP_LINEAR;
    AddressU = WRAP;
    AddressV = WRAP;
};

RasterizerState BackFaceCulling
{
    CullMode = BACK;
};

/************* Data Structures *************/

struct VS_INPUT
{
    float4 ObjectPosition : POSITION;
    float2 TextureCoordinate : TEXCOORD;
    float3 Normal : NORMAL;
};

struct VS_OUTPUT
{
    float4 Position : SV_Position;
    float3 Normal : NORMAL;
    float2 TextureCoordinate : TEXCOORD0;
    float3 WorldPosition : TEXCOORD1;
    float Attenuation : TEXCOORD2;
    float4 ProjectedTextureCoordinate : TEXCOORD3;
};

/************* Vertex Shader *************/

VS_OUTPUT project_texture_vertex_shader(VS_INPUT IN)
{
    VS_OUTPUT OUT = (VS_OUTPUT)0;

    OUT.Position = mul(IN.ObjectPosition, WorldViewProjection);
    OUT.WorldPosition = mul(IN.ObjectPosition, World).xyz;
    OUT.TextureCoordinate = IN.TextureCoordinate;
    OUT.Normal = normalize(mul(float4(IN.Normal, 0), World).xyz);

    float3 lightDirection = LightPosition - OUT.WorldPosition;
    OUT.Attenuation = saturate(1.0f - (length(lightDirection) / LightRadius));

    OUT.ProjectedTextureCoordinate = mul(IN.ObjectPosition, ProjectiveTextureMatrix);

    return OUT;
}

/************* Pixel Shaders *************/

float4 project_texture_pixel_shader(VS_OUTPUT IN) : SV_Target
{
    float4 OUT = (float4)0;

    float3 lightDirection = LightPosition - IN.WorldPosition;
    lightDirection = normalize(lightDirection);

    float3 viewDirection = normalize(CameraPosition - IN.WorldPosition);

    float3 normal = normalize(IN.Normal);
    float n_dot_l = dot(normal, lightDirection);
    float3 halfVector = normalize(lightDirection + viewDirection);
    float n_dot_h = dot(normal, halfVector);

    float4 color = ColorTexture.Sample(ColorSampler, IN.TextureCoordinate);
    float4 lightCoefficients = lit(n_dot_l, n_dot_h, SpecularPower);

    float3 ambient = get_vector_color_contribution(AmbientColor, color.rgb);
    float3 diffuse = get_vector_color_contribution(LightColor, lightCoefficients.y * color.rgb) * IN.Attenuation;
    float3 specular = get_scalar_color_contribution(SpecularColor, min(lightCoefficients.z, color.w)) * IN.Attenuation;

    OUT.rgb = ambient + diffuse + specular;
    OUT.a = 1.0f;

    IN.ProjectedTextureCoordinate.xy /= IN.ProjectedTextureCoordinate.w;
    float3 projectedColor = ProjectedTexture.Sample(ProjectedTextureSampler, IN.ProjectedTextureCoordinate.xy).rgb;

    OUT.rgb *= projectedColor;

    return OUT;
}

/************* Techniques *************/

technique11 project_texture
{
    pass p0
    {
        SetVertexShader(CompileShader(vs_5_0, project_texture_vertex_shader()));
        SetGeometryShader(NULL);
        SetPixelShader(CompileShader(ps_5_0, project_texture_pixel_shader()));

        SetRasterizerState(BackFaceCulling);
    }
}
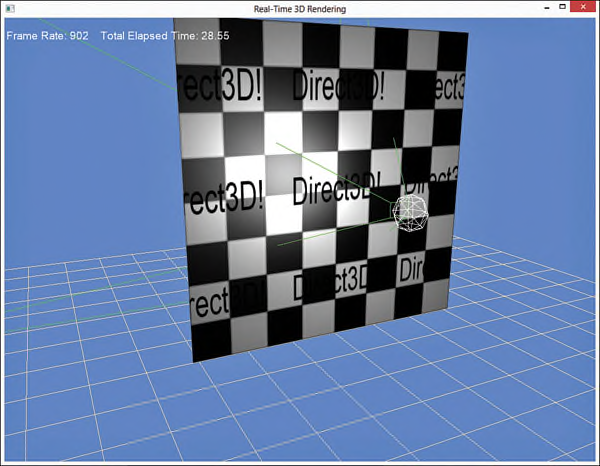
在vertex shader中,只有一行代码是用于projective texture mapping:把vertex从local space变换到projective texture space。然后把变换的结果存储到VS_OUTPUT.ProjectedTextureCoordinate变量中,并传递到pixel shader作为输入。在pixel shader中通过把ProjectedTextureCoordinate变量中的x和y分量除以w分量,把采样坐标位置变换到NDC(normalized device coordinate)space。该过程被称为 homogeneous divide或 perpective divide,对于使用了SV_POSITION semantic的变量VS_OUTPUT.Position,在shader中会自动执行homogeneous divide操作。完成变换之后,就可以采样projected texture并用于计算最终的颜色值。其中,用于执行projected texture采样的对象ProjectedTextureSampler,指定的滤波方式为trilinear filtering,纹理寻址模式为BORDER,并且border颜色为白色。Projective texture的坐标可以扩展[0, 1]范围之外,而一个白色的border提供了用于这种坐标变换的单位乘法。此外,不应该仅局限于使用border addressing mode,可以尝试使用其他的寻址模式。图19.3显示了在shader中使用wrapping texture address模式的输出结果。
Reverse Projection
在列表19.1所列出的shader中有一些问题需要解决。第一个问题是,projector无论从视锥体哪一边投影,都会产生一个反向投影。图19.4显示了这种结果。

要修改这个问题,需要确保只有在projected texture coordinate的w分量大于或等于0时才进行homogenous divide运算。如下所示:
    if (IN.ProjectedTextureCoordinate.w >= 0.0f)
    {
        IN.ProjectedTextureCoordinate.xy /= IN.ProjectedTextureCoordinate.w;
        float3 projectedColor = ProjectedTexture.Sample(ProjectedTextureSampler, IN.ProjectedTextureCoordinate.xy).rgb;

        OUT.rgb *= projectedColor;
    }
在本书的配套网站上提供了一个示例程序,其中把该判断语句放到了一个独立的pixel shader和technique中。使用这种方法,在不考虑reverse projection的情况下就不需要使用该分支语句。
Occlusion
在列表19.1中另一个需要解决的问题是物体之间的遮挡问题。考虑如图19.5所示的输出结果,两张图中都包含了一个teapot放置到平面的前面,并且每一个object都使用同样的projected texture进行渲染,在上图中,该texture被错误的投影到了平面上被teapot遮挡的区域。在下图中,创建了一个depth map,并用于occlusion testing(遮挡测试)。这种occlusion testing不仅用在平面上,还用于teapot。例如,如果旋转teapot,使得teapot的handle(手柄)被pot(壶身,相对于projector投影方向)遮挡,那么handle就不会接收到projected texture。

Creating a Depth Map
下面我们使用上一章所讨论的render-to-target功能创建一个depth map(一个texture用于存储到projector或光源的距离,而不是颜色值)。列表19.2列出了DepthMap类的声明代码,其中包含了用于创建一个depth map的相关函数。列表19.2 Declaration of the DepthMap Class
#pragma once

#include "Common.h"
#include "RenderTarget.h"

namespace Library
{
	class Game;

	class DepthMap : public RenderTarget
	{
		RTTI_DECLARATIONS(DepthMap, RenderTarget)

	public:
		DepthMap(Game& game, UINT width, UINT height);
		~DepthMap();

		ID3D11ShaderResourceView* OutputTexture() const;
		ID3D11DepthStencilView* DepthStencilView() const;

		virtual void Begin() override;
		virtual void End() override;

	private:
		DepthMap();
		DepthMap(const DepthMap& rhs);
		DepthMap& operator=(const DepthMap& rhs);

		Game* mGame;
		ID3D11DepthStencilView* mDepthStencilView;
		ID3D11ShaderResourceView* mOutputTexture;
		D3D11_VIEWPORT mViewport;
	};
}
在DepthMap类中,包含了用于表示depth-stencil view和shader resource view的成员变量和函数,但是并没有rendre target view。与一上章使用render-to-target方法不同的是,在这里并不需要使用一个pixel shader或render target创建depth map。只需要使用包含一个depth-stencil view的vertex shader就可以生成depth map,并且可以通过指定render target view为NULL禁用pixel shader阶段(这样可以带来一定的性能提升)。另外还包含有一个用于表示viewport的成员变量,该viewport与depth map具有同样的分辨率大小。这种方法支持创建一个比应用程序分辨率更小的depth map,因此可以减少内存开销并提高性能。列表19.3列出了DepthMap类的实现代码。
列表19.3 Implementation of the DepthMap Class
#include "DepthMap.h"
#include "Game.h"
#include "GameException.h"

namespace Library
{
    RTTI_DEFINITIONS(DepthMap)

    DepthMap::DepthMap(Game& game, UINT width, UINT height)
        : RenderTarget(), mGame(&game), mDepthStencilView(nullptr),
          mOutputTexture(nullptr), mViewport()
    {
        D3D11_TEXTURE2D_DESC textureDesc;
        ZeroMemory(&textureDesc, sizeof(textureDesc));
        textureDesc.Width = width;
        textureDesc.Height = height;
        textureDesc.MipLevels = 1;
        textureDesc.ArraySize = 1;
        textureDesc.Format = DXGI_FORMAT_R24G8_TYPELESS;
        textureDesc.SampleDesc.Count = 1;
        textureDesc.BindFlags = D3D11_BIND_DEPTH_STENCIL| D3D11_BIND_SHADER_RESOURCE;

        HRESULT hr;
        ID3D11Texture2D* texture = nullptr;
        if (FAILED(hr = game.Direct3DDevice()->CreateTexture2D(&textureDesc, nullptr, &texture)))
        {
            throw GameException("IDXGIDevice::CreateTexture2D() failed.", hr);
        }

        D3D11_SHADER_RESOURCE_VIEW_DESC resourceViewDesc;
        ZeroMemory(&resourceViewDesc, sizeof(resourceViewDesc));
        resourceViewDesc.Format = DXGI_FORMAT_R24_UNORM_X8_TYPELESS;
        resourceViewDesc.ViewDimension = D3D_SRV_DIMENSION_TEXTURE2D;
        resourceViewDesc.Texture2D.MipLevels = 1;

        if (FAILED(hr = game.Direct3DDevice()->CreateShaderResourceView(texture, &resourceViewDesc, &mOutputTexture)))
        {
            ReleaseObject(texture);
            throw GameException("IDXGIDevice::CreateShaderResourceView() failed.", hr);
        }

        D3D11_DEPTH_STENCIL_VIEW_DESC depthStencilViewDesc;
        ZeroMemory(&depthStencilViewDesc, sizeof(depthStencilViewDesc));
        depthStencilViewDesc.Format = DXGI_FORMAT_D24_UNORM_S8_UINT;
        depthStencilViewDesc.ViewDimension = D3D11_DSV_DIMENSION_TEXTURE2D;
        depthStencilViewDesc.Texture2D.MipSlice = 0;

        if (FAILED(hr = game.Direct3DDevice()->CreateDepthStencilView(texture, &depthStencilViewDesc, &mDepthStencilView)))
        {
            ReleaseObject(texture);
            throw GameException("IDXGIDevice::CreateDepthStencilView() failed.", hr);
        }

        ReleaseObject(texture);

        mViewport.TopLeftX = 0.0f;
        mViewport.TopLeftY = 0.0f;
        mViewport.Width = static_cast<float>(width);
        mViewport.Height = static_cast<float>(height);
        mViewport.MinDepth = 0.0f;
        mViewport.MaxDepth = 1.0f;
    }

    DepthMap::~DepthMap()
    {
        ReleaseObject(mOutputTexture);
        ReleaseObject(mDepthStencilView);
    }

    ID3D11ShaderResourceView* DepthMap::OutputTexture() const
    {
        return mOutputTexture;
    }

    ID3D11DepthStencilView* DepthMap::DepthStencilView() const
    {
        return mDepthStencilView;
    }

    void DepthMap::Begin()
    {
        static ID3D11RenderTargetView* nullRenderTargetView = nullptr;
        RenderTarget::Begin(mGame->Direct3DDeviceContext(), 1, &nullRenderTargetView, mDepthStencilView, mViewport);
    }

    void DepthMap::End()
    {
        RenderTarget::End(mGame->Direct3DDeviceContext());
    }
}
在DepthMap的构造函数中包含了该类的大部分实现代码。首先,创建一个2D texture用于存储真正的depth map数据。其中指定了texture的格式为DXGI_FORMAT_R24G8_TYPELESS,表示texture会被划分为24-bit和8-bit两个部分。TYPELESS标识符表示depth-stencil view和shader resource view会以不同的方式处理texture。其中depth-stencil view被绑定到管线的output-merger阶段,而shader resource view则是用于作为一个shader的输入(比如,projective texture mapping shader)。在shader resource view和depth-stencil view创建完成之后,就可以释放texture对象了(因为这两个views成员变量中保存了对该对象的引用)。最后,创建一个viewport。 DepthMap::Begin()和DepthMap::End()函数与上一章FullScreenRenderTarget类中对应的函数具有相同的功能:分别用于把depth-stencil view绑定到output-merger阶段以及恢复之前的render targets。但是在DepthMap的Begin和End()函数中是通过调用一个RenderTarget基类的Begin和End()函数,该类中实现了一个render target栈结构。在RenderTarget::Begin()函数中,先把render targets绑定到output-merger阶段,再push到render target栈中,反之在RenderTarget()::End()函数中则是先从栈中pop出render targets。再绑定到output-merger阶段。这种方式支持嵌套的render-targets。列表19.4和19.5分别列出了RenderTarget基类的声明和实现代码。
列表19.4 Declaration of the RenderTarget Class
#pragma once

#include "Common.h"

namespace Library
{
	class RenderTarget : public RTTI
	{
		RTTI_DECLARATIONS(RenderTarget, RTTI)

	public:
		RenderTarget();
		virtual ~RenderTarget();

		virtual void Begin() = 0;
		virtual void End() = 0;

	protected:
		typedef struct _RenderTargetData
		{
			UINT ViewCount;
			ID3D11RenderTargetView** RenderTargetViews;
			ID3D11DepthStencilView* DepthStencilView;
			D3D11_VIEWPORT Viewport;

			_RenderTargetData(UINT viewCount, ID3D11RenderTargetView** renderTargetViews, ID3D11DepthStencilView* depthStencilView, const D3D11_VIEWPORT& viewport)
				: ViewCount(viewCount), RenderTargetViews(renderTargetViews), DepthStencilView(depthStencilView), Viewport(viewport) { }
		} RenderTargetData;

		void Begin(ID3D11DeviceContext* deviceContext, UINT viewCount, ID3D11RenderTargetView** renderTargetViews, ID3D11DepthStencilView* depthStencilView, const D3D11_VIEWPORT& viewport);
		void End(ID3D11DeviceContext* deviceContext);

	private:
		RenderTarget(const RenderTarget& rhs);
		RenderTarget& operator=(const RenderTarget& rhs);

		static std::stack<RenderTargetData> sRenderTargetStack;
	};
}
列表19.5 Implementation of the RenderTarget Class
#include "RenderTarget.h"
#include "Game.h"

namespace Library
{
    RTTI_DEFINITIONS(RenderTarget)

    std::stack<RenderTarget::RenderTargetData> RenderTarget::sRenderTargetStack;

    RenderTarget::RenderTarget()
    {
    }

    RenderTarget::~RenderTarget()
    {
    }

    void RenderTarget::Begin(ID3D11DeviceContext* deviceContext, UINT viewCount, ID3D11RenderTargetView** renderTargetViews, ID3D11DepthStencilView* depthStencilView, const D3D11_VIEWPORT& viewport)
    {
        sRenderTargetStack.push(RenderTargetData(viewCount, renderTargetViews, depthStencilView, viewport));
        deviceContext->OMSetRenderTargets(viewCount, renderTargetViews, depthStencilView);
        deviceContext->RSSetViewports(1, &viewport);
    }

    void RenderTarget::End(ID3D11DeviceContext* deviceContext)
    {
        sRenderTargetStack.pop();

        RenderTargetData renderTargetData = sRenderTargetStack.top();
        deviceContext->OMSetRenderTargets(renderTargetData.ViewCount, renderTargetData.RenderTargetViews, renderTargetData.DepthStencilView);
        deviceContext->RSSetViewports(1, &renderTargetData.Viewport);
    }
}
注意:原书中RenderTarget::End函数有问题,从stack中弹出之前的RenderTargets和Viewports之后,需要判断stack是否为空,如果为空则通过Game对象重置RenderTargets和Viewports,代码修改如下:
void RenderTarget::End(Game* game)
{
	sRenderTargetStack.pop();

	if (sRenderTargetStack.empty())
	{
		game->ResetRenderTargets();
		game->ResetViewports();
	}
	else
	{
		ID3D11DeviceContext* deviceContext = game->Direct3DDeviceContext();
		RenderTargetData renderTargetData = sRenderTargetStack.top();
		deviceContext->OMSetRenderTargets(renderTargetData.ViewCount, renderTargetData.RenderTargetViews, renderTargetData.DepthStencilView);
		deviceContext->RSSetViewports(1, &renderTargetData.Viewport);
	}
}
介绍完了RenderTarget基类之后,需要修改Game类为该基类的一个派生类。在本书的配套网站上提供了修改后的Game类代码。
DepthMap类的使用方法非常简单:只需要把depth map绑定到output-merger阶段,并以projector的投影方向渲染场景(或者场景的一部分)。代码如下:
mDepthMap->Begin();

ID3D11DeviceContext* direct3DDeviceContext = mGame->Direct3DDeviceContext();
direct3DDeviceContext->IASetPrimitiveTopology(D3D11_PRIMITIVE_TOPOLOGY_TRIANGLELIST);

direct3DDeviceContext->ClearDepthStencilView(mDepthMap->DepthStencilView(), D3D11_CLEAR_DEPTH | D3D11_CLEAR_STENCIL, 1.0f, 0);
Pass* pass = mDepthMapMaterial->CurrentTechnique()->Passes().at(0);
ID3D11InputLayout* inputLayout = mDepthMapMaterial->InputLayouts().at(pass);
direct3DDeviceContext->IASetInputLayout(inputLayout);

UINT stride = mDepthMapMaterial->VertexSize();
UINT offset = 0;
direct3DDeviceContext->IASetVertexBuffers(0, 1, &mModelPositionVertexBuffer, &stride, &offset);
direct3DDeviceContext->IASetIndexBuffer(mModelIndexBuffer, DXGI_FORMAT_R32_UINT, 0);

XMMATRIX modelWorldMatrix = XMLoadFloat4x4(&mModelWorldMatrix);
mDepthMapMaterial->WorldLightViewProjection() << modelWorldMatrix * mProjector->ViewMatrix() * mProjector->ProjectionMatrix();

pass->Apply(0, direct3DDeviceContext);

direct3DDeviceContext->DrawIndexed(mModelIndexCount, 0, 0);

mDepthMap->End();
在该段代码中引用了DepthMaterial类对象,用于支持列表19.6所示的DepthMap.fx shader。
列表19.6 The DepthMap.fx Shader
cbuffer CBufferPerObject
{
    float4x4 WorldLightViewProjection;
}

float4 create_depthmap_vertex_shader(float4 ObjectPosition : POSITION) : SV_Position
{
    return mul(ObjectPosition, WorldLightViewProjection);
}

technique11 create_depthmap
{
    pass p0
    {
        SetVertexShader(CompileShader(vs_5_0, create_depthmap_vertex_shader()));
        SetGeometryShader(NULL);
        SetPixelShader(NULL);
    }
}
在DepthMap.fx shader effect中只包含一个变量WorldLightViewProjection,并且在vertex shader的输入参数中只有一个ObjectPosition变量。另外注意下在create_depthmap technique中是如何把pixel shader设为NULL。
A Projective Texture-Mapping Shader with Occlusion Testing
完成了depth map的创建之后,现在就可以修改projective texture mapping使其支持occlusion testing。列表19.7列出了修改后的shader代码,为了简洁只列出了部分代码。列表19.7 An Updated Projective Texture-Mapping Shader with Occlusion Testing
#include "include\\Common.fxh"

/************* Resources *************/
static const float4 ColorWhite = { 1, 1, 1, 1 };

cbuffer CBufferPerFrame
{
    float4 AmbientColor = { 1.0f, 1.0f, 1.0f, 0.0f };
    float4 LightColor = { 1.0f, 1.0f, 1.0f, 1.0f };
    float3 LightPosition = { 0.0f, 0.0f, 0.0f };
    float LightRadius = 10.0f;
    float3 CameraPosition;
    float DepthBias = 0.005;
}

cbuffer CBufferPerObject
{
    float4x4 WorldViewProjection : WORLDVIEWPROJECTION;
    float4x4 World : WORLD;
    float4 SpecularColor : SPECULAR = { 1.0f, 1.0f, 1.0f, 1.0f };
    float SpecularPower : SPECULARPOWER  = 25.0f;

    float4x4 ProjectiveTextureMatrix;
}

Texture2D ColorTexture;
Texture2D ProjectedTexture;
Texture2D DepthMap;

SamplerState DepthMapSampler
{
    Filter = MIN_MAG_MIP_POINT;
    AddressU = BORDER;
    AddressV = BORDER;
    BorderColor = ColorWhite;
};

/************* Pixel Shaders *************/

float4 project_texture_w_depthmap_pixel_shader(VS_OUTPUT IN) : SV_Target
{
    float4 OUT = (float4)0;

    float3 lightDirection = LightPosition - IN.WorldPosition;
    lightDirection = normalize(lightDirection);

    float3 viewDirection = normalize(CameraPosition - IN.WorldPosition);

    float3 normal = normalize(IN.Normal);
    float n_dot_l = dot(normal, lightDirection);
    float3 halfVector = normalize(lightDirection + viewDirection);
    float n_dot_h = dot(normal, halfVector);

    float4 color = ColorTexture.Sample(ColorSampler, IN.TextureCoordinate);
    float4 lightCoefficients = lit(n_dot_l, n_dot_h, SpecularPower);

    float3 ambient = get_vector_color_contribution(AmbientColor, color.rgb);
    float3 diffuse = get_vector_color_contribution(LightColor, lightCoefficients.y * color.rgb) * IN.Attenuation;
    float3 specular = get_scalar_color_contribution(SpecularColor, min(lightCoefficients.z, color.w)) * IN.Attenuation;

    OUT.rgb = ambient + diffuse + specular;
    OUT.a = 1.0f;

    if (IN.ProjectedTextureCoordinate.w >= 0.0f)
    {
        IN.ProjectedTextureCoordinate.xyz /= IN.ProjectedTextureCoordinate.w;
        float pixelDepth = IN.ProjectedTextureCoordinate.z;
        float sampledDepth = DepthMap.Sample(DepthMapSampler, IN.ProjectedTextureCoordinate.xy).x + DepthBias;

        float3 projectedColor = (pixelDepth > sampledDepth ? ColorWhite.rgb : ProjectedTexture.Sample(ProjectedTextureSampler, IN.ProjectedTextureCoordinate.xy).rgb);
        OUT.rgb *= projectedColor;
    }

    return OUT;
}

/************* Techniques *************/

technique11 project_texture_w_depthmap
{
    pass p0
    {
        SetVertexShader(CompileShader(vs_5_0, project_texture_vertex_shader()));
        SetGeometryShader(NULL);
        SetPixelShader(CompileShader(ps_5_0, project_texture_w_depthmap_pixel_shader()));

        SetRasterizerState(BackFaceCulling);
    }
}
修改后的Projective Texture-Mapping Shader中包含了变量DepthMap和DepathBias(稍后会讲到),以及DepathMapSampler。与之前的projected texture(其中使用了trilinear filtering用于减少渲染残影)不同的是,在depth map sampler中使用point filtering计算与纹理坐标UV距离最近的值。其中depth map中每一个纹理值表示场景中一个具体的位置。尽管可以采样多个深度值,并通过插值计算哪些会遮挡一个object哪些不会(在下一节将会处理不遮挡的情况),但是不能对depth本身进行插值。
在pixel shader中,对输入参数的成员变量ProjectedTextureCoordinate中x,y和z分量都执行了homogeneous divide运算。其中z分量值表示要渲染的object到projector投影点的pixel深度。然后把该深度值(pixel shader)与从depth map中采样得到的深度值(sampled shader)进行比较,以此确定是否需要把projected texture应用于计算最终的颜色值。如果pixel depth大于sampled depth,就表示有一个object挡住了projector对该pixel的投影。另外使用了一个DepthBias变量用于修改sampled depth值。这是用于解决在实现shadow mapping时遇到的第一个问题: shadow acne。图19.6显示了shadow mapping时shadow acne现象,其中DepthBias变量设为0。(在图19.6的左下角还显示了所使用的depth map)
图19.6 Output of the projective texture mapping shader, using a depth map and no depth bias.
Shadow acen是self-shadowing的一种错误,是由于shadow map有限的分辨率和量化的深度值导致的。当把实际的depth与smapled depth进行比较时,会产生各种不同的结果。因此,一些pixels depth值表示会收到投影纹理,一些表示会被遮挡。此外,浮点数精度误差也会导致产生shadow acne。一种简单的方法是使用某个固定值对深度值进行补偿。或者是使用一个slope-scaled depth biasing(根据斜率动态调整的深度偏差值),而不是使用一个固定的深度偏差值,在讨论shadow mapping时将会讲述slope-scaled depth biasing技术。


 1174
1174

 被折叠的 条评论
为什么被折叠?
被折叠的 条评论
为什么被折叠?
 到【灌水乐园】发言


