


目录
Node & Software & Docker Images Lists
Node & Software & Docker Images Lists
| HOSTNAME | IP | NODE TYPE | CONFIG |
| master1 | 192.168.1.100 | master | 4vCPU8G |
| Software Name | Version |
| kubeadm | v1.26.0 |
| kubectl | v1.26.0 |
| kubelet | v1.26.0 |
| cri-containerd-cni | 1.6.14 |
| centos | 7.9 |
| Image Type | Version |
| k8s | registry.aliyuncs.com/google_containers/coredns:v1.9.3 registry.aliyuncs.com/google_containers/etcd:3.5.6-0 registry.aliyuncs.com/google_containers/kube-apiserver:v1.26.0 registry.aliyuncs.com/google_containers/kube-controller-manager:v1.26.0 registry.aliyuncs.com/google_containers/kube-proxy:v1.26.0 registry.aliyuncs.com/google_containers/kube-scheduler:v1.26.0 registry.aliyuncs.com/google_containers/pause:3.9 |
| calico | docker.io/calico/apiserver:v3.24.5 docker.io/calico/cni:v3.24.5 docker.io/calico/kube-controllers:v3.24.5 docker.io/calico/node:v3.24.5 docker.io/calico/pod2daemon-flexvol:v3.24.5 docker.io/calico/typha:v3.24.5 quay.io/tigera/operator:v1.28.5 |
| redis | docker.io/library/redis:6.2.3-alpine |
| dashbord | docker.io/kubernetesui/dashboard:v2.7.1 |
| python | docker.io/library/python:3.11.3 |
Prerequisites
Before we begin, there are a few things that you will need to make sure you have installed:
- Kubernetes Cluster
- Containerd
If you haven't installed,you could refer to this guide: Install Kubernetes 1.26 on Centos 7.9(Contianerd as CRI )_JJH的创世纪的博客-CSDN博客
Architecture
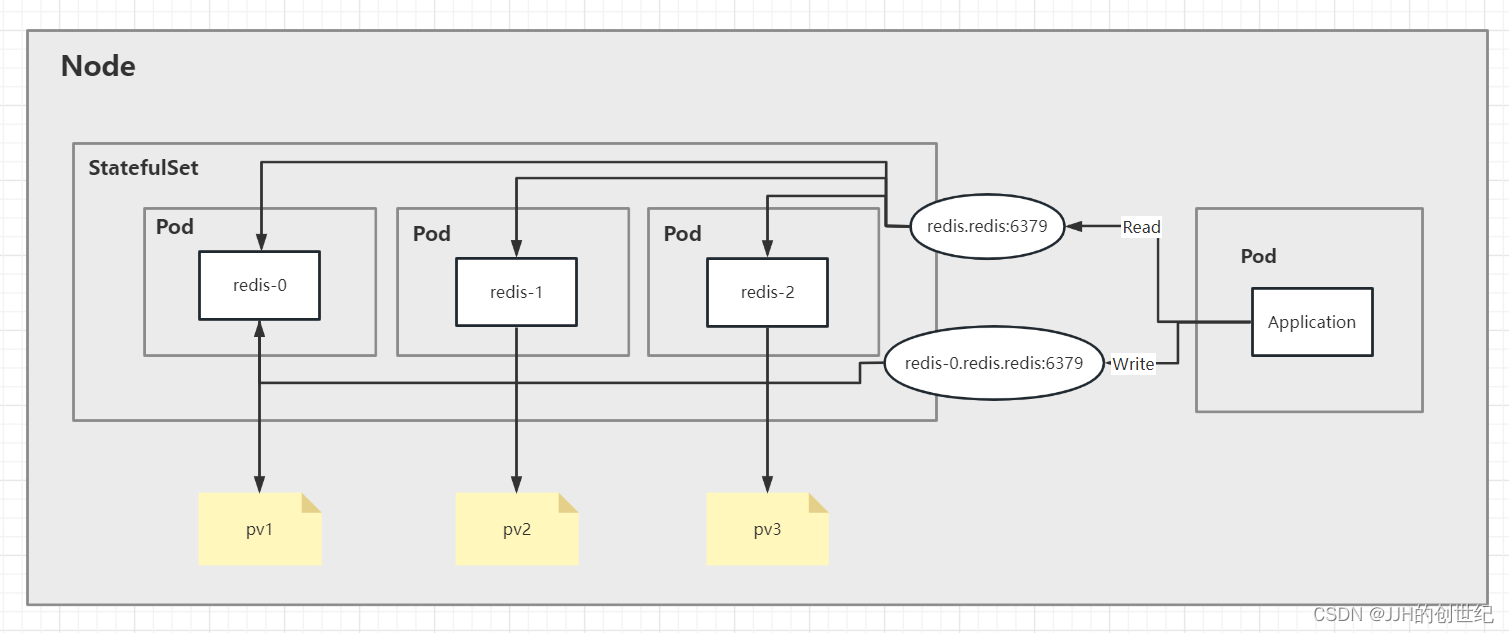
This article explores how to set up a Redis cluster (1 Master- 2 Slave) on Kubernetes and the architecture shown in the diagram below. We set StatefulSet as manager and run 3 redis-pods instances, create 1 Storageclass and 3 PVs, and a headless service exposed to other intranet pods that here is application-pod.
Setting up your Redis cluster
Before you go much further, you should have a Kubernetes cluster up and running. This article makes use of Redis version 6. Follow the step-by-step instructions here, and your Redis cluster will be ready without any trouble.
You can download all files here.kubernetes-redis/redis-cluster-1master-2slave at main · ck784101777/kubernetes-redis · GitHub
Creating Namespace
Create a namespace for a Redis server setup:
kubectl create namespace redis
Then you can check it.
kubectl get pods -n redisCreating StorageClass
A storage class links to a provisioner, which is a plugin that can reserve disk space or purchase volumes to your cloud provider on your behalf. In this guide we uses persistent volume for the purposes of the demo with local storage (a file system folder).
Create a storage class, which points to the local storage, using the following manifest code:
kubectl apply -f storageclass.yamlapiVersion: storage.k8s.io/v1
kind: StorageClass
metadata:
name: local-storage
provisioner: kubernetes.io/no-provisioner
volumeBindingMode: WaitForFirstConsumer
allowVolumeExpansion: true
reclaimPolicy: DeleteThen you can check it.(By the way,Storageclass as a kind of resources has no concept of namespace)
kubectl get storageclassCreating Persistent volumes
Persistent volumes (PVs) are used to create a storage size. In this demo, you will create a Redis cluster with three pods (one master and two slaves). Therefore, create three PVs.
The following code creates three PVs using the local storage provisioner:
kubectl apply -f pv.yamlapiVersion: v1
kind: PersistentVolume
metadata:
name: redis-pv1
spec:
storageClassName: redis-storage
capacity:
storage: 1Gi
accessModes:
- ReadWriteOnce
hostPath:
path: "/storage/data1"
---
apiVersion: v1
kind: PersistentVolume
metadata:
name: redis-pv2
spec:
storageClassName: redis-storage
capacity:
storage: 1Gi
accessModes:
- ReadWriteOnce
hostPath:
path: "/storage/data2"
---
apiVersion: v1
kind: PersistentVolume
metadata:
name: redis-pv3
spec:
storageClassName: redis-storage
capacity:
storage: 1Gi
accessModes:
- ReadWriteOnce
hostPath:
path: "/storage/data3"
kubectl get pv
NAME        CAPACITY   ACCESS MODES   RECLAIM POLICY   STATUS   CLAIM                STORAGECLASS    REASON   AGE
local-pv1   1Gi        RWO            Retain           Bound    redis/data-redis-0   local-storage            16h
local-pv2   1Gi        RWO            Retain           Bound    redis/data-redis-1   local-storage            16h
local-pv3   2Gi        RWO            Retain           Bound    redis/data-redis-2   local-storage            16h
Creating ConfigMap
The ConfigMap in the Kubernetes cluster is a key-value store. You can use the config information of Redis in the Kubernetes cluster as a ConfigMap. Get the full code of the ConfigMap manifest here redis-config.yaml. Download this file and save to your loacl system.
One thing important is to change the password of master and slave with your desired password, which is needed for authentication.
kubectl apply -n redis -f config.yamlCreating StatefulSet
StatefulSet is the workload API object used to manage stateful applications such as Mysql、Oracle、Redis.
The StatefulSet offers ordered pod names starting from zero and recreates the pod with the same name whenever the pod dies or crashes. A pod can fail at any time. The persistent pod identifier uses this feature (recreating the pod with the same name) to match existing persistent volume (storage volume attached to the failed pod) to the newly created pod.
Create redis-statefulset.yaml which define a initContenter and run a series of shell commands.These commands aim at make a election strategy when master-pod down and following below diagram.
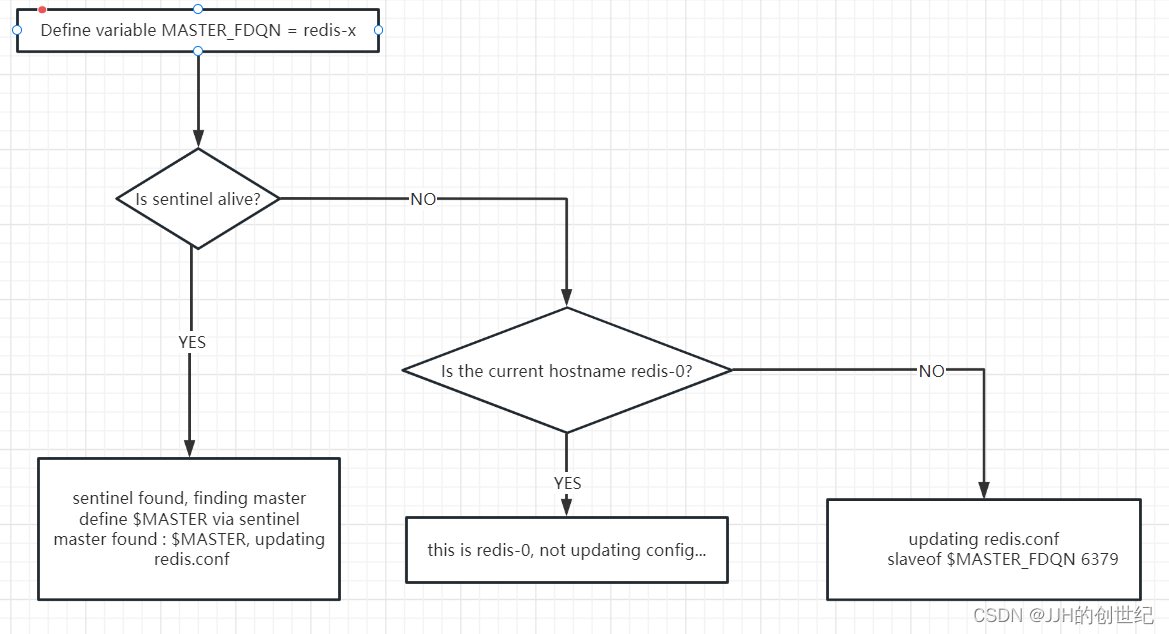
Node The command of `redis slaveof` can turn the current server into a slave server of the specified server. The format is `slaveof hostip port`
apiVersion: apps/v1
kind: StatefulSet
metadata:
  name: redis
spec:
  serviceName: redis
  replicas: 3
  selector:
    matchLabels:
      app: redis
  template:
    metadata:
      labels:
        app: redis
    spec:
      initContainers:
      - name: config
        image: redis:6.2.3-alpine
        command: [ "sh", "-c" ]
        args:
          - |
            cp /tmp/redis/redis.conf /etc/redis/redis.conf

            echo "finding master..."
            MASTER_FDQN=`hostname  -f | sed -e 's/redis-[0-9]\./redis-0./'`
            if [ "$(redis-cli -h sentinel -p 5000 ping)" != "PONG" ]; then
              echo "master not found, defaulting to redis-0"

              if [ "$(hostname)" == "redis-0" ]; then
                echo "this is redis-0, not updating config..."
              else
                echo "updating redis.conf..."
                echo "slaveof $MASTER_FDQN 6379" >> /etc/redis/redis.conf
              fi
            else
              echo "sentinel found, finding master"
              MASTER="$(redis-cli -h sentinel -p 5000 sentinel get-master-addr-by-name mymaster | grep -E '(^redis-\d{1,})|([0-9]{1,3}\.[0-9]{1,3}\.[0-9]{1,3}\.[0-9]{1,3})')"
              echo "master found : $MASTER, updating redis.conf"
              echo "slaveof $MASTER 6379" >> /etc/redis/redis.conf
            fi
        volumeMounts:
        - name: redis-config
          mountPath: /etc/redis/
        - name: config
          mountPath: /tmp/redis/
      containers:
      - name: redis
        image: redis:6.2.3-alpine
        command: ["redis-server"]
        args: ["/etc/redis/redis.conf"]
        ports:
        - containerPort: 6379
          name: redis
        volumeMounts:
        - name: data
          mountPath: /data
        - name: redis-config
          mountPath: /etc/redis/
      volumes:
      - name: redis-config
        emptyDir: {}
      - name: config
        configMap:
          name: redis-config
  volumeClaimTemplates:
  - metadata:
      name: data
    spec:
      accessModes: [ "ReadWriteOnce" ]
      storageClassName: "redis-storage"
      resources:
        requests:
          storage: 500Mi
kubectl apply -n redis -f redis-statefulset.yamlkubectl get pods -n redis
NAME READY STATUS RESTARTS AGE
redis-0 1/1 Running 1 (12m ago) 15h
redis-1 1/1 Running 1 (12m ago) 15h
redis-2 1/1 Running 0 23sThen you can use `kubectl logs` to find how the election strategy run.As you can see,the "redis-0" was selected to Master,and "redis-1","redis-2" were selected to Slave.
[root@master1 ~]# kubectl logs -f -nredis redis-0 -c config
finding master...
Could not connect to Redis at sentinel:5000: Try again
master not found, defaulting to redis-0
this is redis-0, not updating config...
[root@master1 ~]# kubectl logs -f -nredis redis-1 -c config
finding master...
Could not connect to Redis at sentinel:5000: Try again
master not found, defaulting to redis-0
updating redis.conf...
[root@master1 ~]# kubectl logs -f -nredis redis-2 -c config
finding master...
Could not connect to Redis at sentinel:5000: Try again
master not found, defaulting to redis-0
updating redis.conf...
Next we try to delete "redis-2" and the StatefulSet recreate a new pod named "redis-2",too.And of cause , is still be seleted to Slave.By the way,we see log of "Could not connect to Redis at sentinel:5000:".This is because we dont set a redis-sentinel,the Sentinel node is implemented through k8s’ built-in failure recovery mechanism + the script in the StatefulSet configuration content.
[root@master1 ~]# kubectl delete pod -nredis redis-2
pod "redis-2" deleted
[root@master1 ~]# kubectl get pod -nredis
NAME      READY   STATUS     RESTARTS      AGE
curl      1/1     Running    2 (12m ago)   15h
redis-0   1/1     Running    1 (12m ago)   15h
redis-1   1/1     Running    1 (12m ago)   15h
redis-2   0/1     Init:0/1   0             2s
[root@master1 ~]# kubectl logs -f -nredis redis-2 -c config
finding master...
Could not connect to Redis at sentinel:5000: Name does not resolve
master not found, defaulting to redis-0
updating redis.conf...
Creating Headless Service
Headless services are usually used in conjunction with StatefulSet. Using headless services can expose breakpoints to other applications for their access .The particularity is only internal pods can communicate with each other. Not exposed to applications outside the Kubernetes cluster
apiVersion: v1
kind: Service
metadata:
  name: redis
spec:
  clusterIP: None
  ports:
  - port: 6379
    targetPort: 6379
    name: redis
  selector:
    app: redis
kubectl apply -n redis -f redis-service.yamlkubectl get service -n redis
NAME TYPE CLUSTER-IP EXTERNAL-IP PORT(S) AGE
redis ClusterIP None <none> 6379/TCP 16hIf other pod run to access Headless Service,the can via domain name which is "redis.redis"(the full name is redis.redis.svc.cluster.local).And the single domain name of each redis-pod such as "redis-0" is "redis-0.redis.redis.svc.cluster.local".So the syntax is <pod-name>.<service-name>.<namespace-name>.svc.cluster.local
[root@master1 nginx]# kubectl run curl --image=radial/busyboxplus:curl -it
If you don't see a command prompt, try pressing enter.

[ root@curl:/ ]$ nslookup redis.redis
Server:    10.96.0.10
Address 1: 10.96.0.10 kube-dns.kube-system.svc.cluster.local

Name:      redis.redis
Address 1: 10.244.137.99 redis-0.redis.redis.svc.cluster.local
Address 2: 10.244.137.116 redis-1.redis.redis.svc.cluster.local
Address 3: 10.244.137.114 redis-2.redis.redis.svc.cluster.loca

[ root@curl:/ ]$ nslookup redis-0.redis.redis.svc.cluster.local
Server:    10.96.0.10
Address 1: 10.96.0.10 kube-dns.kube-system.svc.cluster.local

Name:      redis-0.redis.redis.svc.cluster.local
Address 1: 10.244.137.97 redis-0.redis.redis.svc.cluster.local

[ root@curl:/ ]$ nslookup redis-1.redis.redis.svc.cluster.local
Server:    10.96.0.10
Address 1: 10.96.0.10 kube-dns.kube-system.svc.cluster.local

Name:      redis-1.redis.redis.svc.cluster.local
Address 1: 10.244.137.96 redis-1.redis.redis.svc.cluster.local

[ root@curl:/ ]$ nslookup redis-2.redis.redis.svc.cluster.local
Server:    10.96.0.10
Address 1: 10.96.0.10 kube-dns.kube-system.svc.cluster.local

Name:      redis-2.redis.redis.svc.cluster.local
Address 1: 10.244.137.102 redis-2.redis.redis.svc.cluster.local
Testing Redis Cluster
Now we have created a Redis cluster with one master node and two slave nodes. Pod redis-0 will act as master node and pod redis-1 and redis-2 will act as slave nodes. You can check the log and description of redis-0.Or go inside the container to see the cluster information:
kubectl -n redis exec -it redis-0 -- sh

----
redis-cli
auth a-very-complex-password-here
info replication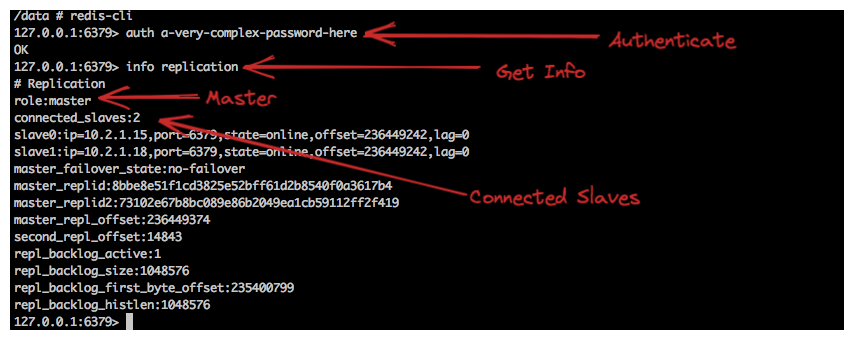
The figure above shows how many slaves the master is connected to, as well as the slave's IP address and other information.Similarly, you can check the log of the slave pod to see that the master and slave are connected successfully:
$kubectl -n redis exec -it redis-1 -- sh

---
redis-cli
auth a-very-complex-password-here
info replication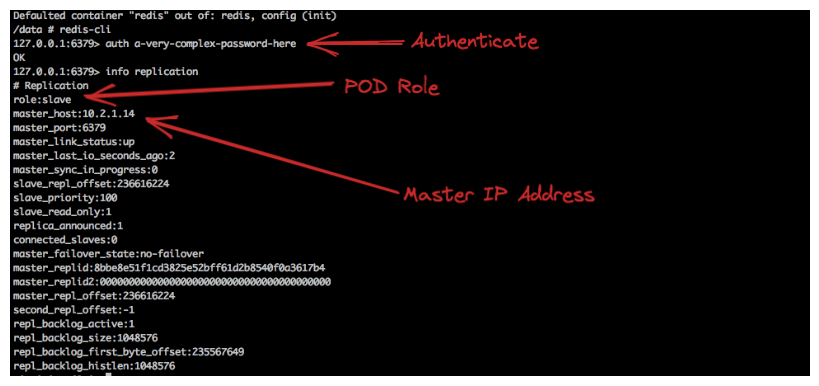
Note that you can only write data on the master pod; slave pods are only for reading. So, log into the master pod and create some key-value data. Then check to see if the same data is replicated in the slave pod.
$kubectl -n redis exec -it redis-0 -- sh

--

redis-cli
auth a-very-complex-password-here

SET name1 zhangsan
SET name1 lisi
SET name1 wangwu
$kubectl -n redis exec -it redis-1 -- sh

--

redis-cli
auth a-very-complex-password-here

keys *
Deploying Application
Now we going to Deploy a application which use python3 and import redis module.Code a simple sample to connect to redis and try read from redis cluster via "redis.redis:6379" and write to redis cluster via "0.redis.redis.svc.cluster.local:6379".(Don't forget replace your password)
import redis

wredis_url = "redis-0.redis.redis.svc.cluster.local"
rredis_url = "redis.redis"
rr = redis.Redis(host=rredis_url, port=6379, decode_responses=True,password="Your password")
wr = redis.Redis(host=wredis_url, port=6379, decode_responses=True,password="Your password")
wr.set('age', '18')
print(rr['age'])
You could run a python image and following below test:
kubectl run application --image=docker.io/library/python:3.11.3  -it /bin/bash
--
pip3 install redis

cat <<EOF > ~/test.py
import redis

wredis_url = "redis-0.redis.redis.svc.cluster.local"
rredis_url = "redis.redis"
rr = redis.Redis(host=rredis_url, port=6379, decode_responses=True,password="Your password")
wr = redis.Redis(host=wredis_url, port=6379, decode_responses=True,password="Your password")
wr.set('age', '18')
print(rr['age'])
EOF

python3 ~/test.py
[OUTPUT]
18
Review
This article configures a redis cluster with one master and two slaves. The focus is on the configuration with StatefulSet. If you have experience, you may ask, where are the sentinel nodes deployed? This is a good question. In fact, in this configuration case, the Sentinel node is implemented through k8s’ built-in failure recovery mechanism + the script in the StatefulSet configuration content. Let's review the deployment process:
- 1. Create a namespace. We don't want to expose the redis service to other applications in k8s. At the same time, creating a separate namespace helps manage resources, such as resource quotas (CPU, memory, IO)
- 2-3. Section 2-3 describes how to create a persistent volume for redis. First, define a Storageclass. Use StorageClass to dynamically create PV according to PVC. Then we created a specific PV, and the creation of a PVC is not shown here, that is, it does not declare how the PV is used. The pv-pvc matching mechanism here is implemented by volumeClaimTemplates. By defining volumeClaimTemplates in Statefulset and specifying the Storageclass of volumeClaimTemplates as the created Storageclass, the pv-pvc relationship is dynamically established
- 4. Created configMap to save redis configuration information
- 5. Create a StatefulSet stateful service, the StatefulSet controller will create pods in order (starting from -0), and create the same pod name when the pod dies or restarts, the first pod will be assumed to be the master, and the others The pods will become slaves. Therefore, for a stateful application cluster, we need an ordered pod name, otherwise the pods will not be able to identify each other. And a master-slave election mechanism is added to StatefulSet, that is, redis-0 will be the master and others will be slaves. Since the pod is stateful, even if it dies
- 6.Create a application with python3 and embed test code to check read and write to redis cluster.
In the example configuration in this article, the main pod (master) is only allowed to write data. This is because data synchronization cannot be handled if multiple pods are allowed to write data, the master pod will push the data changes to the slave pods and always stay in sync.
This approach ensures that data is replicated smoothly across all pods. The slave pods are used for data retrieval purposes only. , the first pod will be assumed to be the master, and the other pods will be slaves. Therefore, for a stateful application cluster, you need an ordered pod name.
However, Pods are assigned a random name in a Kubernetes deployment. Also, in order to match an existing persistent volume with a newly created pod, the same pod name is required whenever the pod is restarted.
A StatefulSet controller in a Kubernetes cluster will help you easily deploy stateful applications by giving each pod an ordered number starting from zero and creating the same pod name when the pod dies or restarts. The functionality provided by the StatefulSet controller is very much needed to set up a cluster environment for stateful applications.
Deploying stateful applications on a Kubernetes cluster has always been complicated. This article simplifies the complexities involved in deploying Redis Cluster.
Flaw
Finally, I want to talk about some of the flaws of this guide.
- I didn't prepare a Kubernetes cluster by 3 nodes due to insufficient resources on my computer.Because of that,I did't set node affinity for redis pod.Ideally,the master redis-pod and the slave redis-pod should be assigned to different nodes then we can avoid single point of failure.
- Regarding persistent storage, in this guide we are using local volumes as persistent storage, which is definitely a bad approach. Using local volumes as persistent storage means that pods are tied to persistent storage, and we cannot avoid data loss when a node goes down.So the better way is depart away them,using nfs,ceph or other reliable storage methoh as persistent storage and via mount to use it.So better way is to separate them, using nfs, ceph or other reliable storage method as persistent storage and use it by mounting.
- Using the method of this tutorial will creates a time vacuum.This question is about how Kubernetes check the health status of pod and how many time cost that the pod be recreate.It will spend some time to recreate a new pod when master pod died and write operations cannot be performed during this time.Let think about the traditional approach ,which we will set a sentinel check the health status of redis cluster and select a new master,and the transfer that slave to master is very fast.Unfortunately, using the architecture of this tutorial cannot solve the problem of single point of failure of the master node.
Reference documents
K8S 快速入门(十六)实战篇:StorageClass(存储类)_犬豪的博客-CSDN博客
(十七)高并发redis学习笔记:3节点哨兵搭建_redis三节点的哨兵怎么配置_秦怀的博客-CSDN博客
redis之sentinel模式_redis sentinel_九千⑦的博客-CSDN博客
Redis哨兵服务器,检测主服务器宕机_JJH的创世纪的博客-CSDN博客
Redis Enterprise for Kubernetes architecture | Redis Documentation Center
Redis-哨兵选出Master较慢_redis宕机后,哨兵不会选举新的主机_iuAlex的博客-CSDN博客


 5781
5781


 被折叠的 条评论
为什么被折叠?
被折叠的 条评论
为什么被折叠?
 到【灌水乐园】发言


