


jetpack
Jetpack is a popular WordPress plugin created by Automattic, the people behind WordPress.com. The plugin brings many of the most powerful features available on WordPress.com to self-hosted WordPress sites, and thereby contributing greatly to the improvement of WordPress powered blogs and websites.
Jetpack是由WordPress.com背后的人Automattic创建的流行WordPress插件。 该插件为自托管的WordPress网站带来了WordPress.com上许多最强大的功能,从而极大地改善了WordPress驱动的博客和网站。
In this article, I’m going to share five great features of the Jetpack plugin that you may not know about, including how to enable, configure, and use them on your WordPress site.
在本文中,我将分享您可能不知道的Jetpack插件的五个重要功能,包括如何在WordPress网站上启用,配置和使用它们。
自定义CSS (Custom CSS)
Editing the core CSS files of a WordPress theme is rarely the best approach to modifying, or customizing a WordPress theme. Mistakes can be made which damage the theme, and customizations can be lost if the theme is updated.
编辑WordPress主题的核心CSS文件很少是修改或自定义WordPress主题的最佳方法。 可能会造成破坏主题的错误,如果更新主题,定制可能会丢失。
With the Jetpack Custom CSS feature, editing, modifying, and customizing can be done without laying a single finger on the theme’s core CSS files. If mistakes are made, they can be corrected easily. Revisions can be done faster, and restoring the CSS back to default will not be a problem either!
借助Jetpack自定义CSS功能,无需单调主题的核心CSS文件就可以进行编辑,修改和自定义。 如果犯了错误,可以很容易地纠正它们。 可以更快地完成修改,将CSS恢复为默认值也不是问题!
自定义CSS功能的工作方式 (How the Custom CSS Feature Works)
By default, and on activating Jetpack, the Custom CSS module is automatically activated and can be found in the admin under, Dashboard → Appearance → Edit CSS.
默认情况下,在激活Jetpack时,“自定义CSS”模块会自动激活,并且可以在管理员的“ 仪表板”→“外观”→“编辑CSS”下找到 。
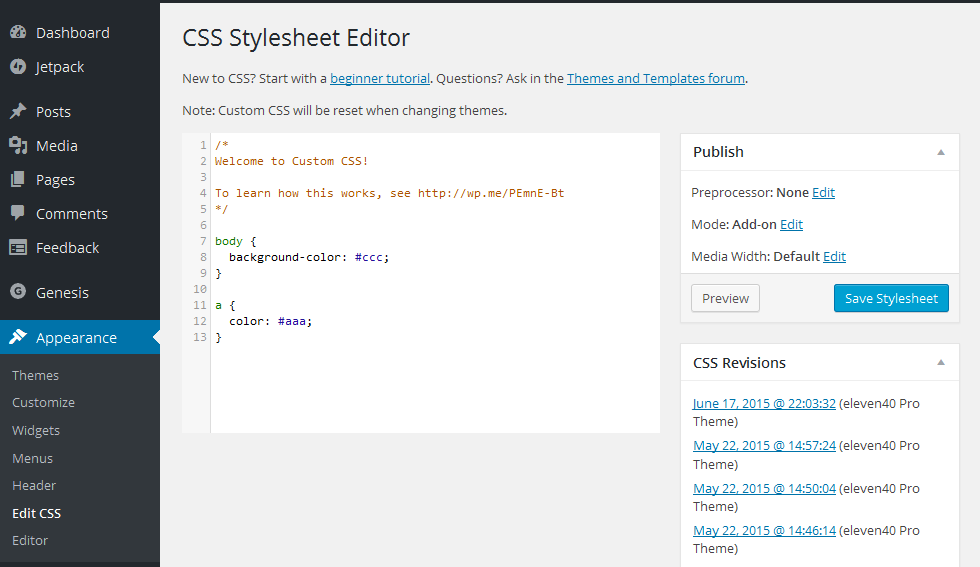
Here you can use standard CSS syntax to specify the selectors and properties to create your custom styles. For example, if you wish to change the body background color of all pages, and perhaps the color of all links, you could enter in the style editor the CSS code below and click Save Stylesheet.
在这里,您可以使用标准CSS语法来指定选择器和属性,以创建自定义样式。 例如,如果您希望更改所有页面的正文背景颜色,或者所有链接的颜色,则可以在样式编辑器中输入以下CSS代码,然后点击保存样式表 。
body {
         background-color: #ccc;}
a {
         color: #aaa;}
The revisions are located beside the CSS editor on a Desktop view. Each revision is labelled with the revision date. On opening a revision, the red highlights specify what has been removed, while the green highlights specify what has been added.
修订版位于“桌面”视图上CSS编辑器旁边。 每个修订均标有修订日期。 打开修订版本时,红色突出显示指定已删除的内容,绿色突出显示指定已添加的内容。

To restore a previous version of your custom CSS, click Restore This Revision for that date and the custom CSS will be reverted back. Just in case you need to activate the module manually: Dashboard → Jetpack → Custom CSS and Activate.
要还原自定义CSS的先前版本,请单击该日期的“还原此修订” ,然后将还原自定义CSS。 以防万一您需要手动激活模块: 仪表板→Jetpack→自定义CSS并激活。
宣传 (Publicize)
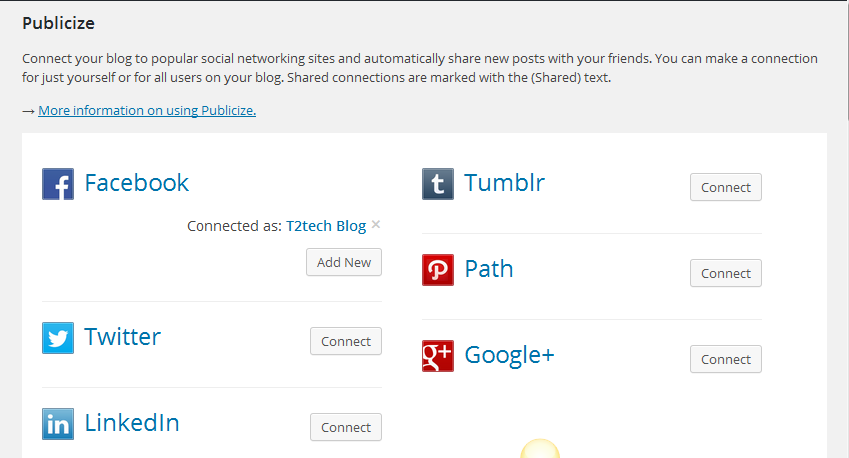
Do you find social media sharing a challenge or too time consuming? With Jetpack, you can instantly share your update across six popular platforms.
您是否发现社交媒体面临挑战或太耗时? 使用Jetpack,您可以在六个流行的平台上即时共享更新。
After connecting to the various social networks you’ll be broadcasting to, the Publicize module handles the automatic sharing of your posts on the networks you have selected.
连接到您将要广播到的各种社交网络后,“公开”模块将处理您在所选网络上的帖子的自动共享。
如何配置宣传功能 (How to Configure the Publicize Feature)
After activating the feature Dashboard → Jetpack → Settings → Publicize and Activate, you can configure the feature by navigating to the sharing settings page Dashboard → Settings → Sharing and connect your blog to the social networks you prefer.
激活功能仪表板→Jetpack→设置→公布并激活后,您可以通过导航到共享设置页面仪表板→设置→共享并将博客连接到所需的社交网络来配置功能。
相关文章 (Related Posts)
There are many related posts plugins for WordPress, many of which work well, but if you want one that will perform an accurate calculation to determine if a post is related without bogging down your database or adding extra load on your server, or you’re interested in reducing the bounce rate on your blog, then you should consider activating the Jetpack Related Posts module.
有很多与WordPress相关的帖子插件,其中许多插件都可以很好地工作,但是如果您希望一个插件可以执行准确的计算来确定某个帖子是否相关,而不会造成数据库停顿或在服务器上增加额外负载的情况,或者有兴趣降低博客跳出率的用户 ,那么您应该考虑激活Jetpack Related Posts模块。
The Related Posts module does all the necessary calculations and analysis before concluding that posts are related. All the processes are carried out on the WordPress.com servers, so there’s no extra load on your server.
“相关职位”模块会在确定相关职位之前进行所有必要的计算和分析。 所有过程都在WordPress.com服务器上执行,因此服务器上没有额外的负载。
激活相关帖子模块 (Activating the Related Posts Module)
You can activate the module by visiting the admin and selecting Dashboard → Jetpack → Settings → Related Posts and Activate. After activating, the module takes it from there, and shows the related posts below each published posts.
您可以通过访问管理员并选择仪表板→Jetpack→设置→相关帖子并激活来激活该模块。 激活后,模块从那里开始,并在每个已发布帖子下方显示相关帖子。
分享中 (Sharing)
After publishing great content, it’s a good idea to give readers the opportunity to share your content with their networks to give you added exposure.
在发布了精彩的内容之后,最好让读者有机会与他们的网络共享您的内容,从而增加您的展示机会。
The sharing module makes this easy. Content can be shared on different social networks with just a single click.
共享模块使此操作变得容易。 只需单击即可在不同的社交网络上共享内容。
共享功能的工作方式 (How the Sharing Feature Works)
The settings page for the sharing feature can be found at Dashboard → Settings → Sharing. At the time of writing, there are eleven share buttons you can drag and drop to the positions you want.
共享功能的设置页面可在仪表板→设置→共享中找到 。 在撰写本文时,共有11个共享按钮,您可以将其拖放到所需位置。
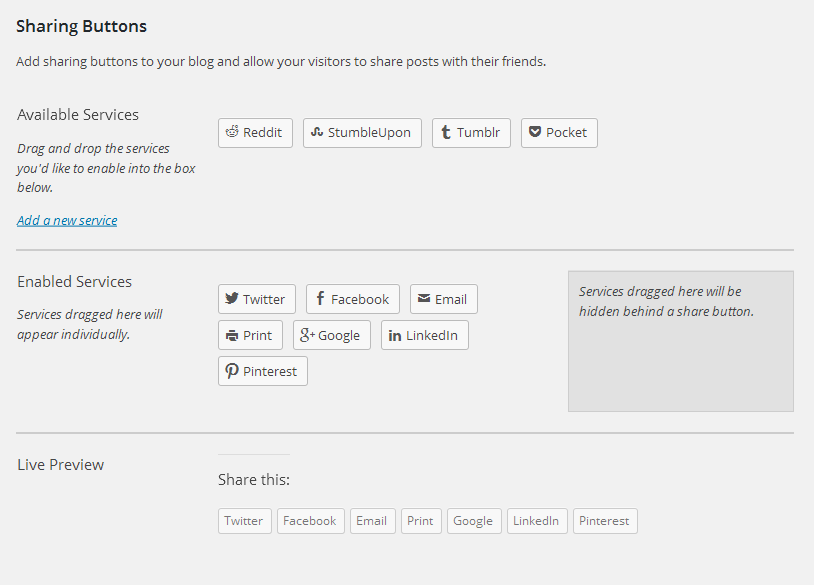
You can select how you want the buttons to be displayed: either in a text-only form, or as icons instead. The buttons can also be displayed before the content or after it, depending on which you prefer.
您可以选择希望按钮的显示方式:可以是纯文本形式,也可以是图标形式。 这些按钮也可以显示在内容之前或之后,具体取决于您的喜好。
光子 (Photon)
According to the official documentation of Jetpack plugin features: “Photon is an image acceleration and editing service for sites hosted on WordPress.com or on Jetpack-connected WordPress sites. That means less load on your host and faster images for your readers.”
根据Jetpack插件功能的官方文档 : “ Photon是针对WordPress.com或与Jetpack连接的WordPress网站上托管的网站的图像加速和编辑服务。 这意味着主机上的负载更少,读者的图像更快。”
This feature can be very beneficial. I’ve seen some sites where it’s possible to read the whole blog post before the images have even finished loading. This is where the Photon feature of Jetpack comes in handy.
此功能可能非常有益。 我见过一些站点,在这些站点甚至可以完成加载图像之前,可以阅读整个博客文章。 这是Jetpack的光子功能派上用场的地方。
光子功能如何工作 (How the Photon Feature Works)
The feature loads your post’s images through the WordPress.com CDN. It relieves your server of the extra load, and does it all through the WordPress.com servers.
该功能通过WordPress.com CDN加载帖子的图像。 它可以减轻您服务器的额外负担,并通过WordPress.com服务器完成所有工作。
You can activate the feature by visiting your WordPress admin, Dashboard → Jetpack → Settings → Photon and then Activate. You should also check this article by Jacco Blankenspoor to learn more about CDNs and why you should consider setting one up for your WordPress site.
您可以通过以下方式激活功能:访问WordPress管理员, 仪表板→Jetpack→设置→光子 ,然后激活。 您还应该查看Jacco Blankenspoor的这篇文章,以了解有关CDN的更多信息以及为什么应该考虑为WordPress网站设置一个。
结论 (Conclusion)
I’ve only given you a small taste of what Jetpack can do for your site, at the time of writing there are over 30 more great features like the ones highlighted above that come with the plugin, and only the VideoPress and VaultPress modules are premium (paid for) features.
我只是向您介绍了Jetpack可以为您的网站做些什么,在撰写本文时,该插件附带了30多种强大功能,例如上面突出显示的功能,而且只有VideoPress和VaultPress模块是高级功能(付费)功能。
Once you’ve got it installed, I’m sure you’ll agree with me that Jetpack is a feature rich plugin that will save you a lot of time. You can visit the official Jetpack plugin page here.
一旦安装完毕,我相信您会同意我的看法,Jetpack是功能丰富的插件,可以为您节省很多时间。 您可以在此处访问官方的Jetpack插件页面 。
翻译自: https://www.sitepoint.com/5-things-you-may-not-know-about-jetpack-for-wordpress/
jetpack


 968
968


 被折叠的 条评论
为什么被折叠?
被折叠的 条评论
为什么被折叠?
 到【灌水乐园】发言


