


actionscript
So you’ve learned the basics of Flash, but you still don’t understand how designers create such sophisticated Flash Websites and Interfaces. In this tutorial, I’m going to show you a simple way to create interactive animation with ActionScript.
因此,您已经了解了Flash的基础知识,但是您仍然不了解设计人员如何创建如此复杂的Flash网站和界面。 在本教程中,我将向您展示一种使用ActionScript创建交互式动画的简单方法。
In this example, ActionScript will be used to scale a basic shape, but this same procedure can be used for motion, transparency, color effects and more. I will assume you have some knowledge of basic ActionScript syntax and the basic Flash interface/tools. If you become overly confused, I would suggest you pause to read a few beginner Flash tutorials, such as Flash 101 here at SitePoint.
在此示例中,将使用ActionScript缩放基本形状,但此相同过程也可用于运动,透明度,色彩效果等。 我将假定您具有基本的ActionScript语法和基本的Flash接口/工具的知识。 如果您过于困惑,我建议您停下来阅读一些Flash入门教程,例如SitePoint上的Flash 101 。
Our project will consist of a slider bar with a handle that controls the size of a square on the stage. As we slide the handle, the square will smoothly grow or shrink.
我们的项目将包括一个带有控制舞台上正方形大小的手柄的滑块。 当我们滑动手柄时,正方形将平滑地增大或缩小。
入门 (Getting Started)
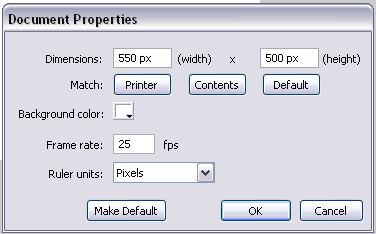
First, we need to set up our stage and create a few symbols. Open a new Flash document and set it to 550 pixels wide and 500 pixels tall. Set the frame rate to 25fps.
首先,我们需要设置阶段并创建一些符号。 打开一个新的Flash文档,并将其设置为550像素宽和500像素高。 将帧频设置为25fps。
Next, we want to create 3 simple symbols, all Movie Clips. To make each symbol, choose Insert > New Symbol. We want these symbols to be stored in the library; we’ll place them on the stage later.
接下来,我们要创建3个简单的符号,即所有影片剪辑。 要制作每个符号,请选择“插入”>“新符号”。 我们希望将这些符号存储在库中; 我们稍后将它们放置在舞台上。
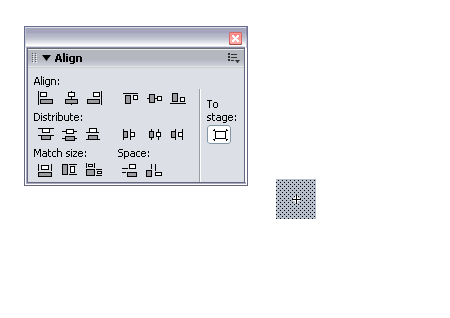
Name the first movie clip "shape", and inside it create a 10 x 10-pixel square, using the align panel to center it both vertically and horizontally. You should now have a little square with the clip’s registration point located at its center (note that square is being shown at 400% zoom in the image below).
将第一个影片剪辑命名为“ shape”,并在其内部创建一个10 x 10像素的正方形,使用对齐面板将其垂直和水平居中。 现在,您应该有一个小正方形,剪辑的注册点位于其中心(请注意,在下图中以400%缩放显示正方形)。
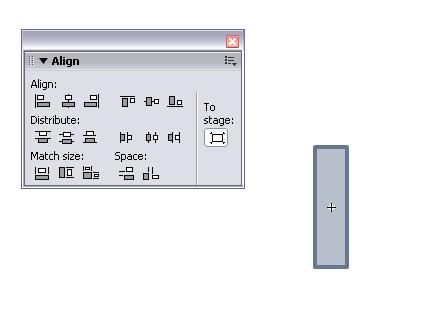
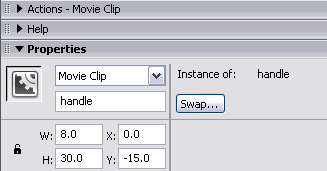
Let’s move back to the main timeline and create the symbols for the widget that will control the size of the square we just created. Create a new Movie Clip named "handle" and in it create a small rectangle 8 pixels wide and 30 pixels tall. Like the square, center this rectangle horizontally and vertically (again, the image below is shown at 400% zoom).
让我们回到主时间轴并为小部件创建符号,这些符号将控制我们刚刚创建的正方形的大小。 创建一个名为“ handle”的新影片剪辑,并在其中创建一个小矩形,宽8像素,高30像素。 像正方形一样,将此矩形水平和垂直居中(同样,下图显示为400%缩放)。
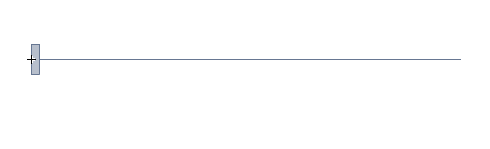
Move back to the main timeline and create the last symbol. This will serve as the track on which our handle will slide. Create a Movie Clip called "slider". Inside this clip, simply place a horizontal line 400 pixels long, using a 1 pixel stroke. Align the line so the left end is at x=0 y=0. This can be done using the Align or Property panels.
返回主时间轴并创建最后一个符号。 这将用作我们的手柄在其上滑动的轨道。 创建一个名为“ slider”的影片剪辑。 在此剪辑内,只需使用1个像素的笔触就可以放置一条长400像素的水平线。 对齐直线,使左端位于x = 0 y = 0。 可以使用“对齐”或“属性”面板来完成。

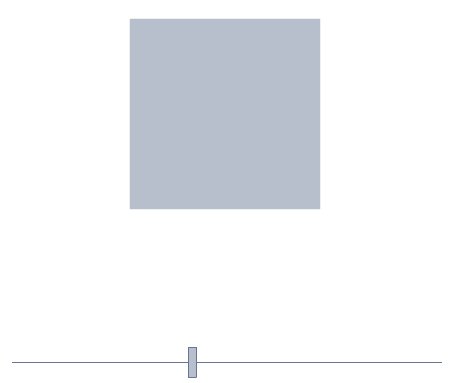
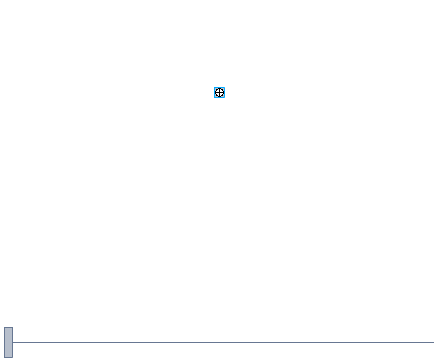
We’ve made the 3 symbols we’re going to need. Now, it’s time to combine the handle and the slider to make a working control bar. From the library panel, click back into the slider symbol we just created. Insert a new layer above the layer that contains the line you made. As pictured below, drag an instance of "handle" from the library on to the stage. Use the property panel to set the position of the handle to 0,-15 and name the instance "handle". The handle should now be positioned at the left end of the line and have the properties show below.
我们已经制作了我们需要的3个符号。 现在,是时候组合手柄和滑块以制作可操作的控制栏了。 在库面板中,单击回到我们刚刚创建的滑块符号。 在包含您创建的线条的图层上方插入一个新图层。 如下图所示,将“ handle”的实例从库中拖到舞台上。 使用属性面板将句柄的位置设置为0,-15,并将实例命名为“ handle”。 现在,手柄应位于该行的左端,其属性如下所示。
Your slider should now look like the one pictured below.
现在,您的滑块应如下图所示。
带上代码! (Bring On the Code!)
It’s time for a little ActionScript! Create a third layer above the two existing layers in your slider symbol and name it "actions". Select frame 1 of the actions layer and open the Actions (ActionSript) Panel. Copy or retype the following code into the panel for frame 1.
是时候准备一些ActionScript了! 在滑块符号的两个现有层之上创建一个第三层,并将其命名为“ actions”。 选择“动作”图层的第1帧,然后打开“动作(ActionSript)”面板。 将以下代码复制或重新输入到框架1的面板中。
handle.onPress = function(){

  this.startDrag(false,0,0,400,0);

};

handle.onRelease = function(){

  this.stopDrag()

}
This code contains two action handlers. The first handle.onPress function defines what happens when the mouse button is pressed while the cursor hovers over our handle. In this case, we want to use the Flash function startDrag(); This will allow us to drag the handle left and right. The limitations on the dragging motion are define by the numerical parameters we pass to the startDrag() function. The syntax for this function is the following: startDrag(lock, left, top, right, bottom).
此代码包含两个动作处理程序。 第一个handle.onPress函数定义当光标悬停在我们的手柄上时按下鼠标按钮时会发生什么。 在这种情况下,我们要使用Flash函数startDrag(); 这将允许我们左右拖动手柄。 拖动运动的限制由传递给startDrag()函数的数值参数定义。 该函数的语法如下: startDrag ( lock , left , top , right , bottom )。
The "lock" parameter is true or false and tells Flash if it should lock the pointer to the center of the object while dragging. In this case, we give that parameter a value of false. We are more concerned with using the numerical values to limit the motion of the slider. By examining the values passed to the drag function, you’ll see we set both top and bottom to 0, which prevents the handle from being moved vertically. We set left to 0 and right to 400, to allow the handle to slide along our predefined track. The second handle.onRelease function says that when the mouse is released, the handle will stop being dragged.
“ lock”参数为true或false并告诉Flash在拖动时是否应将指针锁定到对象的中心。 在这种情况下,我们将该参数的值设置为false 。 我们更关心使用数值来限制滑块的运动。 通过检查传递给拖动函数的值,您将看到我们将top和bottom都设置为0,这可以防止手柄垂直移动。 我们将left设置为0,将right设置为400,以允许手柄沿我们的预定义轨道滑动。 第二个handle.onRelease函数表示释放鼠标时,将不再拖动该手柄。
Moving back to the main timeline, create a layer called "control", place an instance of slider on the stage in your new layer and position it at 75, 450. If you select Control > Test Movie, you should have a working slider. It doesn’t yet control anything, but it should drag left and right as expected.
返回主时间轴,创建一个名为“ control”的层,在新层中的舞台上放置一个滑块实例,并将其放置在75、450处。如果选择“ Control”>“ Test Movie”,则应该有一个工作滑块。 它尚无任何控制,但应按预期向左和向右拖动。
Next, create another layer on the main timeline, called "shape". Drag an instance of your shape symbol onto the stage, position it at 270, 210 and name it "shape" in the property panel.
接下来,在主时间轴上创建另一个图层,称为“形状”。 将形状符号的一个实例拖到舞台上,将其放置在270、210处,并在属性面板中将其命名为“ shape”。
As for the slider clip, we now need to add some actions to the main timeline. Create a layer above the existing layers in the main timeline and call it "actions". Click on frame 1 of that layer and open the actions panel. Place the following code in frame 1.
至于滑块剪辑,我们现在需要向主时间轴添加一些操作。 在主时间轴中现有图层之上创建一个图层,并将其称为“动作”。 单击该层的第1帧,然后打开“动作”面板。 将以下代码放在框架1中。
shape.targetWidth = shape._width;

shape.targetHeight = shape._height;

shape.onEnterFrame = function() {

    var speed = 5;

    this._width += (this.targetWidth - this._width)/speed;

    this._height += (this.targetHeight - this._height)/speed;

};
The first 2 lines initialize our two variables. We create the variables targetWidth and targetHeight and set them equal to the initial height and width of our shape symbol. Note that this initialization happens only once, at the start of our movie.
前两行初始化我们的两个变量。 我们创建变量targetWidth和targetHeight ,并将它们设置为等于形状符号的初始高度和宽度。 请注意,在影片开始时,此初始化仅发生一次。
The second part of the code assigns an onEnterFrame handler to the shape. This might be new to you, but you’ll soon get to know it very well! onEnterFrame defines some action that’s executed in every frame. So, if the frame rate is 25 frames a second, the code in the onEnterFrame handler will run 25 times a second. Basically, it’s a way to achieve real-time interactivity.
代码的第二部分为该形状分配一个onEnterFrame处理函数。 这对您来说可能是新手,但是您很快就会非常了解它! onEnterFrame定义在每个帧中执行的某些操作。 因此,如果帧速率为每秒25帧,则onEnterFrame处理程序中的代码将每秒运行25次。 基本上,这是一种实现实时交互的方法。
Inside the function, we use a mathematical formula to define the change in size of our shape. Both code lines for the width and height evaluate to the same value in this example, because we’re dealing with a square and uniform scaling. This could, of course, be modified to handle all sorts of more complex actions. Since both lines do pretty much the same thing, I will examine only one of the lines of code.
在函数内部,我们使用数学公式定义形状大小的变化。 在此示例中,宽度和高度的两条代码行求值相同,因为我们正在处理正方形且均匀的缩放比例。 当然,可以对其进行修改以处理各种更复杂的操作。 由于这两行几乎都是同一件事,因此我将只检查其中一行代码。
this._height += (this.targetHeight - this._height)/speed;this._heightthis._targetHeightThis code increments the actual height of the object by a fraction of the difference between the actual and target heights. As this line is executed at every frame, the actual height will quickly approach the target height. It will also track any changes made to the value of the
targetHeightvariable and size our shape accordingly. This is the key to this entire exercise.If you are confused by the math used here, try doing it out with a pen and paper. If you write it out starting with a height of 10 and a target height of 100, you will see what happens when you execute the code again and again: the value of height will get closer and closer to the target height. Adjusting the "speed" variable will determine how fast the actual height reaches the target height.
Make it Work
We're almost done! You can test the movie again if you want. You will see your working slider at the bottom and a small square just sitting there, motionless. Why doesn't the square move? Because we have haven't told the slider to change the value of
targetHeightandtargetWidth.Double-click the instance of slider to edit that symbol again, click on frame 1 of your actions layer and re-open the actions panel. You should now be looking at the code that controls the dragging action of the slider. We want to add a little more code to this, to complete the functionality of our movie. Trade the existing code for the following code snippet.
handle.onPress = function(){

  this.startDrag(false,0,0,430,0);

};

handle.onRelease = function(){

  this.stopDrag()

}

handle.onEnterFrame = function(){

  _root.shape.targetWidth = this._x +10;

  _root.shape.targetHeight = this._x +10;

};
The first two functions remain the same, but the third is new. At this point in the lesson, this might look familiar. We are using an onEnterFrame handler to form a relationship between the position of the handle and the value of the targetWidth and targetHeight variables. We set the value of the target width and height to be the X position of the handle + 10.
前两个功能保持不变,但第三个功能是新的。 在课程的这一点上,这看起来很熟悉。 我们使用onEnterFrame处理程序在句柄的位置与targetWidth和targetHeight变量的值之间形成关系。 我们将目标宽度和高度的值设置为手柄的X位置+ 10。
As defined in our starDrag() function, the X value of handle will be between 0 and 400, so we will be able to scale our shape between 10 pixels and 410 pixels. You could remove the "+10" but then our shape could be sized down to 0, and I didn’t want to let it disappear.
如我们在starDrag()函数中定义的那样,handle的X值将在0到400之间,因此我们将能够在10像素到410像素之间缩放形状。 您可以删除“ +10”,但是我们的形状可以缩小到0,而我不想让它消失。
恭喜你! (Congratulations!)
Move back to the main timeline, click Control > test movie …and there you go! If you have followed all the steps correctly, you should now have a working movie. I hope you found this tutorial helpful in learning Flash.
返回主时间轴,单击“控制”>“测试影片”,然后就可以了! 如果正确执行了所有步骤,则现在应该可以正常播放电影了。 希望本教程对学习Flash有所帮助。
Download the full source code here.
在此处下载完整的源代码。
翻译自: https://www.sitepoint.com/actionscript-animation-flash/
actionscript


 1584
1584

 被折叠的 条评论
为什么被折叠?
被折叠的 条评论
为什么被折叠?
 到【灌水乐园】发言


