


wordpress响应慢
In the first part of this series, we covered the basics of setting up customized WordPress functions. Here’s a quick recap of the steps if you skipped ahead:
在本系列的第一部分中 ,我们介绍了设置自定义WordPress功能的基础知识。 如果您跳过了以下内容,请快速回顾一下这些步骤:
We installed the Flot for WordPress plugin
我们安装了Flot for WordPress插件
- We uploaded custom-workout.php to the plugin folder 我们将custom-workout.php上传到插件文件夹
- We told WordPress where to find the custom-workout.php file by using the include(); call 我们告诉WordPress通过使用include()在哪里可以找到custom-workout.php文件。 呼叫
Moving forward with this part, we’ll be covering these steps in three sections:
继续这一部分,我们将在三个部分中介绍这些步骤:
- Creating a blank post with a placeholder shortcode 使用占位符简码创建空白帖子
- Telling WordPress about your shortcode 告诉WordPress您的简码
- Creating a database table for collecting data 创建用于收集数据的数据库表
For some of you, this will be a very challenging tutorial to follow — the database tables are usually a serious point of fear and loathing for newbies. But, don’t sweat it. I’ll walk you through how to create a new table just for this data so that you don’t have to worry about breaking your current WordPress site. With that being said, let’s get rolling!
对于您中的某些人来说,这将是一个非常具有挑战性的教程,因为数据库表通常是新手担心和讨厌的一个严重问题。 但是,不要流汗。 我将逐步指导您如何仅为此数据创建一个新表,这样您就不必担心破坏当前的WordPress网站。 话虽这么说,让我们滚吧!
第1步:创建空白帖子 (Step 1: Create a Blank Post)
Now, one of the easiest steps of this process! Go to your “Posts” > “Add New,” and create a post called “Pushups” or whatever you’d like. In the body, only add the following code:
现在,此过程最简单的步骤之一! 转到“帖子”>“添加新内容”,然后创建一个名为“ Pushups”或任何您想要的帖子。 在正文中,仅添加以下代码:
[pushups_sc]You just added a shortcode to your post, which we will call and define later. When you click “Publish” and view the post, it will display this shortcode as the exact text “[pushups_sc]” for now. That’s to be expected.
您刚刚在帖子中添加了一个简码,稍后我们将对其进行调用和定义。 当您单击“发布”并查看帖子时,它现在将显示此短代码为确切的文本“ [pushups_sc]”。 这是意料之中的。
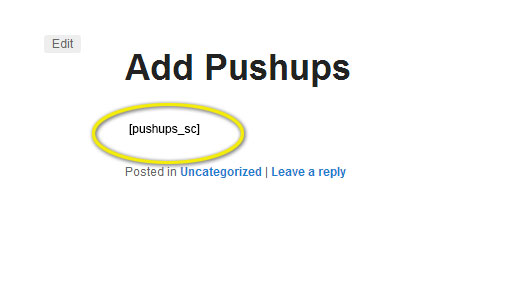
It doesn’t look like much, but this is a big step and one that will make many uncomfortable if they’ve never worked with shortcodes. Now, we’ll create the functionality for the shortcode so it actually does something.
它看起来并不多,但这是迈出的一大步,如果他们从未使用过简码,则会使许多人感到不舒服。 现在,我们将为短代码创建功能,以便其实际执行某些操作。
步骤2:建立函式和简码 (Step 2: Create a Function and Shortcode)
This step is more just an experience-gainer than anything else, but it’s important if you need to troubleshoot later. Open up that blank custom-workout.php file in the “Plugins” > “Editor” area. We’re going to create our first function and register a shortcode so you can see how this process works.
此步骤比任何其他步骤都更能获得经验,但是如果您以后需要进行故障排除,则这一点很重要。 在“插件”>“编辑器”区域中打开该空白的custom-workout.php文件。 我们将创建我们的第一个函数并注册一个短代码,以便您可以了解此过程的工作方式。
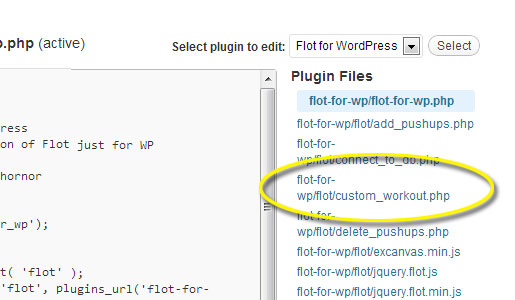
With your blank custom-workout.php file open, paste the following code:
打开空白的custom-workout.php文件,粘贴以下代码:
<?php
function pushups (){
echo ‘<h1>Pushups</h1>’;
};
add_shortcode( ‘pushups_sc’, ‘pushups’ );
?>
Save it (or upload it to your wp-content/plugins/flot-for-wp/flot folder, replacing the blank file we added earlier). Now, go and refresh the “Add Pushups” post we created. You’ll see that the “[pushups_sc]” has been replaced with the <h1>Pushups</h1> code that we put in the function!
保存(或将其上传到您的wp-content / plugins / flot-for-wp / flot文件夹,替换我们之前添加的空白文件)。 现在,去刷新我们创建的“添加俯卧撑”帖子。 您会看到“ [pushups_sc]”已替换为函数中放入的<h1> Pushups </ h1>代码!
If it still just shows the [pushups_sc] shortcode, then you’ll need to check your code and paths to the files. You might also need to disable your WP-Cache under “Settings” within your WordPress dashboard. Lastly, you may have to do a Shift + Refresh of your page.
如果仍然只显示[pushups_sc]短代码,则需要检查代码和文件路径。 您可能还需要在WordPress仪表板的“设置”下禁用WP-Cache。 最后,您可能需要对页面进行Shift +刷新。
Let me step you through what we just accomplished:
让我逐步介绍一下我们刚刚完成的工作:
- We created a function called pushups. 我们创建了一个名为pushups的函数。
Then, we added some code for this function to execute, namely to print out “Pushups” in the heading tags.
然后,我们添加了一些要执行此功能的代码,即在标题标签中打印出“ Pushups ”。
- After closing the function, we then told WordPress that we created a shortcode. The first attribute is the name of the shortcode, followed by the function that it calls. 关闭函数后,我们告诉WordPress我们创建了一个简码。 第一个属性是短代码的名称,后跟它调用的函数。
步骤3:在WordPress数据库中创建俯卧撑表 (Step 3: Create a Pushups Table in Your WordPress Database)
Log into phpMyAdmin and you’ll be staring down a screen that looks something like this:
登录phpMyAdmin,您将凝视着一个看起来像这样的屏幕:
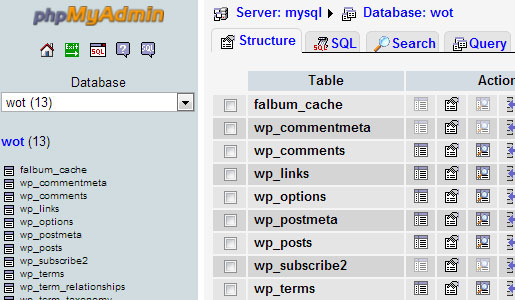
On the left, we have a list of tables in a standard WordPress installation. On the right, we have our various admin tools. I’m working with a database called WOT — which stands for workout tracker. Your database name will likely be named something different.
左侧是标准WordPress安装中的表格列表。 在右边,我们有各种管理工具。 我正在使用一个名为WOT的数据库-它代表锻炼跟踪器。 您的数据库名称可能会被命名为其他名称。
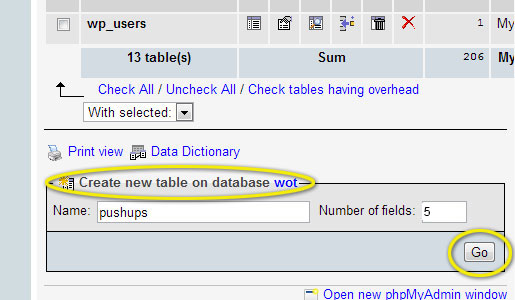
For now, I want you to scroll down to the bottom of the screen to the “Create new table…” field. For the name, use “pushups,” for the number of fields use 5, and press “Go.”
现在,我希望您向下滚动到屏幕底部的“创建新表...”字段。 对于名称,请使用“ pushups”,对于字段数请使用5,然后按“ Go”。
Now we’re ready to tell your database what kind of data to expect. Set up your five rows of data using the following names, types, length/values, and extra settings:
现在,我们准备告诉您的数据库需要什么样的数据。 使用以下名称,类型,长度/值和其他设置来设置五行数据:
| Field | Type | Length/Val | Extra | Default |
|---|---|---|---|---|
| pushups_id | INT | 10 | auto_increment | (leave blank) |
| pushups_count | INT | 3 | (leave blank) | (leave blank) |
| pushups_date | VARCHAR | 15 | (leave blank) | (leave blank) |
| pushups_wpuser | VARCHAR | 100 | (leave blank) | (leave blank) |
| active | INT | 2 | (leave blank) | 1 |
| 领域 | 类型 | 长度/ Val | 额外 | 默认 |
|---|---|---|---|---|
| pushups_id | INT | 10 | 自动递增 | (留着空白) |
| pushups_count | INT | 3 | (留着空白) | (留着空白) |
| pushups_date | VARCHAR | 15 | (留着空白) | (留着空白) |
| pushups_wpuser | VARCHAR | 100 | (留着空白) | (留着空白) |
| 活性 | INT | 2 | (留着空白) | 1个 |
Here’s a screenshot of the setup for clarity:
为了清晰起见,以下是设置的屏幕截图:
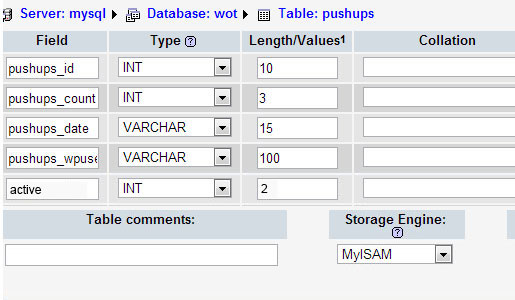
Let’s take a step back for the sake of learning. Looking at the pushups_id row as an example, we’ve told the database to expect a number (INT) with a value of up to 10 characters and to auto-increment each row. This is our unique id for each pushup score that we record. The pushups_wpuser is going to be the username of the person logged into the WordPress site — so your users will have to register for your site to make this work, but that’s a good thing!
为了学习,让我们退后一步。 以pushups_id行为例,我们告诉数据库期望一个最大为10个字符的数字(INT),并自动递增每一行。 这是我们记录的每个俯卧撑分数的唯一ID。 pushups_wpuser将成为登录WordPress网站的人员的用户名-因此,您的用户将必须注册您的网站才能进行此工作,但这是一件好事!
You can store some other unique field here, such as an email address instead. That’s fine, too. But, for this tutorial I want to teach you how to use some more advanced features than simply adding an email to a form field.
您可以在此处存储其他一些唯一字段,例如电子邮件地址。 也可以 但是,对于本教程,我想教你如何使用一些更高级的功能,而不仅仅是向表单字段添加电子邮件。
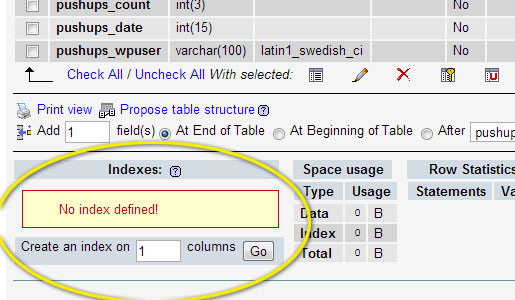
Click “Save” to add these fields, and you’re almost done with this phase.
单击“保存”以添加这些字段,到此阶段,您已经差不多完成了。
You’ll notice, hopefully, that along the bottom of the page you’ve got a little red box with some red warning text. Click the “Go” button in this area as we need to define an index real fast.
希望您会注意到,在页面底部,您会看到一个带有一些红色警告文本的红色小框。 单击该区域中的“开始”按钮,因为我们需要快速定义一个索引。
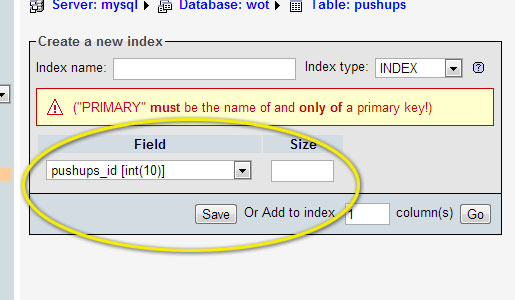
In the “Field” drop-down, select the pushups_id option and leave the size blank. Click “Save” and you’re ready to start adding data!
在“字段”下拉列表中,选择pushups_id选项,并将大小保留为空白。 点击“保存”,您就可以开始添加数据了!
(Quick point: I know the experienced database guys are going to be screaming at me for not going through a detailed list of best practices. As a matter of fact, they’re right, but the goal of this article is to get you out of your comfort zone and into the development pit. If I put too much information into one instruction set, the beginners will get overwhelmed.)
( 要点:我知道经验丰富的数据库专家会因为没有详细列出最佳实践而对我大喊大叫。事实上,它们是正确的,但是本文的目的是让您脱颖而出如果您将太多的信息放在一个指令集中,那么初学者就会不知所措。)
So, I’ve made the decision to keep this database setup simple and straightforward. As you learn more about how to set up tables and other database matters, you’ll learn a lot about the finer points of database design and maintenance. But for now, let’s move on to the more fun stuff, like using forms to add data to these new tables.
因此,我决定保持此数据库的设置简单明了。 当您了解有关如何设置表和其他数据库事务的更多信息时,您将学到很多有关数据库设计和维护的要点。 但是现在,让我们继续进行一些更有趣的工作,例如使用表单将数据添加到这些新表中。
回顾 (Recap)
Wow! We covered a lot of ground here. Between shortcodes and database tables, you’re doing some really advanced stuff in WordPress at this point. You’ve already done some of the hardest work. The rest is just building out our functionality.
哇! 我们在这里覆盖了很多领域。 在简码和数据库表之间,此时您正在WordPress中做一些非常高级的事情。 您已经完成了一些最艰巨的工作。 剩下的只是建立我们的功能。
Coming up in the next part, we’re going to create a way to start loading data into our database by giving our shortcode some functionality. You’re going to be working with your new database table, so don’t close out of phpMyAdmin just yet.
在下一部分中,我们将通过为短码提供一些功能来创建一种开始将数据加载到数据库中的方法。 您将要使用新的数据库表,因此暂时不要关闭phpMyAdmin。
Hang in there! You’re getting close!
挂在那里! 你越来越近了!
翻译自: https://www.sitepoint.com/build-responsive-real-time-graphs-in-wordpress-functions-and-data/
wordpress响应慢


 751
751

 被折叠的 条评论
为什么被折叠?
被折叠的 条评论
为什么被折叠?
 到【灌水乐园】发言


