wordpress 自定义
With the release of WordPress 3.0, a whole slew of features were introduced, including the merging of WordPress MU into the main codebase (allowing multiple sites to be managed from one WordPress installation), and the addition of custom post types. A feature that has been around for a while, but which is now extra-interesting as a result of the new custom post types, is Custom Write Panels.
随着WordPress 3.0的发布,引入了一系列功能,包括将WordPress MU合并到主要代码库中(允许从一个WordPress安装中管理多个站点),以及添加自定义帖子类型。 “ 自定义书写面板” ( Custom Write Panels)是已经存在了一段时间的功能,但是由于新的自定义帖子类型,现在变得更加有趣。

A Custom Write Panel is a box of form fields (inputs, checkboxes, radio buttons, textareas, and so on) that’s shown when you’re writing or editing a post. The fields link up to custom fields that you’ve added to posts.
“自定义书写面板”是一栏表单域(输入,复选框,单选按钮,文本区域等),当您编写或编辑帖子时会显示这些表单域。 这些字段链接到您添加到帖子中的自定义字段。
Although the Custom Field Panel displays in the Edit Post page by default, it can be tricky to use, especially when you want to enter a fair amount of data. That’s where Custom Write Panels come in: they let you create slick-looking panels that allow users to enter all the additional information you want for a post.
尽管默认情况下“自定义字段面板”显示在“编辑帖子”页面中,但使用起来很棘手,尤其是当您要输入大量数据时。 这就是“自定义书写面板”的用处:它们使您可以创建外观漂亮的面板,允许用户输入要发布的所有其他信息。
For example, let’s create a custom post type called Books. Books will have a title and description (the title and main blog content panels), but they also need some extra information in order to display properly: an author and an ISBN (a unique numeric commercial book identifier). So, in your theme’s functions.php, you need to add this code:
例如,让我们创建一个称为“书籍”的自定义帖子类型。 书籍将具有标题和描述(标题和主要博客内容面板),但它们还需要一些额外的信息才能正确显示:作者和ISBN(唯一的数字商业书籍标识符)。 因此,在主题的functions.php ,您需要添加以下代码:
add_action( 'init', 'create_book_type' );
function create_book_type() {
  register_post_type( 'books',
    array(
      'labels' => array(
        'name' => __( 'Books' ),
        'singular_name' => __( 'Book' )
      ),
      'public' => true,
    )
  );
}
What does this do?
这是做什么的?
add_action( 'init', 'create_book_type' ); tells WordPress to run our code on the init action (as soon as WordPress loads, in other words), and the register_post_type() method adds the Book post type. Now, if you view your admin dashboard, you’ll see a new Books panel in the left-hand navigation. We want to add the Custom Write Panel to this post type so, again in functions.php, we add the following code:
add_action( 'init', 'create_book_type' ); 告诉WordPress在init操作上运行我们的代码(换句话说,一旦WordPress加载), register_post_type()方法添加Book帖子类型。 现在,如果您查看管理信息中心,则在左侧导航栏中会看到一个新的“图书”面板。 我们想要将“自定义编写面板”添加到该帖子类型,因此,再次在functions.php ,添加以下代码:
//We set up a few things, like where your
//theme folder is, etc.
define(
  'MY_WORDPRESS_FOLDER',
  $_SERVER['DOCUMENT_ROOT']
);
define(
  'MY_THEME_FOLDER',
  str_replace("\",'/',dirname(__FILE__))
);
define(
  'MY_THEME_PATH',
  '/' . substr(
    MY_THEME_FOLDER,
    stripos(MY_THEME_FOLDER,'wp-content')
  )
);

//This initializes the write panel.
add_action('admin_init','book_meta_init');

function book_meta_init() {
  //This adds our CSS file,
  //so our write panels look pretty.
  wp_enqueue_style(
    'my_meta_css',
    MY_THEME_PATH . '/custom/book_panel.css'
  );

  //This method is the one that actually adds the
  //write panel, named 'Book Information' to the
  //post type 'books'
  add_meta_box(
    'book_meta',
    'Book Information',
    'book_meta',
    'books',
    'advanced',
    'high'
  );
}

// The function below links the panel
// to the custom fields
// ---------------------------------
function book_meta() {
  global $post;
  //The two variables.
  $author = get_post_meta($post->ID,'author',TRUE);
  $isbn = get_post_meta($post->ID,'isbn',TRUE);

  //Call the write panel HTML
  include(MY_THEME_FOLDER .
      '/custom/book_information.php');

  // create a custom nonce for submit
  // verification later
  echo '';
}

//The function below checks the
//authentication via the nonce, and saves
//it to the database.
function my_meta_save($post_id) {
  // authentication checks
  // make sure data came from our meta box
  if(!wp_verify_nonce(
      $_POST['my_meta_noncename',__FILE__)
  ) return $post_id;
  if (!current_user_can('edit_post', $post_id)) {
    return $post_id;
  }
  // The array of accepted fields for Books
  $accepted_fields['books'] = array(
    'author',
    'isbn'
  );
  $post_type_id = $_POST['post_type'];

  //We loop through the list of fields,
  //and save 'em!
  foreach($accepted_fields[$post_type_id] as $key){
    // Set it to a variable, so it's
    // easier to deal with.
    $custom_field = $_POST[$key];

    //If no data is entered
    if(is_null($custom_field)) {

      //delete the field. No point saving it.
      delete_post_meta($post_id, $key);

      // If it is set (there was already data),
      // and the new data isn't empty, update it.
    }
    elseif(isset($custom_field)
&& !is_null($custom_field))
    {
      // update
     update_post_meta($post_id,$key,$custom_field);

      //Just add the data.
    } else {
      // Add?
      add_post_meta($post_id, $key,
        $custom_field, TRUE);
    }
  }
  return $post_id;
}
The code comments should make the workings of this snippet fairly evident, so onto the next step: adding the HTML for the Custom Write Panel. Inside your theme folder, create a new directory called custom and add two files: a CSS file for styling the panel’s looks, and the HTML so it displays the fields properly. The CSS file should be named book_panel.css and contain this code :
代码注释应该使该代码段的工作方式显而易见,因此,下一步是:为Custom Write Panel添加HTML。 在主题文件夹内,创建一个名为custom的新目录,并添加两个文件:一个用于设置面板外观样式CSS文件,以及一个HTML,以便它正确显示字段。 CSS文件应命名为book_panel.css并包含以下代码:
.book_panel .description {
  display: none;
}

.book_panel label {
  display: block;
  font-weight: bold;
  margin: 6px;
  margin-bottom: 0;
  margin-top: 12px;
}

.book_panel label span {
  display: inline;
  font-weight: normal;
}

.book_panel span {
  color: #999;
  display: block;
}

.book_panel textarea,
.book_panel input[type='text'] {
  margin-bottom: 3px;
  width: 100%;
}

.book_panel h4 {
  color: #999;
  font-size: 1em;
  margin: 15px 6px;
  text-transform:uppercase;
}
The HTML file should be named book_information.php, and it should contain this code:
HTML文件应命名为book_information.php ,并且应包含以下代码:
<div class="book_panel">

This panel contains information
for displaying the book

  <label>Author</label>
  <!-- The php checks if there is existing
       data to pre-fill the input fields -->

  <input type="text" name="author" value="<?php
    if(!empty($author)) echo $author;
  ?>"/>

  <label>ISBN</label>
  <!-- The php checks if there is
    existing data to pre-fill the input fields -->
  <input type="text" name="isbn" value="<?php
    if(!empty($isbn)) echo $isbn;
  ?>"/>
</div>
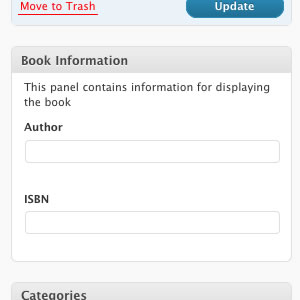
If you’ve followed the steps, when you add a Book in the Books panel, a new box of fields (containing Author and the ISBN) will display. To display these fields in your theme, call the posts via the loop and grab the custom field information:
如果执行了这些步骤,则在“书籍”面板中添加一本书时,将显示一个新的字段框(包含“作者”和ISBN)。 要在主题中显示这些字段,请通过循环调用帖子并获取自定义字段信息:
$loop = new WP_Query( array(
  'post_type' => 'books',
  'posts_per_page' => 10 )
);
while ($loop->have_posts()) : $loop->the_post();
  the_title();
  the_content();
  echo 'Author: ' .
get_post_meta($post->ID, "author", true);
  echo 'ISBN: ' .
get_post_meta($post->ID, "isbn", true);
endwhile;
That’s it: your posts will display with the custom information. If you want to learn more about WordPress, check out our latest release Build Your Own Wicked WordPress Themes. Enjoy!
就是这样:您的帖子将显示自定义信息。 如果您想了解有关WordPress的更多信息,请查看我们的最新版本Build Your Owned WordPress Themes 。 请享用!
翻译自: https://www.sitepoint.com/guide-to-wordpress-custom-write-panels/
wordpress 自定义


 1055
1055

 被折叠的 条评论
为什么被折叠?


