


arcore
In part I and part II of our ARCore blog series, we shared how you can leverage ARCore for Unity features, like motion tracking to create a Jenga AR game or light estimation to trigger object behavior. In this post, we want to share some cool ARCore for Unity experiments that show what you can do with data generated from the camera feed.
在ARCore博客系列的第一部分和第二部分中,我们分享了如何利用ARCore for Unity功能,例如运动跟踪来创建Jenga AR游戏或光线估计来触发对象行为。 在本文中,我们想分享一些很酷的ARCore for Unity实验,这些实验展示了您可以使用相机Feed生成的数据做什么。
手持设备的相机不仅用于拍摄照片和视频 (A handheld device’s camera is not just for taking photos and videos)
ARCore for Unity enhances the utility of the cameras by bringing contextual data to the user experience. To showcase some of the things you can do, we asked some of our top engineers to create some AR experiments, including a breakdown of their techniques and code snippets, so you can explore them on your own. Here are just a few things you can start testing today!
ARCore for Unity通过将上下文数据带入用户体验来增强摄像机的实用性。 为了展示您可以做的事情,我们请一些顶级工程师创建一些AR实验,包括其技术和代码片段的细分,以便您可以自己进行探索。 以下是您可以立即开始测试的几件事!
世界捕捉 (World Captures)
By Dan Miller
丹·米勒(Dan Miller)
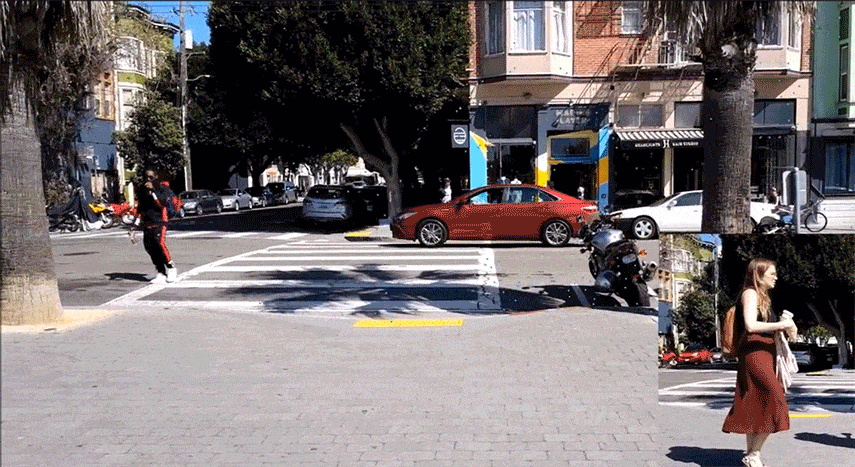
Contextual applications of AR, that is those that live and interact with the real world, are perhaps one of the most mainstream use cases. With World Captures, you can use the camera feed to capture and record a moment in time and space in order to share it in its context. Inspired by Zach Lieberman, World Captures spawns a quad in space, which uses a screenshot from the camera feed as texture.
AR的上下文应用程序(即与现实世界生活并互动的应用程序)可能是最主流的用例之一。 借助World Captures,您可以使用相机源来捕获和记录时间和空间中的某个时刻,以便在上下文中共享它。 受到Zach Lieberman的启发,World Captures在空间中生成了一个四边形,该正方形将来自摄影机提要的屏幕截图用作纹理。
To transform the camera feed to a quad texture, I used the CaptureScreenshotAsTexture API. Once the screenshot is captured, I can easily add it as a texture to a material on a quad that is spawned at the same time the user taps the screen. Notice that you need to wait until the end of the frame in order to properly give the application time to render the full screenshot to a texture.
为了将相机提要转换为四边形纹理,我使用了CaptureScreenshotAsTexture API。 捕获屏幕截图后,我可以轻松地将其作为纹理添加到四边形的材质上,该材质可以在用户点击屏幕的同时生成。 请注意,您需要等到帧的末尾才能适当地给应用程序时间将完整的屏幕截图呈现为纹理。
The code snippet below will help you experiment with World Capture with ARCore for Unity.
下面的代码段将帮助您使用ARCore for Unity体验World Capture。
|
1
2
3
4
5
6
7
8
9
|
IEnumerator CaptureScreenshot()
{
yield return new WaitForEndOfFrame();
PlaneTex = ScreenCapture.CaptureScreenshotAsTexture();
yield return new WaitForEndOfFrame();
GameObject newPlane = Instantiate(plane, spawnPoint.position, Camera.main.transform.rotation);
newPlane.GetComponent<MeshRenderer>().material.mainTexture = PlaneTex;
PlaneTex.Apply();
}
|
|
1
2
3
4
5
6
7
8
9
|
IEnumerator CaptureScreenshot ( )
{
yield return new WaitForEndOfFrame ( ) ;
PlaneTex = ScreenCapture . CaptureScreenshotAsTexture ( ) ;
yield return new WaitForEndOfFrame ( ) ;
GameObject newPlane = Instantiate ( plane , spawnPoint . position , Camera . main . transform . rotation ) ;
newPlane . GetComponent < MeshRenderer > ( ) . material . mainTexture = PlaneTex ;
PlaneTex . Apply ( ) ;
}
|
AR相机照明 (AR Camera Lighting)
by John Sietsma
由John Sietsma

Use the camera feed to provide lighting and reflections to virtual objects.
使用相机提要为虚拟对象提供照明和反射。
It’s difficult to create the illusion that virtual objects blend with the real world as if they actually exist. A key component in creating this illusion is influencing the behavior of 3D digital objects, using the real light and reflections around them.
很难创建虚拟对象与现实世界融合在一起的假象,就像它们确实存在一样。 产生这种幻觉的关键因素是利用3D数字对象周围的真实光线和反射来影响其行为。
AR Camera Lighting allows you to do that by creating a skybox based on the camera feed. You can then use the skybox in your Unity scene to add lighting to virtual objects, and use a reflection probe to create reflections from the skybox.
AR Camera Lighting可以通过基于摄像头源创建一个天空盒来实现这一点。 然后,您可以在Unity场景中使用天空盒向虚拟对象添加照明,并使用反射探针从天空盒创建反射。
Because the image captured from your camera view won’t be enough to cover a sphere, the lighting and reflections won’t be fully accurate. Still the illusion it creates is very compelling, in particular for cases in which the user is moving the camera and the model itself is moving.
由于从相机视图捕获的图像不足以覆盖一个球体,因此照明和反射将无法完全准确。 它产生的错觉仍然非常引人注目,特别是在用户移动相机而模型本身在移动的情况下。
To create the sphere, I transform the camera feed to a RenderTexture and access the texture in ARCore using a GLSL shader. You can find more thorough instructions and access all assets used in AR Camera Lighting here.
为了创建球体,我将摄影机提要转换为RenderTexture并使用GLSL着色器访问ARCore中的纹理。 您可以在此处找到更详尽的说明并访问AR Camera Lighting中使用的所有资产。
特征点颜色: (Feature Point Colors:)
by Amy DiGiovanni
通过艾米·迪乔万尼(Amy DiGiovanni)
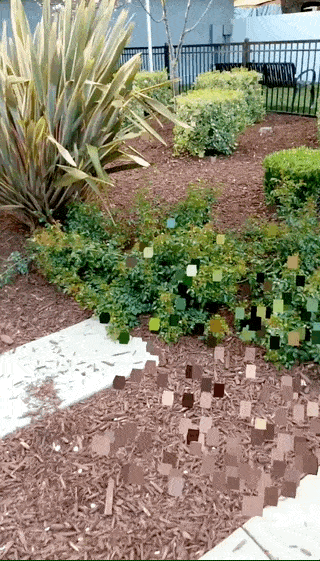
Use the camera feed to place pixelated cubes at visible feature points. Each cube is colored based on the pixelation of each feature point.
使用相机源将像素化的立方体放置在可见的特征点上。 每个立方体根据每个特征点的像素化进行着色。
Feature Point Colors showcases how you can add depth and shape, and call out distinct elements in real world objects presented in your camera view by using visual cues.
Feature Point Colors展示了如何添加深度和形状,以及如何使用视觉提示在相机视图中呈现的现实对象中调用不同的元素。
I use GoogleARCore’s TextureReader component to get the raw camera texture from the GPU, and then make a friendlier representation of the pixels from this texture. The cubes are all spawned up-front, based on a pool size, for performance, and they are activated and deactivated as needed.
我使用GoogleARCore的TextureReader组件从GPU获取原始相机纹理,然后从该纹理中更友好地表示像素。 多维数据集都是根据池大小预先生成的,以提高性能,并根据需要激活和停用它们。
|
1
2
3
4
5
6
7
8
9
10
11
12
13
14
15
16
17
18
19
20
21
22
23
24
25
26
27
28
29
30
31
32
33
34
35
36
37
38
39
40
41
42
43
44
45
46
47
48
49
50
51
|
void OnImageAvailable(TextureReaderApi.ImageFormatType format, int width, int height, IntPtr pixelBuffer, int bufferSize)
{
if (format != TextureReaderApi.ImageFormatType.ImageFormatColor)
return;
// Adjust buffer size if necessary.
if (bufferSize != m_PixelBufferSize || m_PixelByteBuffer.Length == 0)
{
m_PixelBufferSize = bufferSize;
m_PixelByteBuffer = new byte[bufferSize];
m_PixelColors = new Color[width * height];
}
// Move raw data into managed buffer.
System.Runtime.InteropServices.Marshal.Copy(pixelBuffer, m_PixelByteBuffer, 0, bufferSize);
// Interpret pixel buffer differently depending on which orientation the device is.
// We need to get pixel colors into a friendly format - an array
// laid out row by row from bottom to top, and left to right within each row.
var bufferIndex = 0;
for (var y = 0; y < height; ++y)
{
for (var x = 0; x < width; ++x)
{
int r = m_PixelByteBuffer[bufferIndex++];
int g = m_PixelByteBuffer[bufferIndex++];
int b = m_PixelByteBuffer[bufferIndex++];
int a = m_PixelByteBuffer[bufferIndex++];
var color = new Color(r / 255f, g / 255f, b / 255f, a / 255f);
int pixelIndex;
switch (Screen.orientation)
{
case ScreenOrientation.LandscapeRight:
pixelIndex = y * width + width - 1 - x;
break;
case ScreenOrientation.Portrait:
pixelIndex = (width - 1 - x) * height + height - 1 - y;
break;
case ScreenOrientation.LandscapeLeft:
pixelIndex = (height - 1 - y) * width + x;
break;
default:
pixelIndex = x * height + y;
break;
}
m_PixelColors[pixelIndex] = color;
}
}
FeaturePointCubes();
}
|
|
1
2
3
4
5
6
7
8
9
10
11
12
13
14
15
16
17
18
19
20
21
22
23
24
25
26
27
28
29
30
31
32
33
34
35
36
37
38
39
40
41
42
43
44
45
46
47
48
49
50
51
|
void OnImageAvailable ( TextureReaderApi . ImageFormatType format , int width , int height , IntPtr pixelBuffer , int bufferSize )
{
if ( format != TextureReaderApi . ImageFormatType . ImageFormatColor )
return ;
// Adjust buffer size if necessary.
if ( bufferSize != m_PixelBufferSize || m_PixelByteBuffer . Length == 0 )
{
m_PixelBufferSize = bufferSize ;
m_PixelByteBuffer = new byte [ bufferSize ] ;
m_PixelColors = new Color [ width * height ] ;
}
// Move raw data into managed buffer.
System . Runtime . InteropServices . Marshal . Copy ( pixelBuffer , m_PixelByteBuffer , 0 , bufferSize ) ;
// Interpret pixel buffer differently depending on which orientation the device is.
// We need to get pixel colors into a friendly format - an array
// laid out row by row from bottom to top, and left to right within each row.
var bufferIndex = 0 ;
for ( var y = 0 ; y < height ; ++ y )
{
for ( var x = 0 ; x < width ; ++ x )
{
int r = m_PixelByteBuffer [ bufferIndex ++ ] ;
int g = m_PixelByteBuffer [ bufferIndex ++ ] ;
int b = m_PixelByteBuffer [ bufferIndex ++ ] ;
int a = m_PixelByteBuffer [ bufferIndex ++ ] ;
var color = new Color ( r / 255f , g / 255f , b / 255f , a / 255f ) ;
int pixelIndex ;
switch ( Screen . orientation )
{
case ScreenOrientation . LandscapeRight :
pixelIndex = y * width + width - 1 - x ;
break ;
case ScreenOrientation . Portrait :
pixelIndex = ( width - 1 - x ) * height + height - 1 - y ;
break ;
case ScreenOrientation . LandscapeLeft :
pixelIndex = ( height - 1 - y ) * width + x ;
break ;
default :
pixelIndex = x * height + y ;
break ;
}
m_PixelColors [ pixelIndex ] = color ;
}
}
FeaturePointCubes ( ) ;
}
|
Once I have a friendly representation of the pixel colors, I go through all points in the ARCore point cloud (until the pool size is reached), and then I position cubes at any points that are visible in screen space. Each cube is colored based on the pixel at its feature point’s screen space position.
一旦有了像素颜色的友好表示,就可以遍历ARCore点云中的所有点(直到达到池大小),然后将多维数据集放置在屏幕空间中可见的任何点。 每个立方体根据其特征点的屏幕空间位置处的像素进行着色。
|
1
2
3
4
5
6
7
8
9
10
11
12
13
14
15
16
17
18
19
20
21
22
23
24
25
26
27
28
29
30
31
|
void FeaturePointCubes()
{
foreach (var pixelObj in m_PixelObjects)
{
pixelObj.SetActive(false);
}
var index = 0;
var pointsInViewCount = 0;
var camera = Camera.main;
var scaledScreenWidth = Screen.width / k_DimensionsInverseScale;
while (index < Frame.PointCloud.PointCount && pointsInViewCount < poolSize)
{
// If a feature point is visible, use its screen space position to get the correct color for its cube
// from our friendly-formatted array of pixel colors.
var point = Frame.PointCloud.GetPoint(index);
var screenPoint = camera.WorldToScreenPoint(point);
if (screenPoint.x >= 0 && screenPoint.x < camera.pixelWidth &&
screenPoint.y >= 0 && screenPoint.y < camera.pixelHeight)
{
var pixelObj = m_PixelObjects[pointsInViewCount];
pixelObj.SetActive(true);
pixelObj.transform.position = point;
var scaledX = (int)screenPoint.x / k_DimensionsInverseScale;
var scaledY = (int)screenPoint.y / k_DimensionsInverseScale;
m_PixelMaterials[pointsInViewCount].color = m_PixelColors[scaledY * scaledScreenWidth + scaledX];
pointsInViewCount++;
}
index++;
}
}
|
|
1
2
3
4
5
6
7
8
9
10
11
12
13
14
15
16
17
18
19
20
21
22
23
24
25
26
27
28
29
30
31
|
void FeaturePointCubes ( )
{
foreach ( var pixelObj in m_PixelObjects )
{
pixelObj . SetActive ( false ) ;
}
var index = 0 ;
var pointsInViewCount = 0 ;
var camera = Camera . main ;
var scaledScreenWidth = Screen . width / k_DimensionsInverseScale ;
while ( index < Frame . PointCloud . PointCount && pointsInViewCount < poolSize )
{
// If a feature point is visible, use its screen space position to get the correct color for its cube
// from our friendly-formatted array of pixel colors.
var point = Frame . PointCloud . GetPoint ( index ) ;
var screenPoint = camera . WorldToScreenPoint ( point ) ;
if ( screenPoint . x >= 0 && screenPoint . x < camera . pixelWidth &&
screenPoint . y >= 0 && screenPoint . y < camera . pixelHeight )
{
var pixelObj = m_PixelObjects [ pointsInViewCount ] ;
pixelObj . SetActive ( true ) ;
pixelObj . transform . position = point ;
var scaledX = ( int ) screenPoint . x / k_DimensionsInverseScale ;
var scaledY = ( int ) screenPoint . y / k_DimensionsInverseScale ;
m_PixelMaterials [ pointsInViewCount ] . color = m_PixelColors [ scaledY * scaledScreenWidth + scaledX ] ;
pointsInViewCount ++ ;
}
index ++ ;
}
}
|
Full code for the FeaturePointColors component can be found here.
可以在此处找到FeaturePointColors组件的完整代码。
索贝尔空间 (Sobel Spaces)
By Stella Cannefax
斯特拉·坎内法克斯(Stella Cannefax)
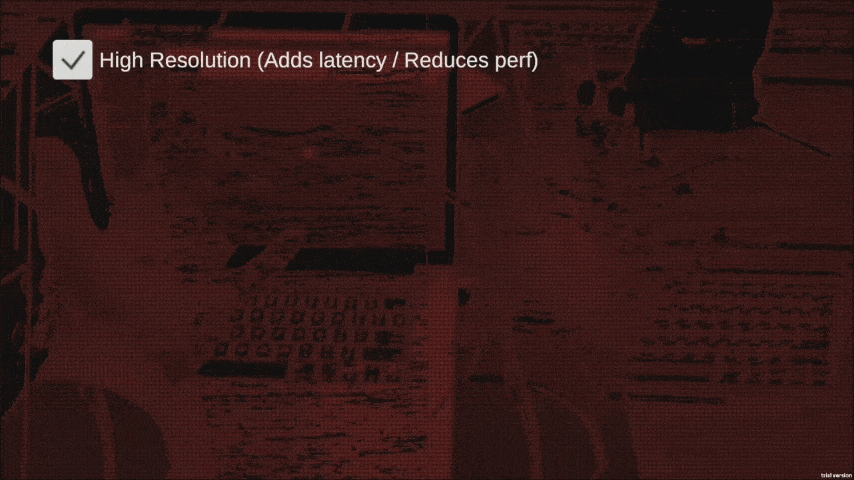
Use the camera feed to draw shapes from one side of the screen to the other creating interesting spatial effects.
使用相机提要从屏幕的一侧到另一侧绘制形状,以创建有趣的空间效果。
Sobel Spaces is an example of how you can use the camera feed to reveal new layers of information from the real world. Emphasizing edges or creating visually compelling filters that alter the viewport are just two examples of what you can do.
Sobel Spaces是一个示例,说明了如何使用相机供稿来揭示现实世界中的新信息层。 强调边缘或创建视觉上引人注目的滤镜以改变视口,这只是您可以执行的两个示例。
The experiment is based on the Sobel operator, a common method of detecting edges from the camera feed in order to produce an image with the edges emphasized. Sobel Spaces is a modified version of the ComputerVision sample from the ARCore SDK. All that’s really changed is how the Sobel filter works:
该实验基于Sobel运算符 ,该运算符是一种常见的方法,可以从相机输入中检测边缘,以生成强调边缘的图像。 Sobel Spaces是ARCore SDK中ComputerVision示例的修改版本。 真正改变的是Sobel过滤器的工作方式:
|
1
2
3
4
5
6
7
8
9
10
11
12
13
14
15
16
17
18
19
20
21
22
23
24
25
26
27
28
29
30
31
32
33
34
35
36
37
38
39
40
41
42
43
44
45
46
47
48
49
50
51
52
53
54
55
56
|
{
var halfWidth = width / 2;
// Adjust buffer size if necessary.
int bufferSize = width * height;
if (bufferSize != s_ImageBufferSize || s_ImageBuffer.Length == 0)
{
s_ImageBufferSize = bufferSize;
s_ImageBuffer = new byte[bufferSize];
}
// Move raw data into managed buffer.
System.Runtime.InteropServices.Marshal.Copy(inputImage, s_ImageBuffer, 0, bufferSize);
// Detect edges. Instead of iterating over every pixel,
// we do every other one.
for (int j = 1; j < height - 1; j += 2)
{
for (int i = 1; i < width - 1; i += 2)
{
// Offset of the pixel at [i, j] of the input image.
int offset = (j * width) + i;
byte pixel = s_ImageBuffer[offset];
// the normal sobel filter here would do
// offset - width , the halfWidth is part of how we get the offset effect
int a00 = s_ImageBuffer[offset - halfWidth - 1];
int a01 = s_ImageBuffer[offset - halfWidth];
int a02 = s_ImageBuffer[offset - halfWidth + 1];
int a10 = s_ImageBuffer[offset - 1];
int a12 = s_ImageBuffer[offset + 1];
int a20 = s_ImageBuffer[offset + halfWidth - 1];
int a21 = s_ImageBuffer[offset + halfWidth];
int a22 = s_ImageBuffer[offset + halfWidth + 1];
int xSum = -a00 - (2 * a10) - a20 + a02 + (2 * a12) + a22;
int ySum = a00 + (2 * a01) + a02 - a20 - (2 * a21) - a22;
// instead of summing the X & Y sums like a normal sobel,
// here we consider them separately, which enables a tricolor look
if ((xSum * xSum) > 128)
{
outputImage[offset] = 0x2F;
}
else if((ySum * ySum) > 128)
{
outputImage[offset] = 0xDF;
}
else
{
// the noise is just for looks - achieves a more unstable feel
byte yPerlinByte = (byte)Mathf.PerlinNoise(j, 0f);
byte color = (byte)(pixel | yPerlinByte);
outputImage[offset] = color;
}
}
}
|
|
1
2
3
4
5
6
7
8
9
10
11
12
13
14
15
16
17
18
19
20
21
22
23
24
25
26
27
28
29
30
31
32
33
34
35
36
37
38
39
40
41
42
43
44
45
46
47
48
49
50
51
52
53
54
55
56
|
{
var halfWidth = width / 2 ;
// Adjust buffer size if necessary.
int bufferSize = width * height ;
if ( bufferSize != s_ImageBufferSize || s_ImageBuffer . Length == 0 )
{
s_ImageBufferSize = bufferSize ;
s_ImageBuffer = new byte [ bufferSize ] ;
}
// Move raw data into managed buffer.
System . Runtime . InteropServices . Marshal . Copy ( inputImage , s_ImageBuffer , 0 , bufferSize ) ;
// Detect edges. Instead of iterating over every pixel,
// we do every other one.
for ( int j = 1 ; j < height - 1 ; j += 2 )
{
for ( int i = 1 ; i < width - 1 ; i += 2 )
{
// Offset of the pixel at [i, j] of the input image.
int offset = ( j * width ) + i ;
byte pixel = s_ImageBuffer [ offset ] ;
// the normal sobel filter here would do
// offset - width , the halfWidth is part of how we get the offset effect
int a00 = s_ImageBuffer [ offset - halfWidth - 1 ] ;
int a01 = s_ImageBuffer [ offset - halfWidth ] ;
int a02 = s_ImageBuffer [ offset - halfWidth + 1 ] ;
int a10 = s_ImageBuffer [ offset - 1 ] ;
int a12 = s_ImageBuffer [ offset + 1 ] ;
int a20 = s_ImageBuffer [ offset + halfWidth - 1 ] ;
int a21 = s_ImageBuffer [ offset + halfWidth ] ;
int a22 = s_ImageBuffer [ offset + halfWidth + 1 ] ;
int xSum = - a00 - ( 2 * a10 ) - a20 + a02 + ( 2 * a12 ) + a22 ;
int ySum = a00 + ( 2 * a01 ) + a02 - a20 - ( 2 * a21 ) - a22 ;
// instead of summing the X & Y sums like a normal sobel,
// here we consider them separately, which enables a tricolor look
if ( ( xSum * xSum ) > 128 )
{
outputImage [ offset ] = 0x2F ;
}
else if ( ( ySum * ySum ) > 128 )
{
outputImage [ offset ] = 0xDF ;
}
else
{
// the noise is just for looks - achieves a more unstable feel
byte yPerlinByte = ( byte ) Mathf . PerlinNoise ( j , 0f ) ;
byte color = ( byte ) ( pixel | yPerlinByte ) ;
outputImage [ offset ] = color ;
}
}
}
|
ARCore资源以及如何分享您的想法 (ARCore resources and how to share your ideas)
With significant AR utility introduced to handheld cameras, AR will continue to become mainstream practice for consumers, simply because the camera is one of the most-used features in mobile devices. We’d love to learn how you would leverage the camera feed to create engaging AR experiences on Android!
随着手持式相机中大量AR工具的推出,AR将继续成为消费者的主流实践,仅因为相机是移动设备中最常用的功能之一。 我们很想学习您如何利用相机供稿在Android上创建引人入胜的AR体验!
Share your ideas with the community and use ARCore 1.1.0 for Unity to create high-quality AR apps for more than 100 million Android devices on Google Play! Here’s how:
与社区分享您的想法,并使用ARCore 1.1.0 for Unity在Google Play上为超过1亿个Android设备创建高质量的AR应用程序! 这是如何做:
Join the Unity Connect Handheld AR channel for an opportunity to meet, chat, and learn from other community creators working on AR apps.
加入Unity Connect手持式AR频道 ,有机会与其他使用AR应用程序的社区创建者见面,聊天和学习。
在Google I / O上了解有关ARCore for Unity的更多信息 (Learn more about ARCore for Unity at Google I/O)
arcore


 2114
2114

 被折叠的 条评论
为什么被折叠?
被折叠的 条评论
为什么被折叠?
 到【灌水乐园】发言


