


密室逃脱玩家角色分配
sample assets will provide all the animations needed for controlling the character, but of course you can add you own. In this example I’ve created a
样本资产将提供控制角色所需的所有动画,但是您当然可以添加自己的动画。 在这个例子中,我创造了一个
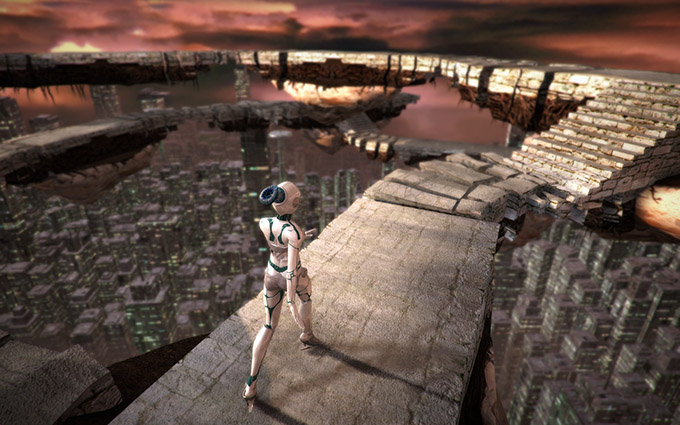
Lola3000 character inspired by Barberella, Soroyama & Metropolis amongst other influences and brought her to life, running through a tricky landscape of floating islands high above a sci-fi cityscape.
Lola3000角色,灵感来自Barberella,Soroyama和Metropolis等因素,并使她栩栩如生,穿越了科幻城市景观之上高高的浮岛的棘手景观。
遵循12个步骤 (Follow the 12 Steps)
We’ll begin with steps you can use to prepare and rig your character, before adding BlendShapes, verifying and then importing your rigged file into Unity. We’ll then set up some of the materials and shaders so that you can get your character looking it’s best. Next we will be creating an avatar to match your character rig and set it up for animation using a 3
rd person controller with the Unity sample assets. We’ll load in a custom animation and setup a blendshape layer to further customise the character. Finally we’ll add lights and fx to the environment and camera to finish the look.
 1 Preparing your Model Unity is a real-time platform, so prepare your model to look good without breaking the bank polygon wise. Name your materials and textures sensibly and use normal maps for extra detail, there are no polygon limits but the more you use, the less you have to spend on environment, FX and other characters. 5-25,000 can be a good range to aim for, depending on platform – so reduce polygons with the tools in your 3D package where necessary. Place your textures in a folder called textures within your Unity project
assets folder and re-path them before you export.
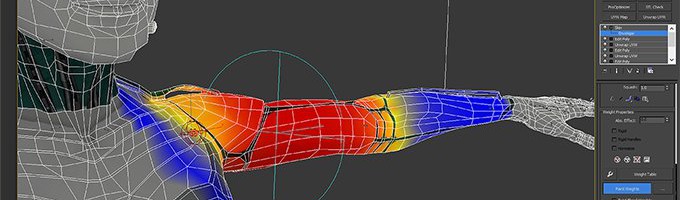
2 Rigging your character This stage will depend on your 3D package, skills and time available. Once your model is prepared in a t-pose you can either create a bone hierarchy from scratch – assigning skin weights – use your 3D package in-built tools to generate and skin to a skeleton, or use a fully automated solution like
Mixamo Autorigger. In Maya for example, use Human IK, 3DSMax has Biped/CAT along with the skin modifier and Blender provides Rigify, as a few examples to create your skeleton hierarchy and assist with skinning. See Mecanim>
preparing your own character in the documentation for more details.
1 Preparing your Model Unity is a real-time platform, so prepare your model to look good without breaking the bank polygon wise. Name your materials and textures sensibly and use normal maps for extra detail, there are no polygon limits but the more you use, the less you have to spend on environment, FX and other characters. 5-25,000 can be a good range to aim for, depending on platform – so reduce polygons with the tools in your 3D package where necessary. Place your textures in a folder called textures within your Unity project
assets folder and re-path them before you export.
2 Rigging your character This stage will depend on your 3D package, skills and time available. Once your model is prepared in a t-pose you can either create a bone hierarchy from scratch – assigning skin weights – use your 3D package in-built tools to generate and skin to a skeleton, or use a fully automated solution like
Mixamo Autorigger. In Maya for example, use Human IK, 3DSMax has Biped/CAT along with the skin modifier and Blender provides Rigify, as a few examples to create your skeleton hierarchy and assist with skinning. See Mecanim>
preparing your own character in the documentation for more details.
 3 Set up BlendShapes Unity supports BlendShapes (Morph targets) so decide which part of the character requires morphing, and set up in your package appropriately, using BlendShapes in Maya, Morpher in 3DS Max and Shape Keys in Blender for example. This is often used for phoneme shapes when animating a talking face and works by assigning morphed shapes of the same number of vertices (often a duplicate of the original) to a target so that you can blend between versions to obtain different shapes without animating a complex bone hierarchy.
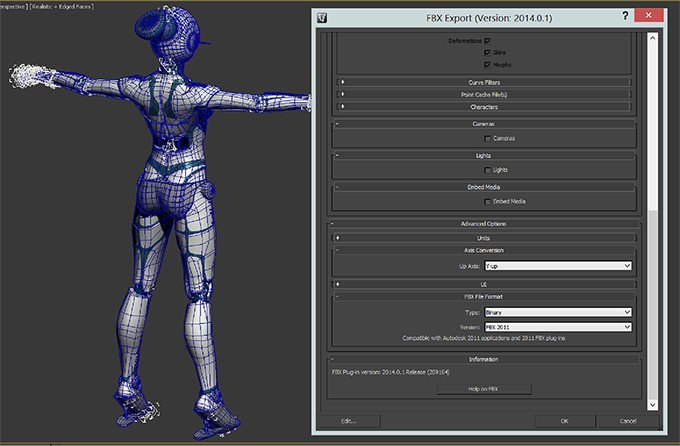
4 Verify and export This stage is important to minimize errors and troubleshooting when you set up your model later. Remove unused meshes and extraneous assets like lights or cameras from your scene, or simply use the export selected if you 3D package allows. Use the
FBX file format if you can, to allow for file portability and simplicity – if you have your own animation clips be sure to check the animation check box in the export dialogue. Re-importing your exported model into the 3D package is often a good way to verify your model before bringing it into Unity.
3 Set up BlendShapes Unity supports BlendShapes (Morph targets) so decide which part of the character requires morphing, and set up in your package appropriately, using BlendShapes in Maya, Morpher in 3DS Max and Shape Keys in Blender for example. This is often used for phoneme shapes when animating a talking face and works by assigning morphed shapes of the same number of vertices (often a duplicate of the original) to a target so that you can blend between versions to obtain different shapes without animating a complex bone hierarchy.
4 Verify and export This stage is important to minimize errors and troubleshooting when you set up your model later. Remove unused meshes and extraneous assets like lights or cameras from your scene, or simply use the export selected if you 3D package allows. Use the
FBX file format if you can, to allow for file portability and simplicity – if you have your own animation clips be sure to check the animation check box in the export dialogue. Re-importing your exported model into the 3D package is often a good way to verify your model before bringing it into Unity.
 5 Importing your model You can drag your FBX into the
Project pane, or if you exported here already your model will be picked up automatically. You can select your model in the project browser and set up the options in the inspector panel. You should probably leave most of these as default, but check the Scale Factor, as scale can vary hugely depending on units used in your 3D package and your export settings. Click apply and drag the model into the Scene. You can create a (1m) cube to make sure the scale is correct and readjust.
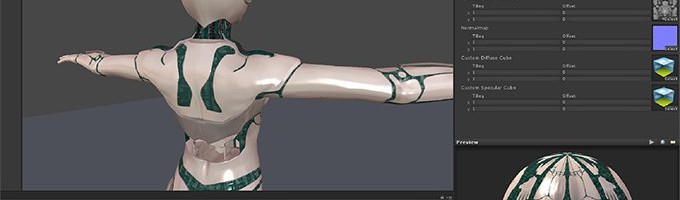
6 Setting up your materials in Unity Select your character in the scene and observe the associated material(s) in the inspector, these should have been created in
materials folder where your model is exported. Each material has a drop down for shader, choose one appropriately e.g. Bumped Specular, so that you can define a base colour (tint) specular colour and the texture maps for the diffuse (Base RGB), gloss in the alpha channel and a normal map to add surface detail. Reflective materials can also have a cubemap assigned for reflections, which you can render once in the Unity editor or realtime (pro) for dynamic reflections.
5 Importing your model You can drag your FBX into the
Project pane, or if you exported here already your model will be picked up automatically. You can select your model in the project browser and set up the options in the inspector panel. You should probably leave most of these as default, but check the Scale Factor, as scale can vary hugely depending on units used in your 3D package and your export settings. Click apply and drag the model into the Scene. You can create a (1m) cube to make sure the scale is correct and readjust.
6 Setting up your materials in Unity Select your character in the scene and observe the associated material(s) in the inspector, these should have been created in
materials folder where your model is exported. Each material has a drop down for shader, choose one appropriately e.g. Bumped Specular, so that you can define a base colour (tint) specular colour and the texture maps for the diffuse (Base RGB), gloss in the alpha channel and a normal map to add surface detail. Reflective materials can also have a cubemap assigned for reflections, which you can render once in the Unity editor or realtime (pro) for dynamic reflections.
 7 Creating an avatar Once imported your character model needs to have an avatar applied, this will map your skeleton to an avatar to use with any humanoid animation. Select the character model FBX file in your
Project pane. Select the
Rig tab and choose Humanoid for ‘Animation Type’ – click configure to create and configure. If your rig is good to go it will all be in green, otherwise assign bones to the correct slots or revisit your bone hierarchy and re-export to closer match the avatar. You can test your skinning in the Muscles tab by dragging the sliders. Click Done when finished.
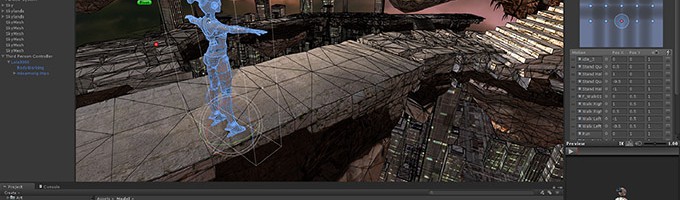
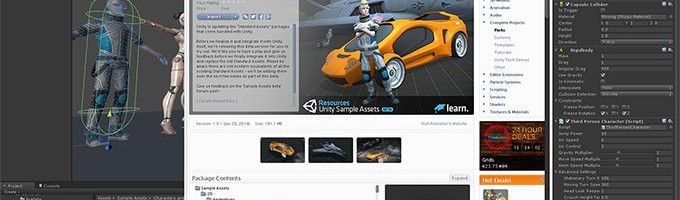
8 Adding a controller Unity
sample assets provide all you need to control your player. From the project window, drag the Third Person Character
prefab from the Sample Assets\Characters and vehicles\Third person Controller\prefabs folder into your scene. In your
Hierarchy delete the Ethan node underneath Third Person Character. Drag your character node on top of your Third Person Character node which has all scripts, parameters and the player tag already assigned. From the Cameras\Prefabs folder drag the Free Look camera rig into the scene, add and position a ‘plane’ game object and press Play!
7 Creating an avatar Once imported your character model needs to have an avatar applied, this will map your skeleton to an avatar to use with any humanoid animation. Select the character model FBX file in your
Project pane. Select the
Rig tab and choose Humanoid for ‘Animation Type’ – click configure to create and configure. If your rig is good to go it will all be in green, otherwise assign bones to the correct slots or revisit your bone hierarchy and re-export to closer match the avatar. You can test your skinning in the Muscles tab by dragging the sliders. Click Done when finished.
8 Adding a controller Unity
sample assets provide all you need to control your player. From the project window, drag the Third Person Character
prefab from the Sample Assets\Characters and vehicles\Third person Controller\prefabs folder into your scene. In your
Hierarchy delete the Ethan node underneath Third Person Character. Drag your character node on top of your Third Person Character node which has all scripts, parameters and the player tag already assigned. From the Cameras\Prefabs folder drag the Free Look camera rig into the scene, add and position a ‘plane’ game object and press Play!
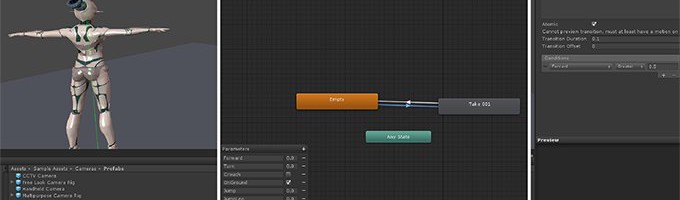
 9 Adding your animation If you have imported or acquired animation from the store, you can replace the animations from the character animator. Select your character root node, Open the
animator from the Window menu – This opens a pane that manages which state your character is in and therefore which animation to play. Double click
Grounded state to open a blend tree for when you character is on the ground. Select the blend tree and over in the inspector click the little circle next to an animation to choose another. Press play to preview then stop and make adjustments as necessary.
10 Adding BlendShapes and tweaking your character Create an animation in your source package which blends between two or more meshes, as outlined in step 3. Re-export your mesh and include animation > morphs in the FBX dialogue. In Unity create a new layer in your
animator window set blending to
additive and weight: 1, then drag in your clip from the project window, create an empty state and right click >
Make transition – and transition to and from the clip. Set a condition for this e.g. forward: greater than 0.5 for
to – and forward: Less than 0.5 for
from transition in the inspector.
9 Adding your animation If you have imported or acquired animation from the store, you can replace the animations from the character animator. Select your character root node, Open the
animator from the Window menu – This opens a pane that manages which state your character is in and therefore which animation to play. Double click
Grounded state to open a blend tree for when you character is on the ground. Select the blend tree and over in the inspector click the little circle next to an animation to choose another. Press play to preview then stop and make adjustments as necessary.
10 Adding BlendShapes and tweaking your character Create an animation in your source package which blends between two or more meshes, as outlined in step 3. Re-export your mesh and include animation > morphs in the FBX dialogue. In Unity create a new layer in your
animator window set blending to
additive and weight: 1, then drag in your clip from the project window, create an empty state and right click >
Make transition – and transition to and from the clip. Set a condition for this e.g. forward: greater than 0.5 for
to – and forward: Less than 0.5 for
from transition in the inspector.
 11 Adding environment, lights and settings To immerse yourself in the game you can planes & primitives to create a
greybox test environment to play about in, or use levels from the sample assets or asset store and of course import your own environment artwork. Any imported artwork needs to have ‘Generate Colliders’ checked and applied in the inspector, for the imported file in the project view, so that you can walk on the surface etc. Create a ‘directional light’ from the Create button at the top of the hierarchy and adjust the parameters in the inspector.
12 Adding Post FX and polish Unity pro includes a number of full screen Image FX that can help improve the look of your scene. Separate the ‘Game’ view by dragging the tab out to preview. Select the ‘Main Camera’ node under the Free Look Camera Rig. In the inspector click Add Component > Image Effects > Camera > Depth of field – for example – to retain focus on your character, but blurring the background akin to a wide aperture. You can add as many others as your eyes and frame rate can handle so try vignette, bloom, ambient occlusion, so go ahead & play!
11 Adding environment, lights and settings To immerse yourself in the game you can planes & primitives to create a
greybox test environment to play about in, or use levels from the sample assets or asset store and of course import your own environment artwork. Any imported artwork needs to have ‘Generate Colliders’ checked and applied in the inspector, for the imported file in the project view, so that you can walk on the surface etc. Create a ‘directional light’ from the Create button at the top of the hierarchy and adjust the parameters in the inspector.
12 Adding Post FX and polish Unity pro includes a number of full screen Image FX that can help improve the look of your scene. Separate the ‘Game’ view by dragging the tab out to preview. Select the ‘Main Camera’ node under the Free Look Camera Rig. In the inspector click Add Component > Image Effects > Camera > Depth of field – for example – to retain focus on your character, but blurring the background akin to a wide aperture. You can add as many others as your eyes and frame rate can handle so try vignette, bloom, ambient occlusion, so go ahead & play!


我们将在添加BlendShapes,验证然后将绑定的文件导入Unity之前,从可用于准备和绑定角色的步骤开始。 然后,我们将设置一些材质和着色器,以使您的角色看起来最好。 接下来,我们将创建一个化身来匹配您的角色装备,并使用带有Unity示例资产的
第三人称控制器将其设置为动画。 我们将加载一个自定义动画,并设置一个blendshape图层以进一步自定义角色。 最后,我们将灯光和fx添加到环境和相机中以完成外观。
1准备模型 Unity是一个实时平台,因此可以在不破坏bank多边形的情况下使模型看起来不错。 合理地命名您的材质和纹理,并使用法线贴图获取更多细节,没有多边形限制,但是使用的越多,您在环境,FX和其他角色上的花费就越少。 根据平台的不同,5-25,000可能是一个不错的目标范围-因此在必要时使用3D包装中的工具减少多边形。 将纹理放置在Unity项目
资产文件夹中名为“纹理”的文件夹中,并在导出之前重新对其进行路径设置。
2操纵角色此阶段取决于您的3D程序包,技能和可用时间。 一旦在T型姿势中准备好模型,您就可以从头开始创建骨骼层次结构-分配皮肤权重-使用3D包内置工具生成骨骼并生成骨骼皮肤,或者使用完全自动化的解决方案(例如
Mixamo Autorigger) 。 例如,在Maya中,使用人类IK,3DSMax具有Biped / CAT以及蒙皮修改器,而Blender提供了Rigify,这是创建骨骼层次结构并辅助蒙皮的一些示例。 有关更多详细信息,请参见Mecanim>在文档中
准备自己的角色 。
3设置BlendShapes Unity支持BlendShapes(变形目标),因此可以确定角色的哪一部分需要变形,并在包中进行适当设置,例如使用Maya中的BlendShapes,3DS Max中的Morpher和Blender中的Shape Keys。 在为会说话的脸设置动画时,通常用于音素形状,并通过将相同数量顶点的变形形状(通常是原始顶点的副本)分配给目标来工作,以便您可以在不同版本之间进行混合以获得不同的形状而无需为复杂的动画设置动画骨骼层次。
4验证并导出此阶段对于在以后设置模型时最大程度地减少错误和故障排除很重要。 从您的场景中删除未使用的网格物体和多余的资源(例如灯光或照相机),或者如果3D包允许的话,只需使用选择的导出。 如果可以,请使用
FBX文件格式 ,以实现文件的可移植性和简便性-如果您有自己的动画剪辑,请确保选中导出对话框中的动画复选框。 将导出的模型重新导入3D包通常是在将模型导入Unity之前验证模型的好方法。
5导入模型您可以将FBX拖动到“
项目”窗格中,或者如果已在此处导出,则将自动提取您的模型。 您可以在项目浏览器中选择模型,然后在检查器面板中设置选项。 您可能应该将其中大多数保留为默认设置,但请检查“比例因子”,因为比例会因3D包中使用的单位和导出设置而相差很大。 单击应用并将模型拖到场景中。 您可以创建一个(1m)立方体以确保比例正确并重新调整。
6在Unity中设置材料在场景中选择您的角色并在检查器中观察相关的材料,这些
材料应已在导出模型的
材料文件夹中创建。 每种材质都有一个用于着色器的下拉菜单,请适当选择一种,例如“凹凸高光”,以便您可以定义基本色(淡色)高光色和漫反射的纹理贴图(基本RGB),alpha通道中的光泽度和法线贴图。添加表面细节。 反射材质也可以分配一个用于反射的立方体贴图,您可以在Unity编辑器中渲染一次,也可以在实时(pro)中渲染动态反射。
7创建化身导入角色模型后,需要应用化身,这会将您的骨骼映射到化身以与任何类人动物动画一起使用。 在“
项目”窗格中选择角色模型FBX文件。 选择“
装备”选项卡,然后为“动画类型”选择类人动物–单击“配置”以创建和配置。 如果您的装备良好,它将全部显示为绿色,否则将骨骼分配到正确的插槽或重新访问骨骼层次结构并重新导出以更接近虚拟角色。 您可以通过拖动滑块在“肌肉”选项卡中测试外观。 完成后,单击完成。
8添加控制器 Unity
示例资产提供控制播放器所需的全部功能。 从项目窗口中,将“第三人称角色”
预制件从“示例资产” \“字符和车辆” \“第三人控制器” \“预制件”文件夹中拖到场景中。 在您的
层次结构中,删除“第三人称角色”下的“ Ethan”节点。 将您的角色节点拖到“第三人称角色”节点的顶部,该节点已分配了所有脚本,参数和玩家标签。 从Cameras \ Prefabs文件夹中,将Free Look摄像机装备拖到场景中,添加并放置一个“平面”游戏对象,然后按Play!
9添加动画如果您从商店中导入或获取了动画,则可以替换角色动画师中的动画。 选择您的角色根节点,从“窗口”菜单中打开
动画制作器 –这将打开一个窗格,该窗格管理您的角色处于哪个状态并因此播放哪个动画。 双击“
接地”状态以打开角色在地面上时的混合树。 选择混合树,然后在检查器中单击动画旁边的小圆圈以选择另一个。 按播放进行预览,然后停止并根据需要进行调整。
10添加BlendShapes并调整角色的步骤在第3步中概述的在源包中创建一个动画,该动画在两个或多个网格之间进行混合。重新导出网格,并在FBX对话框中包含animation> morphs。 在Unity中,在
动画器窗口中创建一个新图层,将混合设置为
添加剂和权重:1,然后从项目窗口中拖动剪辑,创建一个空状态,然后右键单击>进行
过渡 –并往返于剪辑。 为此设置一个条件,例如:向前:大于-
到 -和向前:大于0.5,以便
从检查器中的过渡开始。
11添加环境,灯光和设置要沉浸在游戏中,您可以使用平面和图元创建一个
灰盒测试环境以在其中玩耍,或使用示例资产或资产存储中的级别,当然还要导入您自己的环境图稿。 对于任何导入的艺术品,都需要在检查器中检查并应用“ Generate Colliders”(生成碰撞体),以在项目视图中导入文件,以便您可以在表面上行走等。从顶部的“创建”按钮创建“方向灯”层次结构并在检查器中调整参数。
12添加Post FX并进行润饰 Unity Pro包含许多全屏Image FX,可以帮助改善场景的外观。 通过将选项卡拖出进行预览来分离“游戏”视图。 选择“自由外观摄像头装备”下的“主摄像头”节点。 在检查器中,单击“添加组件”>“图像效果”>“相机”>“景深”,例如,以使焦点保持在角色上,但使背景模糊,类似于大光圈。 您可以添加其他视线和帧速率可以处理的其他内容,因此请尝试装饰图案,光晕,环境光遮挡,然后继续玩!
Here are some Useful resources to continue with your project:
以下是一些有用的资源,可以继续您的项目:
Unity Asset Store – for models, scripts and much more
Unity Asset Store –适用于模型,脚本等
Mixamo Auto Rigger – rig your character quickly and easily
Mixamo Auto Rigger –快速轻松地绑定角色
To follow the video tutorial click Play >
要观看视频教程,请点击播放>
翻译自: https://blogs.unity3d.com/2014/04/14/turn-your-character-into-a-player/
密室逃脱玩家角色分配


 被折叠的 条评论
为什么被折叠?
被折叠的 条评论
为什么被折叠?
 到【灌水乐园】发言


