


babylon.js
Nowadays, it’s really hard to navigate the web and not run into some wonderful website that has some stunning effects that seem like black magic.
如今,要浏览网页并且不碰到一个具有令人赞叹的效果(如黑魔法)的精彩网站真的很困难。
Well, many times that “black magic” is in fact WebGL, sometimes mixed with a bit of GLSL. You can find some really nice examples in this Awwwards roundup, but there are many more out there.
好吧,很多时候,“黑魔法”实际上是WebGL,有时还包含一些GLSL。 您可以在此Awwwards综述中找到一些非常好的示例,但还有更多示例。
Recently, I stumbled upon the Waka Waka website, one of the latest works of Ben Mingo and Aristide Benoist, and the first thing I noticed was the hover effect on the images.
最近,我偶然发现了Waka Waka网站,这是Ben Mingo和Aristide Benoist的最新作品之一,我注意到的第一件事是图像上的悬停效果。
It was obvious that it’s WebGL, but my question was: “How did Aristide do that?”
显然是WebGL,但是我的问题是:“阿里斯蒂德是怎么做到的?”
Since I love to deconstruct WebGL stuff, I tried to replicate it, and in the end I’ve made it.
由于我喜欢解构WebGL内容,因此我尝试对其进行复制,最后完成了它。
In this tutorial I’ll explain how to create an effect really similar to the one in the Waka Waka website using Microsoft’s BabylonJS library and some GLSL.
在本教程中,我将说明如何使用Microsoft的BabylonJS库和某些GLSL在Waka Waka网站中创建一种与Waka Waka网站中的效果非常相似的效果。
This is what we’ll do.
这就是我们要做的。
设置(The setup)
The first thing we have to do is create our scene; it will be very basic and will contain only a plane to which we’ll apply a custom ShaderMaterial.
我们要做的第一件事就是创建场景。 这将是非常基本的,并且仅包含一个平面,我们将对其应用自定义ShaderMaterial 。
I won’t cover how to setup a scene in BabylonJS, for that you can check its comprehensive documentation.
我不会介绍如何在BabylonJS中设置场景,因为您可以查看其全面的文档。
Here’s the code that you can copy and paste:
这是您可以复制和粘贴的代码:
import { Engine } from "@babylonjs/core/Engines/engine";
import { Scene } from "@babylonjs/core/scene";
import { Vector3 } from "@babylonjs/core/Maths/math";
import { ArcRotateCamera } from "@babylonjs/core/Cameras/arcRotateCamera";
import { ShaderMaterial } from "@babylonjs/core/Materials/shaderMaterial";
import { Effect } from "@babylonjs/core/Materials/effect";
import { PlaneBuilder } from "@babylonjs/core/Meshes/Builders/planeBuilder";

class App {
  constructor() {
    this.canvas = null;
    this.engine = null;
    this.scene = null;
  }

  init() {
    this.setup();
    this.addListeners();
  }

  setup() {
    this.canvas = document.querySelector("#app");
    this.engine = new Engine(this.canvas, true, null, true);
    this.scene = new Scene(this.engine);

    // Adding the vertex and fragment shaders to the Babylon's ShaderStore
    Effect.ShadersStore["customVertexShader"] = require("./shader/vertex.glsl");
    Effect.ShadersStore[
      "customFragmentShader"
    ] = require("./shader/fragment.glsl");

    // Creating the shader material using the `custom` shaders we added to the ShaderStore
    const planeMaterial = new ShaderMaterial("PlaneMaterial", this.scene, {
      vertex: "custom",
      fragment: "custom",
      attributes: ["position", "normal", "uv"],
      uniforms: ["worldViewProjection"]
    });
    planeMaterial.backFaceCulling = false;

    // Creating a basic plane and adding the shader material to it
    const plane = new PlaneBuilder.CreatePlane(
      "Plane",
      { width: 1, height: 9 / 16 },
      this.scene
    );
    plane.scaling = new Vector3(7, 7, 1);
    plane.material = planeMaterial;

    // Camera
    const camera = new ArcRotateCamera(
      "Camera",
      -Math.PI / 2,
      Math.PI / 2,
      10,
      Vector3.Zero(),
      this.scene
    );

    this.engine.runRenderLoop(() => this.scene.render());
  }

  addListeners() {
    window.addEventListener("resize", () => this.engine.resize());
  }
}

const app = new App();
app.init();
As you can see, it’s not that different from other WebGL libraries like Three.js: it sets up a scene, a camera, and it starts the render loop (otherwise you wouldn’t see anything).
如您所见,它与Three.js等其他WebGL库没有什么不同:它设置了一个场景,一个摄像头,并启动了渲染循环(否则您什么也看不到)。
The material of the plane is a ShaderMaterial for which we’ll have to create its respective shader files.
平面的材质是ShaderMaterial ,我们必须为其创建各自的着色器文件。
// /src/shader/vertex.glsl

precision highp float;

// Attributes
attribute vec3 position;
attribute vec3 normal;
attribute vec2 uv;

// Uniforms
uniform mat4 worldViewProjection;

// Varyings
varying vec2 vUV;

void main(void) {
    gl_Position = worldViewProjection * vec4(position, 1.0);
    vUV = uv;
}
// /src/shader/fragment.glsl
precision highp float;
// Varyings
varying vec2 vUV;
void main() {
vec3 color = vec3(vUV.x, vUV.y, 0.0);
gl_FragColor = vec4(color, 1.0);
}You can forget about the vertex shader since for the purpose of this tutorial we’ll work only on the fragment shader.
您可能会忘记顶点着色器,因为在本教程中,我们将仅在片段着色器上使用。
Here you can see it live:
在这里您可以实时看到它:
Good, we’ve already written 80% of the JavaScript code we need for the purpose of this tutorial.
很好,我们已经编写了本教程所需JavaScript代码的80%。
逻辑 (The logic)
GLSL is cool, it allows you to create stunning effects that would be impossible to do with HTML, CSS and JS alone. It’s a completely different world, and if you’ve always done “web” stuff you’ll get confused at the beginning, because when working with GLSL you have to think in a completely different way to achieve any effect.
GLSL很酷,它使您可以创建仅凭HTML,CSS和JS无法实现的惊人效果。 这是一个完全不同的世界,如果您总是做“网络”工作,一开始会感到困惑,因为在使用GLSL时,您必须以完全不同的方式思考以取得任何效果。
The logic behind the effect we want to achieve is pretty simple: we have two overlapping images, and the image that overlaps the other one has a mask applied to it.
我们要实现的效果背后的逻辑非常简单:我们有两个重叠的图像,并且与另一个图像重叠的图像已应用了蒙版。
Simple, but it doesn’t work like SVG masks for instance.
很简单,但是它不像SVG蒙版那样工作。
调整片段着色器 (Adjusting the fragment shader)
Before going any further we need to tweak the fragment shader a little bit.
在继续之前,我们需要稍微调整片段着色器。
As for now, it looks like this:
现在,它看起来像这样:
// /src/shader/fragment.glsl

precision highp float;

// Varyings
varying vec2 vUV;

void main() {
  vec3 color = vec3(vUV.x, vUV.y, 0.0);
  gl_FragColor = vec4(color, 1.0);
}Here, we’re telling the shader to assign each pixel a color whose channels are determined by the value of the x coordinate for the Red channel and the y coordinate for the Green channel.
在这里,我们告诉着色器为每个像素分配一种颜色,该颜色的通道由红色通道的x坐标和绿色通道的y坐标确定。
But we need to have the origin at the center of the plane, not the bottom-left corner. In order to do so we have to refactor the declaration of uv this way:
但是我们需要使原点位于平面的中心,而不是左下角。 为此,我们必须以这种方式重构uv的声明:
// /src/shader/fragment.glsl

precision highp float;

// Varyings
varying vec2 vUV;

void main() {
  vec2 uv = vUV - 0.5;
  vec3 color = vec3(uv.x, uv.y, 0.0);
  gl_FragColor = vec4(color, 1.0);
}
This simple change will result into the following:
这个简单的更改将导致以下结果:
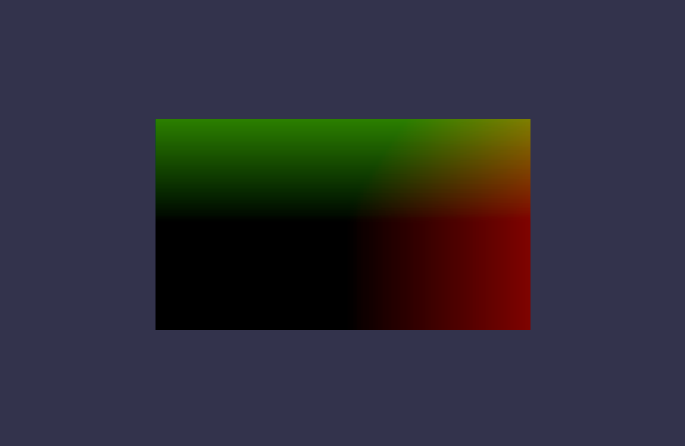
This is becase we moved the origin from the bottom left corner to the center of the plane, so uv‘s values go from -0.5 to 0.5. Since you cannot assign negative values to RGB channels, the Red and Green channels fallback to 0.0 on the whole bottom left area.
这是因为我们将原点从左下角移动到平面的中心,所以uv的值从-0.5变为0.5 。 由于无法为RGB通道分配负值,因此在整个左下方区域,红色和绿色通道会回退为0.0 。
创建遮罩 (Creating the mask)
First, let’s change the color of the plane to complete black:
首先,让我们将平面的颜色更改为完整的黑色:
// /src/shader/fragment.glsl

precision highp float;

// Varyings
varying vec2 vUV;

void main() {
  vec2 uv = vUV - 0.5;
  vec3 color = vec3(0.0);
  gl_FragColor = vec4(color, 1.0);
}
Now let’s add a rectangle that we will use as the mask for the foreground image.
现在,我们添加一个矩形,它将用作前景图像的蒙版。
Add this code outside the main() function:
将此代码添加到main()函数之外:
vec3 Rectangle(in vec2 size, in vec2 st, in vec2 p, in vec3 c) {
  float top = step(1. - (p.y + size.y), 1. - st.y);
  float right = step(1. - (p.x + size.x), 1. - st.x);
  float bottom = step(p.y, st.y);
  float left = step(p.x, st.x);
  return top * right * bottom * left * c;
}
(How to create shapes is beyond of the scope of this tutorial. For that, I suggest you to read this chapter of “The Book of Shaders”)
(如何创建形状超出了本教程的范围。为此,建议您阅读“着色器之书”这一章)
The Rectangle() function does exactly what its name says: it creates a rectangle based on the parameters we pass to it.
Rectangle()函数完全按照其名称的含义进行操作:它根据传递给它的参数创建一个矩形。
Then, we redeclare the color using that Rectangle() function:
然后,我们使用该Rectangle()函数重新声明color :
vec2 maskSize = vec2(0.3, 0.3);
// Note that we're subtracting HALF of the width and height to position the rectangle at the center of the scene
vec2 maskPosition = vec2(-0.15, -0.15);
vec3 maskColor = vec3(1.0);
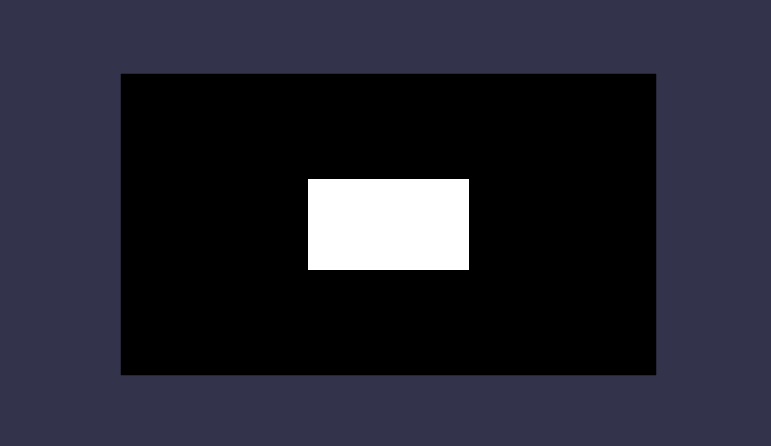
color = Rectangle(maskSize, uv, maskPosition, maskColor);Awesome! We now have our black plane with a beautiful white rectangle at the center.
太棒了! 现在我们有了黑色的平面,中间有一个漂亮的白色矩形。
But, wait! That’s not supposed to be a rectangle; we set its size to be 0.3 on both the width and the height!
可是等等! 那不应该是矩形; 我们将其大小设置为宽度和高度均为0.3!
That’s because of the ratio of our plane, but it can be easily fixed in two simple steps.
那是因为我们的飞机的比例,但是可以通过两个简单的步骤轻松地将其固定。
First, add this snippet to the JS file:
首先,将此代码段添加到JS文件中:
this.scene.registerBeforeRender(() => {
  plane.material.setFloat("uPlaneRatio", plane.scaling.x / plane.scaling.y);
});
And then, edit the shader by adding this line at the top of the file:
然后,通过在文件顶部添加以下行来编辑着色器:
uniform float uPlaneRatio;…and this line too, right below the line that sets the uv variable
…这行,也就是设置uv变量的行的正下方
uv.x *= uPlaneRatio;简短说明 (Short explanation)
In the JS file, we’re sending a uPlaneRatio uniform (one of the GLSL data type) to the fragment shader, whose value is the ratio between the plane width and height.
在JS文件中,我们uPlaneRatio片段着色器发送一个uPlaneRatio统一形式(GLSL数据类型之一),其值是平面宽度和高度之间的比率。
We made the fragment shader wait for that uniform by declaring it at the top of the file, then the shader uses it to adjust the uv.x value.
我们通过在文件顶部声明片段着色器来等待该统一着色器,然后着色器使用它来调整uv.x值。
Here you can see the final result: a black plane with a white square at the center; nothing too fancy (yet), but it works!
在这里,您可以看到最终结果:中心为白色正方形的黑色平面; 还没有什么花哨的东西,但是它有效!
添加前景图像(Adding the foreground image)
Displaying an image in GLSL is pretty simple. First, edit the JS code and add the following lines:
在GLSL中显示图像非常简单。 首先,编辑JS代码并添加以下行:
// Import the `Texture` module from BabylonJS at the top of the file
import { Texture } from '@babylonjs/core/Materials/Textures/texture'
// Add this After initializing both the plane mesh and its material
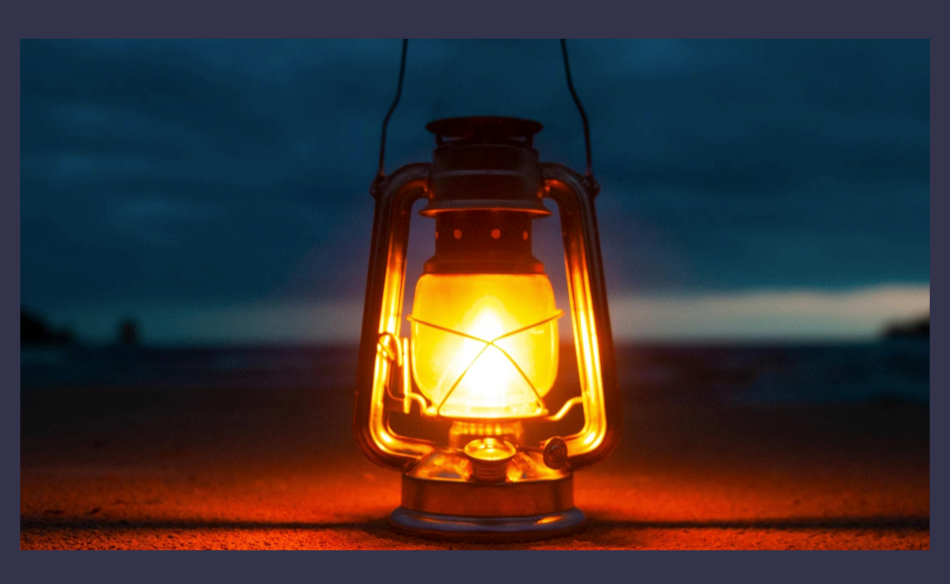
const frontTexture = new Texture('src/images/lantern.jpg')
plane.material.setTexture("u_frontTexture", frontTexture)This way, we’re passing the foreground image to the fragment shader as a Texture element.
这样,我们将前景图像作为Texture元素传递到片段着色器。
Now, add the following lines to the fragment shader:
现在,将以下行添加到片段着色器:
// Put this at the beginninng of the file, outside of the `main()` function
uniform sampler2D u_frontTexture;
// Put this at the bottom of the `main()` function, right above `gl_FragColor = ...`
vec3 frontImage = texture2D(u_frontTexture, uv * 0.5 + 0.5).rgb;有点解释: (A bit of explaining:)
We told BabylonJS to pass the texture to the shader as a sampler2D with the setTexture() method, and then, we made the shader know that we will pass that sampler2D whose name is u_frontTexture.
我们告诉BabylonJS纹理传递到shader作为sampler2D用setTexture()方法,然后,我们做了着色知道,我们将传递sampler2D名字是u_frontTexture 。
Finally, we created a new variable of type vec3 named frontImage that contains the RGB values of our texture.
最后,我们创建了一个名为frontImage vec3类型的新变量,其中包含纹理的RGB值。
By default, a texture2D is a vec4 variable (it contains the r, g, b and a values), but we don’t need the alpha channel so we declare frontImage as a vec3 variable and explicitly get only the .rgb channels.
默认情况下, texture2D是一个vec4变量(它包含r , g , b和a值),但是我们不需要alpha通道,因此我们将frontImage声明为vec3变量,并且显式地仅获取.rgb通道。
Please also note that we’ve modified the UVs of the texture by first multiplying it by 0.5 and then adding 0.5 to it. This is because at the beginning of the main() function I’ve remapped the coordinate system to -0.5 -> 0.5, and also because of the fact that we had to adjust the value of uv.x.
还请注意,我们已修改纹理的UV,方法是先将纹理乘以0.5,然后再对其添加0.5 。 这是因为在main()函数的开头,我已将坐标系重新映射为-0.5 -> 0.5 ,并且还因为我们必须调整uv.x的值。
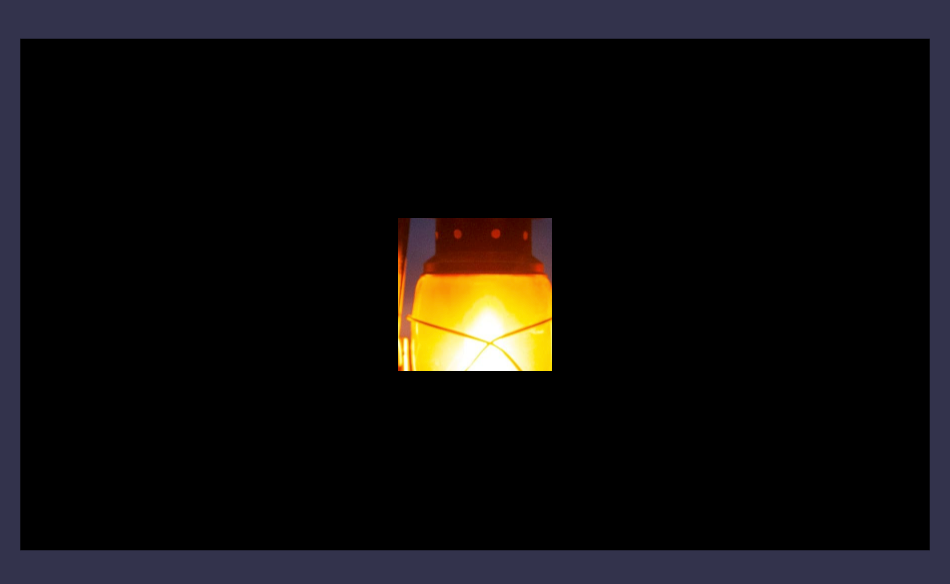
If you now add this to the GLSL code…
如果现在将其添加到GLSL代码中...
color = frontImage;…you will see our image, rendered by a GLSL shader:
…您将看到由GLSL着色器渲染的图像:
掩蔽 (Masking)
Always keep in mind that, for shaders, everything is a number (yes, even images), and that 0.0 means completely hidden while 1.0 stands for fully visible.
始终牢记,对于着色器,所有内容都是一个数字(是,甚至是图像),并且0.0表示完全隐藏,而1.0表示完全可见。
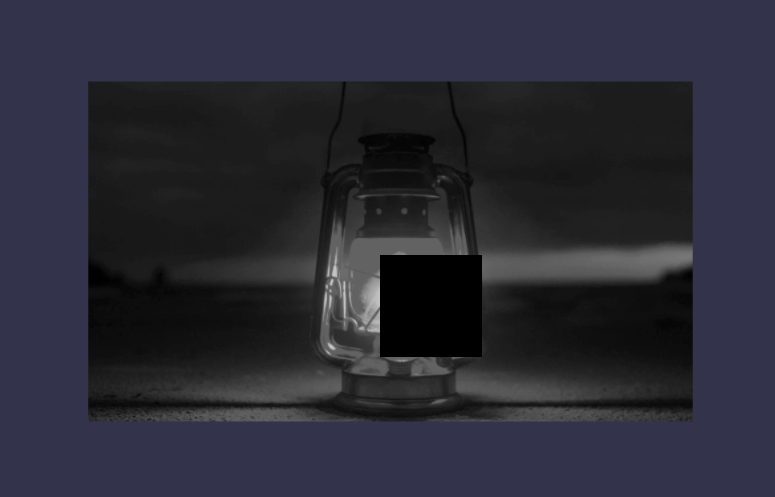
We can now use the mask we’ve just created to hide the parts of our image where the value of the mask equals 0.0.
现在,我们可以使用刚刚创建的遮罩隐藏遮罩的值等于0.0图像部分。
With that in mind, it’s pretty easy to apply our mask. The only thing we have to do is multiply the color variable by the value of the mask:
考虑到这一点,涂抹我们的面膜非常容易。 我们唯一要做的就是将color变量乘以mask的值:
// The mask should be a separate variable, not set as the `color` value
vec3 mask = Rectangle(maskSize, uv, maskPosition, maskColor);

// Some super magic trick
color = frontImage * mask;
Et voilà, we now have a fully functioning mask effect:
等等,我们现在有了一个功能全面的蒙版效果:
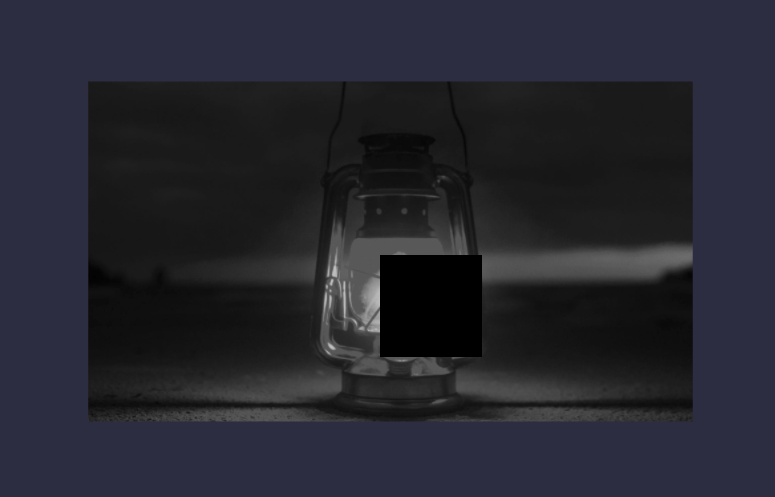
Let’s enhance it a bit by making the mask follow a circular path.
让我们通过使蒙版沿着圆形路径来增强它。
In order to do that we must go back to our JS file and add a couple of lines of code.
为此,我们必须返回到JS文件并添加几行代码。
// Add this to the class constructor
this.time = 0
// This goes inside the `registerBeforeRender` callback
this.time++;
plane.material.setFloat("u_time", this.time);In the fragment shader, first declare the new uniform at the top of the file:
在片段着色器中,首先在文件顶部声明新的制服:
uniform float u_time;Then, edit the declaration of maskPosition like this:
然后,像这样编辑maskPosition的声明:
vec2 maskPosition = vec2(
  cos(u_time * 0.05) * 0.2 - 0.15,
  sin(u_time * 0.05) * 0.2 - 0.15
);
u_time is simply one of the uniforms that we pass to our shader from the WebGL program.
u_time只是我们从WebGL程序传递给着色器的制服之一。
The only difference with the u_frontTexture uniform is that we increase its value on each render loop and pass its new value to the shader, so that it updates the mask’s position.
与u_frontTexture统一的唯一区别是,我们在每个渲染循环上增加其值,并将其新值传递给着色器,以便它更新蒙版的位置。
Here’s a live preview of the mask going in a circle:
这是面具绕圈走的实时预览:
添加背景图片(Adding the background image)
In order to add the background image we’ll do the exact opposite of what we did for the foreground image.
为了添加背景图像,我们将做与对前景图像完全相反的操作。
Let’s go one step at a time.
让我们一次走一步。
First, in the JS class, pass the shader the background image in the same way we did for the foreground image:
首先,在JS类中,以与对前景图像相同的方式,将着色器传递给背景图像:
const backTexture = new Texture("src/images/lantern-bw.jpg");
plane.material.setTexture("u_backTexture", backTexture);
Then, tell the fragment shader that we’re passing it that u_backTexture and initialize another vec3 variable:
然后,告诉片段着色器我们将u_backTexture传递给它,并初始化另一个vec3变量:
// This goes at the top of the file
uniform sampler2D backTexture;

// Add this after `vec3 frontImage = ...`
vec3 backgroundImage = texture2D(iChannel1, uv * 0.5 + 0.5).rgb;
When you do a quick test by replacing
当您通过更换进行快速测试时
color = frontImage * mask;with
与
color = backImage * mask;you’ll see the background image.
您会看到背景图片。
But for this one, we have to invert the mask to make it behave the opposite way.
但是对于这个,我们必须反转掩码以使其表现出相反的方式。
Inverting a number is really easy, the formula is:
倒数很简单,公式为:
invertedNumber = 1 - <number>So, let’s apply the inverted mask to the background image:
因此,让我们将反转蒙版应用于背景图像:
backImage *= (1.0 - mask);Here, we’re applying the same mask we added to the foreground image, but since we inverted it, the effect is the opposite.
在这里,我们将应用与添加到前景图像中的蒙版相同的蒙版,但是由于我们对其进行了反转,因此效果却相反。
放在一起 (Putting it all together)
At this point, we can refactor the declaration of the two images by directly applying their masks.
此时,我们可以通过直接应用它们的掩码来重构两个图像的声明。
vec3 frontImage = texture2D(u_frontTexture, uv * 0.5 + 0.5).rgb * mask;
vec3 backImage = texture2D(u_backTexture, uv * 0.5 + 0.5).rgb * (1.0 - mask);
We can now display both images by adding backImage to frontImage:
现在我们可以通过将backImage添加到frontImage来显示两个图像:
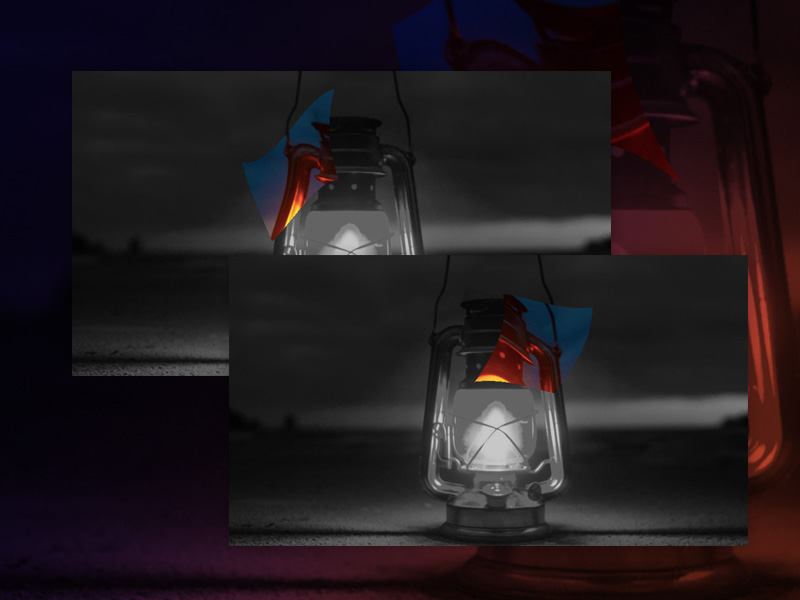
color = backImage + frontImage;That’s it, here’s a live example of the desired effect:
就是这样,这是一个预期效果的现场示例:
遮罩变形(Distorting the mask)
Cool uh? But it’s not over yet! Let’s tweak it a bit by distorting the mask.
酷吧? 但是还没有结束! 让我们通过扭曲蒙版进行一些调整。
To do so, we first have to create a new vec2 variable:
为此,我们首先必须创建一个新的vec2变量:
vec2 maskUV = vec2(
  uv.x + sin(u_time * 0.03) * sin(uv.y * 5.0) * 0.15,
  uv.y + cos(u_time * 0.03) * cos(uv.x * 10.0) * 0.15
);
Then, replace uv with maskUV in the mask declaration
然后,在mask声明maskUV uv替换为maskUV
vec3 mask = Rectangle(maskSize, maskUV, maskPosition, maskColor);In maskUV, we’re using some math to add uv values based on the u_time uniform and the current uv.
在maskUV ,我们使用一些数学运算基于u_time统一值和当前uv添加uv值。
Try tweaking those values by yourself to see different effects.
尝试自己调整这些值以查看不同的效果。
扭曲前景图像(Distorting the foreground image)
Let’s now distort the foreground image the same way we did for the mask, but with slightly different values.
现在让我们以与蒙版相同的方式使前景图像变形,但值略有不同。
Create a new vec2 variable to store the foreground image uvs:
创建一个新的vec2变量来存储前景图像uv s:
vec2 frontImageUV = vec2(
  (uv.x + sin(u_time * 0.04) * sin(uv.y * 10.) * 0.03),
  (uv.y + sin(u_time * 0.03) * cos(uv.x * 15.) * 0.05)
);
Then, use that frontImageUV instead of the default uv when declaring frontImage:
然后,在声明frontImage时,使用该frontImageUV而不是默认的uv :
vec3 frontImage = texture2D(u_frontTexture, frontImageUV * 0.5 + 0.5).rgb * mask;Voilà! Now both the mask and the image have a distortion effect applied.
瞧! 现在,蒙版和图像都应用了失真效果。
Again, try tweaking those numbers to see how the effect changes.
同样,尝试调整这些数字以查看效果如何变化。
10 –添加鼠标控件 (10 – Adding mouse control)
What we’ve made so far is really cool, but we could make it even cooler by adding some mouse control like making it fade in/out when the mouse hovers/leaves the plane and making the mask follow the cursor.
到目前为止,我们所做的工作确实很酷,但是我们可以通过添加一些鼠标控件(例如,当鼠标悬停/离开平面时使它淡入/淡出并使蒙版跟随光标移动)来使它变得更酷。
添加淡入淡出效果 (Adding fade effects)
In order to detect the mouseover/mouseleave events on a mesh and execute some code when those events occur we have to use BabylonJS’s actions.
为了检测网格上的mouseover / mouseleave事件并在这些事件发生时执行一些代码,我们必须使用BabylonJS的action 。
Let’s start by importing some new modules:
让我们从导入一些新模块开始:
import { ActionManager } from "@babylonjs/core/Actions/actionManager";
import { ExecuteCodeAction } from "@babylonjs/core/Actions/directActions";
import "@babylonjs/core/Culling/ray";
Then add this code after the creation of the plane:
然后在创建平面之后添加以下代码:
this.plane.actionManager = new ActionManager(this.scene);

this.plane.actionManager.registerAction(
  new ExecuteCodeAction(ActionManager.OnPointerOverTrigger, () =>
    this.onPlaneHover()
  )
);

this.plane.actionManager.registerAction(
  new ExecuteCodeAction(ActionManager.OnPointerOutTrigger, () =>
    this.onPlaneLeave()
  )
);
Here we’re telling the plane’s ActionManager to listen for the PointerOver and PointerOut events and execute the onPlaneHover() and onPlaneLeave() methods, which we’ll add right now:
在这里,我们告诉飞机的ActionManager侦听PointerOver和PointerOut事件并执行onPlaneHover()和onPlaneLeave()方法,我们现在将添加它们:
onPlaneHover() {
  console.log('hover')
}

onPlaneLeave() {
  console.log('leave')
}
有关上述代码的一些注意事项 (Some notes about the code above)
Please note that I’ve used this.plane instead of just plane; that’s because we’ll have to access it from within the mousemove event’s callback later, so I’ve refactored the code a bit.
请注意,我使用this.plane而不是仅仅使用plane ; 这是因为稍后我们必须从mousemove事件的回调中访问它,因此我对代码进行了一些重构。
ActionManager allows us to listen to certain events on a target, in this case the plane.
ActionManager允许我们侦听目标(在本例中为飞机)上的某些事件。
ExecuteCodeAction is a BabylonJS action that we’ll use to execute some arbitrary code.
ExecuteCodeAction是一个BabylonJS动作,我们将使用它执行一些任意代码。
ActionManager.OnPointerOverTrigger and ActionManager.OnPointerOutTrigger are the two events that we’re listening to on the plane. They behave exactly like the mouseenter and mouseleave events for DOM elements.
ActionManager.OnPointerOverTrigger和ActionManager.OnPointerOutTrigger是我们在飞机上正在侦听的两个事件。 它们的行为与DOM元素的mouseenter和mouseleave事件完全一样。
To detect hover events in WebGL, we need to “cast a ray” from the position of the mouse to the mesh we’re checking; if that ray, at some point, intersects with the mesh, it means that the mouse is hovering it. This is why we’re importing the @babylonjs/core/Culling/ray module; BabylonJS will take care of the rest.
为了检测WebGL中的悬停事件,我们需要从鼠标的位置“投射射线”到我们正在检查的网格。 如果该射线在某个点与网格相交,则表示鼠标正在将其悬停。 这就是为什么我们要导入@babylonjs/core/Culling/ray模块的原因; BabylonJS将负责其余的工作。
Now, if you test it by hovering and leaving the mesh, you’ll see that it logs hover and leave.
现在,如果通过悬停并离开网格对其进行测试,则会看到它记录了hover并leave 。
Now, let’s add the fade effect. For this, I’ll use the GSAP library, which is the de-facto library for complex and high-performant animations.
现在,让我们添加淡入淡出效果。 为此,我将使用GSAP库,该库是用于复杂和高性能动画的事实上的库。
First, install it:
首先,安装它:
yarn add gsapThen, import it in our class
然后,将其导入我们的班级
import gsap from 'gsapand add this line to the constructor
并将此行添加到constructor
this.maskVisibility = { value: 0 };Finally, add this line to the registerBeforeRender()‘s callback function
最后,将此行添加到registerBeforeRender()的回调函数中
this.plane.material.setFloat( "u_maskVisibility", this.maskVisibility.value);This way, we’re sending the shader the current value property of this.maskVisibility as a new uniform called u_maskVisibility.
这样,我们this.maskVisibility着色器this.maskVisibility的当前value属性作为新的统一形式发送给u_maskVisibility 。
Refactor the fragment shader this way:
以这种方式重构片段着色器:
// Add this at the top of the file, like any other uniforms
uniform float u_maskVisibility;

// When declaring `maskColor`, replace `1.0` with the `u_maskVisibility` uniform
vec3 maskColor = vec3(u_maskVisibility);
If you now check the result, you’ll see that the foreground image is not visible anymore; what happened?
如果现在检查结果,您将看到前景图像不再可见。 发生了什么?
Do you remember when I wrote that “for shaders, everything is a number”? That’s the reason! The u_maskVisibility uniform equals 0.0, which means that the mask is invisible.
您还记得我写过“对于着色器,一切都是数字”吗? 那就是原因! u_maskVisibility统一等于0.0 ,这意味着该遮罩是不可见的。
We can fix it in few lines of code. Open the JS code and refactor the onPlaneHover() and onPlaneLeave() methods this way:
我们可以用几行代码来修复它。 打开JS代码,并通过以下方式重构onPlaneHover()和onPlaneLeave()方法:
onPlaneHover() {
  gsap.to(this.maskVisibility, {
    duration: 0.5,
    value: 1
  });
}

onPlaneLeave() {
  gsap.to(this.maskVisibility, {
    duration: 0.5,
    value: 0
  });
}
Now, when you hover or leave the plane, you’ll see that the mask fades in and out!
现在,当您将鼠标悬停或离开飞机时,您会发现遮罩会淡入淡出!
(And yes, BabylonJS has it’s own animation engine, but I’m way more confident with GSAP, that’s why I opted for it.)
(是的,BabylonJS有它自己的动画引擎,但是我对GSAP更有信心,这就是为什么我选择它。)
使遮罩跟随鼠标光标 (Make the mask follow the mouse cursor)
First, add this line to the constructor
首先,将此行添加到constructor
this.maskPosition = { x: 0, y: 0 };and this to the addListeners() method:
并将其添加到addListeners()方法中:
window.addEventListener("mousemove", () => {
  const pickResult = this.scene.pick(
    this.scene.pointerX,
    this.scene.pointerY
  );

  if (pickResult.hit) {
    const x = pickResult.pickedPoint.x / this.plane.scaling.x;
    const y = pickResult.pickedPoint.y / this.plane.scaling.y;

    this.maskPosition = { x, y };
  }
});
What the code above does is pretty simple: on every mousemove event it casts a ray with this.scene.pick() and updates the values of this.maskPosition if the ray is intersecting something.
上面的代码非常简单:在每个mousemove事件中,它使用this.scene.pick()投射射线,如果射线与某物相交,则更新this.maskPosition的值。
(Since we have only a single mesh we can avoid checking what mesh is being hit by the ray.)
(由于我们只有一个网格,因此可以避免检查射线正在撞击哪个网格。)
Again, on every render loop, we send the mask position to the shader, but this time as a vec2. First, import the Vector2 module together with Vector3
同样,在每个渲染循环中,我们将遮罩位置发送到着色器,但这一次是vec2 。 首先,将Vector2模块与Vector3一起导入
import { Vector2, Vector3 } from "@babylonjs/core/Maths/math";Add this in the runRenderLoop callback function
将此添加到runRenderLoop回调函数中
this.plane.material.setVector2(
  "u_maskPosition",
  new Vector2(this.maskPosition.x, this.maskPosition.y)
);
Add the u_maskPosition uniform at the top of the fragment shader
在片段着色器的顶部添加u_maskPosition统一
uniform vec2 u_maskPosition;Finally, refactor the maskPosition variable this way
最后,以这种方式重构maskPosition变量
vec3 maskPosition = vec2(
  u_maskPosition.x * uPlaneRatio - 0.15,
  u_maskPosition.y - 0.15
);
Side note; I’ve adjusted the x using the uPlaneRatio value because at the beginning of the main() function I did the same with the shader’s uvs
边注; 我已经使用uPlaneRatio值调整了x ,因为在main()函数的开始,我对着色器的uv做了同样的操作
And here you can see the result of your hard work:
在这里,您可以看到您辛勤工作的结果:
结论(Conclusion)
As you can see, doing these kind of things doesn’t involve too much code (~150 lines of JavaScript and ~50 lines of GLSL, including comments and empty lines); the hard part with WebGL is the fact that it’s complex by nature, and it’s a very vast subject, so vast that many times I don’t even know what to search on Google when I get stuck.
如您所见,执行此类操作不需要太多代码(约150行JavaScript和约50行GLSL,包括注释和空行); WebGL的困难之处在于它本质上很复杂,并且是一个非常广泛的主题,以至于无数次,甚至在我陷入困境时,我什至都不知道要在Google上搜索什么。
Also, you have to study a lot, way more than with “standard” website development. But in the end, it’s really fun to work with.
此外,您还需要进行很多研究,而不仅仅是“标准”网站开发。 但是最后,与之合作真的很有趣。
In this tutorial, I tried to explain the whole process (and the reasoning behind everything) step by step, just like I want someone to explain it to me; if you’ve reached this point of this tutorial, it means that I’ve reached my goal.
在本教程中,我试图逐步解释整个过程(以及一切背后的原因),就像我希望有人向我解释它一样。 如果您已经达到本教程的这一点,则意味着我已经达到了目标。
In any case, thanks!
无论如何,谢谢!
学分 (Credits)
The lantern image is by Vladimir Fetodov
灯笼图片来自弗拉基米尔·费托多夫( Vladimir Fetodov)
babylon.js


 1266
1266


 被折叠的 条评论
为什么被折叠?
被折叠的 条评论
为什么被折叠?
 到【灌水乐园】发言


