


 通过Windows 10的内置功能StorageSense,用户可以配置系统自动删除回收站中达到一定期限的文件,以此来释放磁盘空间。用户可以根据自身需求设置清空频率及保留期限。
Using a built-in feature called Storage Sense, you can save disk space by configuring Windows 10 to delete files of a certain age located in your Recycle Bin automatically every day, week, or month. Here’s how to set it up.
使用称为Storage Sense的内置功能,您可以通过将Windows 10配置为每天,每周或每月自动删除位于回收站中的特定年龄的文件来节省磁盘空间。 设置方法如下。
First, launch “Settings” by opening the “Start Menu” and clicking the “gear” icon on the left. You can also press Windows+I to open Settings quickly. In Settings, click the “System” icon and then click “Storage.”
首先,通过打开“开始菜单”并单击左侧的“齿轮”图标启动“设置”。 您也可以按Windows + I快速打开“设置”。 在“设置”中,单击“系统”图标,然后单击“存储”。
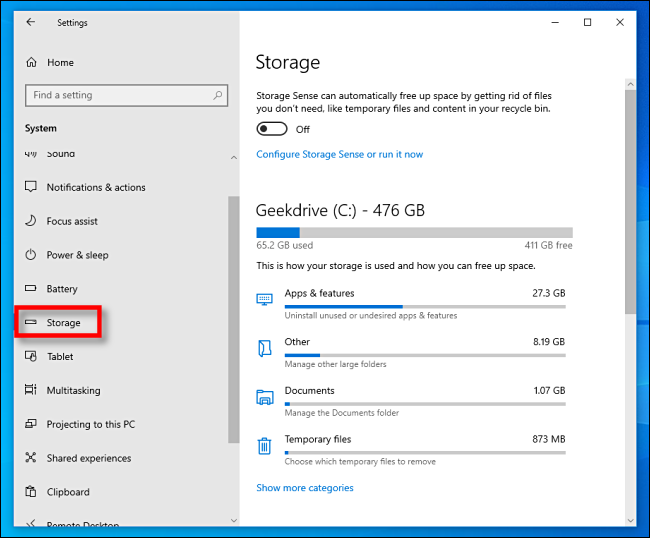
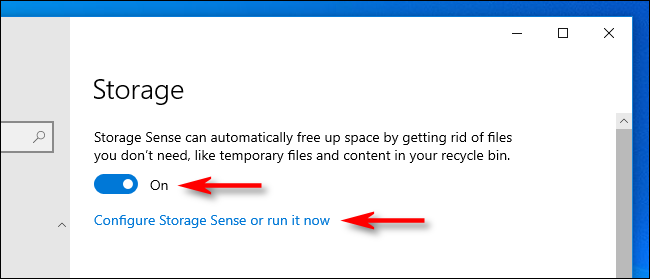
At the top of the Storage options, you’ll see a small paragraph of text about Storage Sense. Click the sliding switch located just below to set it to the “On” position. Then under that, click “Configure Storage Sense or run it now.”
在“存储”选项的顶部,您会看到一小段关于存储感知的文本。 单击位于下方的滑动开关,将其设置为“ On”位置。 然后在其下单击“配置Storage Sense或立即运行它”。
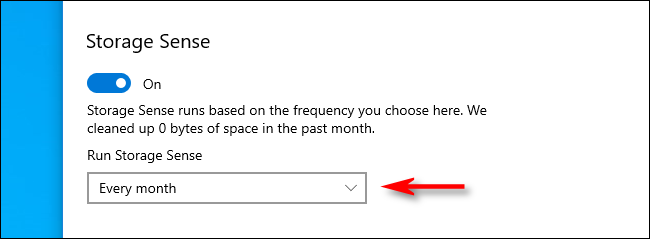
In the “Storage Sense” options, you’ll want to take note of a few different settings. The first is the frequency of when Storage Sense runs, which is set with a drop-down menu labeled “Run Storage Sense.” You can set it to run every day, week, or month—or whenever disk space is low. Click the menu, and select the option that works best for you.
在“ Storage Sense”选项中,您需要注意一些不同的设置。 第一个是Storage Sense运行的频率,它通过标有“ Run Storage Sense”的下拉菜单进行设置。 您可以将其设置为每天,每周或每月运行,或者在磁盘空间不足时运行。 单击菜单,然后选择最适合您的选项。
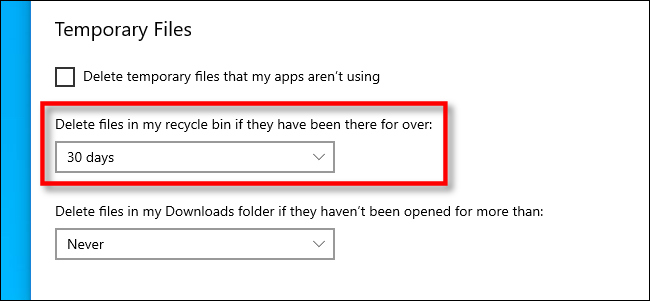
Because we’re only talking about deleting files in the Recycle Bin, uncheck the box beside “Delete temporary files that my apps aren’t using” if you don’t want Storage Sense removing old temporary files. Also, if necessary, set the “Delete files in my Downloads folder” option to “Never” using the drop-down menu.
因为我们只是在谈论删除回收站中的文件,所以如果您不希望Storage Sense删除旧的临时文件,请取消选中“删除我的应用程序未使用的临时文件”旁边的框。 另外,如有必要,请使用下拉菜单将“删除我的下载文件夹中的文件”选项设置为“从不”。
In-between those, you’ll find a drop-down menu labeled “Delete files in my Recycle Bin if they have been there for over,” and the options are “Never,” “1 day,” “14 days, “30 days,” or “60 days.”
在这两者之间,您会找到一个下拉菜单,其中标有“如果文件已在回收站中,请删除我的回收站中的文件”,选项为“从不”,“ 1天”,“ 14天”,“ 30天或60天。
Here’s how it works: whenever Storage Sense is run (as per the earlier setting), it will automatically delete files that have been sitting in your Recycle Bin for longer than that period of time. Using the menu, set it to whichever option you’d like.
它的工作方式如下:每当运行Storage Sense(按照先前的设置)时,它都会自动删除在回收站中放置时间超过该时间段的文件。 使用菜单将其设置为所需的任何选项。
After that, you’re free to close Settings.
之后,您可以自由关闭设置。
If you ever change your mind about the frequency of the Recycle Bin emptying (or want to disable it), just revisit Settings > Storage again and set Storage Sense to “Off.” Or, you can change the interval options again to suit your needs.
如果您对回收站清空的频率有所改变(或想禁用它),只需再次访问“设置”>“存储”并将“存储检测”设置为“关”即可。 或者,您可以再次更改间隔选项以适合您的需求。
翻译自: https://www.howtogeek.com/681171/how-to-empty-your-recycle-bin-on-a-schedule-on-windows-10/


 2616
2616

 被折叠的 条评论
为什么被折叠?
被折叠的 条评论
为什么被折叠?
 到【灌水乐园】发言


