


 本文是关于免费音频编辑器Audacity的初学者指南,适合各种水平的用户。Audacity因其免费、开源、跨平台及丰富的插件而被选中。文章介绍了其用户界面、录音、音轨管理、保存项目和导出音频的基本操作,帮助理解音频编辑的基础概念。

音频类算法入门学习
Ever get the urge to edit some audio but you’re not sure where to start? Settle in with this HTG guide to the free audio editor Audacity that’s written for beginners but caters to geeks of all levels.
曾经有过编辑一些音频的冲动,但是您不确定从哪里开始? 收看此HTG指南,该指南是为初学者编写的免费音频编辑器Audacity,但可满足所有级别的极客。
Note: this is the first article in a multi-part series that we’ll be covering over the next few weeks.
注意:这是多部分系列的第一篇文章,我们将在接下来的几周中进行介绍。
哦,大胆! (Oh, the Audacity!)
In this series, we’ve chosen to highlight a particular application, Audacity, because of a few important reasons. It’s free, which is always optimal. It’s open source, and that’s always appreciated by geeks like us. It’s cross-platform, so even though our guide is done in Windows, OS X and Linux users can play, too. It’s got great plug-ins and amazing effects right out of the box.
在本系列中,由于一些重要原因,我们选择突出显示特定的应用程序Audacity 。 它是免费的,始终是最佳选择。 它是开源的,并且一直受到像我们这样的极客的赞赏。 它是跨平台的,因此即使我们的指南在Windows中完成,OS X和Linux用户也可以玩。 它具有出色的插件和开箱即用的惊人效果。
Perhaps most importantly, though, while more advanced apps like Adobe’s Soundbooth or Apple’s GarageBand get the job done, they’re designed for more experienced users and for more involved projects. Audacity can help you understand simpler concepts of audio editing that can be transferred to those more powerful programs.
不过,也许最重要的是,虽然Adobe的Soundbooth或Apple的GarageBand之类的更高级的应用程序可以完成工作,但它们是为更有经验的用户和更多参与项目设计的。 Audacity可以帮助您了解音频编辑的更简单概念,这些概念可以转移到功能更强大的程序中。
Hop on over to the Audacity download page, and be sure to choose the 1.3 series, as that’s the most compatible with the latest OS releases. If you use Linux, you can just grab it from your repository. We’ll leave the extra add-ons for another day.
跳至Audacity下载页面 ,并确保选择1.3系列 ,因为它与最新的OS版本最兼容。 如果您使用Linux,则可以从存储库中获取它。 我们会将多余的附件留给另一天。
用户界面 (User Interface)
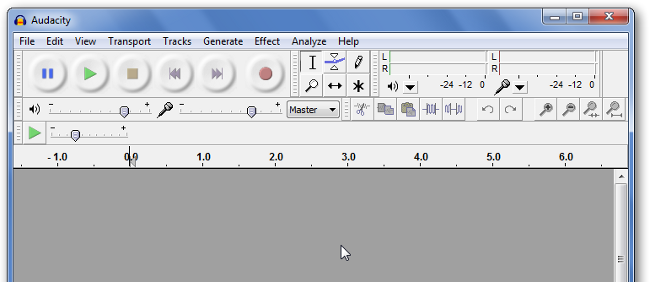
There’s a lot of options in the main window, but it breaks down pretty simply. Let’s take a look.
主窗口中有很多选项,但是很容易分解。 让我们来看看。

Audio controls: The standard controls – pause, play, stop, skip backward, skip forward, and record – for the project as a whole.
音频控件 :整个项目的标准控件-暂停,播放,停止,向后跳过,向前跳过和录制。
Toolbar: In order, from top-left to bottom-right: Selection, Envelope, Draw, Zoom, Time Shift, and Multi-Tool Mode.
工具栏 :依次从左上到右下:选择,信封,绘制,缩放,时移和多工具模式。
Level meters: The left one is for output, and the right is for input. Clicking on the the input meter will actively monitor audio levels, and right clicking will give you options to change the refresh rate.
电平表 :左边的用于输出,右边的用于输入。 单击输入电平表将主动监视音频电平,单击鼠标右键将为您提供更改刷新率的选项。
Level sliders: Change the volume level for both output and input, and the drop-down menu to the immediate right is to select an input.
级别滑块 :更改输出和输入的音量级别,最右边的下拉菜单用于选择输入。
Shortcut bar: Shortcuts to quick actions – such as cut, paste, insert silence, etc – and for zooming.
快捷栏 :快捷操作的快捷方式,例如剪切,粘贴,插入静音等,以及用于缩放。
Audio tracks: The top of this area has the timeline, and any audio tracks will appear here. More on that in a bit.
音轨 :此区域的顶部具有时间线,所有音轨都将显示在此处。 一点点更多。
Selection tools: Here, you can choose where to start selection by time, and then choose to put in an end time, or a length of selection.
选择工具 :您可以在此处选择按时间开始选择的位置,然后选择输入结束时间或选择的时间长度。
There’s a lot here, but we’ll go into more depth in future articles in this series.
这里有很多内容,但是我们将在本系列的后续文章中更深入地介绍。
录制曲目 (Recording a Track)
Let’s get a track recorded to illustrate some basic editing. Audacity uses Windows audio defaults for recording and playback with few exceptions, so go down to your system tray, right-click your volume control, and go to “Recording Devices”.
让我们记录一下曲目,以说明一些基本的编辑。 除了少数例外,Audacity都会使用Windows音频默认值进行录制和播放,因此请转到系统托盘,右键单击音量控件,然后转到“录制设备”。
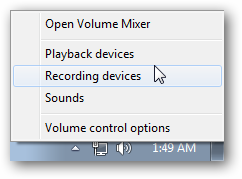
Make sure your microphone is set to be the default device. Then, in Audacity, just click the “Record” button up top. It’s the one that has a small red circle in the center.
确保将麦克风设置为默认设备。 然后,在Audacity中,只需单击顶部的“记录”按钮。 这是一个在中心有一个小红色圆圈的地方。
You’ll see something like this appear:
您会看到如下所示:

音轨 (Audio Tracks)
Let’s take a closer look at the audio track and it’s associated stuff.
让我们仔细看看音轨及其相关的东西。

Timeline: Here you can see the lengths of your audio tracks.
时间轴 :在这里您可以看到音轨的长度。
Audio Track Properties: The pertinent audio properties can be found here and changed. Tracks can also be removed by clicking on the tiny “X” in the upper-right corner. Volume and balance can be adjusted by moving the sliders.
音轨属性 :可以在此处找到和更改相关的音频属性。 也可以通过单击右上角的小“ X”来删除轨道。 可以通过移动滑块来调节音量和平衡。
Scrubber: This green arrow usually has a line running down the screen as well. It appears when you hit “Play” and marks the location of the waveform that is currently output through your speakers.
洗涤器 :此绿色箭头通常在屏幕上也有一条线。 当您单击“播放”并标记当前通过扬声器输出的波形的位置时,它会出现。
Left Channel Audio Waveform
左声道音频波形
Right Channel Audio Waveform
右声道音频波形
As you can see, there’s a wealth of information displayed here. Any added tracks will stack vertically in this portion of the screen so you can see the information from all of them.
如您所见,此处显示了大量信息。 任何添加的曲目将垂直堆叠在屏幕的此部分,因此您可以查看所有曲目的信息。
保存您的项目 (Saving Your Project)
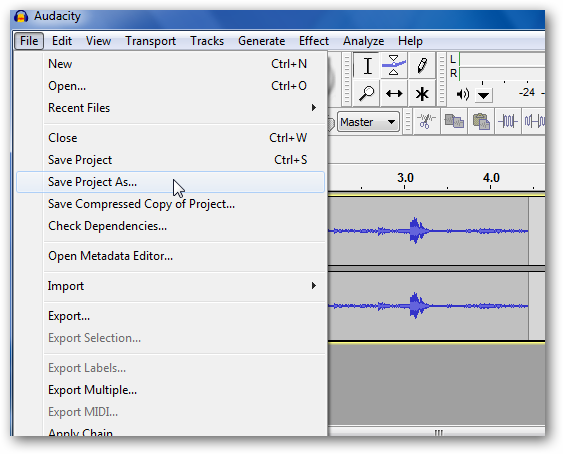
When you’ve made some edits but you’re not quite done with your project, you can save it for later. Go to File > Save Project As…
当您进行了一些编辑但还没有完成项目时,可以将其保存以供以后使用。 转到文件>将项目另存为...
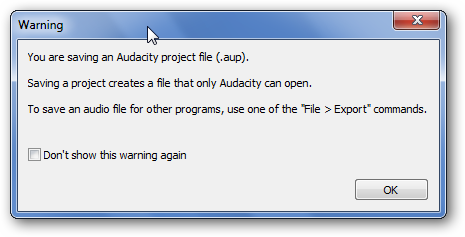
You’ll see a warning pop up, reminding you that this just for use with Audacity itself. Following that, you’ll get a normal save prompt. That’s it!
您会看到一个警告弹出窗口,提醒您该警告仅用于Audacity本身。 之后,您会收到一个正常的保存提示。 而已!
导出音频 (Exporting Audio)
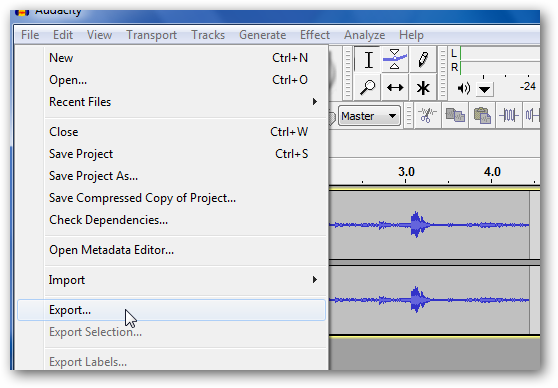
If you want to get your audio track, with all of its layers and effects, into a single finished file, you’re going to want to export it. Go to File > Export…
如果要将音频轨道及其所有层和效果放入单个完成的文件中,则需要将其导出。 转到文件>导出...
You’ll see a different save dialog pop up.
您会看到一个不同的保存对话框弹出。
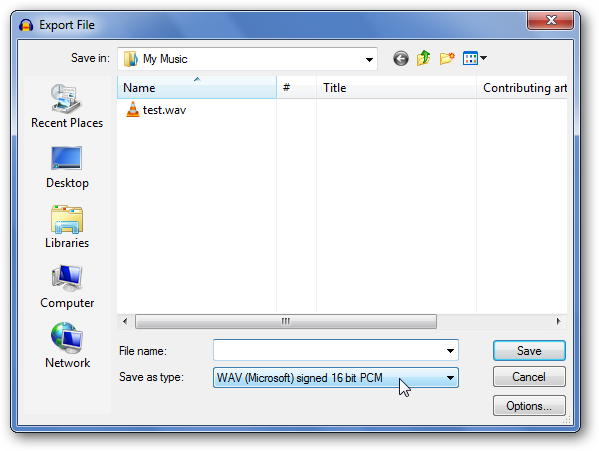
After giving it a name, you can change the type of audio file you’d like to encode it as. There are more than a few options.
给它命名后,您可以更改要将其编码为的音频文件的类型。 有很多选择。

After you choose your type, you can click on the “Options…” button to change things like the bitrate. I left mine as a “WAV” file for now. You may need additional codecs to be able to use other options, but that’s something we’ll cover in a future article.
选择类型后,您可以单击“选项...”按钮来更改比特率等内容。 我暂时将我的文件保留为“ WAV”文件。 您可能需要其他编解码器才能使用其他选项,但这将在以后的文章中介绍。
As you can see, we’re just touching on the basics of using Audacity, but rest assured, we’ve got some interesting articles coming up soon. We’ll cover the tools you’ll use, filters, effects, and even some extra fun stuff, so stay tuned!
如您所见,我们只是在介绍使用Audacity的基础知识,但是请放心,我们很快就会发布一些有趣的文章。 我们将介绍您将使用的工具,滤镜,效果,甚至还有一些其他有趣的东西,请继续关注!
翻译自: https://www.howtogeek.com/howto/39681/the-how-to-geek-guide-to-audio-editing-the-basics/
音频类算法入门学习


 1336
1336

 被折叠的 条评论
为什么被折叠?
被折叠的 条评论
为什么被折叠?
 到【灌水乐园】发言


