
极客时间和极客学院

In this installation of Geek School we take a look at our options for Backup and Recovery. This is an important one, so come on and join us.
在此Geek School安装中,我们将了解备份和恢复的选项。 这是重要的一步,请加入我们。
Be sure to check out the previous articles in this Geek School series on Windows 7:
请务必查看Windows 7上此Geek School系列中的先前文章:
Note: Backup and Recovery is a fairly straight forward concept and thus there is not much theory to be covered. Rather, we take the approach of showing you how to get a backup plan in place, and point out things as we go.
注意:备份和恢复是一个非常简单的概念,因此没有太多理论要涉及。 相反,我们采用向您展示如何制定备份计划的方法,并指出我们进行中的事情。
备份Windows (Backing Up Windows)
Windows 7 includes a utility that enables you to create and restore backups. For those uninitiated, backups protect your data in the event of a catastrophic failure by allowing you to store a copy of your data on another storage medium, such as a hard disk, CD, DVD, or network location. When a catastrophic event occurs, examples of which include corruption, deletion or media failure, you will be able to restore your data using one of your saved backups. In order to set up your backup plan you need to head into the Control Panel.
Windows 7包含一个实用程序,使您可以创建和还原备份。 对于那些未启动的备份,如果发生灾难性故障,备份可通过允许您将数据的副本存储在另一个存储介质(例如硬盘,CD,DVD或网络位置)上来保护您的数据。 发生灾难性事件时,例如损坏,删除或介质故障等事件,您将能够使用已保存的备份之一还原数据。 为了设置备份计划,您需要进入“控制面板”。
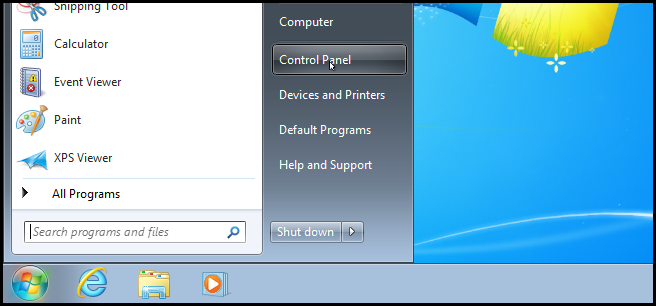
Then click on System and Security.
然后单击系统和安全性。
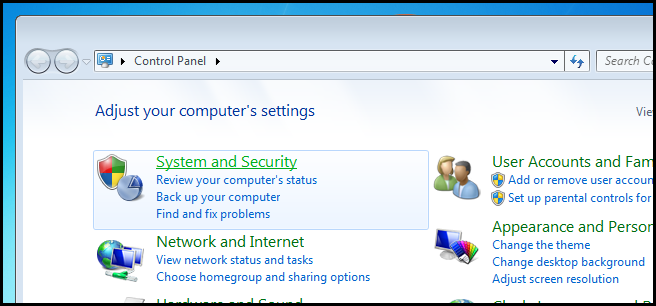
Here you will see a Backup and Restore link. Click on it.
在这里,您将看到“备份和还原”链接。 点击它。
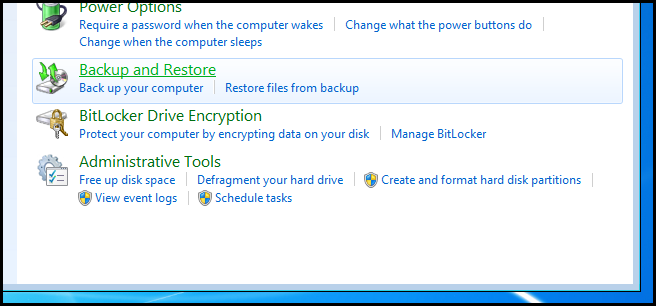
Once you enter the backup section, you will need to click on the Set up backup link.
进入备份部分后,您需要点击设置备份链接。
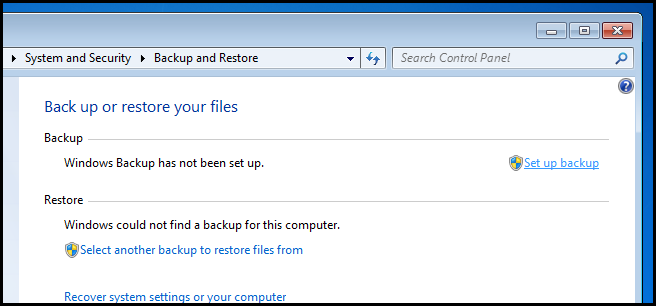
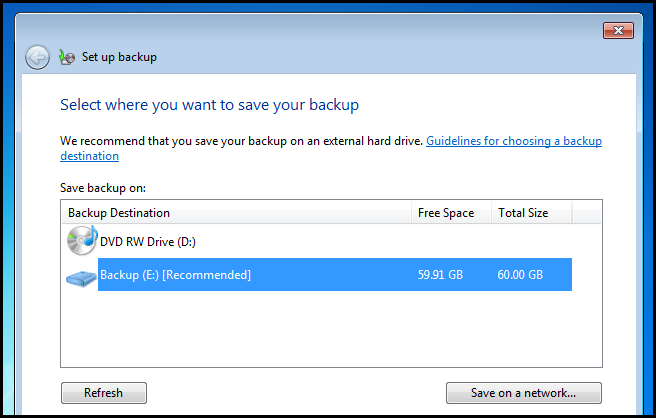
Now choose where you want to save the backup, then click next. We will opt to save our backup on a Hard Drive, however you always have the option of using a network location.
现在选择要保存备份的位置,然后单击下一步。 我们将选择将备份保存在硬盘驱动器上,但是您始终可以选择使用网络位置。
You also have the option of letting Windows choose what to back up or rolling your own backup strategy. We will roll our own.
您还可以选择让Windows选择要备份的内容或采用自己的备份策略。 我们将自己滚动。
Note: If you choose to let Windows pick out what to back up, it will basically include anything within common Windows folders, the contents of your libraries as well as a system image which can be used to restore your “C” drive should anything happen to your computer.
注意:如果您选择让Windows选择要备份的内容,则它将基本上包含普通Windows文件夹中的所有内容,库的内容以及可用于在发生任何情况下还原“ C”驱动器的系统映像到您的计算机。
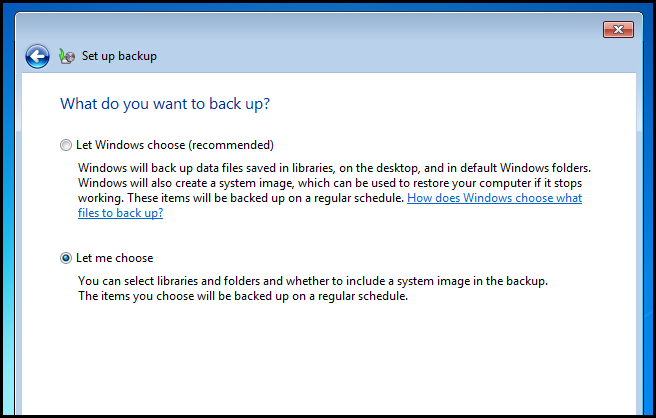
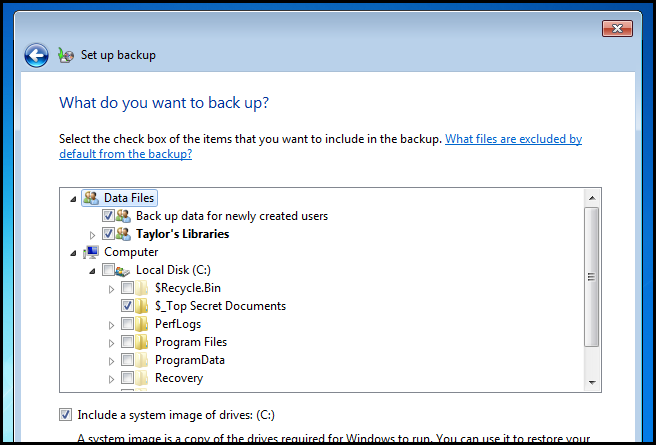
The advantage to rolling your own backup strategy is that you can choose individual folders that you want to back up, and the contents of these folders will be available for restoration without restoring a system image. If you let Windows choose what to backup and you suddenly need to restore a single folder, you would need to restore your entire “C” drive using the system image, losing any files you have created since the backup. Of course, we will include our libraries as well as a system image in our custom backup.
滚动使用自己的备份策略的好处是,您可以选择要备份的单个文件夹,并且这些文件夹的内容将可用于还原而无需还原系统映像。 如果让Windows选择要备份的内容,而突然需要还原一个文件夹,则需要使用系统映像还原整个“ C”驱动器,从而丢失自备份以来创建的所有文件。 当然,我们将在自定义备份中包括我们的库以及系统映像。
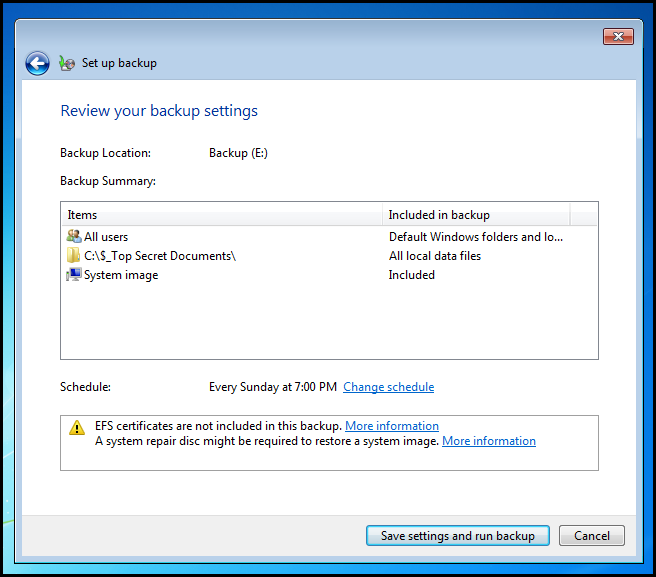
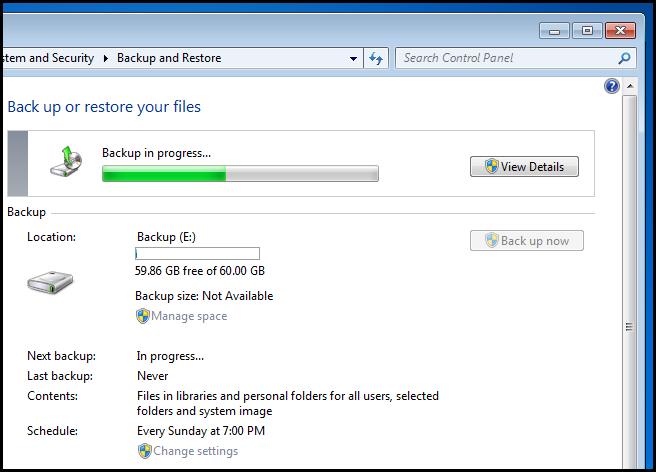
Once you have chosen what you want to be backed up, you will be given a nice overview. If you are not happy with the default schedule, you can change it by clicking on the change schedule link, however Sunday at 7PM suits us perfectly. After confirming everything you need is included, kick off the backup.
选择了要备份的内容后,将获得一个很好的概述。 如果您对默认时间表不满意,可以通过单击更改时间表链接来更改它,但是星期日晚上7点非常适合我们。 确认您需要的所有内容都包括在内后,开始备份。
That’s all there is to it.
这里的所有都是它的。
恢复数据 (Restoring Your Data)
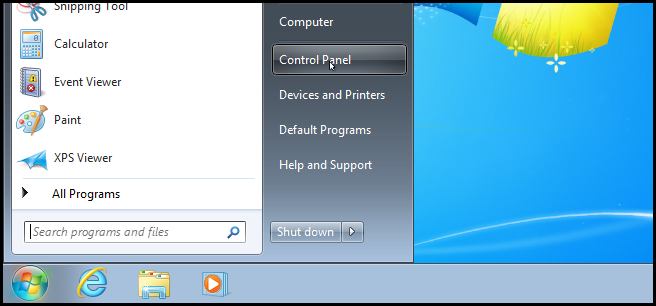
If you ever need to restore a single file from your backup, simply open the Control Panel.
如果您需要从备份中还原单个文件,只需打开“控制面板”。
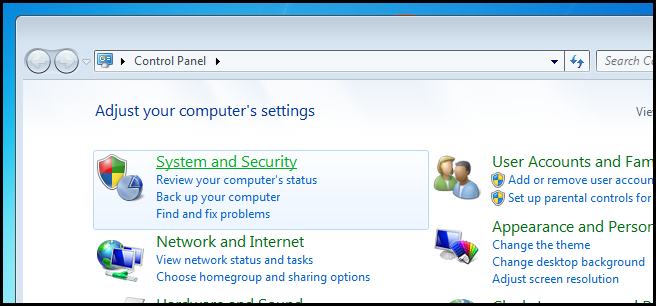
Then click on System and Security.
然后单击系统和安全性。
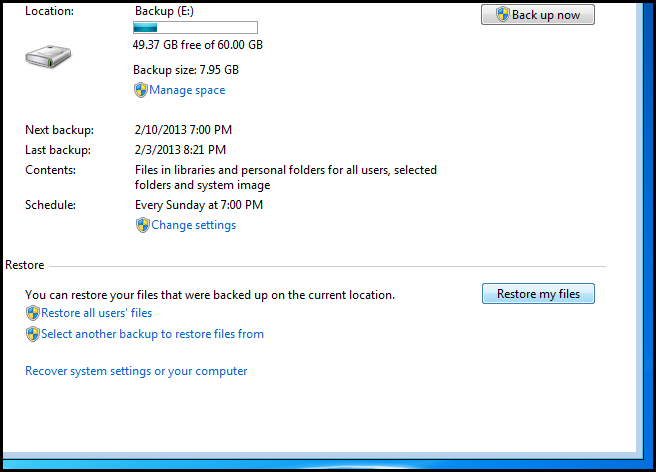
Now click on the Restore my files button in the bottom right hand corner of the Window.
现在,单击窗口右下角的“还原我的文件”按钮。
Then click the Browse for files button.
然后单击浏览文件按钮。
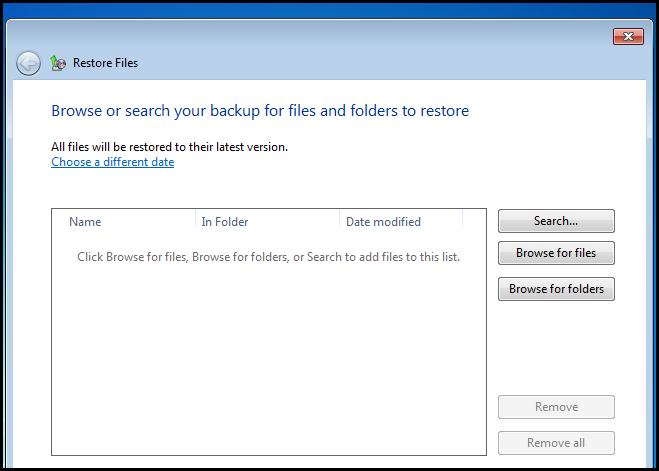
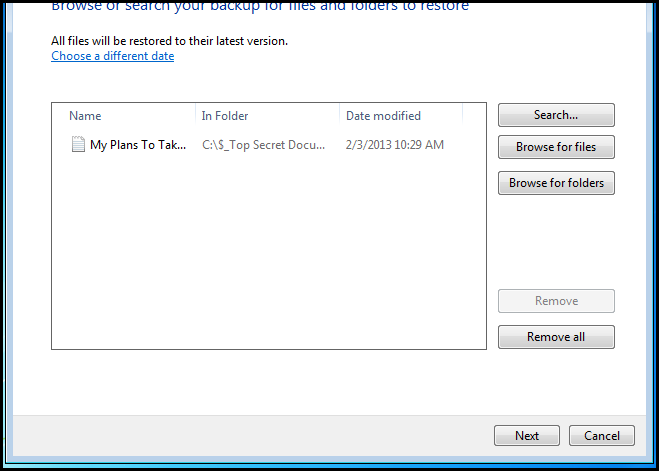
Now simply browse and select the file you want to restore, then click the add files button.
现在,只需浏览并选择要还原的文件,然后单击添加文件按钮。

Then click next.
然后单击下一步。
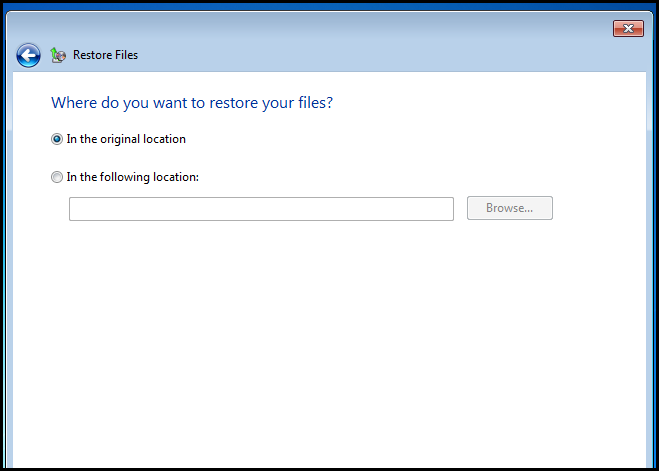
You can now restore the file to its original location or choose to restore it to an alternative location. This could be useful should you want to compare the files.
现在,您可以将文件还原到其原始位置,或选择将其还原到其他位置。 如果您要比较文件,这可能会很有用。
That’s all there is to restoring a single file. Next, let’s take a look at the Windows Recovery Environment, which can help you restore your PC from a system image following a system-wide failure.
这就是还原单个文件的全部内容。 接下来,让我们看一下Windows恢复环境,它可以帮助您在发生系统范围的故障后从系统映像还原PC。
Windows恢复环境 (The Windows Recovery Environment)
Windows includes a set of tools that you can use to troubleshoot and revive your system should a serious error ever occur. Collectively, these tools form what is called the WinRE (Windows Recovery Environment). Since we already have a guide on creating a recovery disc, lets take a look tools the WinRE includes.
Windows包含一组工具,如果发生严重错误,您可以使用它们来对系统进行故障排除和恢复。 这些工具共同构成了WinRE(Windows恢复环境)。 由于我们已经有创建恢复光盘的指南,因此让我们来看看WinRE包含的工具。
Note: You can also boot into the WinRE without creating a disc by holding the F8 key while your computer boots, then choosing repair your computer from the advanced boot options screen. Alternatively you could also access it using your installation DVD.
注意:您也可以在不启动光盘的情况下启动WinRE,方法是在计算机启动时按住F8键,然后从高级启动选项屏幕中选择修复计算机。 或者,您也可以使用安装DVD访问它。
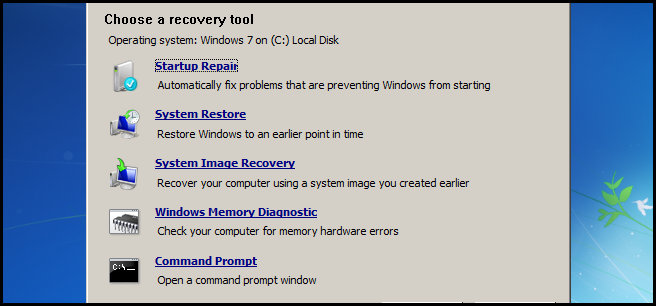
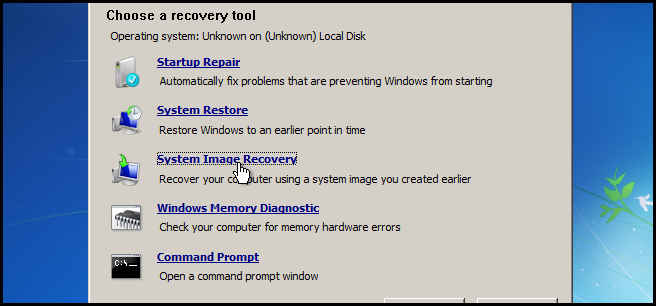
Startup Repair: Fixes certain problems that are preventing Windows from starting. For the most part it does this by verifying the integrity of core Windows files.
启动修复:修复了阻止Windows启动的某些问题。 在大多数情况下,它是通过验证核心Windows文件的完整性来实现的。
System Restore: Allows you to restore your computer’s files to an earlier point in time.
系统还原:允许您将计算机的文件还原到较早的时间点。
System Image Recovery: This is the option we will use to restore a system image.
系统映像恢复:这是我们将用来还原系统映像的选项。
Windows Memory Diagnostic Tool: Scans your computer’s memory for corruption.
Windows内存诊断工具:扫描计算机的内存是否损坏。
Command Prompt: Opens a new command prompt Window from where you can run command line utilities.
命令提示符:打开一个新的命令提示符窗口,从中可以运行命令行实用程序。
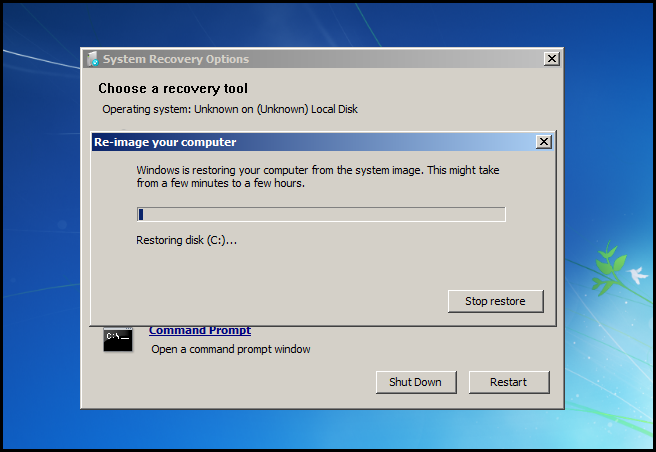
In the event that your PC won’t even boot, you will want to restore your data using the system image that is included in the Windows backup. To do that, select the System Image Recovery option.
如果您的PC甚至无法启动,则需要使用Windows备份中包含的系统映像来还原数据。 为此,请选择“系统映像恢复”选项。
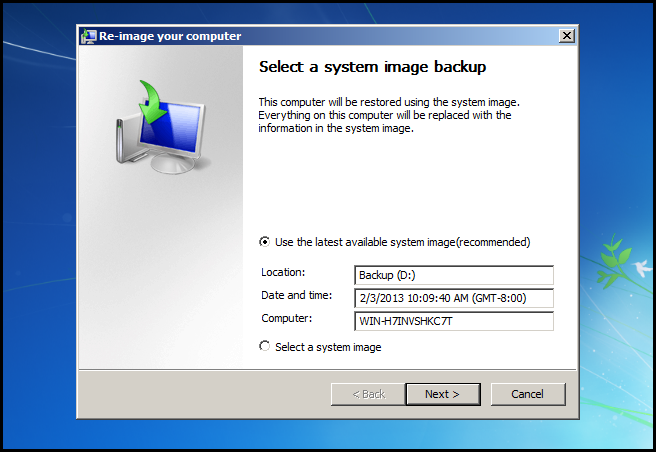
You will then be asked which system image you want to restore to. By default, it will detect the latest system image on any valid backup medium. In our case this is in fact the image I want to use, however if you want to restore to an older image you can always choose the select a system image option.
然后将询问您要将还原到哪个系统映像。 默认情况下,它将在任何有效的备份介质上检测到最新的系统映像。 在本例中,这实际上是我要使用的映像,但是,如果要还原到较旧的映像,则始终可以选择“选择系统映像”选项。
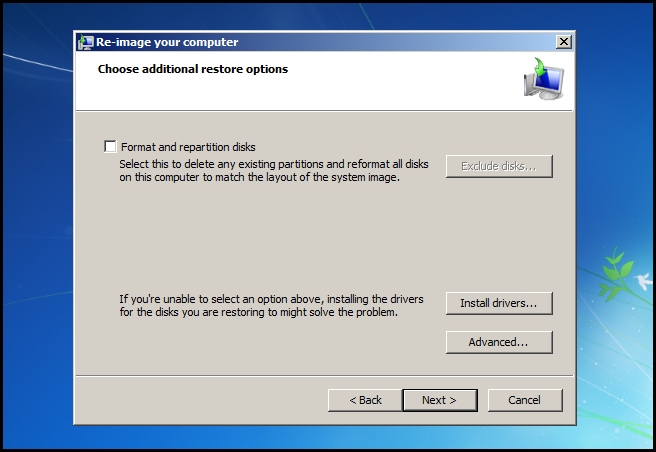
Then you have the option of formatting your systems disks. Just be careful to exclude the disk which your backup is on should your backup be on an internal disk. Then click next.
然后,您可以选择格式化系统磁盘。 如果备份位于内部磁盘上,请小心排除备份所在的磁盘。 然后单击下一步。
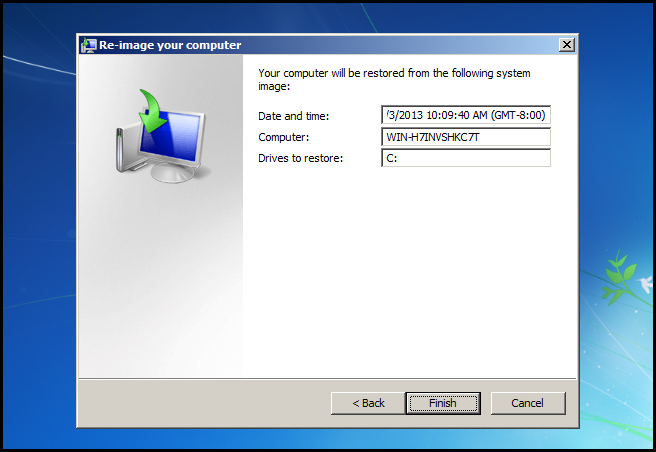
Finally, confirm your actions by clicking on the finish button, which will kick off the restore process.
最后,通过单击完成按钮确认您的操作,这将启动还原过程。
That’s all there is to it.
这里的所有都是它的。
家庭作业 (Homework)
This has been a long one, but you’re not done yet. There are still some miscellaneous topics you need to cover regarding Windows’ backup features.
这已经很长了,但是您还没有完成。 关于Windows的备份功能,您仍然需要涵盖一些其他主题。
- Learn about the Volume Shadow Copy Service. 了解有关卷影复制服务的信息。
- Learn about System Restore Points. 了解有关系统还原点的信息。
- Learn about Previous Versions. 了解以前的版本。
翻译自: https://www.howtogeek.com/136522/geek-school-learning-windows-7-backup-and-recovery/
极客时间和极客学院


 1832
1832

 被折叠的 条评论
为什么被折叠?


