


garageband 淡出

The ability to automate tracks is one of GarageBand’s more powerful features. Automation allows you to adjust the volume, panning, echo, and other effects at different points in your song. The way GarageBand implements this feature is actually very straightforward and intuitive, and easy to get started with.
自动跟踪曲目的能力是GarageBand的更强大功能之一。 自动化允许您在歌曲的不同点上调整音量,平移,回声和其他效果。 GarageBand实现此功能的方式实际上非常简单直观,并且易于入门。
如何自动跟踪 (How to Automate a Track)
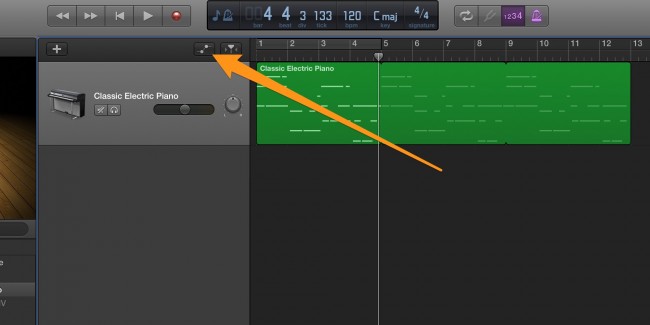
To begin automating a track, click the unlabeled “Automation Button” at the top of the instrument list, which should toggle and turn yellow. Make sure you have at least one track and at least one loop in that track, or you won’t have anything to automate.
要开始自动跟踪,请单击乐器列表顶部未标记的“自动化按钮”,该按钮应切换并变为黄色。 确保您至少有一个轨道和该轨道中的至少一个循环,否则您将没有任何自动化的方法。
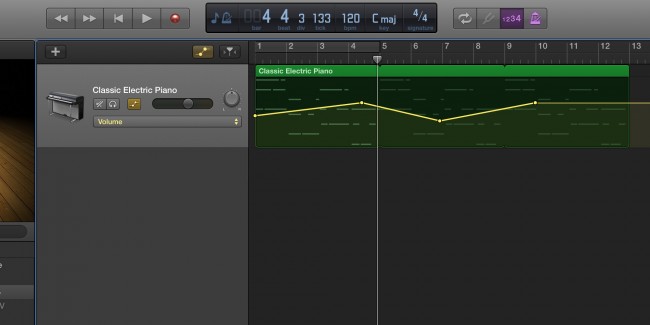
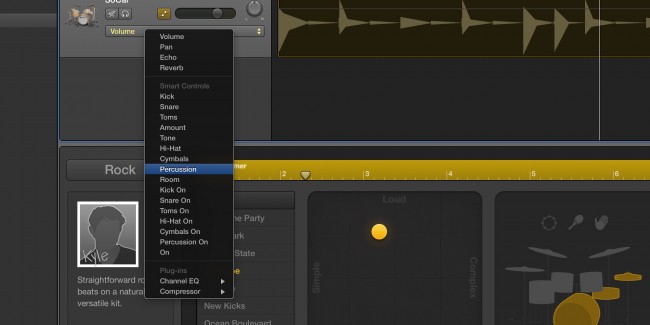
Your loops will turn dark, and you should now see a dropdown window of all the different options you can automate for each instrument. We’ll start by automating the track’s volume.
您的循环将变黑,现在您应该会看到一个下拉窗口,其中包含可针对每种乐器自动执行的所有不同选项。 我们将从自动化轨道音量开始。
Note that if you want to add new loops or edit existing ones, you will have to disable the automation editor by clicking the button again.
请注意,如果要添加新循环或编辑现有循环,则必须再次单击该按钮来禁用自动化编辑器。

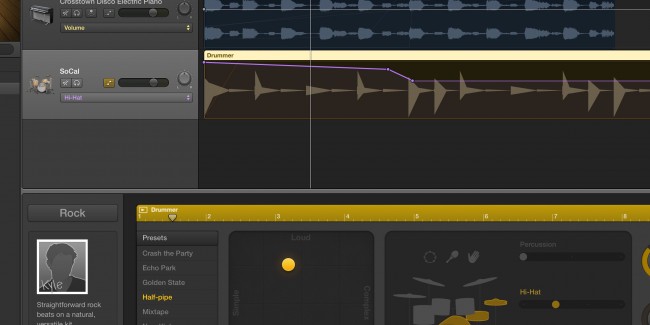
Start by holding down Command and clicking anywhere in the track region, which will create a new point. You can make new points by Command-clicking and dragging existing points around with your mouse. By creating slopes in between points, you can automatically adjust the volume as the track plays, creating a fade-in or fade-out effect. With sharp drops, you can effectively mute certain areas of a track.
首先按住Command键并单击跟踪区域中的任意位置,这将创建一个新点。 您可以通过Command单击鼠标并拖动现有点来创建新点。 通过在点之间创建坡度,您可以在音轨播放时自动调节音量,从而创建淡入或淡出效果。 通过锐减,您可以有效地使轨道的某些区域静音。
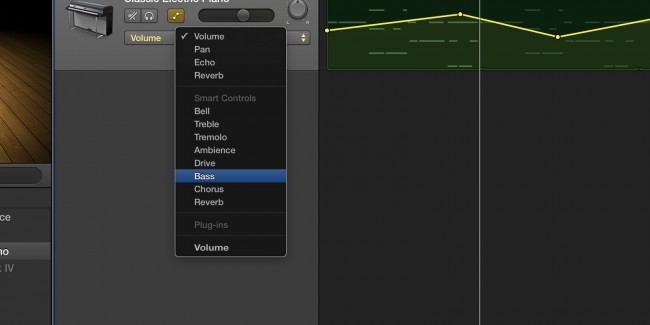
If you click the dropdown menu, you can see a list of the options you can automate.
如果单击下拉菜单,则可以看到可以自动执行的选项的列表。
The basic options for every instrument are Volume, Pan, Echo and Reverb. Volume controls how loud a track is, Pan shifts a track’s sound towards one ear, and Echo and Reverb are very similar with a key difference: an echo on a track is distinct from the original track, almost like the track was copied and delayed for a short time, and a reverb on the track is a very short echo that sounds blended together with the original track.
每种乐器的基本选项是音量,声相,回声和混响。 音量控制音轨的音量,Pan将音轨的声音移向一只耳朵,回声和混响非常相似,但有一个关键的区别:音轨上的回声不同于原始音轨,几乎就像该音轨被复制并延迟了在很短的时间内,轨道上的混响是一个非常短的回声,听起来会与原始轨道混合在一起。
The “Smart Controls” section of the options vary from instrument to instrument. For example, the options to configure for the drums are completely different from the piano. Actually, the options for the drums provide a level of control over the Apple’s automatic drums that you wouldn’t have otherwise.
选项的“智能控件”部分因仪器而异。 例如,为鼓配置的选项与钢琴完全不同。 实际上,鼓的选件提供了对Apple自动鼓的某种程度的控制,而这是您以前没有的。
In this example, the volume of the drum’s Hi Hats starts high and slowly decreases over the course of the track. You can control each piece of the drum individually, adjusting the volume or turning elements on and off.
在此示例中,鼓的Hi Hat的音量开始很高,然后在轨道上逐渐减小。 您可以分别控制每个鼓,调节音量或打开或关闭元件。
如何使均衡器自动化 (How to Automate the Equalizer)
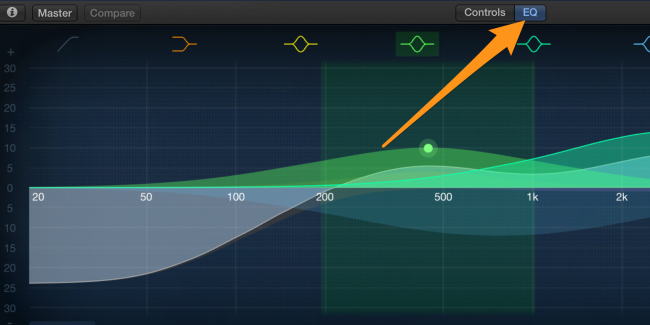
The built in Visual equalizer (or EQ) is a very powerful tool, and gets even more powerful with the ability to automate it. If you don’t already have the EQ enabled, you can enable it by double-clicking on an instrument and clicking the “EQ” button.
内置的Visual均衡器(或EQ)是一种非常强大的工具,并且具有自动实现的功能,因此功能更加强大。 如果尚未启用均衡器,则可以通过双击乐器并单击“ EQ”按钮来启用它。
Now that the EQ is enabled, it will show up in the dropdown for the possible automations, with its own expandable menu. This menu contains over 30 options to automate, but you’ll only really use a few. You can configure the EQ however you want, and anything that you don’t automate will stay the same throughout the track.
现在启用了EQ,它将在下拉菜单中显示其可能的自动化功能,并带有自己的可扩展菜单。 该菜单包含30多个自动化选项,但您实际上只会使用其中几个。 您可以根据需要配置EQ,所有不自动化的操作在整个过程中都将保持不变。
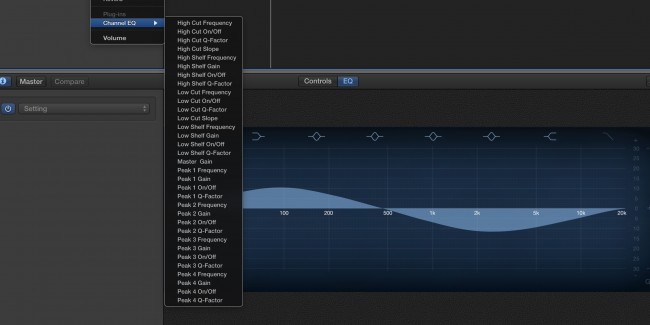
The EQ has a high and low shelf, a high and low cutoff, and 4 peaks. For each of these, you can automate the frequency, which controls the horizontal position on the EQ. For the shelfs and peaks, you can control the gain, which controls how much quieter or louder that frequency will be. You can switch each point on and off with the On/Off setting, and you can even control the Q-factor, which controls the tightness of the peak, something you can’t do without automation in the Visual EQ.
均衡器有一个高和低的架子,一个高和低的截止,和4个峰。 对于这些中的每一个,您都可以使频率自动化,从而控制EQ上的水平位置。 对于架子和峰值,您可以控制增益,该增益控制该频率将变得更安静或更大声。 您可以使用“开/关”设置来打开和关闭每个点,甚至可以控制Q因子,该因子控制峰的紧密度,而如果没有Visual EQ中的自动化,则无法做到这一点。
翻译自: https://www.howtogeek.com/238649/how-to-use-automation-in-garageband/
garageband 淡出


 1014
1014

 被折叠的 条评论
为什么被折叠?
被折叠的 条评论
为什么被折叠?
 到【灌水乐园】发言


