


plex 乱码

Plex Media Server’s remote access function is usually so smooth to set up that it’s practically magic. But if you’re having trouble accessing your movies from afar, we’re here to help.
Plex Media Server的远程访问功能通常设置起来非常流畅,以至于几乎是魔术。 但是,如果您无法从远处观看电影,我们会在这里为您提供帮助。
If you primarily use Plex Media Server for watching content on your local network (like streaming your favorite shows to your HDTV or smartphone), you may not have given much though to the benefits of remote access.
如果您主要使用Plex Media Server来观看本地网络上的内容(例如将喜欢的节目流式传输到HDTV或智能手机),则可能不会充分利用远程访问的好处。
One of the greatest things about the Plex Media Server platform, however, is the ease with which you can access your media from anywhere. With remote access enabled and properly configured, you can watch your favorite TV shows anywhere you have internet access: on your phone while you’re sitting in a waiting room, on your laptop while you’re vacationing, or even on a smart TV at a friend’s house.
但是,关于Plex Media Server平台的最大优点之一就是您可以轻松地从任何地方访问媒体。 启用远程访问并正确配置后,您可以在任何可以访问互联网的地方观看喜爱的电视节目:在等候室时在手机上,度假时在笔记本电脑上,甚至在智能电视上,朋友家
Most of the time you should have very little trouble setting up remote access to your Plex Media Server, but there are a few instances where your home network configuration can throw you a curve ball. Let’s look at how to enable remote access and then how to trouble shoot remote access issues. If you need help with the initial setup and configuration of Plex Media Server, please refer to our getting started with Plex guide here.
在大多数情况下,设置对Plex Media Server的远程访问应该很少有麻烦,但是在某些情况下,您的家庭网络配置会给您带来麻烦。 让我们看看如何启用远程访问,然后如何解决远程访问问题。 如果您需要有关Plex Media Server的初始设置和配置的帮助,请在此处参考我们的Plex入门指南。
如何启用远程访问 (How to Enable Remote Access)
During the initial setup of the Plex Media Server, the setup wizard prompts you to enable or disable remote access. While the default state is enabled, you may have opted at the time to disable remote access, or perhaps you inadvertently disabled it while messing around with the system settings later on. Regardless, it’s easy enough to check the status of remote access and enable it if it is currently disabled.
在Plex Media Server的初始安装过程中,安装向导会提示您启用或禁用远程访问。 启用默认状态后,您可能当时选择禁用远程访问,或者您可能无意中禁用了远程访问,而稍后又在修改系统设置。 无论如何,检查远程访问的状态并启用(如果当前已禁用)很容易。
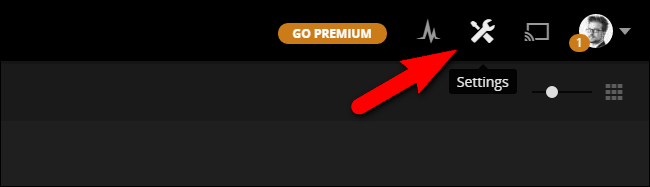
While logged into your Plex Media Server’s web control panel, select the Settings icon from the upper right toolbar.
登录到Plex Media Server的Web控制面板后,从右上方工具栏中选择“设置”图标。
Within the Settings menu select, the “Server” tab. Then, from the left hand navigation pane, select “Remote Access”. By default, you’ll only see a simple view (the information in the large red box below), for the more advanced view with the “Server Mapping” information visible, click on the “Show Advanced” button in the upper right corner of the navigation bar.
在设置菜单中,选择“服务器”选项卡。 然后,从左侧导航窗格中选择“远程访问”。 默认情况下,您只会看到一个简单的视图(下面的红色大框中的信息),对于显示“服务器映射”信息的更高级的视图,请单击该视图右上角的“显示高级”按钮。导航栏。

If your server is currently not configured for remote access, it will say “Not available outside your network” as seen above. Click the large orange button that reads “Enable Remote Access”.
如果您的服务器当前未配置为进行远程访问,它将显示“网络外部不可用”,如上所示。 单击显示为“启用远程访问”的橙色大按钮。
After you enable remote access (or if remote access was already enabled), you’ll see an entry similar to the one below.
启用远程访问(或如果已启用远程访问)后,您将看到与以下内容相似的条目。
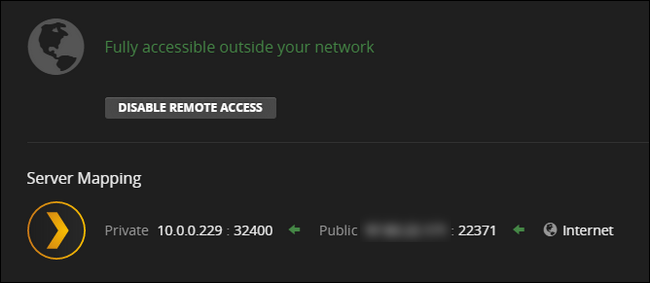
In addition to telling you that the server is accessible, the control panel will also indicate the internal IP address and port number of the Plex Media Server on your local network as well as external, or public, IP address and port number.
除了告诉您服务器可访问之外,控制面板还将指示本地网络上Plex Media Server的内部IP地址和端口号以及外部或公共IP地址和端口号。
Although making note of both the internal and external IP addresses and port numbers is useful for troubleshooting, you don’t need to know any of this information for regular day-to-day use of Plex Media Server. The Plex system automatically handles all the connection data as long as you are logged into the same Plex account on your media server and all your client devices. If you’re having issues, however, don’t worry–in the next section we’ll look at the most common issues and how to solve them.
尽管记下内部和外部IP地址以及端口号对于故障排除很有用,但是您无需知道任何此类信息即可正常使用Plex Media Server。 只要您在媒体服务器和所有客户端设备上登录到相同的Plex帐户,Plex系统就会自动处理所有连接数据。 但是,如果您遇到问题,请不要担心–在下一节中,我们将介绍最常见的问题以及如何解决它们。
对Plex Media Server的连接进行故障排除 (Troubleshooting Your Plex Media Server’s Connection)
While remote access is generally headache free, sometimes you run into a hiccup or two. If you enable remote access to your Plex Media Server and see an error message like “Not available outside your network”, then you have a little trouble shooting to do.
虽然远程访问通常不会让人头疼,但有时您会遇到一两次打ic。 如果您启用了对Plex Media Server的远程访问,并看到诸如“网络外部不可用”之类的错误消息,则您在进行拍摄时会遇到一些麻烦。
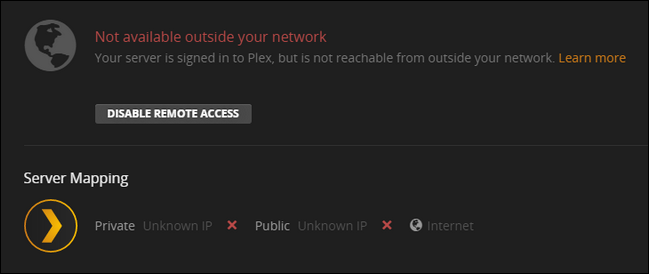
It’s important to note that the Plex Media Server can still reach the internet (the server is signed in), but the Plex system can’t access your Plex server from the outside. If you can’t log in, at all then you’ve got a bigger problem on your hands–a general internet outage. (But don’t worry, even if you’re experiencing network problems beyond just setting up your Plex server, we still have you covered.)
重要的是要注意,Plex Media Server仍然可以访问Internet(服务器已登录),但是Plex系统无法从外部访问您的Plex服务器。 如果您无法登录,那么您将面临一个更大的问题-普遍的互联网中断。 (但是请放心,即使您遇到的不仅仅是设置Plex服务器而遇到的网络问题,我们仍然可以解决。)
启用自动连接的UPnP (Enable UPnP For Automatic Connections)
The first thing you should check, when you encounter this error message, is that your router supports either NAT-PMP (less common) or UPnP (more common). Both of these services allow for automatic port forwarding and if your router supports them, then Plex Media Server will automatically configure its own port forwarding.
遇到此错误消息时,您应该检查的第一件事是您的路由器支持NAT-PMP(较不常见)或UPnP(较常见)。 这两种服务都允许自动端口转发,如果您的路由器支持它们,则Plex Media Server将自动配置其自己的端口转发。
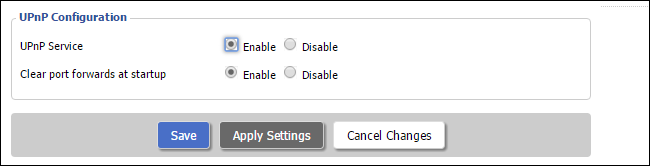
Check the documentation of your router or simply search for the router name and additional search terms like “how to enable UPnP” for additional information. If UPnP is off, turning it on will allow Plex to automatically forward itself to the greater internet.
查看路由器的文档,或仅搜索路由器名称和其他搜索词(例如“如何启用UPnP”)以获取其他信息。 如果UPnP关闭,将其打开将允许Plex自动将自身转发到更大的Internet。
If your router doesn’t support NAT-PMP or UPnP (or you have a pressing reason not to use it) then you’ll want to jump to the section below “Manually Forward Your Ports”
如果您的路由器不支持NAT-PMP或UPnP(或者迫切需要不使用它),则需要跳至“手动转发端口”下面的部分。
用桥接模式消除地址问题 (Banish Address Problems With Bridge Mode)
Far and away the UPnP fix should remedy nearly everyone’s connectivity issues. In rare situations, however, your network configuration can be conspiring against you. Routers have a feature known as Network Address Translation (NAT) that handles the complex task of juggling all the network requests coming into your single public facing IP against all the many internal IP addresses those requests are destined for.
UPnP修复程序几乎可以解决几乎每个人的连接问题。 但是,在极少数情况下,您的网络配置可能会阴谋害您。 路由器具有称为网络地址转换(NAT)的功能,该功能可处理将进入您的单个面向公共IP的所有网络请求与针对这些请求的所有许多内部IP地址进行混合的复杂任务。
All by itself, the NAT system works awesome. When a NAT system is doubled up with another NAT system, however, it can create issues for apps (like the Plex Media Server) that rely on UPnP to create automatic port forwarding rules. This occurs commonly when you have a router/modem combo supplied by your ISP and your own router plugged into that unit. For help dealing with that particular situation, as well as eliminating double NAT problems in general, check out our guide here.
单独使用NAT系统就可以了。 但是,当一个NAT系统与另一个NAT系统加倍时,它将为依赖UPnP创建自动端口转发规则的应用程序(例如Plex Media Server)造成问题。 当您有一个由ISP提供的路由器/调制解调器组合并将自己的路由器插入该设备时,通常会发生这种情况。 要获得处理该特定情况的帮助,并通常消除双重NAT问题,请在此处查看我们的指南。
手动转发端口 (Manually Forward Your Ports)
If you prefer not to use UPnP or you can’t resolve your double NAT situation that’s playing havoc with UPnP, you can circumvent the entire issue by manually setting up a port forwarding rule. For the unfamiliar, port forwarding is simply when you tell your router “OK router, any requests that come in to my public IP address at port #XXXX, should be forwarded to this internal IP address at Port #YYYY.”
如果您不想使用UPnP,或者无法解决UPnP造成的双重NAT问题,则可以通过手动设置端口转发规则来规避整个问题。 对于不熟悉的人,端口转发只是当您告诉路由器“确定路由器,进入端口#XXXX到我的公共IP地址的任何请求都应转发到端口#YYYY的此内部IP地址”。
To do so, you need to tell Plex Media Server you wish to manually specify the port number, and then, at the router level, assign a static IP address to your Plex Media Server computer and create a port forwarding rule. First, let’s turn on the manual port mode in Plex. To do so navigate to Settings > Server > Remote Access (as we did in the previous section of the tutorial).
为此,您需要告诉Plex Media Server您希望手动指定端口号,然后在路由器级别为Plex Media Server计算机分配一个静态IP地址并创建端口转发规则。 首先,让我们在Plex中打开手动端口模式。 为此,请导航至“设置”>“服务器”>“远程访问”(如本教程上一节所述)。
Check “Manually specify public port”. Unless you have a pressing reason to do so, there’s no need to change the port number here. Click “Apply”.
选中“手动指定公共端口”。 除非您有紧迫的理由,否则无需在此更改端口号。 点击“应用”。
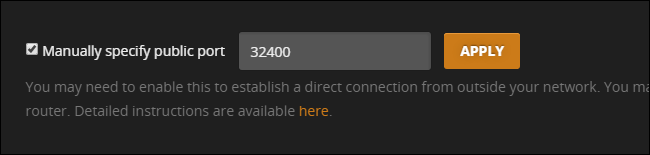
If you don’t see the manual port option in your settings, you need to click on the “Show Advanced” button in the upper right navigation bar.
如果您在设置中没有看到手动端口选项,则需要单击右上方导航栏中的“显示高级”按钮。
Once you’ve turned on the option in Plex, it’s time to access your router’s admin page. How you set up a static IP address and port forwarding rules vary from router to router, but the general premise is the same. You’ll need to identify your Plex Media Server computer on the network and then look for an option in your router to create a “static IP”, “static lease”, or “DHCP reservation” to permanently associate the Plex Media Center with a given IP address. Below you can see an example of what adding a static IP address looks like, via our DD-WRT router.
启用Plex中的选项后,就可以访问路由器的管理页面了。 设置静态IP地址和端口转发规则的方式因路由器而异,但一般前提是相同的。 您需要识别网络上的Plex Media Server计算机,然后在路由器中寻找一个选项来创建“静态IP”,“静态租约”或“ DHCP保留”,以将Plex Media Center与计算机永久关联。指定的IP地址。 在下面,您可以通过DD-WRT路由器看到添加静态IP地址的示例。
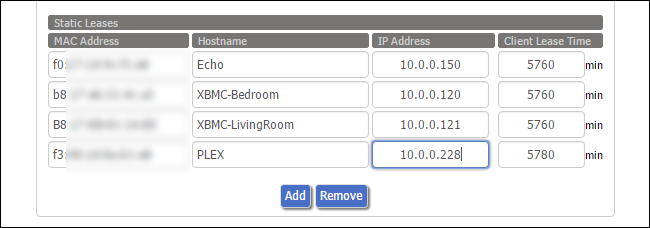
If you don’t do this every time your router assigns a new internal address to the media server it will break your port forwarding rule. If you need more information on setting up a static IP address you can search for documentation for your specific router and read up on static IP addresses here.
如果您每次路由器都不给媒体服务器分配一个新的内部地址时不这样做,则会违反您的端口转发规则。 如果您需要有关设置静态IP地址的更多信息,则可以搜索特定路由器的文档并在此处阅读静态IP地址。
Once you’ve set a static IP address for the server, then you simply need to tell the router, via port forwarding rule, that all traffic on that port should be directed at that internal IP address. Again, via our DD-WRT router, here’s a general example of what that looks like: we’ve forwarded everything on external port 32400 to the internal IP address of the Plex server, also on port 32400 to keep things simple. Check out our full guide to port forwarding for more information, if you need it.
为服务器设置静态IP地址后,只需通过端口转发规则告诉路由器该端口上的所有流量都应定向到该内部IP地址。 同样,通过DD-WRT路由器,这是一个大致的示例:我们将外部端口32400上的所有内容转发到了Plex服务器的内部IP地址上,也将其转发给了32400端口上的内部IP地址,以简化操作。 如果需要,请查看我们的端口转发完整指南以获取更多信息。
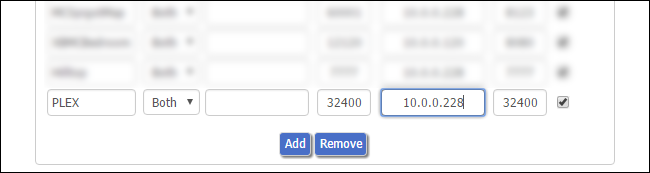
After you’ve set the port in Plex and set up the two rules (static IP and port forwarding) in your router, everything is all set. Simply hop back over or to the Plex Media Server control panel to double check the server status page, and enjoy.
在Plex中设置端口并在路由器中设置两个规则(静态IP和端口转发)后,一切都设置完毕。 只需跳回或跳到Plex Media Server控制面板以仔细检查服务器状态页面,即可享用。
Plex Media Server generally works, by the magic of UPnP, right out of the box. But in those rare instances it doesn’t, it’s just a matter of applying a few simple tweaks to get your media server back online.
通常,借助UPnP,Plex Media Server可以立即使用。 但是在极少数情况下却并非如此,这只是应用一些简单的调整即可使您的媒体服务器重新联机的问题。
plex 乱码


 2803
2803


 被折叠的 条评论
为什么被折叠?
被折叠的 条评论
为什么被折叠?
 到【灌水乐园】发言


