
wordpress表单调用
Do you want to create AMP-friendly forms on your WordPress site?
您是否要在WordPress网站上创建AMP友好表单?
Accelerated Mobile Pages or AMP is a Google project that makes websites load faster on mobile devices.
加速的移动页面或AMP是一个Google项目,可以使网站在移动设备上的加载速度更快。
While AMP offers a great mobile browsing experience by making your webpages load faster, it disables many useful features on your website.
虽然AMP通过加快网页加载速度提供了出色的移动浏览体验,但它禁用了网站上的许多有用功能。
One of them is contact forms. Since AMP uses a limited set of HTML and JavaScript, it cannot load your WordPress forms properly on AMP pages.
联系表格就是其中之一。 由于AMP使用一组有限HTML和JavaScript,因此无法在AMP页面上正确加载WordPress表单。
But thankfully, now there is an easy solution available. WPForms, the most beginner-friendly WordPress form plugin now helps you create AMP-ready WordPress forms. Their team recently worked with Google to make AMP forms easy for WordPress.
但值得庆幸的是,现在有一个简单的解决方案可用。 WPForms是最适合初学者的WordPress表单插件,现在可以帮助您创建可用于AMP的WordPress表单。 他们的团队最近与Google合作,简化了WordPress的AMP表格。
In this article, we will show you how to create AMP forms in WordPress using WPForms (the easy way).
在本文中,我们将向您展示如何使用WPForms(简单的方法)在WordPress中创建AMP表单。
在WordPress中创建AMP表单(逐步操作) (Creating AMP Forms in WordPress (Step by Step))
In order to use AMP with WordPress, you need to install and activate the official AMP plugin for WordPress. For more details, see our step by step guide on how to install a WordPress plugin.
为了将AMP与WordPress结合使用,您需要安装并激活WordPress的官方AMP插件 。 有关更多详细信息,请参阅有关如何安装WordPress插件的分步指南。
Once activated, the plugin will automatically add Google AMP support for your WordPress site.
激活后,该插件将自动为您的WordPress网站添加Google AMP支持。
However, you can change AMP settings for your website by going to AMP » General from your dashboard.
但是,您可以通过从仪表板转到AMP»General来更改网站的AMP设置。

From the AMP settings page, you can enable or disable AMP on your website, choose a website mode for AMP, and choose supported templates.
在“ AMP设置”页面上,可以启用或禁用网站上的AMP,选择AMP的网站模式,然后选择支持的模板。
Once you have configured AMP, the next step is to create an AMP compatible contact form on your WordPress site.
配置AMP后,下一步就是在WordPress网站上创建AMP兼容的联系表单。
步骤1.使用WPForms创建WordPress表单 (Step 1. Create a WordPress Form with WPForms)
To get started, install and activate the WPForms Lite plugin on your site. It is the lite version of the WPForms Pro plugin.
首先,请在您的网站上安装并激活WPForms Lite插件。 它是WPForms Pro插件的精简版。
Both the lite and pro version of WPForms allows you to create a basic AMP ready contact form. In our article, we will be using the free version for screenshots.
WPForms的精简版和专业版均允许您创建基本的AMP就绪联系表。 在我们的文章中,我们将使用免费版本的屏幕截图。
Once the plugin is installed and activated, you need to head over to WPForms » Add New page to create a new WordPress form.
安装并激活插件后,您需要转到WPForms»添加新页面以创建新的WordPress表单。
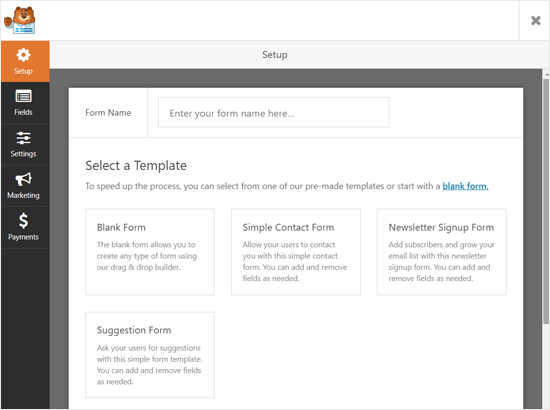
On the form setup screen, you can choose a form template to get started quickly. You can select the Blank Form if you want to start from scratch.
在表单设置屏幕上,您可以选择一个表单模板以快速入门。 如果要从头开始,可以选择空白表格。
Next, it will open the form builder page.
接下来,它将打开表单构建器页面。
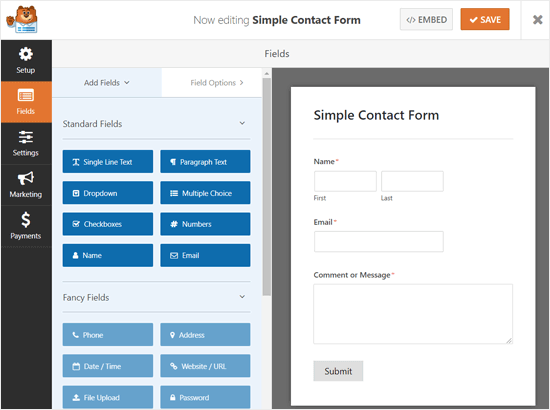
From here, you can add or remove form fields. To add a new field to your form, you can simply click on a form field from the left panel, and it will appear in the form builder panel on the right.
在这里,您可以添加或删除表单字段。 要将新字段添加到表单,只需在左侧面板上单击一个表单字段,该字段就会出现在右侧的表单构建器面板中。
After that, you can configure the field options. Simply click on a field, and then Field Options will appear.
之后,您可以配置字段选项。 只需单击一个字段,然后将出现“字段选项”。
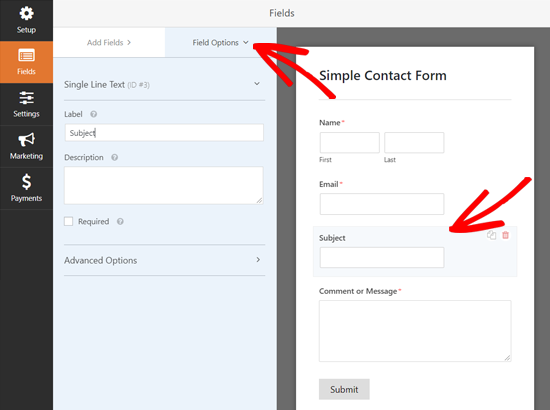
Similarly, you can customize all the other fields.
同样,您可以自定义所有其他字段。
After that, you can click on the Settings tab to configure your form settings.
之后,您可以单击“设置”选项卡以配置表单设置。

The General Settings allow you to change your form name, submit button text, submit button processing text, enable anti-spam Honeypot, and more.
通过“常规设置”,您可以更改表单名称,提交按钮文本,提交按钮处理文本,启用反垃圾邮件Honeypot等。
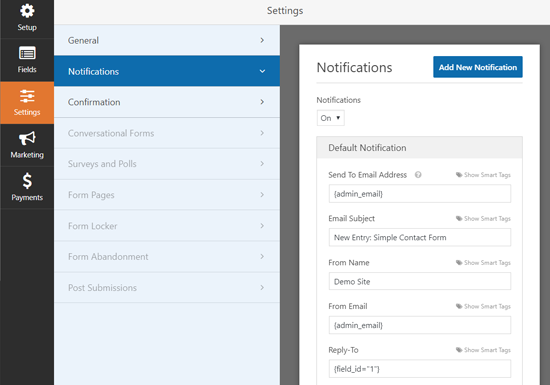
Next, you can click on the Notifications tab to set up email notifications to notify you when a user completes the form.
接下来,您可以单击“通知”选项卡来设置电子邮件通知,以在用户填写表格时通知您。
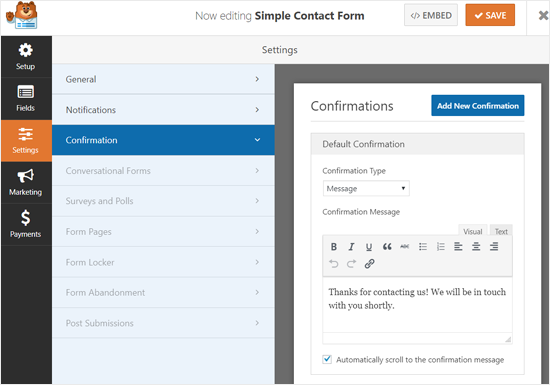
Next, you can click on the Confirmation tab to set up a confirmation message to be shown when a user submits the form.
接下来,您可以单击“确认”选项卡以设置一条确认消息,以在用户提交表单时显示。
After the configuration is complete, you can save your form.
配置完成后,您可以保存表单。
步骤2.将您的AMP表单添加到页面 (Step 2. Add Your AMP Form to a Page)
Now that your WordPress form is ready, you can add it to a page.
现在您的WordPress表单已准备就绪,您可以将其添加到页面中。
First, you need to create a new page or open an existing one where you want to add the form.
首先,您需要创建一个新页面或打开要添加表单的现有页面。
On your page edit screen, click on the Add New Block icon and select the WPForms block.
在页面编辑屏幕上,单击“添加新块”图标,然后选择WPForms块。

After that, you can see the WPForms widget added to your page edit screen. You just need to select the form you created earlier, and the widget will instantly load it in the page editor.
之后,您可以看到WPForms小部件已添加到页面编辑屏幕。 您只需要选择您之前创建的表单,小部件就会立即将其加载到页面编辑器中。

Next, you can publish or update your page.
接下来,您可以发布或更新页面。
That’s all! You don’t need to configure anything else. The WPForms Lite plugin will add full AMP support to your form now.
就这样! 您无需配置其他任何内容。 WPForms Lite插件现在将为您的表单添加完整的AMP支持。
If you want to see how it looks, then you can open the page on your mobile phone.
如果要查看外观,则可以在手机上打开页面。
Or you can open the page on your desktop browser by adding /amp/ or /?amp at the end of your page URL. For example, https://www.example.com/contact/?amp.
或者,您可以通过在页面URL的末尾添加/ amp /或/?amp来在桌面浏览器上打开页面。 例如,https://www.example.com/contact/?amp。
将Google reCAPTCHA添加到您的AMP表单 (Adding Google reCAPTCHA to Your AMP Form)
By default, WPForms includes anti-spam honeypot to catch and block spam. Additionally, you can use Google reCAPTCHA to reduce spam submissions.
默认情况下,WPForms包含反垃圾邮件蜜罐,以捕获和阻止垃圾邮件。 此外,您可以使用Google reCAPTCHA减少垃圾邮件的提交。
To use Google reCAPTCHA with your AMP forms, you need to register your site for Google reCAPTCHA v3 and get the Google API keys.
要将Google reCAPTCHA与AMP表单一起使用,您需要为Google reCAPTCHA v3注册您的网站并获取Google API密钥。
Go to the Google reCAPTCHA website and click on the ‘Admin Console’ button at the top right corner of the page.
转到Google reCAPTCHA网站 ,然后单击页面右上角的“管理控制台”按钮。

After that, you need to sign in with your Google account. Once done, you will see the ‘Register a new site’ page.
之后,您需要使用您的Google帐户登录。 完成后,您将看到“注册新站点”页面。

First, you need to enter your website name in the Label field. Google AMP only supports reCAPTCHA v3, so you need to choose it from the reCAPTCHA type options.
首先,您需要在标签字段中输入您的网站名称。 Google AMP仅支持reCAPTCHA v3,因此您需要从reCAPTCHA类型选项中进行选择。
After that, enter your domain name under the Domains section.
之后,在“域”部分下输入您的域名。

The Owners section shows your email address by default. You can also add another email if you want.
默认情况下,“所有者”部分显示您的电子邮件地址。 您还可以根据需要添加其他电子邮件。
Next, you need to accept the reCAPTCHA Terms of Service to continue. Also, select the ‘Send alerts to owners’ checkbox, which will allow Google to notify you about problems like misconfiguration and suspicious traffic on your site.
接下来,您需要接受reCAPTCHA服务条款才能继续。 另外,选中“向所有者发送警报”复选框,这将使Google可以通知您有关网站上的配置错误和可疑流量等问题。
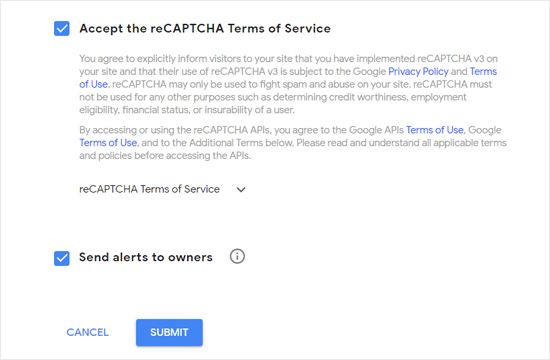
Once done, click on the Submit button.
完成后,单击“提交”按钮。
Next, you will see a success message along with the site key and the secret key to add reCAPTCHA on your site.
接下来,您将看到一条成功消息以及站点密钥和密钥,以在您的站点上添加reCAPTCHA。
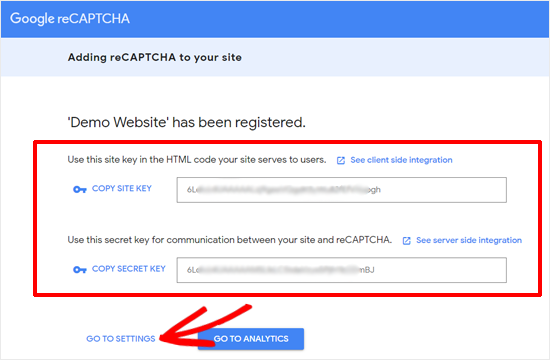
Now you have the Google API keys to add reCAPTCHA to your forms. However, there is one more adjustment required to ensure AMP compatibility with the reCATCHA. Click on the ‘Go to Settings’ link there.
现在,您已经有了Google API密钥,可以将reCAPTCHA添加到表单中。 但是,还需要进行另一项调整以确保AMP与reCATCHA兼容。 单击那里的“转到设置”链接。
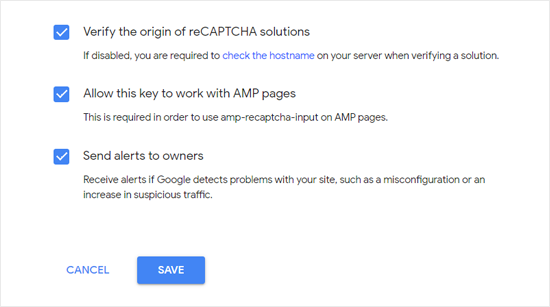
Next, you will see the reCAPTCHA settings again with ‘Allow this key to work with AMP pages’ checkbox. Simply check the box and click on the Save button below.
接下来,您将再次看到“允许此键处理AMP页面”复选框的reCAPTCHA设置。 只需选中该复选框,然后单击下面的“保存”按钮。
Now that you have Google API keys to add reCAPTCHA on AMP forms, you need to open WPForms » Settings » reCAPTCHA page in your WordPress dashboard.
现在您已经有了Google API密钥,可以在AMP表单上添加reCAPTCHA,您需要在WordPress仪表板中打开WPForms»设置»reCAPTCHA页面。

On this screen, you need to choose reCAPTCHA v3 option and paste the site key and secret key. After that, click on the Save Settings button.
在此屏幕上,您需要选择reCAPTCHA v3选项并粘贴站点密钥和秘密密钥。 之后,单击“保存设置”按钮。
Now that Google reCAPTCHA is added to WPForms, you can enable it in your forms where needed. Go to WPForms » All Forms and select the form where you want to enable the reCAPTCHA.
现在Google reCAPTCHA已添加到WPForms中,您可以在需要的表单中启用它。 转到WPForms»所有表单,然后选择要启用reCAPTCHA的表单。

Once the form setup screen appears, click on the Settings tab and select the General Settings section. At the bottom, you can see ‘Enable Google v3 reCAPTCHA’ checkbox.
出现表单设置屏幕后,单击“设置”选项卡,然后选择“常规设置”部分。 在底部,您可以看到“启用Google v3 reCAPTCHA”复选框。

Check the box and then save your form by clicking on the Save button at the top right corner.
选中该框,然后通过单击右上角的“保存”按钮来保存表单。
After that, you can revisit your contact page and see the AMP form with reCAPTCHA in action.
之后,您可以重新访问您的联系页面,并使用reCAPTCHA查看AMP表单。
We hope this article helped you to learn how to create AMP forms in WordPress easily. You may also want to see our guide on how to create GDPR compliant forms in WordPress.
我们希望本文能帮助您学习如何在WordPress中轻松创建AMP表单。 您可能还想查看有关如何在WordPress中创建符合GDPR要求的表单的指南。
If you liked this article, then please subscribe to our YouTube Channel for WordPress video tutorials. You can also find us on Twitter and Facebook
如果您喜欢这篇文章,请订阅我们的YouTube频道 WordPress视频教程。 您也可以在Twitter和Facebook上找到我们
翻译自: https://www.wpbeginner.com/wp-tutorials/how-to-create-amp-forms-in-wordpress/
wordpress表单调用


 2250
2250


 被折叠的 条评论
为什么被折叠?


