


初学者vs安装
We often get compliments from users on how fast our site loads. Everyone wants to know the secret behind a fast loading WordPress site. Aside from good web hosting and well-coded plugins, you have to make sure that you’re using proper caching and have a CDN (content delivery network). For our setup, we use a plugin called W3 Total Cache. Due to a high volume of request, we have decided to create a step by step guide on how to install and setup W3 Total Cache for beginners.
我们经常获得用户对我们网站加载速度的赞赏。 每个人都想知道快速加载WordPress网站背后的秘密。 除了良好的网络托管和良好编码的插件外,您还必须确保使用正确的缓存并拥有CDN( 内容交付网络 )。 对于我们的设置,我们使用一个名为W3 Total Cache的插件。 由于需求量很大,我们决定创建一个逐步指南,介绍如何为初学者安装和设置W3 Total Cache。
In this article, we will show you how to install W3 Total Cache and set it up properly to maximize the benefits. We will also show you how to combine W3 Total Cache wit ha CDN service to make your site load even faster.
在本文中,我们将向您展示如何安装W3 Total Cache并进行正确设置以最大程度地发挥收益。 我们还将向您展示如何结合使用CDN服务和W3 Total Cache使您的站点加载更快。
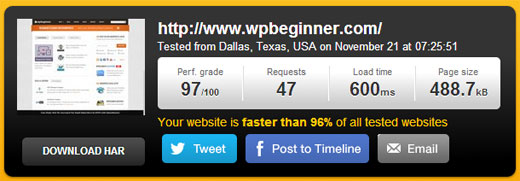
Before you begin, we highly recommend that you check performance of your site by using Google Page Speed and Pingdom Tools. This will give you a before and after comparison.
在开始之前,我们强烈建议您使用Google Page Speed和Pingdom Tools检查网站的性能。 这将为您提供前后比较。
Below is the screenshot of our Pingdom results:
以下是我们Pingdom结果的屏幕截图:
Lets get started with our setup of W3 Total Cache.
让我们开始设置W3 Total Cache。
影片教学 (Video Tutorial)
If you don’t like the video or need more instructions, then continue reading.
如果您不喜欢该视频或需要更多说明,请继续阅读。
什么是W3总缓存? (What is W3 Total Cache?)
W3 Total Cache is the fastest and most complete WordPress performance optimization plugin. Trusted by many popular sites including: AT&T, Mashable, Smashing Magazine, WPBeginner, and millions others. W3 Total Cache improves the user experience of your site by improving your server performance, caching every aspect of your site, reducing the download times and providing transparent content delivery network (CDN) integration.
W3 Total Cache是最快,最完整的WordPress性能优化插件。 受到许多热门网站的信任,包括:AT&T,Mashable,Smashing Magazine,WPBeginner以及数百万其他网站。 W3 Total Cache通过提高服务器性能,缓存站点的各个方面,减少下载时间并提供透明的内容交付网络(CDN)集成来改善站点的用户体验。
在WordPress中安装W3 Total Cache (Installing W3 Total Cache in WordPress)
Before you install W3 Total Cache, you need to make sure that you uninstall all other caching plugins (for example WP Super Cache). If you do not do this prior to installing, the plugin will have issues upon activation.
在安装W3 Total Cache之前,需要确保卸载所有其他缓存插件(例如WP Super Cache )。 如果在安装之前不执行此操作,则插件在激活时会出现问题。
We have a very thorough guide explaining how to install a WordPress plugin which you can follow. Or you can follow the brief guide below:
我们有一个非常详尽的指南,解释如何安装您可以遵循的WordPress插件 。 或者,您可以按照以下简要指南进行操作:
Go to your WordPress admin panel and click on Plugins » Add New. Search for “W3 Total Cache” and you should see results like the image below:
转到WordPress管理面板,然后点击插件»添加新内容 。 搜索“ W3 Total Cache”,您应该看到如下图所示的结果:

Click on the Install Now button and then activate the plugin.
单击立即安装按钮,然后激活插件。
W3总缓存的设置和配置 (Settings and Configuration of W3 Total Cache)
W3 Total Cache is a very powerful plugin, so it has tons of options. This could be a good thing or a bad thing. For those who know how to use these options, they are a gold mine. For most beginners, these options could be quite tricky and confusing. We will visit each of these options in detail, so you can properly set up W3 Total Cache. Lets start with general settings.
W3 Total Cache是一个非常强大的插件,因此有很多选择。 这可能是好事或坏事。 对于那些知道如何使用这些选项的人来说,它们是金矿。 对于大多数初学者而言,这些选项可能会非常棘手和令人困惑。 我们将详细访问每个选项,因此您可以正确设置W3 Total Cache。 让我们从常规设置开始。
常规设置 (General Settings)
You can go to the General Settings page by clicking on the Performance menu button in your WordPress admin panel. This is where you will set up the plugin by configuring basic settings. Make sure that you’re on the general settings page and not the promotional Dashboard page that this plugin has.
您可以通过单击WordPress管理面板中的“性能”菜单按钮转到“常规设置”页面。 您可以在此处通过配置基本设置来设置插件。 确保您位于常规设置页面上,而不是此插件具有的促销仪表板页面上。

什么是页面缓存? (What is Page Cache?)
The first option that you see on this page is Page Cache. It is responsible for creating static cache pages for each page that is loaded, so it is not being dynamically loaded upon each page load. By having this enabled, you will significantly decrease your load time. Refer to the image below to see how Page cache works:
在此页面上看到的第一个选项是页面缓存。 它负责为加载的每个页面创建静态缓存页面,因此不会在每次加载页面时动态加载它。 通过启用此功能,您将大大减少加载时间。 请参考下图查看页面缓存的工作方式:

As you can see normally when a user comes to your site, WordPress runs PHP scripts and MySQL queries to the database to find the requested page. Then PHP parses the data and generates a page. This process takes server resources. Having the page caching turned on, allows you to skip all that server load and show a cached copy of the page when a user requests it.
正如您通常看到的,当用户访问您的网站时,WordPress对数据库运行PHP脚本和MySQL查询以查找请求的页面。 然后PHP解析数据并生成一个页面。 此过程占用服务器资源。 打开页面缓存后,您可以跳过所有服务器负载,并在用户请求时显示页面的缓存副本。
For shared hosting which most beginners use, the Disk:Enhanced method is highly recommended. You should check the Enable Page Cache box, and save all settings.
对于大多数初学者使用的共享主机 ,强烈建议使用Disk:Enhanced方法。 您应该选中“ 启用页面缓存”框,并保存所有设置。

For most folks, this is all you need to do with page caching. Since this guide is for beginner level users we will skip the advanced settings of page caching because the default options are sufficient enough.
对于大多数人来说,这就是页面缓存所要做的全部。 由于本指南是针对初学者的,因此我们将跳过页面缓存的高级设置,因为默认选项已足够。
We will also skip through Minify, Database Cache, and Object Cache. The simple reason is because not all servers provide optimized results with these settings. Next option you will see is Browser Cache.
我们还将跳过Minify,数据库缓存和对象缓存。 原因很简单,因为并非所有服务器都通过这些设置提供优化的结果。 您将看到的下一个选项是“浏览器缓存”。
什么是浏览器缓存? (What is Browser Cache?)
Every time a user visits a website, their web browser downloads all the images, CSS files, JavaScripts, and other static files in a temporary folder to enhance the user experience. This way when the same user goes to the next page, it will load much faster because all the static files are in their browser cache.
每次用户访问网站时,他们的Web浏览器都会将所有图像,CSS文件,JavaScript和其他静态文件下载到一个临时文件夹中,以增强用户体验。 这样,当同一用户转到下一页时,由于所有静态文件都在其浏览器缓存中,因此加载速度会更快。
Browser Cache option in W3 Total Cache sets a time limit on the Browser Cache. Considering you don’t change your logo every day, having static files like that cached for 24 hours does not hurt you. Simply check the Enable under Browser Cache option and click Save all settings button. Once you have done that, then lets visit the Performance » Browser Cache page for more settings.
W3 Total Cache中的Browser Cache选项设置了Browser Cache的时间限制。 考虑到您每天都不会更改徽标,因此将静态文件缓存24小时不会对您造成伤害。 只需选中“浏览器缓存下的启用 ”选项,然后单击“保存所有设置”按钮。 完成此操作后,请访问“ 性能»浏览器缓存”页面以获取更多设置。

As you can see in the image above, we pretty much enabled everything except for the 404. When you save the settings, all settings below on that page will automatically take care of itself.
如上图所示,我们几乎启用了除404之外的所有功能。保存设置后,该页面下面的所有设置都会自动处理。
In our free WordPress setups, these are the default settings that we turn on.
在我们的免费WordPress设置中 ,这些是我们打开的默认设置。
什么是CDN? (What is a CDN?)
CDN stands for Content Delivery Network which allows you to serve your static content from multiple cloud servers rather than just one hosting server. This enables you to reduce server load and speed up your website.
CDN代表Content Delivery Network,它使您可以从多个云服务器(而不只是一台托管服务器)提供静态内容。 这使您可以减少服务器负载并加快网站速度。
We have created an infographic on What is a CDN and Why you Need a CDN for your WordPress site. We highly recommend that you check it out, so you can make an educated decision.
我们已经创建了关于什么是CDN以及为什么您的WordPress网站需要CDN的信息图。 我们强烈建议您检查一下,以便做出明智的决定。
W3 Total Cache supports MaxCDN, Amazon S3, Rackspace Cloud, and Amazon Cloud Front. WPBeginner is using MaxCDN (why we use MaxCDN). This section will only apply to sites that are using CDN, or are planning on using CDN. If you think you will be using a CDN, then we recommend MaxCDN.
W3 Total Cache支持MaxCDN,Amazon S3,Rackspace Cloud和Amazon Cloud Front。 WPBeginner使用MaxCDN ( 为什么我们使用MaxCDN )。 本部分仅适用于正在使用CDN或计划使用CDN的站点。 如果您认为将使用CDN,则建议使用MaxCDN 。
First thing you need to do to is create a Pull Zone in your MaxCDN dashboard. Log in to your MaxCDN account, click on Manage Zones and then click on Create Pull Zone button.
您需要做的第一件事是在MaxCDN仪表板中创建一个“拉动区域”。 登录到您的MaxCDN帐户,单击“ 管理区域” ,然后单击“ 创建下拉区域”按钮。

On the next screen you will be asked to provide details for your pull zone.
在下一个屏幕上,将要求您提供拉区的详细信息。
- Pull Zone Name: Simply give any name to this pull zone so that you can identify it in your MaxCDN panel. 拉区名称:只需给该拉区指定任何名称,以便您可以在MaxCDN面板中识别它。
- Origin Server URL: Enter your WordPress website’s URL starting with http:// and ending with a trailing slash / at the end. 源服务器URL:输入WordPress网站的URL,以http://开头,并在末尾加反斜杠/。
- Custom CDN Domain: enter any subdomain, for example: cdn.wpbeginner.com 自定义CDN域:输入任何子域,例如:cdn.wpbeginner.com
- Label: Provide description for this pull zone. 标签:提供此拉区的描述。
- Compression: Enabling compression will save you bandwidth so it is highly recommended that you check this box. 压缩:启用压缩将节省您的带宽,因此强烈建议您选中此框。
A screenshot of how the above mentioned settings will look like:
上述设置的屏幕截图如下:

Click on the Create button and MaxCDN will create the Pull Zone. On the next screen, it will show you a URL like this one “wpb.wpbeginner.netdna-cdn.com” copy and save this URL in a text file using notepad because we will need this later.
单击创建按钮,MaxCDN将创建拉区。 在下一个屏幕上,它将显示一个类似“ wpb.wpbeginner.netdna-cdn.com”的URL,并使用记事本将此URL保存在文本文件中,因为稍后我们将需要它。
Now that we have created a Pull Zone, the next step is to set up content zones. You can do this by going to your MaxCDN dashboard. Click on the manage button next to your pull zone that you just created. On the next screen, click on the Settings tab. The purpose of creating content zones is to add subdomains, so that we can improve user experience by queuing content from different subdomains into user’s browser. To do this click on the button labeled Custom Domains and add multiple subdomains. See the screenshot below:
现在我们已经创建了一个Pull Zone,下一步是设置内容区域。 您可以通过转到MaxCDN仪表板来执行此操作。 单击您刚刚创建的拉区旁边的管理按钮。 在下一个屏幕上,单击“设置”选项卡。 创建内容区域的目的是添加子域,以便我们通过将来自不同子域的内容排队到用户的浏览器中来改善用户体验。 为此,请单击标记为“自定义域”的按钮并添加多个子域。 请参见下面的屏幕截图:

Once you have added custom domains simply click on the Update button.
添加自定义域后,只需单击“更新”按钮。
The next step is to set up CNAME records for the subdomains. Most of our recommended WordPress Hosting providers such as Hostgator, Bluehost, etc provide a cPanel to their clients to manage different settings of their hosting. We will describe how to set up a CNAME record in cPanel.
下一步是为子域设置CNAME记录。 我们推荐的大多数WordPress托管服务提供商(例如Hostgator , Bluehost等)都向其客户端提供了cPanel来管理其托管的不同设置。 我们将描述如何在cPanel中设置CNAME记录。
Log in to your cPanel dashboard and then click on Simple DNS Zone Editor under Domains.
登录到cPanel仪表板,然后单击“域”下的“简单DNS区域编辑器”。

On the next screen you will see a form with two fields. Enter the subdomain name you entered while creating the content zone. For example you will put cdn for cdn.wpbeginnner.com.
在下一个屏幕上,您将看到一个包含两个字段的表单。 输入您在创建内容区域时输入的子域名。 例如,将cdn放在cdn.wpbeginnner.com中。
cPanel will automatically fill in the full domain. In the CNAME field enter the URL provided by MaxCDN when you created the pull zone. It is the URL we asked you to save in notepad.
cPanel将自动填写完整域。 在创建提取区域时,在CNAME字段中输入MaxCDN提供的URL。 这是我们要求您保存在记事本中的URL。

Repeat the process for all your subdomains, e.g. cdn1, cdn2, etc. Remember that only the name field will change each time and the CNAME field always have the url provided by MaxCDN for your pull zone. Once you have created CNAME records for all subdomains, it is time to go back to WordPress and setup MaxCDN with W3 Total Cache.
对所有子域(例如cdn1,cdn2等)重复此过程。请记住,每次只会更改名称字段,并且CNAME字段始终具有MaxCDN为您的提取区域提供的url。 为所有子域创建CNAME记录后,就该回到WordPress并使用W3 Total Cache设置MaxCDN了。
Go to Performance » General Settings. Scroll down till you find CDN configuration box. Check Enable and select MaxCDN from CDN Type drop down menu. Click on Save All Settings button.
转到性能»常规设置 。 向下滚动,直到找到CDN配置框。 选中启用,然后从CDN类型下拉菜单中选择MaxCDN。 单击保存所有设置按钮。

After saving settings you will see a notification informing you to provide information for “Authorization Key” and “Replace default hostname with” fields and select a pull zone. Click on “Specify it here” link and W3 Total Cache will take you to the CDN page.
保存设置后,您会看到一条通知,通知您提供有关“授权密钥”和“将默认主机名替换为”字段的信息,并选择一个拉区。 单击“在此处指定”链接,W3 Total Cache将带您进入CDN页面。

On the next screen click on the Authorize button. This will take you to MaxCDN website where you will generate an authorization key. Copy and paste this key back in W3 Total Cache. In “Replace site’s host name with” enter the subdomain you created earlier.
在下一个屏幕上,单击“授权”按钮。 这将带您到MaxCDN网站,您将在其中生成授权密钥。 将此密钥复制并粘贴回W3 Total Cache。 在“将站点的主机名替换为”中,输入您先前创建的子域。

Save all settings and that’s all. Your site is now configured to serve static files using MaxCDN. Now if you load your site, the image URLs should be served from the CDN subdomain rather than your site’s actual domain. For example:
保存所有设置,仅此而已。 现在,您的站点已配置为使用MaxCDN提供静态文件。 现在,如果您加载站点,则应该从CDN子域而不是站点的实际域中提供图像URL。 例如:
https://www.wpbeginner.com/wp-content/uploads/2010/08/w3totalcachecdnconfig.gif
https://www.wpbeginner.com/wp-content/uploads/2010/08/w3totalcachecdnconfig.gif
would be replaced with:
将被替换为:
http://cdn.wpbeginner.com/wp-content/uploads/2010/08/w3totalcachecdnconfig.gif
http://cdn.wpbeginner.com/wp-content/uploads/2010/08/w3totalcachecdnconfig.gif
Now if any of your static files are not loading with the CDN, then it probably means that you will need to specify it in the custom files list setting in W3 Total Cache. We had to do it for OIO Publisher plugin that we use for serving ads. If you go to the CDN settings page, you will see the Advanced option:
现在,如果您的任何静态文件未随CDN一起加载,则可能意味着您需要在W3 Total Cache的自定义文件列表设置中指定它。 我们必须为用于投放广告的OIO Publisher插件执行此操作。 如果转到“ CDN设置”页面,将看到“高级”选项:

Simply add all the files/folders that you want to include for CDN. Also if you notice, there is a rejected file list. When you make a small design update, your style.css will not update right away. So you can put that in a rejected file list for the time that you are making changes. If you just want a one-time purge, you can do that from your MaxCDN dashboard.
只需添加要包含CDN的所有文件/文件夹。 另外,如果您注意到,还有一个拒绝的文件列表。 进行小的设计更新时,style.css不会立即更新。 因此,您可以在进行更改时将其放入拒绝的文件列表中。 如果您只想一次性清除,则可以从MaxCDN仪表板进行清除。
Everything that we have covered up till now, will work great on most web hosting accounts. However, W3 Total Cache comes with many other options. We will try our best to explain what they are, and why we do not enable them on all sites.
到目前为止,我们涵盖的所有内容都可以在大多数虚拟主机帐户上正常运行。 但是,W3 Total Cache带有许多其他选项。 我们将尽力解释它们是什么,以及为什么不在所有站点上都启用它们。
缩小 (Minify)
Minify simply reduce the size of your static files to save you every single kilobyte that you can. However, sometimes generating that minified file can be more resource intensive then the resource it will save. We are not saying that it is a horrible function. We are simply saying that it might not be the best fit for every server. We have heard numerous users complaining about it, and our host (HostGator) recommended us to leave this off. If you are like us (NOT SAVVY with server lingo), then listen to your web hosting provider.
Minify只需减少静态文件的大小即可为您节省每一千字节。 但是,有时生成该缩小的文件可能比它要保存的资源占用更多的资源。 我们并不是说这是一个可怕的功能。 我们只是在说它可能不是最适合每台服务器。 我们已经听到许多用户对此抱怨,我们的主持人( HostGator )建议我们不要使用它。 如果您像我们一样(不带服务器术语的SAVVY),请听听您的网络托管提供商。
数据库缓存 (Database Caching)
Database caching reduces the server load by caching SQL queries. This eliminates the processing time of querying the database (which may not be a lot for smaller sites). When we started using this, it seemed to put a lot of load on our server. Our host recommended us to turn it off. Instead, they ended up turning on the built-in SQL caching for us. Again, use this option at your own risk. You can try it out and see how it impacts your site load time. Then simply turn it off, if the impact is not significant enough. Most hosts do not recommend this for shared hosting accounts.
数据库缓存通过缓存SQL查询来减少服务器负载。 这消除了查询数据库的处理时间(对于较小的站点,这可能不是很多)。 当我们开始使用它时,似乎给我们的服务器带来了很多负担。 房东建议我们将其关闭。 相反,他们最终为我们打开了内置SQL缓存。 同样,使用此选项需您自担风险。 您可以尝试一下,看看它如何影响您的网站加载时间。 如果影响不明显,则只需将其关闭。 大多数主机不建议共享主机帐户使用此功能。
对象缓存 (Object Caching)
If you have a highly dynamic site, then using the Object Caching will help. This is mainly used if you have complex database queries that are expensive to regenerate. For most beginners, ignore it.
如果您拥有一个高度动态的站点,那么使用对象缓存将有所帮助。 这主要在您具有复杂的数据库查询且重新生成成本很高的情况下使用。 对于大多数初学者,请忽略它。
Now that you have everything setup, it is best to create a backup for your W3 Total Cache Configuration. After all, we went through a lot in this article. You will need to come back to your W3 Total Cache’s General Settings Page. There is a section for Import / Export Settings. Click to Download the settings file from your server.
既然您已完成所有设置,则最好为W3 Total Cache Configuration创建备份。 毕竟,我们在本文中进行了很多研究。 您将需要返回到W3 Total Cache的“常规设置”页面。 有一个关于“导入/导出设置”的部分。 单击以从服务器下载设置文件。
We hope that you found this article useful. For those users who are still not sold on the concept of CDN, we highly recommend you give it a shot. CDN works with your web host to decrease server load and increase site performance. We are using MaxCDN and we recommend you to do the same. (Try them for just a month, and you will see why we recommend them).
我们希望您觉得本文有用。 对于那些仍未使用CDN概念的用户,我们强烈建议您试一试。 CDN与您的Web主机一起使用,以减少服务器负载并提高站点性能。 我们正在使用MaxCDN,建议您也这样做。 (尝试使用它们仅一个月,您将了解我们为什么推荐它们)。
If you have any questions, then please feel free to ask in the comments below.
如果您有任何疑问,请随时在下面的评论中提问。
翻译自: https://www.wpbeginner.com/plugins/how-to-install-and-setup-w3-total-cache-for-beginners/
初学者vs安装


 1648
1648

 被折叠的 条评论
为什么被折叠?
被折叠的 条评论
为什么被折叠?
 到【灌水乐园】发言


