


I'm a documented big fan of Retrogaming (playing older games and introducing my kids to those older games).
我是Retrogaming的忠实拥护者(玩更老的游戏并将我的孩子介绍给那些更老的游戏)。
For example, we enjoy the Hyperkin Retron 5 in that it lets us play NES, Famicom, SNES, Super Famicom, Genesis, Mega Drive, Game Boy, Game Boy Color, & Game Boy over 5 category ports. with one additional adapter, it adds Game Gear, Master System, and Master System Cards. It uses emulators at its heart, but it requires the use of the original game cartridges. However, the Hyperkin supports all the original controllers - many of which we've found at our local thrift store - which strikes a nice balance between the old and the new. Best of all, it uses HDMI as its output plug which makes it super easy to hook up to our TV.
例如,我们喜欢Hyperkin Retron 5 ,因为它可以让我们在5个类别的端口上玩NES,Famicom,SNES,Super Famicom,Genesis,Mega Drive,Game Boy,Game Boy Color和Game Boy 。 通过一个额外的适配器,它增加了Game Gear,Master System和Master System卡。 它的核心是使用仿真器,但它需要使用原始游戏盒带。 但是,Hyperkin支持所有原始控制器-我们在本地旧货店找到了许多原始控制器-新旧控制器之间取得了很好的平衡。 最棒的是,它使用HDMI作为输出插头,这使得连接电视非常容易。
I've also blogged about modding/updating existing older consoles to support HDMI. On my Sega Dreamcast I've been very happy with this Dreamcast to HDMI adapter (that's really internally Dreamcast->VGA->HDMI).
我也写过博客,介绍如何修改/更新现有的较旧的控制台以支持HDMI 。 在我的Sega Dreamcast上,我对这个Dreamcast转HDMI适配器感到非常满意(这实际上是内部Dreamcast-> VGA-> HDMI)。

When retrogaming there's a few schools of thought:
进行翻版时,有一些思想流派:
Download ROMs and use emulators - I try not to do this as I want to support small businesses (like used game stores, etc) as well as (in a way) the original artists.
下载ROM并使用模拟器-我尽量不要这样做,因为我想支持小型企业(例如二手游戏商店等)以及(在某种程度上)原始艺术家。
For example, I bought Blade Runner on GOG to support the SCUMMVM open source project.
例如,我在GOG上购买了Blade Runner,以支持SCUMMVM开源项目。
Download ROMs and use emulators - I try not to do this as I want to support small businesses (like used game stores, etc) as well as (in a way) the original artists.
下载ROM并使用模拟器-我尽量不要这样做,因为我想支持小型企业(例如二手游戏商店等)以及(在某种程度上)原始艺术家。
Use original consoles with original cartridges
将原始调音台与原始墨盒一起使用
This is my preferred method, although I often mod the consoles for HDMI output.
尽管我经常修改用于HDMI输出的控制台,但这是我的首选方法。
Use original consoles with backup images through an I/O mod.
通过I / O mod将原始控制台与备份映像一起使用。
- I've been doing this more and more as many of my original consoles' CD-ROMs and other moving parts have started to fail. 我越来越多地这样做,因为许多原始控制台的CD-ROM和其他活动部件开始出现故障。
It's the failure of those moving parts that is the focus of THIS post.
这些活动部件的故障是本帖子的重点。
For example, the CD-ROM on my Panasonic 3DO Console was starting to throw errors and have trouble spinning up so I was able to mod it to load the CD-ROMs (for my owned discs) off of USB.
例如,我的Panasonic 3DO Console上的CD-ROM开始引发错误,无法正常旋转,因此我能够对其进行修改,以从USB加载CD-ROM (用于我拥有的光盘)。
This last week my Dreamcast's GD-ROM finally started to get out of alignment.
上周,我的Dreamcast的GD-ROM终于开始脱离对齐状态。
修复Dreamcast光盘错误 (Fixing Dreamcast Disc Errors)
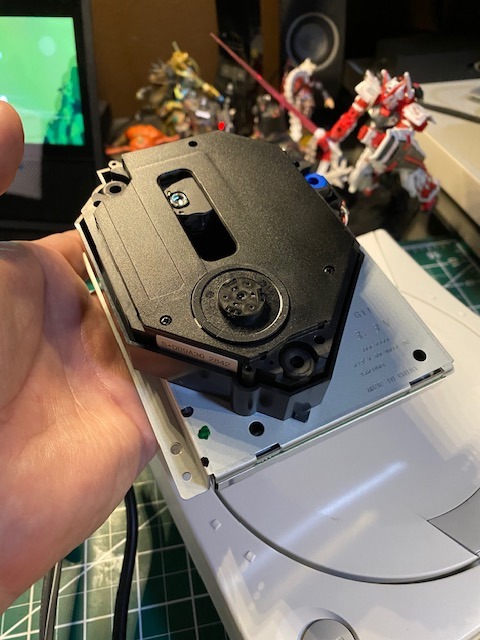
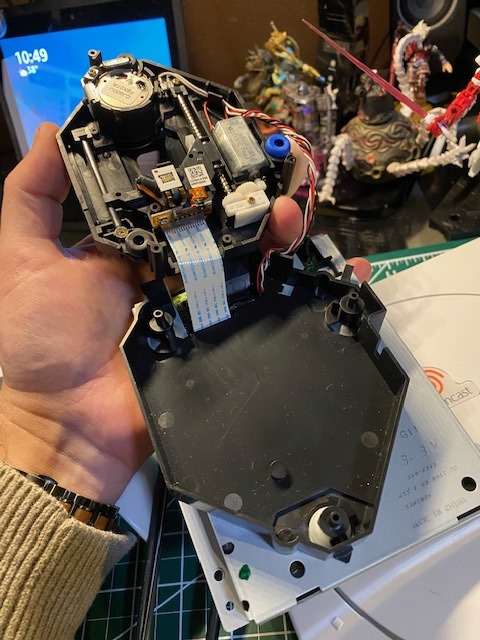
You can can align a Dreamcast GD-ROM by opening it up by removing the four screws on the bottom. Lift up the entire GD-ROM unit without pulling too hard on the ribbon cable. You may have to push the whole laser (don't touch the lens) back in order to flip the unit over.
您可以通过卸下底部的四颗螺钉打开Dreamcast GD-ROM来对齐它。 提起整个GD-ROM单元,而不必用力拉带状电缆。 您可能需要将整个激光器(不要触摸镜头)向后推,以将装置翻转过来。
Then, via trial and error, turn the screw shown below to the right about 5 degrees (very small turn) and test, then do it again, until your drive spins up reliably. It took me 4 tries and about 20 degrees. Your mileage may vary.
然后,通过反复试验,将下面所示的螺钉向右旋转约5度(非常小的转弯)并进行测试,然后再次进行操作,直到驱动器可靠地旋转。 我花了4次尝试,大约20度。 你的旅费可能会改变。

This fix worked for a while but it was becoming clear that I was going to eventually have to replace the whole thing. These are moving parts and moving parts wear out.
此修复程序工作了一段时间,但很明显,我最终将不得不替换整个事情。 这些是运动部件,运动部件磨损。
将固态存储(SD卡)添加到Dreamcast (Adding solid state (SD-Card) storage to a Dreamcast)
Assuming you, like me, have a VA1 Dreamcast (which is most of them) there are a few options to "fake" the GD-ROM. My favorite is the GDEMU mod which requires no soldering and can be done in just a few minutes. You can get them directly or on eBay. I ordered a version 5.5 and it works fantastically.
假设您像我一样,有一个VA1 Dreamcast(这是其中的大多数),有几种方法可以“伪造” GD-ROM。 我最喜欢的是GDEMU mod,它不需要焊接,只需几分钟即可完成。 您可以直接或在eBay上获得它们。 我订购了5.5版本,它的运行非常出色。
You can follow the GDEMU instructions to lay out a FAT32 formatted SD Card as it wants it, or you can use this little obscure .NET app called GDEMU SD Card Maker.
您可以按照GDEMU的说明来按需要布置FAT32格式的SD卡,也可以使用这个名不见经传的.NET应用程序,称为GDEMU SD卡制作工具。
The resulting Dreamcast now has an SD Card inside, under where the GD-ROM used to be. It works well, it's quiet, it's faster than the GD-ROM and it allows me to play my backups without concern of breaking any moving parts.
现在生成的Dreamcast现在内部装有SD卡,以前是GD-ROM。 它运作良好,安静,比GD-ROM快,并且可以播放备份文件而不必担心会损坏任何活动部件。
其他Dreamcast小更新 (Other small Dreamcast updates)
As a moving part, the fan can sometimes fail so I replaced fan my using a guide from iFixit. In fact, a 3-pin 5V Noctua silent fan works great. You can purchase that fan plus a mod kit with a 3d printed adapter that includes a fan duct and conversion gable with 10k resistor, or you can certainly 3D print your own.
作为运动部件,风扇有时会失效,因此我使用iFixit的指南更换了风扇。 实际上, 3针5V Noctua静音风扇效果很好。 您可以购买该风扇以及带有3d打印适配器的模块套件,该适配器包括风扇管道和带有10k电阻的转换山墙,或者您也可以自己进行3D打印。
If you like this kind of content, go follow me on Instagram!
如果您喜欢这种内容,请在Instagram上关注我!


 被折叠的 条评论
为什么被折叠?
被折叠的 条评论
为什么被折叠?
 到【灌水乐园】发言


