


介绍 (Introduction)
I’ve introduced how to build Angular App with .NET Core in Global Weather – Angular 7 App With .NET Core series (Part 1, Part 2 and Part 3). Now let’s talk about another popular technology React. React, Angular have become incredibly popular because these single-page app frameworks building apps that run self-contained in a browser page is hugely powerful.
我已经介绍了如何在“全球天气”中使用.NET Core构建Angular App –具有.NET Core的Angular 7 App系列( 第1 部分 , 第2 部分和第3部分 )。 现在让我们谈谈另一种流行的技术React。 React,Angular变得非常受欢迎,因为这些单页面应用程序框架构建了可在浏览器页面中独立运行的应用程序,其功能非常强大。
React vs.Angular (React vs. Angular)
Angular and React have many similarities and many differences. Angular is an MVC framework and structures the application very well, but you have less flexibility. React only provides the “view” in MVC – you need to solve the M and C on your own. Due to this, you can choose any of your own libraries as you see fit.
Angular和React具有许多相似之处和许多差异。 Angular是一个MVC框架,可以很好地构造应用程序,但是灵活性较差。 React仅在MVC中提供“视图” –您需要自己解决M和C问题。 因此,您可以根据需要选择自己的任何库。
Both React and Angular are component based. A component receives an input, and returns a rendered UI template as output.
React和Angular都是基于组件的。 组件接收输入,并返回呈现的UI模板作为输出。
React’s use of a virtual DOM is to make it so fast. A virtual DOM only looks at the differences between the previous and current HTML and changes the part that is required to be updated. Angular uses a regular DOM. This will update the entire tree structure of HTML tags until it reaches the user’s age.
React对虚拟DOM的使用使它变得如此之快。 虚拟DOM仅查看先前HTML和当前HTML之间的差异,并更改需要更新的部分。 Angular使用常规DOM。 这将更新HTML标签的整个树结构,直到达到用户的年龄为止。
React decided to combine UI templates and inline JavaScript/Typescript logic, which no company had ever done before. The result is called “JSX”(javascript) or “TSX” (typescript). JSX/TSX is a big advantage for development, because you have everything in one place, and code completion and compile-time checks work better.
React决定将UI模板和内联JavaScript / Typescript逻辑相结合,这是以前从未有过的公司。 结果称为“ JSX”(javascript)或“ TSX”(打字稿)。 JSX / TSX是开发的一大优势,因为您将所有内容都放在一个地方,并且代码完成和编译时检查可以更好地工作。
React uses one-way binding, and Redux is often used as the solution to handle state. Angular uses two-way binding. One-way data binding means that React is more performant than Angular and also makes debugging a React app easier than debugging an Angular app.
React使用单向绑定,而Redux通常用作处理状态的解决方案。 Angular使用双向绑定。 单向数据绑定意味着React比Angular性能更高,并且调试React应用程序比调试Angular应用程序更容易。
创建React应用 (Create-React-App)
The best solution to build a React app is using create-react-app. Create-React-App is maintained by Facebook. Create React App sets up your development environment so that you can use the latest JavaScript/TypeScript features, provides a nice developer experience, and optimizes your app for production. You’ll need to have Node >= 8.10 and npm >= 5.6 on your machine.
构建React应用的最佳解决方案是使用create-react-app 。 Create-React-App由Facebook维护。 Create React App设置您的开发环境,以便您可以使用最新JavaScript / TypeScript功能,提供良好的开发人员体验并优化您的应用程序以进行生产。 您需要在计算机上安装Node> = 8.10和npm> = 5.6。
To create a JavaScript project, run:
要创建一个JavaScript项目,请运行:
npx create-react-app my-app
cd my-app
npm start
To create a typescript project, run:
要创建一个打字稿项目,请运行:
npx create-react-app my-app --typescript
cd my-app
npm start
从Visual Studio 2019创建ASP.NET Core Web项目 (Create ASP.NET Core Web Project from Visual Studio 2019)
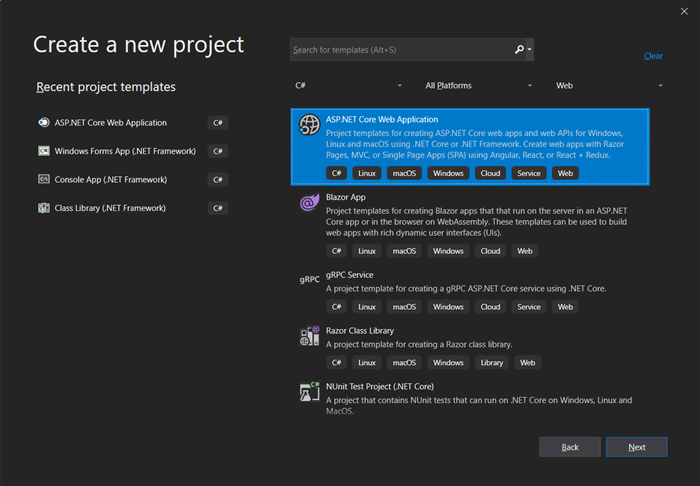
Open your Visual Studio 2019 -> Create New Project -> Select ASP.NET Core Web application.
打开Visual Studio 2019-> 创建新项目 ->选择ASP.NET Core Web应用程序 。
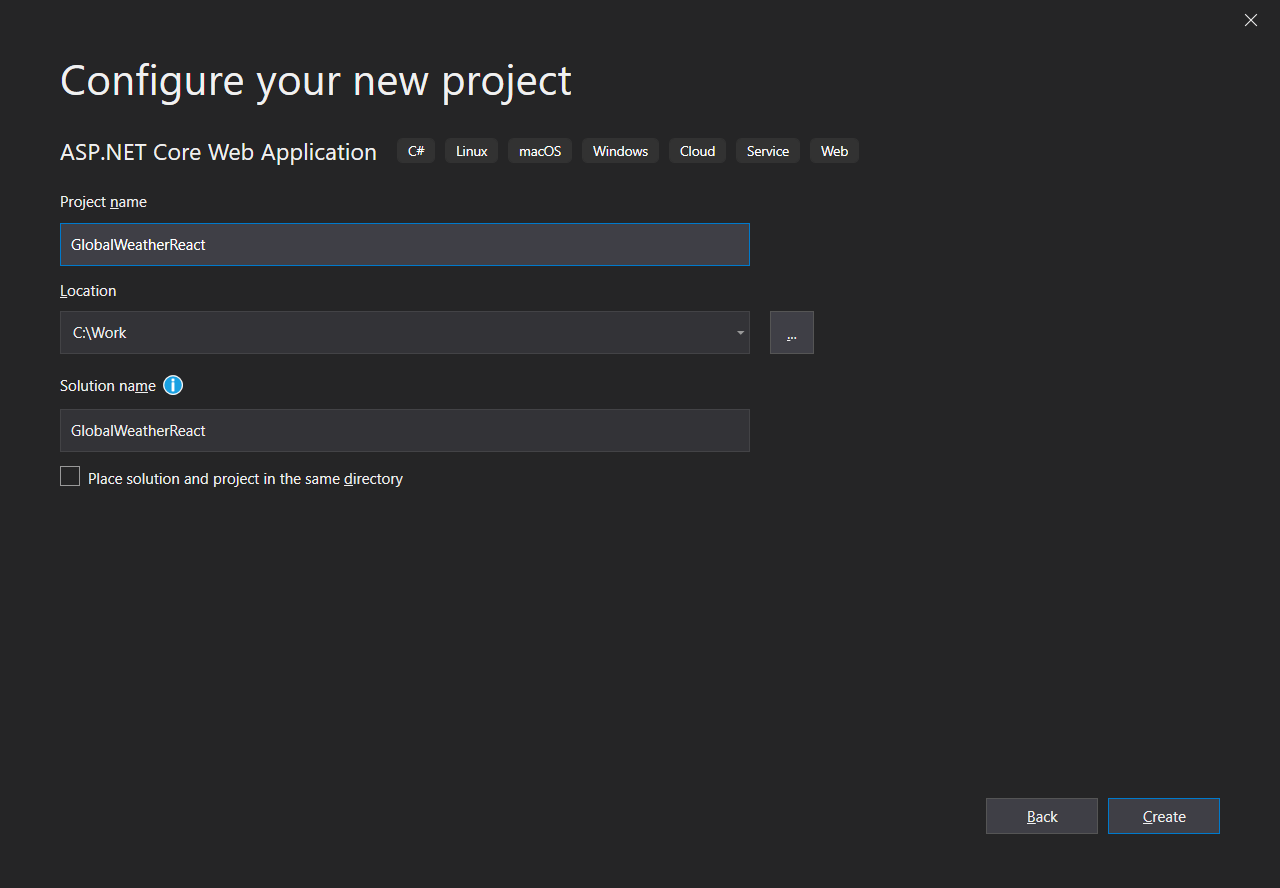
Give the project name as “GlobalWeatherReact”.
将项目名称命名为“ GlobalWeatherReact ”。
Click “Create”, and in the next window, select ASP.NET Core 3.0 and Empty as shown below:
单击“ 创建 ”,然后在下一个窗口中,选择“ ASP.NET Core 3.0”并选择“ 空” ,如下所示:

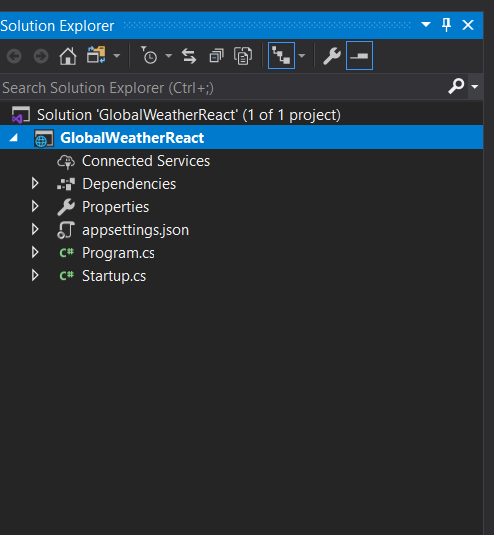
Click “Create”, then a default ASP.NET Core project is created.
单击“ 创建 ”,然后创建一个默认的ASP.NET Core项目。
Leave it for the time being. After we create a React client, need back here to change some code.
暂时将其保留。 创建React客户端后,需要回到此处更改一些代码。
使用Create-React-App创建Weather Client (Create Weather Client with Create-React-App)
Once the API project is created, open the Powershell and navigate to the GlobalWeather project folder and run the following command:
创建API项目后,打开Powershell并导航到GlobalWeather项目文件夹,然后运行以下命令:
npx create-react-app weatherclient --typescript
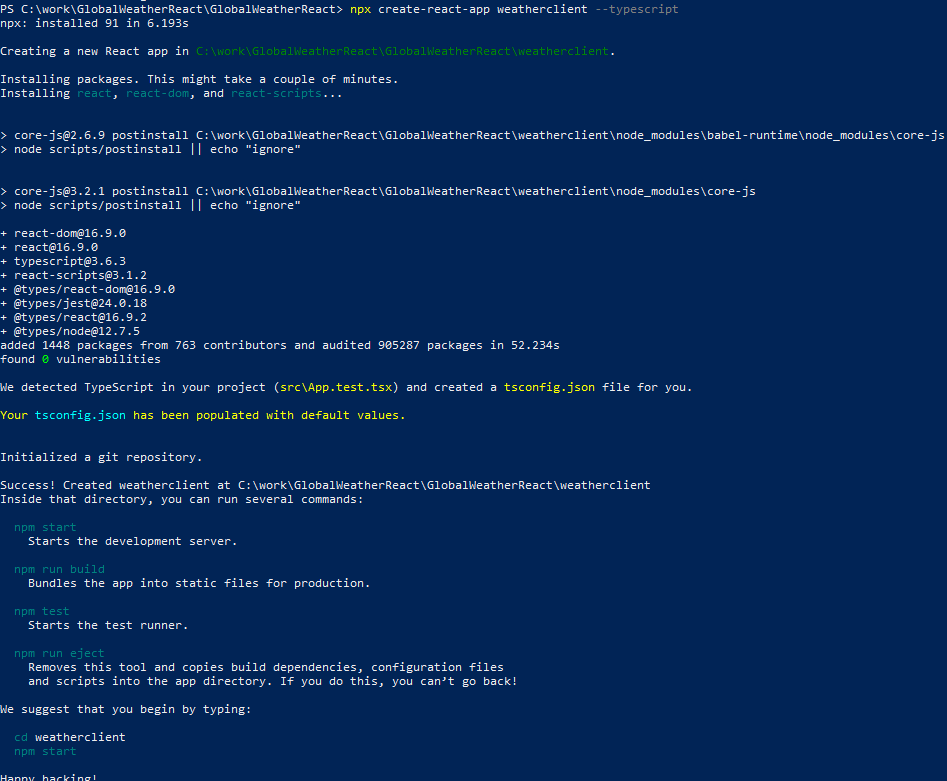
This will create a latest version of React application. Now the solution structure should be like this:
这将创建一个最新版本的React应用程序。 现在,解决方案结构应如下所示:
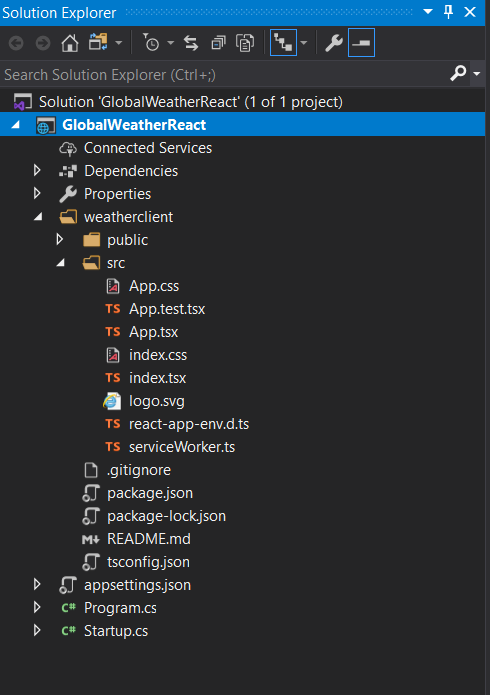
TSX is typescript of JSX. JSX is an embeddable XML-like syntax. It is meant to be transformed into valid JavaScript, though the semantics of that transformation are implementation-specific. JSX rose to popularity with the React framework. TypeScript supports embedding, type checking, and compiling JSX directly to JavaScript.
TSX是JSX的打字稿。 JSX是类似于XML的可嵌入语法。 尽管该转换的语义是特定于实现的,但它应该转换为有效JavaScript。 JSX在React框架中开始流行。 TypeScript支持嵌入,类型检查以及将JSX直接编译为JavaScript。
Now we need make some changes in ASP.NET Core project to make it smoothly integrate with React client.
现在,我们需要在ASP.NET Core项目中进行一些更改,以使其与React客户端顺利集成。
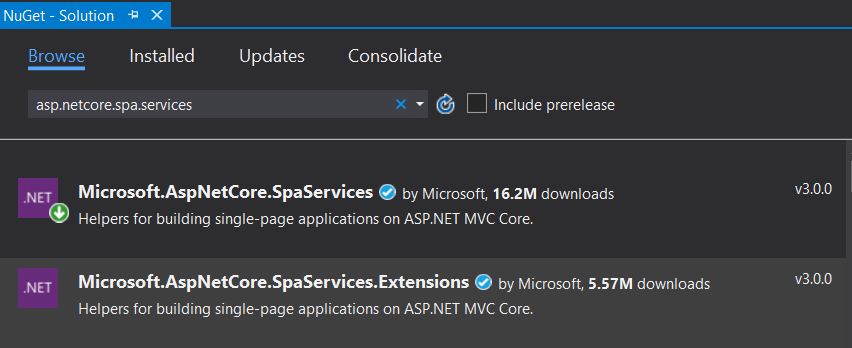
First, install ASP.NET Core SPA Services and ASP.NET Core SPA Services Extensions in Nuget Manager.
首先,在Nuget Manager中安装ASP.NET Core SPA服务和ASP.NET Core SPA服务扩展。
Open Startup.cs, add SpaStaticFiles in ConfigureServices method.
打开Startup.cs ,在ConfigureServices方法中添加SpaStaticFiles 。
services.AddMvc(option => option.EnableEndpointRouting = false);
services.AddSpaStaticFiles(configuration =>
{
    configuration.RootPath = "weatherclient/build";
});
And add the below lines in the Configuration method:
并在Configuration方法中添加以下几行:
app.UseHttpsRedirection();
app.UseStaticFiles();
app.UseSpaStaticFiles();
app.UseMvc();
app.UseSpa(spa =>
{
    spa.Options.SourcePath = Path.Join(env.ContentRootPath, "weatherclient");

    if (env.IsDevelopment())
    {
        spa.UseReactDevelopmentServer(npmScript: "start");
    }
});
OK. Now just run it, click “IISExpress”.
好。 现在只需运行它,单击“ IISExpress ”。
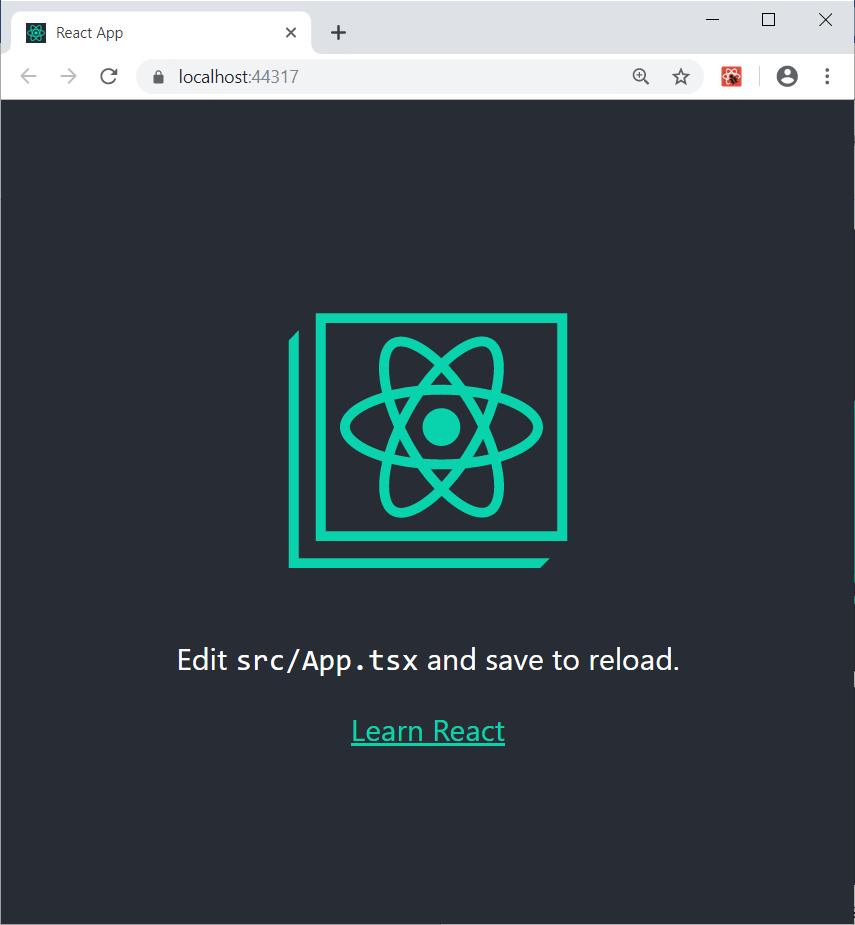
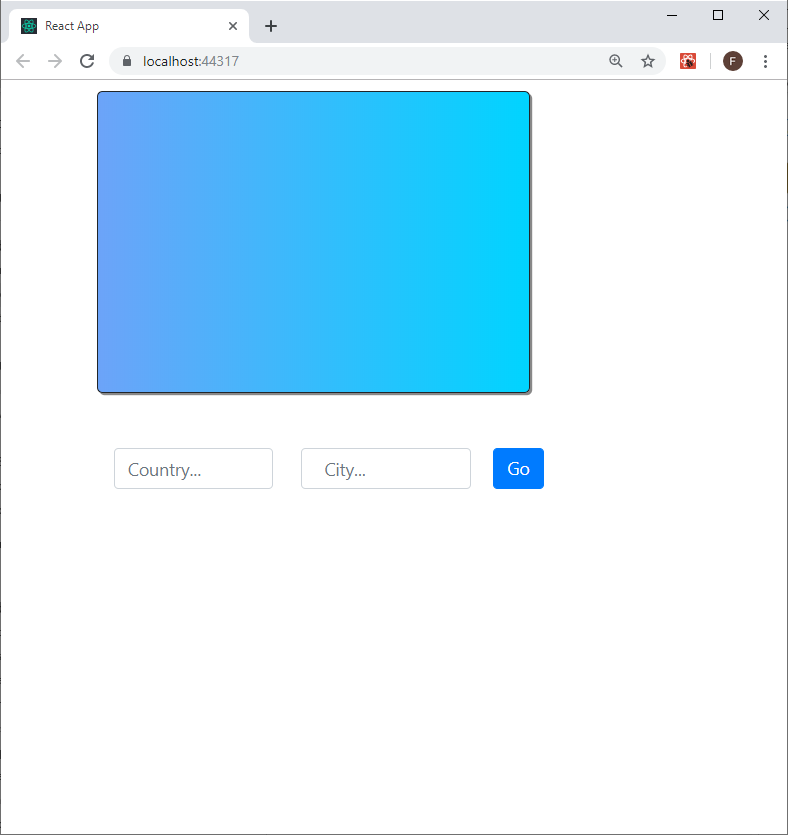
Wow, the React client is starting with ASP.NET Core API project!
哇,React客户端从ASP.NET Core API项目开始!
React路由器和组件 (React Router and Component)
The Hello World react app is a single-component app. But most real world apps are multi-component app. React Router is a collection of navigational components that compose declaratively with your application. In single page apps, there is only a single HTML page. We are reusing the same HTML page to render the different components based on the navigation.
Hello World react应用程序是单组件应用程序。 但是,大多数现实应用是多组件应用。 React Router是一组导航组件,它们与您的应用程序一起声明性地组成。 在单页应用程序中,只有一个HTML页。 我们将重复使用同一HTML页面,以根据导航呈现不同的组件。
React组件 (React Component)
React lets you define components as classes or functions. Components defined as classes currently provide more features. To define a React component class, you need to extend React.Component.
React使您可以将组件定义为类或函数。 当前定义为类的组件提供更多功能。 要定义一个React组件类,您需要扩展React.Component 。
Each component has several “lifecycle methods” that you can override to run code at particular times in process. The component life cycle is listed as below.
每个组件都有几种“生命周期方法”,您可以重写这些方法以在过程中的特定时间运行代码。 组件的生命周期如下所示。
Mounting
安装
These methods are called in the following order when an instance of a component is being created and inserted into the DOM.
在创建组件实例并将其插入DOM时,将按以下顺序调用这些方法。
static getDerivedStateFromProps()
shouldComponentUpdate()
render()
getSnapshotBeforeUpdate()
componentDidUpdate()
Updating
更新中
An update can be caused by changes to props or state. These methods are called in the following order when a component is being re-rendered.
更新可能是由于道具或状态的更改引起的。 重新渲染组件时,将按以下顺序调用这些方法。
static getDerivedStateFromProps()
shouldComponentUpdate()
render()
getSnapshotBeforeUpdate()
componentDidUpdate()
Unmounting
正在卸载
This method is called when a component is being removed from the DOM.
从DOM中删除组件时,将调用此方法。
componentWillUnmount()Error Handling
错误处理
These methods are called when there is an error during rendering, in a lifecycle method, or in the constructor of any child component.
在渲染期间,生命周期方法或任何子组件的构造函数中发生错误时,将调用这些方法。
static getDerivedStateFromError()
componentDidCatch()
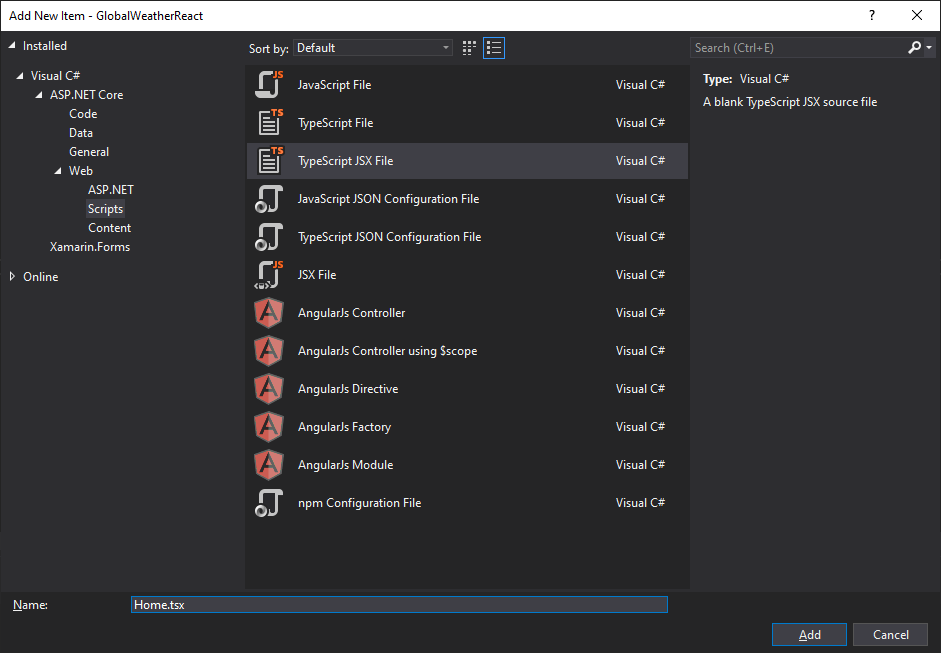
First, we add a Home component first, move the code from App.tsx to Home component.
首先,我们首先添加一个Home组件,将代码从App.tsx移到Home组件。
Create “components” folder under “weatherclient/src”. Then add Home.tsx.
在“ weatherclient / src ”下创建“ components ”文件夹。 然后添加Home.tsx 。
Home component extends React.Component. We copy render() from App.tsx.
Home组件扩展了React.Component 。 我们从App.tsx复制render() 。
import React from 'react';
import logo from '../logo.svg';

class Home extends React.Component {

    render() {
        return (
            <div className="App">
                <header className="App-header">
                    <img src={logo} className="App-logo" alt="logo" />
                    <p>
                        Edit <code>src/App.tsx</code> and save to reload.
                    </p>
                    <a
                        className="App-link"
                        href="https://reactjs.org"
                        target="_blank"
                        rel="noopener noreferrer"
                    >
                        Learn React
                    </a>
                </header>
            </div>
        );
    }
}

export default Home;
React路由器 (React-router-dom)
React-router-dom exports DOM-aware components, like <Link> (which renders an <a>) and <BrowserRouter> (which interacts with the browser's window.history).
React-router-dom导出DOM感知组件,例如<Link> (呈现<a> )和<BrowserRouter> (与浏览器的window.history交互)。
React-router-dom re-exports all of react-router's exports, so you only need to import from react-router-dom in your project.
React-router-dom重新导出了react-router React-router-dom的所有导出,因此您只需要从项目中的react-router-dom导入。
Now we install react-router-dom first. In Powershell, install react-router-dom under “weatherclient” folder.
现在我们首先安装react-router-dom 。 在Powershell中,在“ weatherclient ”文件夹下安装react-router-dom 。
npm install @types/react-router-dom react-router-dom --save
将路由器添加到应用 (Add Router to App)
Create “router” folder under “weatherclient/src”, then add index.tsx.
在“ weatherclient / src ”下创建“ router ”文件夹,然后添加index.tsx 。
import React from "react";
import { Router, Route, Switch, Link, NavLink } from "react-router-dom";
import * as createHistory from "history";
import Home from "../components/Home";

// Instead of BrowserRouter, we use the regular router,
// but we pass in a customer history to it.
export const history = createHistory.createBrowserHistory();

const AppRouter = () => (
    <Router history={history}>
        <div>
            <Switch>
                <Route path="/" component={Home} />
            </Switch>
        </div>
    </Router>
);

export default AppRouter;
Then we go back to change App.tsx.
然后,我们返回更改App.tsx 。
import React from 'react';
import "./App.css";
import AppRouter from "./router";
const App: React.FC = () => {
    return (
        <AppRouter />
    );
}
export default App;
Basically, it removes fall rendering code, and replace with AppRouter.
基本上,它删除了秋季渲染代码,并替换为AppRouter 。
Now, click “IIS Express” to run it again.
现在,单击“ IIS Express ”再次运行。

App Router is working. It automatically navigates to the Home component.
应用路由器正在运行。 它会自动导航到Home组件。
功能组件Vs。 类组件 (Function Component Vs. Class Component)
You may notice App Component is a function component and Home Component is a class component.
您可能会注意到App Component是一个功能组件, Home Component是一个类组件。
But what’s the difference between function component and class component?
但是函数组件和类组件之间有什么区别?
Functional components are basic JavaScript/TypeScript functions. These are typically arrow functions but can also be created with the regular function keyword. React lifecycle methods cannot be used in functional components. There is no render method used in functional components. Functional components should be favored if you do not need to make use of React state.
功能组件是基本JavaScript / TypeScript函数。 这些通常是箭头功能,但也可以使用常规功能关键字创建。 React生命周期方法不能在功能组件中使用。 功能组件中没有使用render方法。 如果您不需要使用React状态,则应该偏爱功能组件。
Class components make use of ES6 class and extend the Component class in React. React lifecycle methods can be used inside class components. Class components have internal state. “this.state” read state and “this.setState” updates state.
类组件利用ES6类并在React中扩展Component类。 可以在类组件内部使用React生命周期方法。 类组件具有内部状态。 “ this.state ”读取状态,“ this.setState ”更新状态。
实施WeatherDetails和表单组件 (Implement WeatherDetails and Form Components)
我们要构建什么? (What We Want to Build?)
After introducing the basic react stuff, now it’s the time to build our weather app. We’ll build a very similar app as my series articles Global Weather - Angular 7 App with .NET Core 2.2.
在介绍了基本的React内容之后,现在该构建我们的天气应用程序了。 我们将与我的系列文章“ 带有.NET Core 2.2的Global Weather-Angular 7 App”构建一个非常相似的应用程序。
So basically, this app has two parts. One is a panel which shows weather details. The other is an input form where we can input country and city. Now let’s build the app step by step.
因此,基本上,此应用包含两个部分。 一个是显示天气详细信息的面板。 另一个是输入表格,我们可以在其中输入country和city 。 现在,让我们逐步构建应用程序。
WeatherDetails组件 (WeatherDetails Component)
Add WeatherDetails.tsx under “components” folder with the below code:
使用以下代码在“ components ”文件夹下添加WeatherDetails.tsx :
import React from 'react';
class WeatherDetails extends React.Component {
    render() {
        return (
            <div>
                Weather Details
            </div>
        );
    }
}
export default WeatherDetails
Add Form.tsx under “components” folder with the below code:
使用以下代码在“ components ”文件夹下添加Form.tsx :
import React from 'react';
class Form extends React.Component {
    render() {
        return (
            <div>
                <input id="country" type="text" name="country" placeholder="  Country... " />
                <input id="city" type="text" name="city" placeholder="  City... " />
            </div>
        );
    }
}
export default Form
Then change Home component to use WeatherDetails and Form.
然后将Home组件更改为使用WeatherDetails和Form 。
import React from 'react';
import Form from './Form';
import WeatherDetails from './WeatherDetails';
class Home extends React.Component {
    render() {
        return (
            <div className="App">
                <WeatherDetails />
                <Form />
            </div>
        );
    }
}
export default Home;
Click “IISExpress” to run it.
单击“ IISExpress ”运行它。

That’s it. Now we create types first, then back to components to do more work.
而已。 现在,我们首先创建类型,然后再返回组件以执行更多工作。
种类 (Types)
We’re developing a website to display weather information via AccuWeather REST API. The user can select whatever location and show current weather information.
我们正在开发一个网站,以通过AccuWeather REST API显示天气信息。 用户可以选择任何位置并显示当前的天气信息。
Create an account to obtain an API key to use against the APIs.
创建一个帐户以获得用于该API的API密钥。
Users should be able to narrow their location search by country.
用户应该能够按国家/地区缩小其位置搜索范围。
The API reference introduces all response details for the different API request. For our app, we only care about country, city and current weather.
API参考介绍了不同API请求的所有响应详细信息。 对于我们的应用程序,我们只关心国家,城市和当前天气。
So according to json response, we create the corresponding type, Country, City and CurrentCondition types.
因此,根据json响应,我们创建了相应的type , Country , City和CurrentCondition类型。
Create “types” folder under “weatherclient/src”. Add Country.ts to “types” folder.
在“ weatherclient / src ”下创建“ types ”文件夹。 将Country.ts添加到“ types ”文件夹中。
Then copy the below code to Country.ts.
然后将以下代码复制到Country.ts 。
export interface Country {
    ID: string;
    EnglishName: string;
};
Then add City type in City.ts.
然后在City.ts中添加City类型。
import { Country } from './Country';
export interface City {
  Key: string;
  EnglishName: string;
  Type: string;
  Country: Country;
};
Add CurrentCondition type in CurrentCondition.ts.
在CurrentCondition.ts中添加CurrentCondition type 。
export interface CurrentCondition {
    LocalObservationDateTime: string;
    WeatherText: string;
    WeatherIcon: number;
    IsDayTime: boolean;
    Temperature: Temperature;
};
export interface Metric {
    Unit: string;
    UnitType: number;
    Value: number;
};
export interface Imperial {
    Unit: string;
    UnitType: number;
    Value: number;
};
export interface Temperature {
    Imperial: Imperial;
    Metric: Metric;
};
For WeatherDetails component, I don’t want to bind CurrentCondition directly, so create a view model class, Weather.
对于WeatherDetails组件,我不想直接绑定CurrentCondition ,因此创建一个视图模型类Weather 。
Add Weather.ts to “types” folder.
将Weather.ts添加到“ types ”文件夹中。
import { CurrentCondition } from './CurrentCondition';
import { City } from './City'
import { Constants } from '../Constants';
export class Weather {
    public location?: string;
    public weatherIcon?: any;
    public weatherText?: string;
    public temperatureValue?: number;
    public temperatureUnit?: string;
    public isDaytime?: boolean;
    public error?: string;
    public constructor(currentConditions: CurrentCondition, city: City) {
        this.location = city.EnglishName!;
        this.weatherText = currentConditions.WeatherText;
        this.isDaytime = currentConditions.IsDayTime;
        if (currentConditions.WeatherIcon) {
            let icon = currentConditions.WeatherIcon.toString();
            if (icon.length === 1)
                icon = "0" + icon;
            this.weatherIcon = `${Constants.weatherIconUrl}${icon}-s.png`;
        }
        this.temperatureValue = currentConditions.Temperature.Metric.Value;
        this.temperatureUnit = currentConditions.Temperature.Metric.Unit;
    }
}
Here, you can see we make up weather icon as an HTML link URL. You can find all weather icons from Accure Weather Icons.
在这里,您可以看到我们将天气图标作为HTML链接URL。 您可以从Accure Weather Icons中找到所有天气图标 。
使用Bootstrap,React-Bootstrap和React-Bootstrap-Typeahead样式化UI (Styling UI With Bootstrap, React-Bootstrap and React-Bootstrap-Typeahead)
Bootstrap is an open source toolkit for developing with HTML, CSS, and JS. Quickly prototype your ideas or build your entire app with our Sass variables and mixins, responsive grid system, extensive prebuilt components, and powerful plugins built on jQuery.
Bootstrap是一个用于使用HTML,CSS和JS开发的开源工具包。 使用我们的Sass变量和mixins,响应式网格系统,大量的预构建组件以及基于jQuery构建的强大插件,可以快速为您的想法制作原型或构建整个应用程序。
React-Bootstrap replaces the Bootstrap JavaScript. Each component has been built from scratch as a true React component, without unneeded dependencies like jQuery.React-Bootstrap provides a bunch of components like Button, Form, Accordion, Badge, Alter, Dropdown.
React-Bootstrap取代了Bootstrap JavaScript。 每个组件都是作为一个真正的React组件从头开始构建的,没有像jQuery.React-Bootstrap这样的不需要的依赖项jQuery.React-Bootstrap提供了一堆组件,例如Button , Form , Accordion , Badge , Alter , Dropdown 。
React-Bootstrap-Typeahead is a React-based typeahead that relies on Bootstrap for styling. It supports both single- and multi-selection.
React-Bootstrap-Typeahead是基于React的typeahead ,它依赖于Bootstrap进行样式设置。 它支持单选和多选。
We use bootstrap for styling and React-Boostrap input and button components. Also, we use React-Bootstrap-Typeahead for Country input.
我们使用引导程序进行样式设置,并使用React-Boostrap输入和按钮组件。 另外,我们使用React-Bootstrap-Typeahead作为Country输入。
Install Bootstrap, React-Bootstrap and React-Bootstrap-Typeahead under “weatherclient” folder.
在“ weatherclient ”文件夹下安装Bootstrap , React-Bootstrap和React-Bootstrap-Typeahead 。
npm install react-bootstrap bootstrap –-save
npm install react-bootstrap-typeahead @types/react-bootstrap-typeahead --save
After installing bootstrap, go to index.tsx under src folder to add the below line:
安装bootstrap ,转到src文件夹下的index.tsx以添加以下行:
import 'bootstrap/dist/css/bootstrap.min.css'
This line apples bootstrap styling to the whole app.
这行苹果bootstrap整个应用bootstrap样式。
Now we can style our app, replace App.css with the following styles:
现在,我们可以对我们的应用程序进行样式设置,将App.css替换为以下样式:
.panel {
    padding-left: 0px;
    padding-top: 10px
}
.field {
    padding-left: 10px;
    padding-right: 10px
}
.city {
    display: flex;
    background: linear-gradient(90deg, rgba(2,0,36,1) 0%,
    rgba(25,112,245,0.6399510487788865) 0%, rgba(0,212,255,1) 100%);
    flex-direction: column;
    height: 40vh;
    justify-content: center;
    align-items: center;
    padding: 0px 20px 20px 20px;
    margin: 0px 0px 50px 0px;
    border: 1px solid;
    border-radius: 5px;
    box-shadow: 2px 2px #888888;
    font-family: 'Merriweather', serif;
}
.city h1 {
    line-height: 1.2
}
.city span {
    padding-left: 20px
}
.city .row {
    padding-top: 20px
}
.weatherError {
    color: #f16051;
    font-size: 20px;
    letter-spacing: 1px;
    font-weight: 200;
}
使用IState和IProp返工组件 (Rework Components with IState and IProp)
表单组件 (Form Component)
We change Form component to a state component. React class component has a built-in state object. The state object is where you store property values that belong to the component. When the state object changes, the component re-renders.
我们将Form组件更改为state组件。 React类组件具有内置的状态对象。 state对象是您存储属于组件的属性值的位置。 当状态对象更改时,组件将重新渲染。
Now we add state and props to our form component.
现在,我们将状态和道具添加到表单组件中。
import React from "react";
import { Button, FormControl } from 'react-bootstrap';
import { AsyncTypeahead, Typeahead } from 'react-bootstrap-typeahead';
import { Country } from '../types/Country';
import { City } from '../types/City';
interface IState {
    city: City;
    country: Country;
    cities: City[];
    searchText: string
};

interface IProps {
    /* The http path that the form will be posted to */
    countries: Country[];
}
class Form extends React.Component<IProps, IState> {
    constructor(props: IProps) {
        super(props);
        this.state = {
            city: {} as City,
            country: {} as Country,
            cities: [],
            searchText: ""
        }
    };
    handleSubmit = async (e: any) => {
    }
    render() {
        return (
            <form onSubmit={this.handleSubmit}>
                <div className="container-fluid">
                    <div className="row">
                        <div className="col-sm-4 form-group">
                            <Typeahead
                                id="country"
                                labelKey="EnglishName"
                                options={this.props.countries}
                                onChange={(s) => this.setState({ country: s[0] } as IState)}
                                placeholder="Country..."
                            />
                        </div>
                        <div className="col-sm-4 form-group field">
                            <FormControl id="city" type="text" name="city"
                             onChange={(e: any) => this.setState
                             ({ searchText: e.target.value })} placeholder="  City... " />
                        </div>
                        <div className="col-sm-2 form-group field">
                            <Button variant="primary" type="submit"> Go </Button>
                        </div>
                    </div>
                </div>
            </form>
        );
    }
};
export default Form;
Here, we use react-bootstrap-typeahead for country input, and use react-boostrap FormControl for city text input, also use react-bootstrap Button for “Go” button. The one thing I think I need mention is OnChange event of input fields.
在这里,我们使用react-bootstrap-typeahead进行country输入,使用react-boostrap FormControl进行city文本输入,还使用react-bootstrap Button进行“ 转到 ”按钮。 我想提到的一件事是输入字段的OnChange事件。
As I mentioned before, React is one way binding, which means when you change the UI field value, binding data model is not get updated automatically as Angular. That’s why we need update the binding data model via onChange event. Also react doesn’t allow you to change component state directly, you need to call setState method to update state.
如前所述,React是绑定的一种方式,这意味着当您更改UI字段值时,绑定数据模型不会自动更新为Angular。 这就是为什么我们需要通过onChange事件更新绑定数据模型。 另外react不允许直接更改组件状态,您需要调用setState方法来更新状态。
We leave handleSubmit as empty function now, and will come back later.
现在,将handleSubmit为空函数,稍后再返回。
WeatherDetails组件 (WeatherDetails Component)
WeatherDetails component is pretty straight forward, just binding Weather view model and display.
WeatherDetails组件非常简单,只需绑定Weather视图模型和显示即可。
import React from 'react';
import { Weather } from '../types/Weather'
interface IProp {
weather: Weather,
};
class WeatherDetails extends React.Component<IProp> {
render() {
const weather = this.props.weather;
return (
<div>
<div className="city col-sm-9">
{
weather.location && <div>
<h1>{weather.location}</h1>
<div className="row">
<table>
<tbody>
<tr>
<td>
{
weather.weatherIcon &&
<img src={weather.weatherIcon}
className="img-thumbnail" />
}
</td>
<td>
<span>{weather.weatherText}</span>
</td>
</tr>
<tr>
<td>
{weather.isDaytime && <span>
Daytime
</span>}
{!weather.isDaytime && <span>
Night
</span>}
</td>
<td>
<span>{weather.temperatureValue}°
{weather.temperatureUnit}</span>
</td>
</tr>
</tbody>
</table>
</div>
</div>
}
</div>
{
weather.error && <p className="weatherError">
{weather.error}
</p>
}
</div>
);
}
};
export default WeatherDetails;
Here, we pass “weather” to WeatherDetails component as prop. In render function, binding prop to HTML fields. Also you can see we’re using conditional rendering.
在这里,我们将“ weather ”作为WeatherDetails传递给WeatherDetails组件。 在render函数中,将prop绑定到HTML字段。 您还可以看到我们正在使用条件渲染。
Conditional rendering in React works the same way conditions work in JavaScript. Use JavaScript operators like if or the conditional operator to create elements representing the current state, and let React update the UI to match them. In a conditional render, a component decides based on one or several conditions which elements it will return. When a component has conditional rendering, the instance of the rendered component can have different looks.
React中的条件渲染的工作方式与JavaScript中的条件工作方式相同。 使用if或conditional运算符之类JavaScript运算符来创建表示当前状态的元素,并让React更新UI来匹配它们。 在条件render ,组件根据一个或多个条件决定它将返回哪些元素。 当组件具有条件渲染时,渲染组件的实例可以具有不同的外观。
家庭组件 (Home Component)
First, define state interface for Home component.
首先,为Home组件定义状态接口。
interface IState {
    weather: Weather,
    countries: Country[],
    city?: City
}
Then initialize the state in constructor of component.
然后在组件的构造函数中初始化state 。
public state: IState = {
    weather: {
        error: ""
    } as Weather,
    countries: [],
    city: undefined
}
In render function, pass state values to WeatherDetails and Form components.
在render功能中,将state值传递给WeatherDetails和Form组件。
render() {
    return (
        <div className="container content panel">
            <div className="container">
                <div className="row">
                    <div className="form-container">
                        <WeatherDetails weather={this.state.weather} />
                        <Form countries={this.state.countries} />
                    </div>
                </div>
            </div>
        </div>
    );
}
Now click “IIS Express” to run again.
现在单击“ IIS Express ”再次运行。
如何在React中使用Restful API (How to Consume Restful API In React)
Most modern web applications make use of the REST Protocol to communicate with each other. To achieve this, data is sent as JSON (JavaScript Object Notation) to the API. In turn, the API returns a JSON payload which can be static or dynamic data.
大多数现代Web应用程序都使用REST协议相互通信。 为此,将数据作为JSON(JavaScript对象表示法)发送到API。 反过来,API返回一个JSON有效负载,可以是静态或动态数据。
The Fetch API provides an interface for fetching resources (including across the network). It will seem familiar to anyone who has used XMLHttpRequest, but the new API provides a more powerful and flexible feature set. Fetch API is builtin package of Create-React-App. So we don’t need install anything, just use it directly.
Fetch API提供了一个用于获取资源(包括通过网络)的接口。 对于使用XMLHttpRequest任何人来说似乎都很熟悉,但是新的API提供了更强大,更灵活的功能集。 Fetch API是Create-React-App内置包。 因此,我们不需要安装任何东西,只需直接使用它即可。
Add Constants.ts, put the API URLs and API key in Constants class.
添加Constants.ts ,将API URL和API密钥放入Constants类中。
export class Constants {
    static locationAPIUrl = 'https://dataservice.accuweather.com/locations/v1';
    static citySearchAPIUrl = 'https://dataservice.accuweather.com/locations/v1/cities/';
    static currentConditionsAPIUrl = 'https://dataservice.accuweather.com/currentconditions/v1';
    static weatherIconUrl = 'http://developer.accuweather.com/sites/default/files/';
    static apiKey = 'XXXXXXXXXXXXXXXXXX';
}
You should replace apiKey with your API key.
您应该用API密钥替换apiKey 。
获取所有国家 (Get All Countries)
Call Country List endpoint of Accure Weather Locations API.
调用Accure Weather Locations API的“ Country List端点。
Resource URL,
资源网址,
https://dataservice.accuweather.com/locations/v1/countries
HTTPS://dataservice.accuweather.com/locations/v1/countries
Add the below function to Home component.
将以下功能添加到Home组件。
async getCountries(): Promise<Country[]> {
    try {
        const res = await fetch
                    (`${Constants.locationAPIUrl}/countries?apikey=${Constants.apiKey}`);
        return await res.json() as Country[];
    } catch (error) {
        console.log(error);
        return [];
    }
}
Here, we call http get by “fetch”, and json deserialize the result to array of Country. In short, the Promise object represents the eventual completion (or failure) of an asynchronous operation, and its resulting value.
在这里,我们将http get通过“ fetch ”调用,并将json反序列化为Country数组。 简而言之, Promise对象表示异步操作的最终完成(或失败)及其结果值。
Now we have getCountries function, but where do we need to call it? We talked react component life cycle before, we need call getCountries() when Home component is being created and inserted into the DOM. Then the best location is componentDidMount().
现在我们有了getCountries函数,但是我们需要在哪里调用呢? 我们之前讨论过React组件的生命周期,在创建Home组件并将其插入DOM时需要调用getCountries() 。 那么最好的位置是componentDidMount() 。
async componentDidMount() {
    try {
        const countries = await this.getCountries();
        await this.setStateAsync({ countries: countries } as IState);
    } catch (error) {
    }
}
Add setStateAsync as well.
也添加setStateAsync 。
async setStateAsync(state: IState) {
    return new Promise((resolve: any) => {
        this.setState(state, resolve);
    });
}
Why do we use async await?
为什么我们使用async await ?
Async and Await are extensions of promises. Async functions enable us to write promise based code as if it were synchronous, but without blocking the execution thread. The await operator is used to wait for a Promise.
Async和Await是Await的扩展。 Async功能使我们能够像编写同步代码一样编写基于promise的代码,但不会阻塞执行线程。 await操作符用于等待Promise 。
OK. Now we run the app again.
好。 现在,我们再次运行该应用程序。
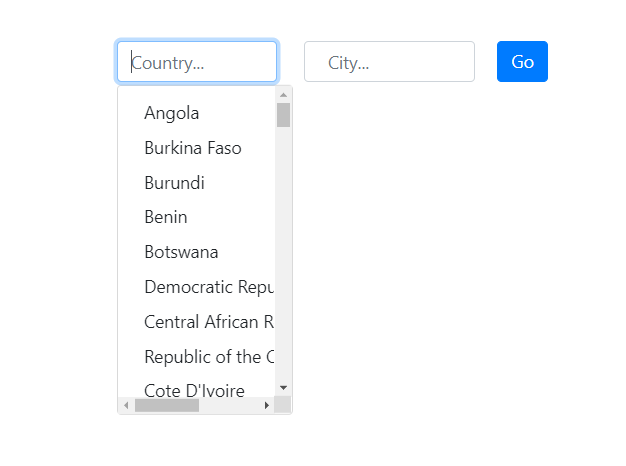
Because we are binding “Country” typeahead with “countries” prop in Form component, and passing countries from Home component to Form component, the typeahead shows options as expected.
因为我们在Form组件中将“ Country ”预输入与“ countries ”道具绑定在一起,并且将国家从Home组件传递到Form组件,所以预输入将显示预期的选项。
获取城市 (Get City)
After select a country, we can search the city per the input text.
选择一个country ,我们可以根据输入的文本搜索city 。
City search endpoint:
City搜索终点:
http://dataservice.accuweather.com/locations/v1/cities/{countryCode}/search
HTTP://dataservice.accuweather.com/locations/v1/cities/{countryCode}/search
Add getCity function to Home component.
将getCity函数添加到Home组件。
async getCity(searchText: string, countryCode: string): Promise<City> {
    const res = await fetch(`${Constants.locationAPIUrl}/cities/
                ${countryCode}/search?apikey=${Constants.apiKey}&q=${searchText}`);
    const cities = await res.json() as City[];
    if (cities.length > 0)
        return cities[0];
    return {} as City;
}
获取当前条件 (Get Current Conditions)
GetCity returns a City type object, which has location key. With location key, we can call Current Conditions endpoint of Current Conditions API.
GetCity返回具有location键的City类型对象。 使用location键,我们可以调用Current Conditions API的Current Conditions端点。
Current conditions endpoint:
当前条件终点:
- http://dataservice.accuweather.com/currentconditions/v1/{locationKey} http://dataservice.accuweather.com/currentconditions/v1/{locationKey}
Add getCurrentConditions function to Home component.
将getCurrentConditions函数添加到Home组件。
async getCurrentConditions(city: City) {
    try {
        const res = await fetch(`${Constants.currentConditionsAPIUrl}/
                                 ${city.Key}?apikey=${Constants.apiKey}`);
        const currentConditions = await res.json() as CurrentCondition[];
        if (currentConditions.length > 0) {
            const weather = new Weather(currentConditions[0], city);
            await this.setStateAsync({
                weather: weather,
                city: city
            } as IState);
        }
    } catch (error) {
        console.log(error);
    }
    return {} as Weather;
}
Now we put getCity and getCurrentConditions together in getWeather.
现在我们将getCity和getCurrentConditions放在getWeather 。
getWeather = async (e: any, countryCode: string, searchText: string) => {
        e.preventDefault();
        if (!countryCode && !searchText) {
            await this.setStateAsync
                 ({ weather: { error: "Please enter the value." } } as IState);
            return;
        }
        try {
            const city = await this.getCity(searchText, countryCode);
            if (city.Key) {
               await this.getCurrentConditions(city);
            }
        } catch (err) {
            await this.setStateAsync({ weather: { error: err } } as IState);
        }
    };
It appears getWeather has two parameters, countryCode and searchText. These values come from Form component, which means getWeather should be called from Form component. How can we do that?
看来getWeather有两个参数, countryCode和searchText 。 这些值来自Form组件,这意味着应该从Form组件调用getWeather 。 我们该怎么做?
Just add getWeather to Form component prop, and set it from Home component.
只需将getWeather添加到Form组件getWeather中,然后从Home组件中进行设置即可。
First, we add getWeather to Form prop. In Form.tsx, we change Iprops interface.
首先,我们将getWeather添加到Form prop。 在Form.tsx中 ,我们更改了Iprops interface 。
interface IProps {
    getWeather: (e: any, country: string, serachText: string) => Promise<void>;
    countries: Country[];
}
Then change handleSubmit:
然后更改handleSubmit :
handleSubmit = async (e: any) => {
        this.props.getWeather(e, this.state.country.ID, this.state.searchText);
    }
Don’t forget set getWeather prop in Home component.
不要忘记在Home组件中set getWeather道具。
<div className="form-container">
    <WeatherDetails weather={this.state.weather} />
    <Form getWeather={this.getWeather} countries={this.state.countries} />
</div>
Click “IISExpress” to run again.
单击“ IISExpress ”再次运行。
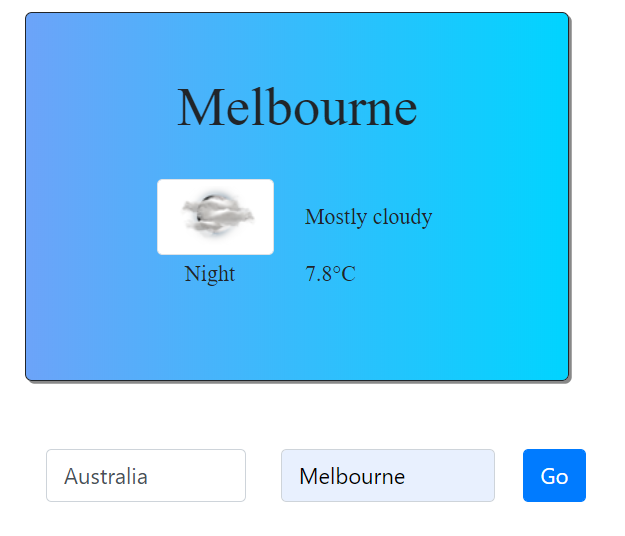
Select “Australia”, and input “Knoxfield”, then click “Go”, the weather conditions displays as we expected.
选择“ 澳大利亚 ”,并输入“Knoxfield”,然后点击“GO”,天气状况显示为我们的预期。
调用.NetCore API (Call .NetCore API)
Now we move to backend .NetCore API controller. Our target is saving the last selected location to database. And when we load the react app, will retrieve the last input location to get the weather conditions automatically.
现在,我们移至后端.NetCore API控制器。 我们的目标是将最后选择的位置保存到数据库。 当我们加载react应用时,将检索最后一个输入位置以自动获取天气状况。
All backend code is the same as Global Weather – ASP.NetCore and Angular 7 (part 2). I don’t explain again. Just quick copy all the code. Run “Release 1.0.sql” to create the database.
所有后端代码均与Global Weather – ASP.NetCore和Angular 7(第2部分)相同。 我不再解释。 只需快速复制所有代码即可。 运行“ Release 1.0.sql ”以创建数据库。
Basically, we created Cities API, one is http get, the other is http post.
基本上,我们创建了Cities API,一个是http get,另一个是http post。
using System.Threading.Tasks;
using GlobalWeather.Services;
using Microsoft.AspNetCore.Mvc;
using Serilog;
using Weather.Persistence.Models;
namespace GlobalWeather.Controllers
{
    [Route("api/[controller]")]
    [ApiController]
    public class CitiesController : ControllerBase
    {
        private readonly ICityService _service;
        private readonly ILogger _logger;
        public CitiesController(ICityService service, ILogger logger)
        {
            _service = service;
            _logger = logger;
        }
        // GET api/cities
        [HttpGet]
        public async Task<ActionResult<City>> Get()
        {
            var city = await _service.GetLastAccessedCityAsync();
            return city;
        }
        // POST api/cities
        [HttpPost]
        public async Task Post([FromBody] City city)
        {
            await _service.UpdateLastAccessedCityAsync(city);
        }
    }
}
Now we need call this API from React app.
现在我们需要从React应用程序调用此API。
First, add CityMetaData.ts to “types” folder.
首先,将CityMetaData.ts添加到“ types ”文件夹中。
import { City } from './City';
export class CityMetaData {
  public id: string;
  public name: string;
  public countryId: string;
  public constructor(city: City) {
    this.id = city.Key;
    this.name = city.EnglishName;
    this.countryId = city.Country.ID;
  }
}
Then add City API Url to Constants.ts:
然后将City API网址添加到Constants.ts中 :
static cityAPIUrl = '/api/cities';
Finally, add getLastAccessedCity and updateLastAccessedCity to Home component.
最后,将getLastAccessedCity和updateLastAccessedCity添加到Home组件。
async updateLastAccessedCity(city: City) {
    try {
        const data = new CityMetaData(city);
        await fetch(`${Constants.cityAPIUrl}`, {
            method: 'post',
            body: JSON.stringify(data)
        });
    } catch (error) {
        console.log(error);
    }
}

async getLastAccessedCity(): Promise<City> {
    try {
        const res = await fetch(`${Constants.cityAPIUrl}`);
        const data = await res.json() as CityMetaData;
        return {
            Key: data.id,
            EnglishName: data.name,
            Type: 'City',
            Country: {
                ID: data.countryId,
                EnglishName: ''
            }
        } as City;
    } catch (error) {
        console.log(error);
        return {} as City;
    }
}
In componentDidMount function to call getLastAccessedCity to retrieve last accessed city, if there is a last accessed city, just get weather of this city directly.
在componentDidMount函数中,调用getLastAccessedCity检索上次访问的城市,如果有上次访问的城市,则直接获取该city天气。
async componentDidMount() {
    try {
        const countries = await this.getCountries();
        await this.setStateAsync({ countries: countries } as IState);
        const lastCity = await this.getLastAccessedCity();
        if (lastCity && lastCity.Key) {
            await this.getWeatherAsync(lastCity);
        }
    } catch (error) {
    }
}
Change getWeather function to call updateLastAccessedCity to save the current city.
更改getWeather函数以调用updateLastAccessedCity以保存当前城市。
getWeather = async (e: any, countryCode: string, searchText: string) => {
    e.preventDefault();
    if (!countryCode && !searchText) {
        await this.setStateAsync({ weather: { error: "Please enter the value." } } as IState);
        return;
    }
    try {
        const city = await this.getCities(searchText, countryCode);
        if (city.Key) {
            await this.updateLastAccessedCity(city);
            await this.getWeatherAsync(city);
        }
    } catch (err) {
        await this.setStateAsync({ weather: { error: err } } as IState);
    }
};
Now run the app again, it should remember the city you input last time.
现在再次运行该应用程序,它应该记住您上次输入的城市。
如何使用源代码 (How to Use Source Code)
- Install Visual Studio 2019 version 16.3 (or later version), which supports the release of .NET Core 3.0. 安装Visual Studio 2019版本16.3(或更高版本),该版本支持.NET Core 3.0的发行版。
- Install NodeJs the latest version. 安装最新版本的NodeJs。
- Download and extract the source code. 下载并提取源代码。
Go to "weatherclient" folder, run "
npm install" from command line.转到“ weatherclient ”文件夹,从命令行运行“
npm install”。Open GlobalWeatherReact.sln with Visual Studio 2019, click "rebuild all", then start with "IIS Express".
使用Visual Studio 2019打开GlobalWeatherReact.sln ,单击“ 全部重建 ”,然后从“ IIS Express ”开始。
结论 (Conclusion)
In this article, we talked about client-side React and server-side ASP. NET Core, and REST API. We’re using Create-React-App to build react client and use .NET Core 3.0 to build API. React app and .NetCore API can be integrated seamlessly.
在本文中,我们讨论了客户端React和服务器端ASP。 NET Core和REST API。 我们正在使用Create-React-App构建React客户端,并使用.NET Core 3.0构建API。 React app和.NetCore API可以无缝集成。
In part 2, we’ll start touching the fun part, React Redux. Without Redux, React only can build something small. But with Redux, React can build an enterprise app.
在第2部分中 ,我们将开始涉及有趣的部分React Redux。 没有Redux,React只能构建很小的东西。 但是使用Redux,React可以构建企业应用程序。
翻译自: https://www.codeproject.com/Articles/5248030/Using-Create-React-App-and-NET-Core-3-0-to-Build-a


 186
186


 被折叠的 条评论
为什么被折叠?
被折叠的 条评论
为什么被折叠?
 到【灌水乐园】发言


