


简单介绍
一个典型的MVC的模式

可以看到,这个是非常自然的想法。也无怪乎是人类第一种提出来的方案。这个的问题就是用久了的话,
MVC的使用非常常见,可以看一下经典的SpringMVC

controller会变得非常复杂,因为主要的业务逻辑都会集中在controller里,controller既要负责更新数据,又要负责选择视图,又要负责处理用户请求。另一个问题,view是依赖于model的。代码很有可能导致view根据model的数据进行业务逻辑判断后进行展示。所以,有人又提出了MVVM

这种情况下,前端界面和ViewModel严格绑定。这样杜绝了View中掺杂业务逻辑。Controller(现在的ViewModel)的部分逻辑拆入到了Service当中,保证ViewModel的代码足够简洁。
实例
先只考虑V和P的分离,在这里,我们用接口实现
首先,程序先实例化V,主函数代码如下
    static class Program
    {
        /// <summary>
        /// 应用程序的主入口点。
        /// </summary>
        [STAThread]
        static void Main()
        {
            Application.EnableVisualStyles();
            Application.SetCompatibleTextRenderingDefault(false);
            Application.Run(new FrmTestMvp());
        }
    }
然后,我们让V去实例化P,将对自己的引用传给P
VIEW代码如下
    public partial class FrmTestMvp : Form, ITestMvpView
    {
        private TestMvpPresenter _testMvpPresenter;

        public FrmTestMvp()
        {
            InitializeComponent();
            //注意构造Presenter时需把自身传过去
            this._testMvpPresenter = new TestMvpPresenter(this);
        }

        //单击按钮事件
        private void button1_Click(object sender, EventArgs e)
        {
            if (Click != null)
            {
                Click();
            }
        }

        #region ITestMvpView 成员

        //实现接口属性方法
        public TextBox TextBox1
        {
            get { return this.textBox1; }
        }

        //委托事件
        public new event Button1_Click Click;

        #endregion
    }
VIEW实现了如下接口。这让我们的Presenter可以支持多个VIEW,只要他作出了对接口的实现
    //声明了一个委托类型,并在接口安上了和这个委托类型相关的事件
    public delegate void Button1_Click();

    interface ITestMvpView
    {
        //声明控件
        TextBox TextBox1{get;}
        //事件
        event Button1_Click Click;
    }
最后就是我们的Presenter部分,利用界面给它的接口来访问界面。
    class TestMvpPresenter
    {
        private ITestMvpView _testMvpView;

        /// <summary>
        /// 构造函数,出入视图接口
        /// </summary>
        /// <param name="testMvpView">ITestMvpView接口</param>
        public TestMvpPresenter(ITestMvpView testMvpView)
        {
            this._testMvpView = testMvpView;
            this.InitEvent();
        }

        //加载委托事件
        private void InitEvent()
        {
            this._testMvpView.Click += new Button1_Click(_testMvpView_Click);
        }

        //处理事件
        void _testMvpView_Click()
        {
            if (CheckValue())
            {
                this.ShowMessage(this._testMvpView.TextBox1.Text);
            }
            else
            {
                this.ShowMessage("输入的值不能为空!");
                this._testMvpView.TextBox1.Focus();
            }
        }

        //检查TestBox1的输入值是否合法
        private bool CheckValue()
        {
            if (this._testMvpView.TextBox1.Text.ToString() == "")
            {
                return false;
            }
            return true;
        }

        private void ShowMessage(string message)
        {
            MessageBox.Show(message);
        }
    }
实际上,上面的例子是先初始化view,然后初始化presenter的方式,我们成为view-first。反过来当然也一样,叫做presenter-first方式。
另外一个例子,首先,在来看我们的Model,model是一个只包含属性的实体类.书写如下
    public class TestMvpModel
    {
        public string Name { get; set; }
    }
然后写我们的view类
View类中依赖model,并负责model和view的绑定
   public partial class FrmTestMvp : Form
    {
        private TestMvpModel model;
        public TestMvpModel Model
        {
            get
            {
                return model as TestMvpModel;
            }
            set
            {
                model = value as TestMvpModel;
                label1.Text = model.Name;
            }
        }

        public FrmTestMvp()
        {
            InitializeComponent();
        }

        public EventHandler ButtonClick;

        private void button1_Click(object sender, EventArgs e)
        {
            if (ButtonClick != null)
            {
                ButtonClick(sender,e);
            }
        }
    }
最后写我们的presenter,负责一切的初始化,和页面逻辑的控制
 class TestMvpPresenter
    {
        public FrmTestMvp View { get; set; }
        public TestMvpPresenter(FrmTestMvp view)
        {
            this.View = view;

            this.View.Model = new TestMvpModel() {Name = "GDL" };

            this.View.ButtonClick += delegate
            {
                this.View.Model = new TestMvpModel() { Name = "ABC" };
            };
        }

    }
主程序改为如下
        [STAThread]
        static void Main()
        {
            Application.EnableVisualStyles();
            Application.SetCompatibleTextRenderingDefault(false);

            TestMvpPresenter presenter = new TestMvpPresenter(new FrmTestMvp());
            Application.Run(presenter.View);
        }
在我的理解中,MVP模式的核心就是将传统VIEW中相互耦合的业务逻辑,页面静态部分,和页面中动态部分分开。页面中不变的静态部分继续放在view里。动态部分放在model里。而业务逻辑放在我们的presenter中。
是不是觉得上面的view代码有点多,还需要手工绑定两件事:
(1)页面动作和presenter中的处理函数
        private void button1_Click(object sender, EventArgs e)
        {
            if (ButtonClick != null)
            {
                ButtonClick(sender,e);
            }
        }
(2)模型和页面的一致性变化
        public TestMvpModel Model
        {
            get
            {
                return model as TestMvpModel;
            }
            set
            {
                model = value as TestMvpModel;
                label1.Text = model.Name;
            }
        }
所以,微软又推出了WPF。我们来看一下WPF中的view典型写法
<Window x:Class="MVPDemo2.PanelView"
    xmlns="http://schemas.microsoft.com/winfx/2006/xaml/presentation"
    xmlns:x="http://schemas.microsoft.com/winfx/2006/xaml"
    Title="PanelView" Height="300" Width="300">
    <Grid>
        <Label Height="28" HorizontalAlignment="Left" Margin="10,10,0,0" Name="label1" VerticalAlignment="Top" Width="120" Content="{Binding Name}" />
        <Button Height="24" HorizontalAlignment="Left" Margin="10,79,0,0" Name="btnModify" VerticalAlignment="Top" Width="111" Click="btnModify_Click">修改Label的文字</Button>
    </Grid>
</Window>
显然,在上述的XAML中,已经对前文提到的两件事进行了绑定。在wpf下,我们可以轻松的写出model代码(#region部分为INotifyPropertyChanged
接口添加)
    public class PanelPresenterationModel : INotifyPropertyChanged
    {
        private string name;

        public string Name
        {
            get
            {
                return this.name;
            }
            set
            {
                if (this.name != value)
                {
                    this.name = value;
                    this.OnPropertyChanged("Name");
                }
            }
        }

        #region INotifyPropertyChanged Members

        public event PropertyChangedEventHandler PropertyChanged;

        private void OnPropertyChanged(string propertyName)
        {
            PropertyChangedEventHandler Handler = PropertyChanged;
            if (Handler != null) Handler(this, new PropertyChangedEventArgs(propertyName));
        }

        #endregion
    }
我们给出presenter代码
    public class PanelPresenter
    {
        public PanelPresenter(PanelView view)
        {
            this.View = view;

            //初始化Model
            this.View.Model = new PanelPresenterationModel() { Name = "Bao, Jianqiang" };

            this.View.ButtonClick += delegate
            {
                this.View.Model.Name = "Jax.Bao";

            };
        }

        public PanelView View { get; set; }
    }
我们看到WPF很成功的实现了MVP。
然而,还有好事者,他们开发了MVVM模式
Simple Mvvm,Mvvm Light和Prism都是MVVM的开源框架
下面只贴上典型的viewmodel的实例
namespace SilverlightApplication2.ViewModels
{
    public class StudentViewModel : NotificationObject
    {
        public StudentViewModel()
        {
            student = new Student();
        }

        Student student;
        public Student Student
        {
            get
            {
                return this.student;
            }
            private set
            {
                this.student = value;
                this.RaisePropertyChanged(() => this.student);
            }
        }
        public bool CanSubmit
        {
            get
            {
                return true;
            }
        }

        public void Submit()
        {
            student.Mock();
        }
    }
}
在上代码中可以看见,viewmodel又负责处理view内容的更新,同时也负责对model内容进行同步调整。下面展现了一个一般MVVM系统的架构
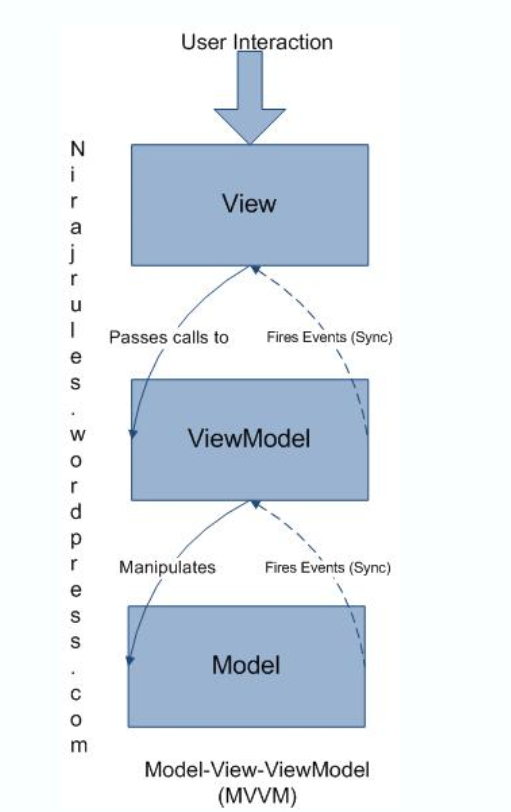
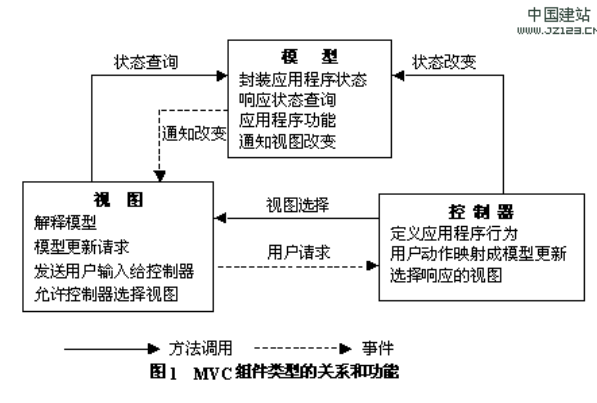
下面,我们用一个图来解释MVC
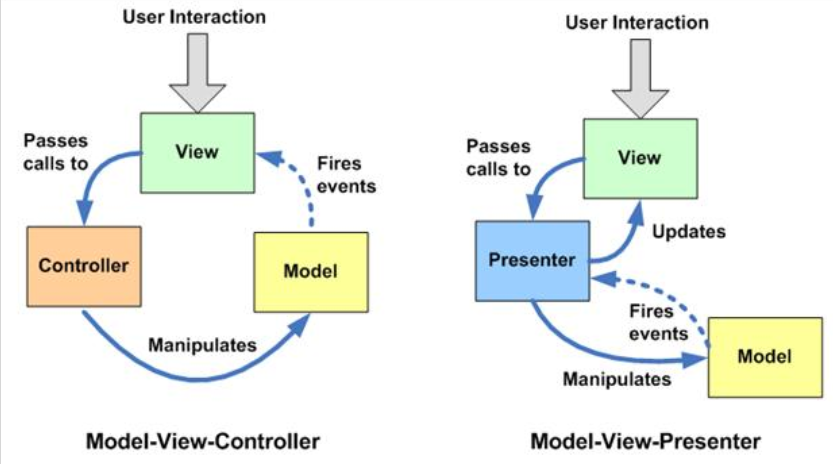
MVC架构和MVP架构的区别


 390
390

 被折叠的 条评论
为什么被折叠?
被折叠的 条评论
为什么被折叠?
 到【灌水乐园】发言


