


原文:http://objectivecbeginner.blogspot.com/2010/11/using-opencv-for-mac-os-in-xcode.html
转帖:http://blog.csdn.net/eminia/article/details/6635040
译文:http://blog.csdn.net/eminia/article/details/6635117
翻译:eminia
在Xcode使用openCV
第1段略.
安装openCV,有很多方法.有的是用Fink安装外部unix库,比如这篇.官网wiki也说要装外部库,但没说具体装哪一个.我试过,但费时费力.种种安装尝试后,碰巧发现一个私有框架.Dr. Patterson. Scroll所写,网页最底下的链接.先下载,双击打开虚拟盘.打开xcode,创建新项目.导入框架,选择下载的框架.最后结果如下: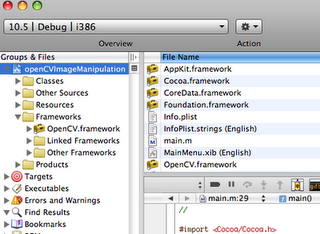
正确安装好框架后,你一定汹涌澎湃想大展宏图跃跃欲试吧.但最让我郁闷的是,openCV帮助很烂.所用的范例要么跑不动,要么版本不对.羡慕嫉妒恨!下面这些是我找到的少量优秀教程:
装好openCV,肯定要做项目了.我呢,做的是生物计量方面的东东.下面我就来解释基本的openCV程序.先加张图片.把任意图片拖到xcode.我放了自己的照片一张me.jpg.
图片导入后,想看看图片可否调用,复制以下代码,粘贴到main.m.
#import "OpenCV/cv.h"
#import "OpenCV/highgui.h"

int main()
{
	//get the image from the directed path
	IplImage* img = cvLoadImage("/Users/wang/Desktop/me1.jpg", 1);
	//NSLog(img);
	//create a window to display the image
	cvNamedWindow("picture", 1);
	//show the image in the window
	cvShowImage("picture", img);
	//wait for the user to hit a key
	cvWaitKey(0);
	//delete the image and window
	cvReleaseImage(&img);
	cvDestroyWindow("picture");
	//return
	return 0;
}
测试前先确定图片路径,右键单击图片->getInfo,将path复制到代码.如果顺利,会显示图片,并打开picture窗口.主要导入2个文件:cv.h和highgui..h.其中.cv.h写的是openCV的所有主要函数,highgui是窗口和图形界面库.上面代码注释已经写的很清楚了,如果有问题可以留言.
因为我要做的是生物计量方面的东东,所以要用到mac的摄像头.下面代码是从摄像头截图.
#import "OpenCV/cv.h"
#import "OpenCV/highgui.h"

int main()
{
	//capture the image from device 0
	CvCapture* capture = cvCaptureFromCAM(0);
	//if the camera cannot take pictures, exit
	if(!cvGrabFrame(capture))
	{
		exit(0);
	}
	//get the image from the directed path
	IplImage* img = cvRetrieveFrame(capture,0);
	//create a window to display the image
	cvNamedWindow("picture", 1);
	//show the image in the window
	cvShowImage("picture", img);
	//wait for the user to hit a key
	cvWaitKey(0);
	//delete the image and window
	cvReleaseImage(&img);
	cvDestroyWindow("picture");
	//return
	return 0;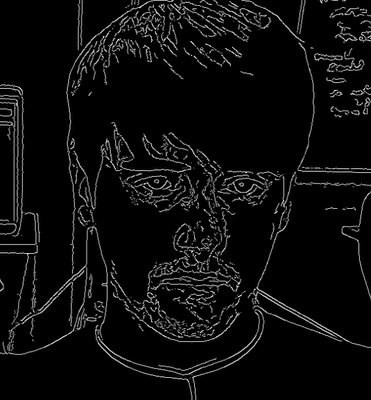
}接下来的例子有点复杂:先从摄像头截图,再生成一个灰阶图.用模糊来平滑.再用canny算法(canny edge )检测边缘.对2维图像进行边界提取操作,最后用hough变换找到圆形对象.比如眼睛.我找的大多数范例,像hough转化,canny算法啊,总是出问题,要么参数不够,要么参数太多.下面的代码是经过我测试过,保证能用的:
#import "OpenCV/cv.h"
#import "OpenCV/highgui.h"

int main()
{
	//create camera object by using device 0
	CvCapture* capture = cvCaptureFromCAM(0);
	//create image object to be used
	IplImage* img = 0;
	// capture a frame from the camera to see if it is working
	if(!cvGrabFrame(capture))
	{exit(0);}
	//capture the first image from the camera
	img=cvRetrieveFrame(capture,0);
	//create a gray image by copying the original image
	IplImage* gray = cvCreateImage(cvGetSize(img), 8, 1);
	//create storage device for hough circles
	CvMemStorage* storage = cvCreateMemStorage(0);
	//convert the gray image to grayscale
	cvCvtColor( img, gray, CV_BGR2GRAY );
	//smooth the gray image down. it takes in the gray image and outputs the gray image
	cvSmooth( gray, gray, CV_GAUSSIAN, 9, 9, 0, 0 );
	//detect edges of the image by performing the canny operator
	cvCanny(gray, gray, 0, 20, 3);
	//run the hough transform and store the coordinates/radius of the circles in the circles object. it stores
	//it int a 3 column matrix with x, y, and radius as the columns
	CvSeq* circles = cvHoughCircles( gray, storage, CV_HOUGH_GRADIENT, 2, gray->height/4,100, 100, 0, 1000);

	//grab the total number of circles found
	int total = circles->total;
	//print out the total number of cirlces just to make sure that some where found
	NSLog(@"Total is : %i", total);
	//cycle through the circle matrix and print out circles detected onto the original image
	for(int i = 0; i <total; i++){
		//grab a row of the circle matrix
		float* p = (float*)cvGetSeqElem( circles, i );
		//it prints the circle using the p[0]/x, p[1]/y, and p[2], as the radius
		cvCircle( img, cvPoint(cvRound(p[0]),cvRound(p[1])), cvRound(p[2]),CV_RGB(255,255,255), 1, 8, 1 );
	}

	//create the windows to display the images
	cvNamedWindow( "circles", 1 ); cvNamedWindow("gray", 1);

	//show the images in the correct windows
	cvShowImage("gray", gray);
	cvShowImage( "circles", img );
	//wait for the user to press anything
	cvWaitKey(0);
	//release camera, images, and windows
	cvReleaseCapture(&capture); cvReleaseImage(&gray); cvReleaseImage(&img);cvDestroyWindow("circles"); cvDestroyWindow("gray");
	return 0;
}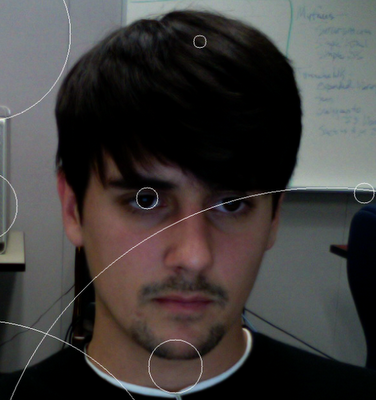
这张图片已经用了hough变形,接着使用canny边缘检测算法.
从这个例子,你可以认为hough算法并不自动.下一周我会试着换一套算法,显示椭圆而不是正圆.我也开始在iPhone上用openCV,但发现有点小难.希望下周我就能弄懂这一点.再发布到博客,我现在做的就是开始.
注意,如果没有摄像头,就用前面的读图片的代码代替.
(完)


 1269
1269

 被折叠的 条评论
为什么被折叠?
被折叠的 条评论
为什么被折叠?
 到【灌水乐园】发言


