


引言
前面我们介绍了相关的关于CAM的算法,本文我们来进行代码实操。
本文代码参考自github.com
1.准备工作
安装相关依赖:
!pip install numpy pandas matplotlib requests tqdm opencv-python pillow -i https://pypi.tuna.tsinghua.edu.cn/simple!pip3 install torch torchvision torchaudio --extra-index-url https://download.pytorch.org/whl/cull3 !pip3 install mmcv-full -f https://download.openmmlab.com/mmcv/dist/cu113/torch1.10.0/index.html!wget https://zihao-openmmlab.obs.cn-east-3.myhuaweicloud.com/20220716-mmclassification/dataset/SimHei.ttf!wget https://zihao-openmmlab.obs.cn-east-3.myhuaweicloud.com/20220716-mmclassification/dataset/meta_data/imagenet_class_index.csv
import os
# 存放测试图片
os.mkdir('test_img')

# 存放结果文件
os.mkdir('output')

# 存放训练得到的模型权重
os.mkdir('checkpoint')
# 下载样例模型文件
!wget https://zihao-openmmlab.obs.cn-east-3.myhuaweicloud.com/20220716-mmclassification/checkpoints/fruit30_pytorch_20220814.pth -P checkpoint

# 下载 类别名称 和 ID索引号 的映射字典
!wget https://zihao-openmmlab.obs.cn-east-3.myhuaweicloud.com/20220716-mmclassification/dataset/fruit30/labels_to_idx.npy
!wget https://zihao-openmmlab.obs.cn-east-3.myhuaweicloud.com/20220716-mmclassification/dataset/fruit30/idx_to_labels.npy
!wget https://zihao-openmmlab.obs.cn-east-3.myhuaweicloud.com/20220716-mmclassification/test/border-collie.jpg -P test_img

!wget https://zihao-openmmlab.obs.cn-east-3.myhuaweicloud.com/20220716-mmclassification/test/cat_dog.jpg -P test_img

!wget https://zihao-openmmlab.obs.cn-east-3.myhuaweicloud.com/20220716-mmclassification/test/0818/room_video.mp4 -P test_img

# 草莓图像,来源:https://www.pexels.com/zh-cn/photo/4828489/
!wget https://zihao-openmmlab.obs.cn-east-3.myhuaweicloud.com/20220716-mmclassification/test/0818/test_草莓.jpg -P test_img
2.实验开始
#设置CPU或者GPU
import torch
device = torch.device('cuda:0' if torch.cuda.is_available() else 'cpu')
print('device', device)
import matplotlib
import matplotlib.pyplot as plt
from PIL import Image
from PIL import ImageFont, ImageDraw
%matplotlib inline
matplotlib.rc("font",family='SimHei')
import cv2
import numpy as np
#导入ImageNet预训练模型
from torchvision import models
model = models.resnet18(weights=models.ResNet18_Weights.DEFAULT)
model = model.eval().to(device)
import torch.nn as nn
if torch.cuda.device_count() > 1:
print(f"Let's use {torch.cuda.device_count()}")
model = nn.DataParallel(model)
model = model.to(device)
#获得ImageNet1000图像分类标签
import pandas as pd
df = pd.read_csv('./data/imagenet_class_index.csv')
idx_to_labels = {}
idx_to_labels_cn = {}
for idx, row in df.iterrows():
idx_to_labels[row['ID']] = row['class']
idx_to_labels_cn[row['ID']] = row['Chinese']
# 导入GradCAMpp可解释性分析方法
SmoothGradCAMpp XGradCAM
from torchcam.methods import SmoothGradCAMpp
cam_extractor = SmoothGradCAMpp(model)
# 图像预处理
from torchvision import transforms
test_transform = transforms.Compose([transforms.Resize(256),
transforms.CenterCrop(224),
transforms.ToTensor(),
transforms.Normalize(
mean=[0.485, 0.456, 0.406],
std=[0.229, 0.224, 0.225])
])
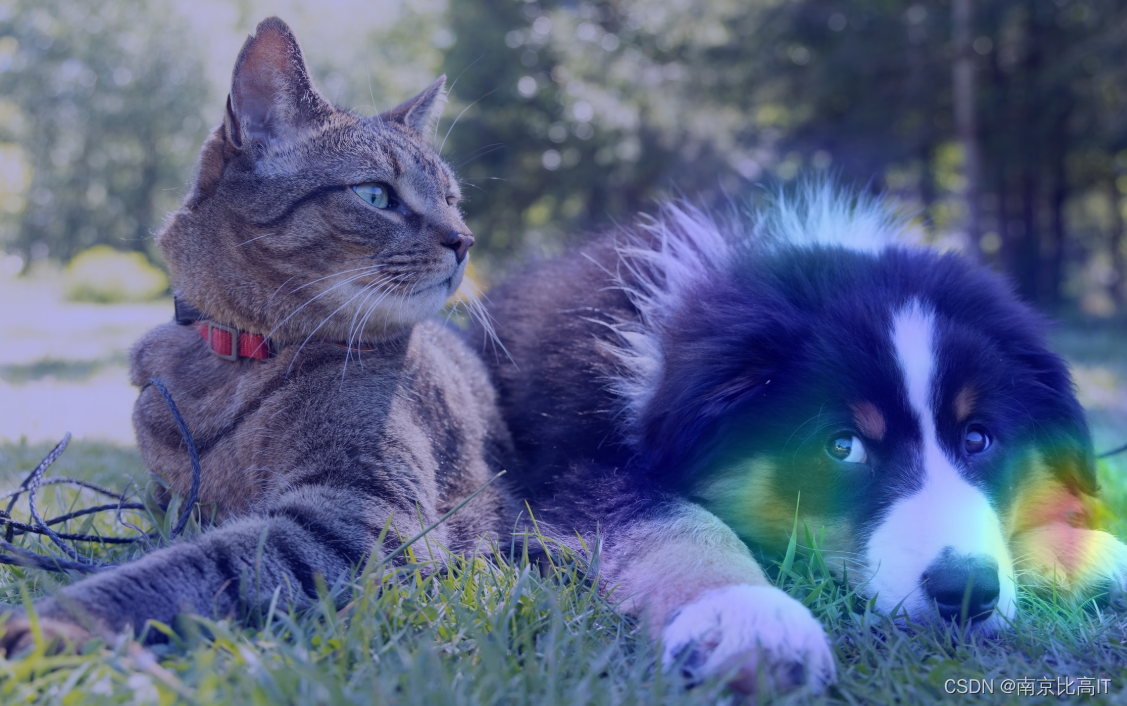
img_path = 'test_img/cat_dog.jpg'
img_pil = Image.open(img_path)
input_tensor = test_transform(img_pil).unsqueeze(0).to(device)
pred_logits = model(input_tensor)
pred_top1 = torch.topk(pred_logits, 1)
pred_id = pred_top1[1].detach().cpu().numpy().squeeze().item()
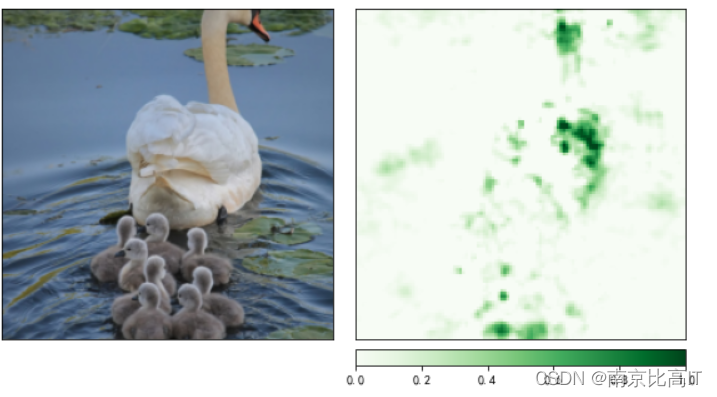
#生成可解释分析热图
activation_map = cam_extractor(pred_id, pred_logits)
activation_map = activation_map[0][0].detach().cpu().numpy()
activation_map
#热图可视化
activation_map = cam_extractor(pred_id, pred_logits)
activation_map = activation_map[0][0].detach().cpu().numpy()
activation_map
from torchcam.utils import overlay_mask
result = overlay_mask(img_pil, Image.fromarray(activation_map), alpha=0.7)
# 可视化热力图的类别ID,如果为 None,则为置信度最高的预测类别ID
# 边牧犬
show_class_id = 231
Chinese = True
def get_cam(img_pil, test_transform, model, cam_extractor,
show_class_id, pred_id, device):
# 前向预测
input_tensor = test_transform(img_pil).unsqueeze(0).to(device) # 预处理
pred_logits = model(input_tensor)
pred_top1 = torch.topk(pred_logits, 1)
pred_id = pred_top1[1].detach().cpu().numpy().squeeze().item()
# 可视化热力图的类别ID,如果不指定,则为置信度最高的预测类别ID
if show_class_id:
show_id = show_class_id
else:
show_id = pred_id
show_class_id = pred_id
# 生成可解释性分析热力图
activation_map = cam_extractor(show_id, pred_logits)
activation_map = activation_map[0][0].detach().cpu().numpy()
result = overlay_mask(img_pil, Image.fromarray(activation_map), alpha=0.7)
return result, pred_id, show_class_id
img_pil = Image.open(img_path)
result, pred_id, show_class_id = get_cam(img_pil, test_transform, model, cam_extractor,
show_class_id, pred_id, device)
result = print_image_label(result, pred_id, show_class_id,
idx_to_labels, idx_to_labels_cn, Chinese)
代码太多,在此处方便开展,可私聊我获取
3.实验总结

观察上述部分结果,可以发现可解释性分析是十分有趣的,我个人认为可解释性机器学习未来是具有可扩展性和实用性极强的,因为它在向我们在解释算法的实质是在做什么。
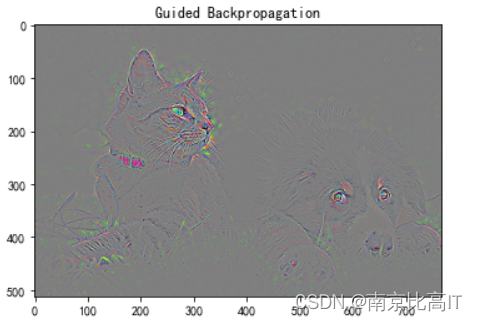
本次实验中,本文主要使用了ImageNet和RESENET18进行图像识别,以及使用了pytorch中的grad_cam\torchcam等工具包,和captum进行图像的遮挡测试,本次实验过程十分有趣,未来我也将会将可解释机器学习应用在自己的研究领域中,并开源相关的个人见解和工具。


 4243
4243


 被折叠的 条评论
为什么被折叠?
被折叠的 条评论
为什么被折叠?
 到【灌水乐园】发言


