- 在移动测量中,采集点云时,通常也会采集全景图像,在 osg 中进行三维浏览展示时,将全景图像与点云叠加现实是一项基础需求,以下代码是在 osg 中创建一个球面模型,将全景图像作为纹理贴在球面上,并按照位置、姿态正确显示的示例代码,以供参考。
void createPanoramicSphere(const ImagePara& para)
{
osg::ref_ptr<osg::Sphere> sphere = new osg::Sphere(osg::Vec3(0.0f, 0.0f, 0.0f), 100.0f);
osg::ref_ptr<osg::ShapeDrawable> sphereDrawable = new osg::ShapeDrawable(sphere.get());
osg::ref_ptr<osg::Image> image = osgDB::readImageFile(para.imgName);
if (!image)
{
ccLog::Error(QObject::tr("Failed to load image: ") + para.imgName.c_str());
return;
}
osg::ref_ptr<osg::Texture2D> texture = new osg::Texture2D;
texture->setWrap(osg::Texture2D::WRAP_S, osg::Texture2D::REPEAT);
texture->setWrap(osg::Texture2D::WRAP_T, osg::Texture2D::REPEAT);
texture->setFilter(osg::Texture2D::MIN_FILTER, osg::Texture2D::LINEAR);
texture->setFilter(osg::Texture2D::MAG_FILTER, osg::Texture2D::LINEAR);
texture->setDataVariance(osg::Object::DYNAMIC);
texture->setImage(image.get());
osg::ref_ptr<osg::StateSet> stateSet = sphereDrawable->getOrCreateStateSet();
stateSet->setTextureAttributeAndModes(0, texture.get(), osg::StateAttribute::ON);
stateSet->setMode(GL_BLEND, osg::StateAttribute::ON);
stateSet->setMode(GL_LIGHTING, osg::StateAttribute::OFF);
osg::ref_ptr<osg::Geode> geode = new osg::Geode;
geode->addDrawable(sphereDrawable.get());
osg::Vec2Array* texCoordArray = dynamic_cast<osg::Vec2Array*>(sphereDrawable->getTexCoordArray(0));
for (size_t i = 0; i < texCoordArray->size(); i++)
texCoordArray->at(i).x() = 0.75 - texCoordArray->at(i).x();
osg::Matrixd matrix;
matrix.postMult(osg::Matrixd::rotate(-para.roll, osg::Vec3d(0, 1, 0)));
matrix.postMult(osg::Matrixd::rotate(-para.pitch, osg::Vec3d(1, 0, 0)));
matrix.postMult(osg::Matrixd::rotate(-para.Yaw, osg::Vec3d(0, 0, 1)));
matrix.postMult(osg::Matrixd::translate(osg::Vec3f(para.x - ofx, para.y - ofy, para.z - ofz)));
osg::ref_ptr<osg::MatrixTransform> panoMatrixTransform = new osg::MatrixTransform(matrix);
panoMatrixTransform->setName("panorama_node");
panoMatrixTransform->addChild(geode.get());
_panoRoot->addChild(panoMatrixTransform);
return;
}
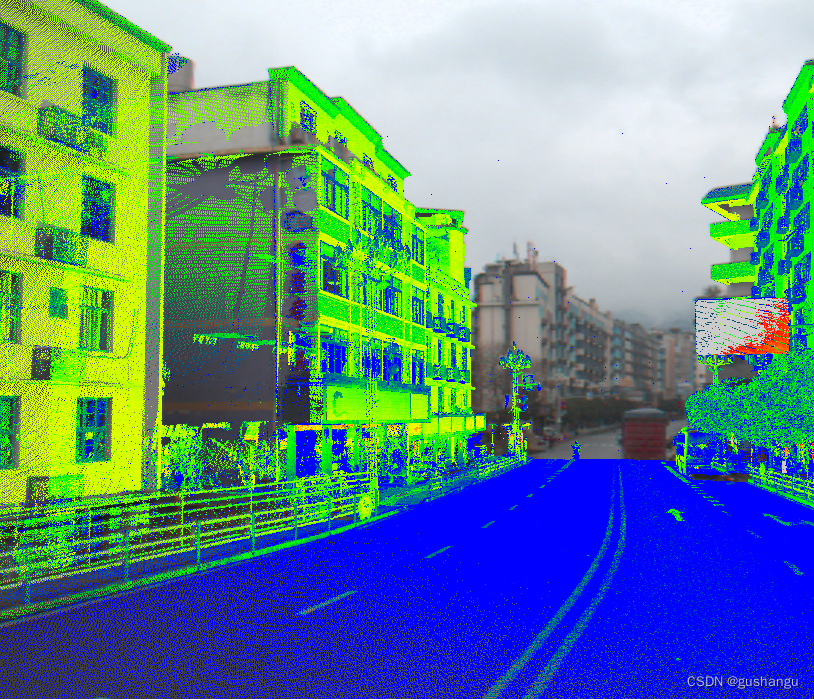
- 全景与点云的叠加效果如图所示:


 798
798

 被折叠的 条评论
为什么被折叠?
被折叠的 条评论
为什么被折叠?
 到【灌水乐园】发言


