


原文在这里
Introduction to Linear Algebra and Unity: Part 1
Throughout your learning with Unity, and although you may not initially like algebra, you will find it very useful to understand some basic concepts linked to vectors, matrices, and operations that can be performed between them. If these names sound exotic to you or have given you a headache in the past, not to worry, they will be explained in depth and clearly in relation to Unity so that you gain a clear understanding of their application in the context of game development with Unity. If you ever wondered, for instance, how NPCs can detect you in half-life, and how wind can be simulated, after completing this tutorial you will be able to:
- Understand basic mathematical concepts such as scalars and vectors
- Understand how they can be used in Unity in both the scene view and through coding
- Apply some simple mathematical operations involving vectors and understand how they are used in games
More importantly, you will understand how these relate to your game development as we will see how they can help to do the following:
- Assign a field of view to an NPC and detect when a player is entering it (this is better than just using Raycast). Adding sensory detection to your NPC always adds some realism to your game as the NPC behave as if they were actually seeing (and reacting to) the player. This is the case in games such as half-Life where NPCs start to shoot at the player when s/he enters their Field of View (FOV).

HALF Life.
Image from http://cdn.akamai.steamstatic.com
- Help NPCs to detect whether the player is within a specific range: In addition to visual sensory detection, you can also improve your game by simulating the detection of sounds (based on distance). For example, in several games, the NPC, even if you walk behind them, will detect you if you are within a specific distance, and this can be calculated thanks to vectors (i.e., magnitude or Euclidian distance). In games like Unreal Tournament, the damage dealt by many types of weapons also depends on distance (if you use a weapon that is very powerful at close range you could sustain serious casualties).

Unreal Tournament.
Image from http://www.fileplanet.com/promotions/ut3/screens/screen1.jpg
- Simulating wind forces from different directions and their impact on an object: forces are very important in games, especially those that rely on physics. For example, games based on gravity (e.g., Worms) or pool games rely on the accurate application of forces to make the game realistic. In pool games, for example, the direction and speed of the colored ball will depend on the speed and direction of the white ball, and all of these are usually expressed as vectors.

8-Ball-Quick-Fire-Pool
Image from:http://i0.wp.com/setkec.com/wp-content/uploads/2015/02/8-Ball-Quick-Fire-Pool.jpg
As you can see, vectors and linear algebra can play an important role in making your game more realistic by improving the AI and making sure that the object in the game behave in a realistic way (according to the laws of physics).
Now, as I know, many of you learn differently and have different preferences as to what format is most suitable. So, you can choose to access the following accordingly from here:
- Video: If you prefer to learn through a video, I have prepared a video that takes you through the necessary knowledge to implement a visual sensory detection for an NPC (field of view) based on vectors
- Unity Project (full Unity project): If you understand the ins and outs of vectors and just want to have a Unity project that you can load, and modify as you wish, then you can move to this section, download the project, experiment and have fun with it.

NPC’s field of view.
- Worked Example: A Worked example of how to use Vectors, Dot products, and Rotations to implement a visual sensory detection for an NPC (field of view)
NPC’s field of view (worked example).
- Theory: this part explains the theory behind vectors and vector operations

Galileo, Newton and Einstein.
Image from: http://images.artelista.com/artelista/obras/fichas/0/5/9/5449803732204278.jpg
Table of Contents (If you would prefer to skip to the section you are interested in):
- Coordinate Systems
- Scalars and vectors
- Notations for vectors
- Using vectors in Unity
- Performing operations on vectors (theory + Unity)
- Checking if the player is in the field of view using dot products
Coordinate Systems
In Unity, because objects are displayed in either 2D or 3D, we need a system to be able to locate them easily and unambiguously. For this purpose, a coordinate system is used to provide each object with unique attributes that make it possible to locate them. In Unity, we use a Cartesian coordinate system (named after the French philosopher Descartes), which gives a set of coordinates to an object along (arbitrarily-defined) )axes. When we deal with two-dimensional or three-dimensional objects, for example (e.g., UI or 2D canvas), we use the coordinates x, and y. We know that if two objects have the same x and y coordinates, they will then be at the same position.

Two-dimensional coordinate system.
However, for 3D environments, we add another coordinate called z, which provides the notion of depth. So, in a three-dimensional space, an object would ideally have three coordinates to determine its location: x, y and z. The x-, y-, and z-axes are orthogonal to each other; if the positive x-axis points to the right, and the positive y-axis points upwards, then the positive z-axis points towards us, in the case of a right-handed coordinate system, and outwards in the case of a left-handed coordinate system.
Three-dimensional coordinate system.
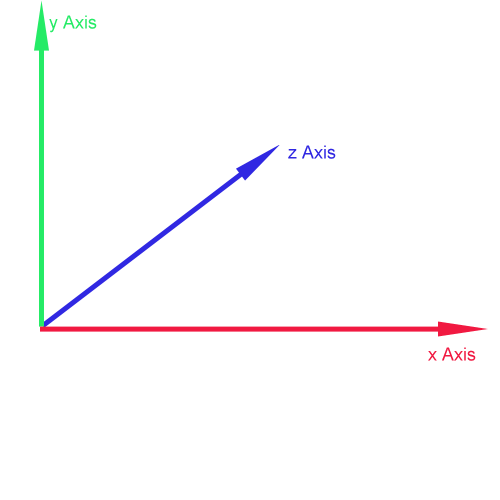
When using Unity, the coordinate system in use is left-handed because when the positive x is pointing to the right, and the positive y-axis is pointing upwards, the positive z-axis is pointing outwards, as illustrated in the next figure.

Three-dimensional coordinate system used in Unity.
As we can see in this figure, the positive x-axis (red) is pointing right, the positive y-axis (green) is pointing upwards, and the positive z-axis (blue) is pointing outwards.
This is called a left-handed coordinate system because we can use our left hand to determine the orientation of the resulting cross product of the x and y axes: using our left hand, if we point our thumb to the right (x-axis), and our index upwards, the right finger is pointing outwards (z-axis). Given that we have defined the x and y axes as two perpendicular axes, the z-axis will also be defined as the cross product of these two, a notion that we will explore later.

Left-handed coordinate system.
Based on the diagram above we can also see that the orientation for the positive z-axis will be different if we use the right hand (opposite direction). In this case, the z-axis will be pointing towards us.
Scalars and Vectors
So far, even if you are not used to vectors, you may already have used variables such as float, int, or boolean to define a quantity. If you were, let’s say, observing a moving object, determining the value of the speed would be great using a float (for example 2 meters per second); however, this quantity, often referred as a magnitude, would not provide any information on the direction of the object (where we it is going). For example, an object could be going a 2 meters per second towards the positive or negative x-axis. So while having the magnitude is useful, knowing the direction is even more useful to determine where this object is going. When we add the magnitude of the speed to its direction, we obtain the velocity, a vector representation that includes both information on the movement of an object: its speed and direction.
Why would we be using a vector rather that single values.
The advantage of using a vector is that not only can you specify a value for a particular attribute of an object, but also a direction, which is very important when we deal with two-dimensional or three-dimensional games, that will more than likely include moving objects; using vectors makes it possible to apply some transformations to these objects for their animation, and also to determine additional information such as speed, or acceleration.
For example, in physics, when we know the acceleration vector of an object, we can, based on integration and derivations, successively determine their speed and position overtime, which makes it possible to create a realistic simulation that mirrors their movement in real life (e.g., canon ball subject to gravity).
Mathematical notations for vectors
Vectors, in addition to their magnitude, also have a direction. They can be used to specify object’s positions, velocities, accelerations, or forces applied to these. They are generally expressed in two or three dimensions and their coordinates are broken down for each direction or axis of the coordinate system (i.e., along the x, y, and z axes).
Unity is using a Cartesian coordinate system, which means that vector coordinates are expressed using two or three attributes. Each of these attributes corresponds to the projection of a vector on one of the two or three axes, respectively, that make up the Cartesian coordinate system.
For example, the velocity of an object could be described as follows in a three-dimensional Cartesian system.

The arrow above v, x, y, and z specify that we are not dealing with a scalar (value) but a quantity that also has a direction (a vector). A scalar would always be numerical and would not have a direction (but vectors do).
This means that the coordinates of the velocity are Vx, Vy, and Vz. Vx is the x coordinate for the vector v; in other words, when you look at the coordinates of the vector, it will have three parameters : x, y ,and z. So Vx will be the x coordinate, Vy the y coordinate and Vz the z coordinate.
![]() are called unit vectors as their magnitude is 1 and they are all pointing towards the positive x-, y- and z-axes, respectively.
are called unit vectors as their magnitude is 1 and they are all pointing towards the positive x-, y- and z-axes, respectively.
A vector can be noted in different formats including:

The magnitude of a vector (often referred to as its Euclidean length can be noted and calculated as follows:

Since the coordinates of the vector are all projections of this vector in the three axes, and that these are at right angles, Pythagora’s theorem can help to determine the magnitude.
Unit Vectors:
Unit vectors have a magnitude of 1. It is often necessary to normalize a vector, as we will see later on. This means that the vector keeps its direction while its magnitude is reduced to 1.
Vectors in Unity
In 3D scenes, 3D vectors are used for information such as position or transformations, including scaling or rotating.
This is the case for any 3D object added to your scene. When looking at its properties in the inspector, you will notice a Transform component. This transform in turn provides information on the position, rotation, and scale of this object, as described in the next Figure.

Transforms in Unity.
In the previous figure, you can see that the object labelled Cube, includes a Transform component and additional properties such as position, rotation, and scale, all expressed using three coordinates. For example, based on the previous Figure, we can see the object’s Transform attributes along with its position (2.1, 1,-1.3), its rotation (0,0,0) and its scale (1,1,1).
Using Vectors in Unity
In terms of coding in Unity, whether your work with C# or JavaScript, Unity provides several utility classes to create and manipulate vectors; this are called Vector2 and Vector3. Generally, 2D vectors will be used for 2D scenes and 3D vectors will be used for 3D scenes.
For example, if you were to create a vector in a JavaScript, you could do so as follows:
|
1
|
var
velocity:Vector2 =
new
Vector2 (2,0);
|
In this code, we declare a vector of type Vector2. This code would describe a velocity of 2 meters per second, along the x-axis going towards the positive values.
In a similar way, we could also declare a 3D vector as follows:
|
1
|
var
velocity:Vector3 =
new
Vector3 (2,0,0);
|
This code would describe a velocity of 2 meters per second, along the x-axis going towards the positive values. As we will see later, you can perform many operations on vectors (e.g., addition, subtraction, dot product or cross product), and these mathematical operations can also be done trough the built-in vector libraries.
Performing operations on vectors
Operations can be performed on vectors (just like scalars) including simple operations such as addition, subtraction, but also more complex ones such as cross products to find perpendicular vectors. As we will see later in this section, many of these operations can improve your game.
Adding and subtracting vectors
One of the most basic operations with vector is to add or subtract vectors. This can be useful to determine the position of an object based on two other objects. It can also be used to add forces and calculate the net force applied to an object (e.g., wind). For example, let’s consider two vectors a and b defined as follows:

and

Then the sum the two vectors is defined as follows:

where:

Adding Vectors in Unity
In Unity, you may need to add vectors in your games to simulate forces applied in different directions.
Problem
You would like an object to be subject to wind forces coming from different directions and you would like to calculate and apply the net force.
Solution
You will need to determine these forces as vectors, then add them to obtain the net force, and then apply this net force to a solid. The following diagram shows how a vector V3 can be created by adding two other vectors V1 and V2.
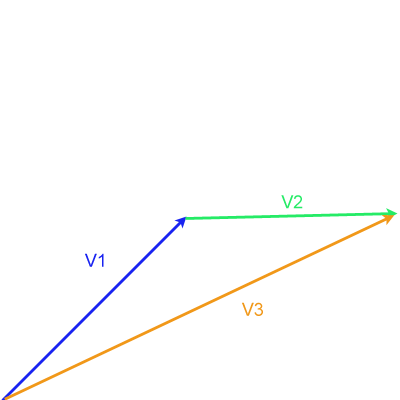
Adding two vectors.
The code
The following code could be added to an object that has a RigidBody component. A RigidBody component will ensure that, amongst other things, forces can be applied to this object.
|
1
2
3
4
5
6
7
8
9
10
11
12
13
|
var
v1:Vector3;
var
v2:Vector3;
var
v3:Vector3;
function
Start ()
{
v1 =
new
Vector3 (0,0,1);
v2 =
new
Vector3 (1,0,0);
v3 = v1+v2;
}
function
FixedUpdate ()
{
rigidbody.AddForce(v3*10);
}
|
In the previous code:
- Line 1-3: we declare three vectors
- Line 6-7: we initialize the two vectors that will represent the forces applied to the object
- Line 8: we add the two vectors (forces) and calculate the resulting vector (net force)
- Line 13: we apply the net force to the object
Based on our previous explanation on adding vectors, the vector V3 should have the coordinates (1=0+1,0=0+0,1=1+0).
Multiplying vectors by scalars
When dealing with vectors, it is possible to multiply a vector by a scalar (i.e., a number). In this case, and while the vector will preserve its direction, its magnitude will be changed (multiplied by the scalar). In the following example, we present two vectors; the initial vector and the vector after having been multiplied by 2.

Multiplying a vector by a scalar.


On the image above, you may see that the first vector has a sign that looks like a quote ‘. This means prime, so we are talking about another vector than v that I called v prime (but you could call it any other name if you wished), which is twice the vector v.
In Unity, multiplying a vector is also quite simple and done as follows:
|
1
2
|
var
v1:Vector3 =
new
Vector3 (1,1,1);
var
v2:Vector3 = 2 * v1;
|
- Line 1: we declare a new vector
- Line 2: we multiply the vector v1 by 2 and should obtain a vector with the coordinates (2,2,2)
Using a dot product
Problem
We are creating a game where we would like to be able to detect when the player is in the field of view of the NPC. How can we, using simple mathematics, determine this?

AI detection: overview.
Solution
We will use a concept called dot product that determines whether the angle between the direction of the NPC and the vector between the NPC and the player.
The Maths
The definition of a dot product between two vectors is the product of their magnitude multiplied by the cosine of the angle between these vectors. In practical terms, we multiply the two vectors; however, to do so, we need to consider whether they are in the same direction. So the cosine will provide us with the projection of one of the vectors on the other one and multiply this projection then by the magnitude of the other vector.
The dot product effectively tells us about the angle between these vectors and to what extent they are aligned; for example, a positive dot product indicates that the angle between the two vectors is between -90 and 90 degrees, a null dot product indicates that they are perpendicular to each-other. The formula is as follows:
![]()
where alpha denotes the angle between two vector.
In Unity, the built-in classes make it easier to use the dot product, as demonstrated below:
|
1
2
3
|
var
v1:Vector3 =
new
vector (1,1,1);
var
v2:Vector3 =
new
vector (-2,-2,-2);
var
productOfV1AndV2:float =vector3.Dot(v1,v2);
|
- Line 1: the vector v1 is created
- Line 2: the vector v2 is created
- Line 3: the dot product of these vectors is calculated
- In this case, the dot product is -2; so we know that angle between the vectors is between 90 and 270 degrees.
It would be great, however, to know more about the direction of these vectors, and more importantly if they are aligned or pointing in the same direction. For this purpose, we can normalize these vectors first (i.e., reduce their magnitude to 1). This way, if they are in the exact same direction, the dot product will be 1; and if they are in the opposite direction, the dot product will be -1. This is because when we calculate the dot product, if the magnitudes of both vectors are 1, the dot product will be equal to the cosine of the angle between these two. Because the cosine is equal to one if the angle is 0 and -1 if the angle is 180, it is now easier if these vectors are aligned. In Unity, we could do this as follows:
|
1
2
3
|
var
v1:Vector3 =
new
vector (1,1,1);
var
v2:Vector3 =
new
vector (-2,-2,-2);
var
productOfV1AndV2:float =vector3.Dot(v1.normalized,v2. normalized);
|
- The first two lines are similar to the previous code
- Line3: we calculate the dot product of these vectors; in this case, we will find that the dot product equals -1 (vectors are pointing to opposite directions
Solution
To answer our initial question, we could do as follows:
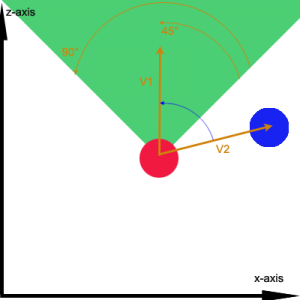
- If we call the field of view alpha, knowing whether the NPC is in the field of view is equivalent to know whether the angle determined by the direction of the NPC (V1 on the next diagram) and the vector that points at the player from the NPC (V2 in the next diagram) is comprised between -alpha/2 and alpha/2. So for a field of view of 90 degrees, the angle defined by V1 and V2 should be comprised between -45degrees and +45 degrees. This is explained on the next diagram if we imagine the vector V1 counterclockwise, if it enters the green zone, we know that the NPC is in the field of view.

Key variables to detect the player.
- So as described on the previous diagram, and knowing that Cosine (45) is approximately 0.7 and that Cosine (-45) is approximately also 0.7, we know that the player is in the field of view if there is an angle between V1 and V2 that is between -45° and +45° or, in a similar way if the Cosine of the angle between the vectors V1 and V2 is comprised between 0.7 and 1.
- This is because when the player is on the right border of the field of view, the angle between V1 and V2 is -45° (Cosine = 0.7)

The player enters the FOV (right side).
- When the player is in front of the NPC, the angle between V1 and V2 is 0 (Cosine = 1)
- When the player is on the left border of the field of view, the angle between V1 and V2 is 45° (Cosine = 0.7). So effectively, when the NPC is in the field of view, the Cosine of the angle will vary between 0.7 and 1.

The player is about to exit the FOV (left side).
- The field of view could be any number that you decide. We have arbitrarily chosen 90° to simulate the horizontal field of view for some humans, but you could, if you wished, increase it to 100°.
- Now that we have clarified the calculation of the cosine, let’s ‘explain how we can find the vectors V1 and V2. V1 is the direction of the NPC. This vector originates (on the diagram) from the NPC and is going in the direction of the positive z-axis. V2 is determined by the position of both the NPC and the Player. Let’s see how. As you can see on the next diagram, V2, Vnpc and Vplayer form a triangle. Vnpc is the vector for the position of the NPC. It starts at the origin of the coordinate system. Vplayer is the vector for the position of the NPC and, as for the previous vector, it starts at the origin of the coordinate system. If we operate a loop from the origin of the coordinate system, we can go from the origin of the coordinate system to the NPC by following the vector Vnpc, the follow the vector V2 (in reverse: from the head to the tail), and then following the vector Vplayer (in reverse: from the head to the tail). So we could say that: Vnpc+V2-Vplayer = 0; in other words, by following Vnpc, then V2 in reverse and Vplayer in reverse, we end up at the same point. Following this, we can then say that: V2 = -Vnpc+Vplayer (we add -V2 to both sides of the previous equation). This is how we can calculate V2

Calculating V1 and V2.
- Normalizing the vectors: so at this stage, we know V1 and V2 and we just need to calculate the dot product between these to have an idea of the cosine of the angle. However, if you remember the definition of a dot product, the cosine of this angle equals the dot product only if the magnitude of the vectors is 1, or in other words, if these vectors have been normalized. Normalizing can be done easily in Unity as each vector can access the function/method normalized which returns a normalized version accordingly.
- At this stage, we have two normalized vectors (magnitude equals 1) and we need to calculate the cosine of the angle defined by them. You will notice that so far, we have been using degrees for angles (FOV=90°). However, the function that calculates the cosine in Unity on ly takes Radians (and not Degrees) as parameters. So we will need to convert our angle in radians first before the cosine can be calculated. This can be done using the function Mathf.Deg2Rad in Unity.
- Now we have an angle expressed in radians and we can calculate the dot product of the normalized versions of V1 and V2. That’s great! Bearing in mind that when the player is on the right border of the field of view, the angle between V1 and V2 is -45° (Cosine = 0.7), when the player is in front of the NPC, the angle between V1 and V2 is 0 (Cosine = 1), and that when the player is on the left border of the field of view, the angle between V1 and V2 is 45° (Cosine = 0.7), we effectively know that for the NPC to detect the player (or the player to enter the Field of View of the NPC), the cosine of the angle between V1 and V2 should be comprised between 0.7 and 1.
- Create two objects (boxes) and rename them respectively player and NPC
- Put the player at the position (3,0,1) using the inspector
- Put the NPC at the position (0,0,0) using the inspector
- Create a new JavaScript script (from the project window, select Create > Script – JavaScript)
- Name this script detect player
- Drag and drop the script on the NPC object
- Open this script, as we will edit it
Type the following code:
|
1
2
3
4
5
6
7
8
9
10
11
12
13
14
15
16
17
18
19
20
21
22
23
24
25
26
27
28
29
30
31
32
33
34
35
36
37
38
39
40
41
42
43
44
45
46
47
48
49
50
51
52
53
54
55
56
57
58
59
60
61
62
63
|
var
field_of_view:float;
//Script: detectPlayerBasedOnDotProduct
//Published by LearnToCreateGames.com
//-------------------------------------
//Declaring Vecrors to be used for the detection (as per diagram)
var
v_player:Vector3 ;
var
v_npc:Vector3 ;
var
v1: Vector3;
var
v2: Vector3;
//Field of View in both degrees and Radians as the later will be required for cosine calculations
var
FOVInDegrees:float;
var
FOVInRadians:float;
//Cosine for the angle left and right border of the field of view
var
minCosine:float;
//dot product of v1 and v2
var
dotP:float;
function
Start()
{
//We deifine the FOV and corresponding Cosine for both borders (left and right)
FOVInDegrees = 90;
FOVInRadians = FOVInDegrees*Mathf.Deg2Rad;
minCosine = Mathf.Cos(FOVInRadians/2);
}
function
Update()
{
//We draw rays at a 45-and +45 degree angles in green from the NPC to highlight the field of view
//Quaternions are used to rotate the direction of the rays around the y axis; the length of each ray is 10
//These rays are only visible in the scene view (not the game view)
Debug.DrawRay(transform.position, Quaternion.Euler (0,45,0)*Vector3.forward*10,Color.green, 10);
Debug.DrawRay(transform.position, Quaternion.Euler (0,-45,0)*Vector3.forward*10,Color.green, 10);
//We draw a ray for v1 (direction of the NPC) using the same principle
Debug.DrawRay(transform.position, Vector3.forward, Color.red, 10);
//all necessary vectors are defined
v_npc = transform.position;
v_player = GameObject.Find (
"player"
).transform.position;
v1 =
new
Vector3(0,0,1);
//the NPC looks forward
v2 = v_player - v_npc;
//v2 calculated as formula specified previously
//we use normalized versions of the vectors to obtain the Cosine and compare it with the min cosine
//this serves to determine the angle between V1 and V2, and ultimately to determine whether the player is in the field of view
dotP = Vector3.Dot(v1.normalized,v2.normalized);
//We detect whether the player is in the field of view and write messages in the console accordingly
if
(dotP>minCosine && dotP<=1)
{
//in case of detection, the NPC will move towards the player, following v2, at .5m per seconds
//Time.deltaTime is the number of seconds since the last frame
transform.Translate(v2 * Time.deltaTime*.5);
print(
"player is in sight"
);
}
else
{
print(
"player is out of sight"
);
}
}
|
- Then type the following code and ad the script to the player
|
1
2
3
4
5
6
7
8
9
10
11
12
13
14
15
16
17
18
19
20
21
22
23
|
//Script: movePlayer.js
//Published by LearnToCreateGames.com
//-------------------------------------
//The velocity is used to move the NPC forward
var
velocity:Vector3;
function
Start ()
{
//By default the player is looking in the direction of the positive z axis
//we rotate the player around the y axis so that its path crosses the NPC's field of view
transform.rotation = Quaternion.Euler(0,-45,0);
//we set the direction of the player using local coordinates
velocity = Vector3.forward;
}
function
Update ()
{
//The player will be moving 1 meter forwards every second
//Time.deltaTime corresponds to the number of seconds elapsed since the last frame
transform.Translate(velocity * Time.deltaTime*1);
}
|
- Play the scene
- Switch to the scene view
- Move the NPC object so that it enters the field of view
- Observe how the NPC starts chasing the player
Project and Code to Download
- Download the code files for the NPC here
- Download the code files for the player here
- Download the full project here
Video
This video explain how the dot product can be used to detect the player.
Thanks for taking the time to read this post.
I hope it was useful to you…
- If you have any question or suggestions on this article please leave a comment below. I will be releasing a Part 2 of this tutorial and i would love to see what topic would be of interest to you.
- If you want to be notified of new posts + content and information that may not be posted on the site, be sure to subscribe to my mailing list.
- If you would like to describe in more details what you feel stuck with in Unity, you can also fill-out this very short questionnaire
To your success!
Patrick


 299
299


 被折叠的 条评论
为什么被折叠?
被折叠的 条评论
为什么被折叠?
 到【灌水乐园】发言


