


前端时间封装了OC版本http://blog.csdn.net/hbblzjy/article/details/75127359,今天把写好的Swift版本共享出来,希望对大家有用;
源码下载请点击Star,star是继续写的动力,谢谢~
自定义ActionSheet的关键点,就是UI的样式修改和设计调整,还有就是点击单元格时进行的后续操作,再一个就是界面显示的平滑度。
首先界面设计:
创建一个半透明的背景视图;
然后一个表格,表格分成两个区,设置标题头、区尾和单元格边角
//创建相关控件
    var maskV = UIView()//半透明背景
    var tableView = UITableView()//表格
    var cellArray = NSArray()//表格数组
    var cancelTitle = NSString()//取消标题设置
    var headView = UIView()//标题头视图
    var selectedClosure:((Int) -> ())?//选中单元格closure
    var cancelClosure:(() -> ())?//取消单元格closure

    //初始化方法:参数一:头视图,参数二:表格数组,参数三:取消的标题设置,参数四:选择单元格closure,参数五:取消closure

    init(aHeadView:UIView,aCellArray:NSArray,aCancelTitle:NSString,aSelectedClosure:@escaping ((Int) -> ()),aCancelClosure:@escaping (() -> ())) {
        super.init(frame: headView.frame)

        headView = aHeadView
        cellArray = aCellArray
        cancelTitle = aCancelTitle
        selectedClosure = aSelectedClosure
        cancelClosure = aCancelClosure

        //创建UI视图
        self.createUI()

    }
    //MARK: ------------ 创建UI视图
    func createUI() {
        self.frame = UIScreen.main.bounds
        //半透明背景
        maskV = UIView.init(frame: UIScreen.main.bounds)
        maskV.backgroundColor = UIColor.black
        maskV.alpha = 0.5
        maskV.isUserInteractionEnabled = true
        self.addSubview(maskV)

        //表格
        tableView = UITableView.init(frame: CGRect.zero, style: .plain)
        tableView.delegate = self
        tableView.dataSource = self
        tableView.layer.cornerRadius = 10.0
        tableView.clipsToBounds = true
        tableView.rowHeight = 44.0
        tableView.bounces = false
        tableView.backgroundColor = UIColor.clear
        tableView.tableHeaderView = self.headView
        tableView.separatorInset = UIEdgeInsets.init(top: 0, left: -50, bottom: 0, right: 0)

        //注册单元格:+ (Class)class OBJC_SWIFT_UNAVAILABLE("use 'aClass.self' instead");
        tableView.register(UITableViewCell.self, forCellReuseIdentifier: "oneCell")

        self.addSubview(tableView)
    }
    //MARK:------------ UITableViewDelegate,UITableViewDataSource
    func numberOfSections(in tableView: UITableView) -> Int {
        return 2
    }
    func tableView(_ tableView: UITableView, numberOfRowsInSection section: Int) -> Int {
        return (section == 0) ? cellArray.count:1
    }
    func tableView(_ tableView: UITableView, cellForRowAt indexPath: IndexPath) -> UITableViewCell {
        let cell = tableView.dequeueReusableCell(withIdentifier: "oneCell")
        if indexPath.section == 0 {
            cell?.textLabel?.text = cellArray[indexPath.row] as? String
            if indexPath.row == cellArray.count-1 {
                //添加贝塞尔曲线,设计边角样式UIBezierPath与CAShapeLayer
                //注意:Swift中的“或”加了一个rawValue:UIRectCorner(rawValue: UIRectCorner.bottomLeft.rawValue | UIRectCorner.bottomRight.rawValue)
                let maskPath = UIBezierPath.init(roundedRect: CGRect.init(x: 0, y: 0, width: Screen_Width - Space_Line*2, height: tableView.rowHeight), byRoundingCorners: UIRectCorner(rawValue: UIRectCorner.bottomLeft.rawValue | UIRectCorner.bottomRight.rawValue), cornerRadii: CGSize.init(width: 10, height: 10))
                let maskLayer = CAShapeLayer.init()
                maskLayer.frame = (cell?.contentView.bounds)!
                maskLayer.path = maskPath.cgPath
                cell?.layer.mask = maskLayer
            }
        }else{
            cell?.textLabel?.text = cancelTitle as String
            cell?.layer.cornerRadius = 10
        }

        cell?.textLabel?.textAlignment = .center
        cell?.selectionStyle = .none

        return cell!
    }
    func tableView(_ tableView: UITableView, didSelectRowAt indexPath: IndexPath) {
        if indexPath.section == 0 {
            if (selectedClosure != nil) {
                selectedClosure!(Int(indexPath.row))
            }
        }else{
            if (cancelClosure != nil) {
                cancelClosure!()
            }
        }

        self.dismiss()
    }
    func tableView(_ tableView: UITableView, heightForFooterInSection section: Int) -> CGFloat {
        return Space_Line
    }
    func tableView(_ tableView: UITableView, viewForFooterInSection section: Int) -> UIView? {
        let footerView = UIView.init(frame: CGRect.init(x: 0, y: 0, width: tableView.bounds.size.width, height: Space_Line))
        footerView.backgroundColor = UIColor.clear
        return footerView
    }
界面设计完成,需要考虑的就是弹出、消失的问题
//MARK:------绘制视图
    override func layoutSubviews() {
        super.layoutSubviews()
        self.show()
    }
    //滑动弹出
    func show() {
        tableView.frame = CGRect.init(x: Space_Line, y: Screen_Height, width: Screen_Width-Space_Line * 2, height: tableView.rowHeight * CGFloat(cellArray.count + 1) + headView.bounds.size.height + Space_Line * 2)
        UIView.animate(withDuration: 0.5) {
            var rect:CGRect = self.tableView.frame
            rect.origin.y -= self.tableView.bounds.size.height
            self.tableView.frame = rect
        }
    }
    //滑动消失
    func dismiss() {
        UIView.animate(withDuration: 0.5, animations: {
            var rect:CGRect = self.tableView.frame
            rect.origin.y += self.tableView.bounds.size.height
            self.tableView.frame = rect
        }) { (finished) in
            self.removeFromSuperview()
        }
    }
    //MARK:------触摸屏幕其他位置谈下
    override func touchesEnded(_ touches: Set<UITouch>, with event: UIEvent?) {
        self.dismiss()
    }
最后是对自定义的视图的调用:
//MARK:------ 弹出按钮
func actionSheetBtnClick() {
//弹出actionSheet
weak var weakSelf = self
let jasonSheetView = JasonActionSheetView.init(aHeadView: (weakSelf?.headView())!, aCellArray: (weakSelf?.dataArray())!, aCancelTitle: "取消", aSelectedClosure: { (index) in
//点击单元格后的操作
if index == 0 {
weakSelf?.view.backgroundColor = UIColor.red
}else if index == 1 {
weakSelf?.view.backgroundColor = UIColor.yellow
}else{
weakSelf?.view.backgroundColor = UIColor.lightGray
}
}) {
weakSelf?.view.backgroundColor = UIColor.white
}
weakSelf?.view.addSubview(jasonSheetView)
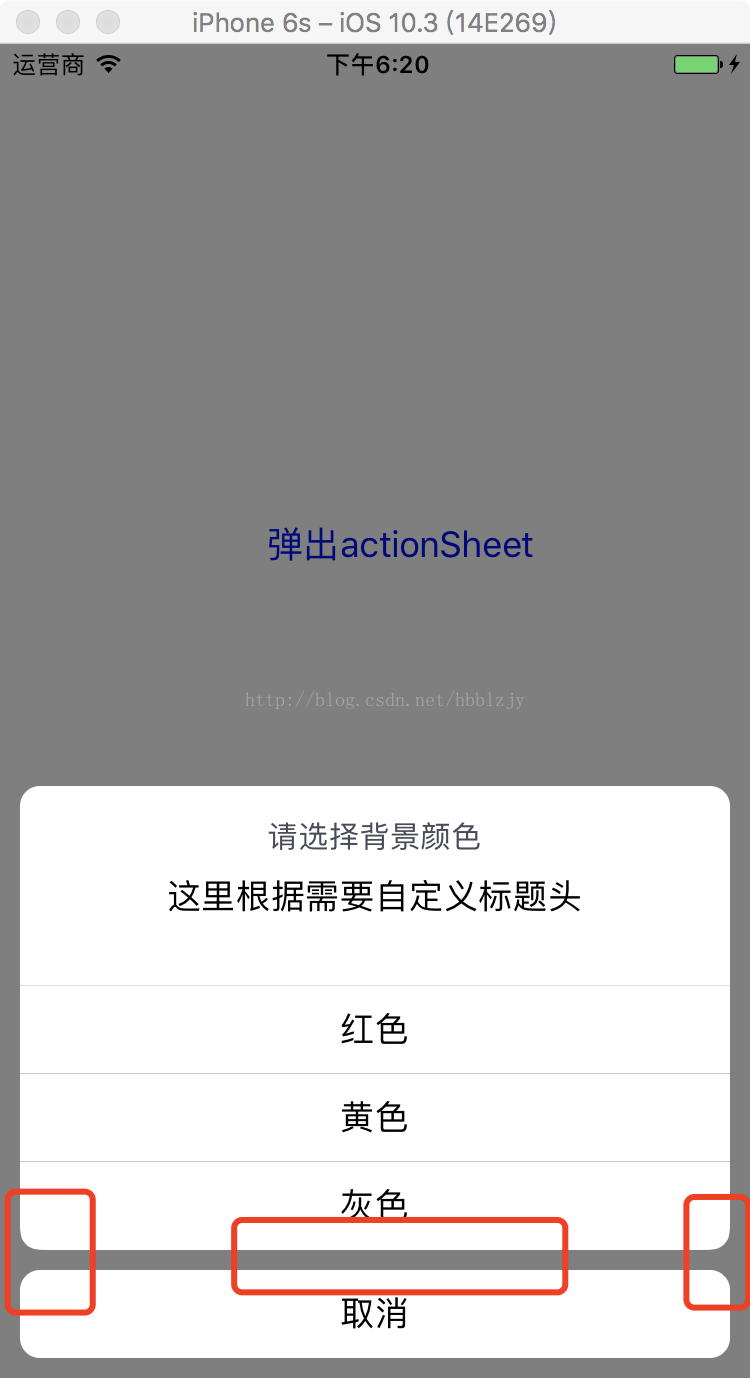
}效果图:
如果喜欢请点击Star,谢谢~
源码下载:https://github.com/hbblzjy/SwiftActionSheetDemo


 1526
1526


 被折叠的 条评论
为什么被折叠?
被折叠的 条评论
为什么被折叠?
 到【灌水乐园】发言


