


widget函数中:
在指向时,
指针变量-> 函数()
命名空间:: 函数
QT对类实例化时, 要在new 后的构造函数中添加this,表示继承了当前窗口.
C++也有lambda表达式. 与C# 类似, 但是要在之前增加[=]
#include "widget.h"
#include<QPushButton>
#include<QDebug>
#include"teacher.h"
# include"student.h"
#define N 0 //定义宏
Widget::Widget(QWidget *parent)
    : QWidget(parent)
{
    //this 表示当前窗口
    this->setWindowTitle("第一个窗口");
    //固定窗口,不可拖动
    this->setFixedSize(800,600);
    //创建button
    QPushButton *btn1 = new  QPushButton("关闭",this);

    //信号的发起者btn1, 发出信号 主窗口this, 实现 关闭(槽函数)
    //connect(btn1,&QPushButton::clicked,this,&QWidget::close);

    connect(btn1,&QPushButton::clicked,this,[=]()
    {
        this->close();
    });

    //lambda表达式
    QPushButton *btn2 = new QPushButton("点击我",this);
    btn2->move(300,400);
    connect(btn2, &QPushButton::clicked,[=]()
    {
        QString text = btn2->text();
        qDebug()<<text<<endl;
        //设置按钮文本
        btn2->setText("戳你咋地?");
    });

    //实例化一个老师
    Teacher *tch = new Teacher(this);//this代表继承父类
    //实例化一个学生
    Student *stu = new Student(this);
#if N
    //建立两个自定义 信号hungry()/槽函数treat()的关系
    void (Teacher:: *p1)() = &Teacher::hungry; //函数指针 多个重载
    void (Student:: *p2)() = &Student::treat;  //函数指针
    connect(tch,p1,stu,p2);
    //connect(tch, &Teacher::hungry,stu,&Student::treat); //无宏选择时
#else
    //报错的原因:hungry信号被重载了
    //通过函数指针 明确那个信号
    void (Teacher:: *p1)(QString foodName) = &Teacher::hungry;
    void (Student:: *p2)(QString foodName) = &Student::treat;
    connect(tch,p1, stu, p2);
#endif
    //建立触发信号 与 老师饿了信号的关系
    QPushButton *btn3 = new QPushButton("下课了",this);
    btn3->move(300,500);
    connect(btn3,&QPushButton::clicked,[=]()
    {
       //发出信号,激活 hungry()函数
       // emit tch->hungry();
#if N
        //下课函数:让老师发出饿的信号
        emit tch->hungry();
#else
        //下课函数:让老师发出饿的信号
        emit tch->hungry("guo Bao Rou");
#endif
    });
}

Widget::~Widget()
{
}
student和teacher的
头文件:
alt+enter 可以直接在cpp中实现函数
#ifndef TEACHER_H
#define TEACHER_H

#include <QObject>

class Teacher : public QObject
{
    Q_OBJECT
public:
    explicit Teacher(QObject *parent = nullptr);

signals://信号
    //自定义信号规则: 返回值类型void 只需声明 不需实现 可以有参数 重载
    void hungry();
    void hungry(QString foodName);

public slots: //槽函数

};

#endif // TEACHER_H
#ifndef STUDENT_H
#define STUDENT_H

#include <QObject>

class Student : public QObject
{
    Q_OBJECT
public:
    explicit Student(QObject *parent = nullptr);

signals:

public slots: //槽函数
    //返回值为void 需要声明 需要实现 可以有参数 可以重载
    void treat();
    void treat(QString foodName);

};

#endif // STUDENT_H
CPP文件:
#include "teacher.h"

Teacher::Teacher(QObject *parent) : QObject(parent)
{

}
#include "student.h"
#include <QtDebug>
Student::Student(QObject *parent) : QObject(parent)
{

}

void Student::treat()
{
    qDebug()<<"treat teacher !!!!!"<<endl;
}

void Student::treat(QString foodName)
{
    qDebug()<<"treat teacher !!!!!"<<foodName<<endl;
}
自定义信号槽需要注意的事项 :
发送者和接收者都需要是 QObject 类 的子类 ( 槽函数是全局函数、 Lambda表达式等无需接收者的时候除外) ;
信号和槽函数返回值是 void
信号只需要声明,不需要实现
槽函数需要声明也需要实现
槽函数是普通的成员函数,作为成员函数,会受到 public 、 private 、
protected 的影响;
使用emit 在恰当的位置发送信号;
使用 connect() 函数连接信号和槽。
任何成员函数、static函数、全局函数和 a Lambda 表达式都可以作为槽函
数
信号槽要求信号和槽的参数一致,所谓一致,是参数类型一致。
如果信号和槽的参数不一致,允许的情况是,槽函数的参数可以比信号的少 ,
即便如此,槽函数存在的那些参数的顺序也必须和信号的前面几个一致起
来 。 这是因为 , 你可以在槽函数中选择忽略信号传来的数据 ( 也就是槽函数的参数比信号的少) 。
信号槽的拓展
一个信号可以和多个槽相连
如果是这种情况,这些槽会一个接一个的被调用,但是它们的 调用顺序是不确定的。
多个信号可以连接到一个槽
只要任意一个信号发出,这个槽就会被调用。
一个信号可以连接到另外的一个信号
当第一个信号发出时,第二个信号被发出。除此之外,这种信号 到 信号的形
式和信号 到 槽的形式没有什么区别。
槽可以被取消链接
这种情况并不经常出现,因为 当一个对象delete 之后, Qt 自动取消所有连
接到这个对象上面的槽。
信号槽可以断开
利用 disconnect 关键字是可以断开信号槽
使用 Lambda 表达式
在使用 Qt 5 的时候,能够支持 Qt 5 的编译器都是支持 Lambda 表达式的。
在连接信号和槽的时候,槽函数可以使用 Lambda 表达式的方式进行处理。
QT       += core gui

greaterThan(QT_MAJOR_VERSION, 4): QT += widgets

CONFIG += c++11

# The following define makes your compiler emit warnings if you use
# any Qt feature that has been marked deprecated (the exact warnings
# depend on your compiler). Please consult the documentation of the
# deprecated API in order to know how to port your code away from it.
DEFINES += QT_DEPRECATED_WARNINGS

# You can also make your code fail to compile if it uses deprecated APIs.
# In order to do so, uncomment the following line.
# You can also select to disable deprecated APIs only up to a certain version of Qt.
#DEFINES += QT_DISABLE_DEPRECATED_BEFORE=0x060000    # disables all the APIs deprecated before Qt 6.0.0

SOURCES += \
    main.cpp \
    mywindow.cpp

HEADERS += \
    mywindow.h

FORMS += \
    mywindow.ui

# Default rules for deployment.
qnx: target.path = /tmp/$${TARGET}/bin
else: unix:!android: target.path = /opt/$${TARGET}/bin
!isEmpty(target.path): INSTALLS += target
#ifndef MYWINDOW_H
#define MYWINDOW_H

#include <QMainWindow>

QT_BEGIN_NAMESPACE
namespace Ui { class MyWindow; }
QT_END_NAMESPACE

class MyWindow : public QMainWindow
{
    //宏定义 QT信号槽需要它
    Q_OBJECT

public:
    MyWindow(QWidget *parent = nullptr);
    int i; //头文件中声明变量
    ~MyWindow();

private:
    Ui::MyWindow *ui;
};
#endif // MYWINDOW_H
#include "mywindow.h"

#include <QApplication>

//argc是命令行参数个数,argv是命令行参数

int main(int argc, char *argv[])
{
    QApplication a(argc, argv);
    MyWindow w;
    w.show();
    return a.exec();
}
#include "mywindow.h"
#include "ui_mywindow.h"
#include <QDebug>

MyWindow::MyWindow(QWidget *parent)
    : QMainWindow(parent)
    ,i(4) //  i=4;
    , ui(new Ui::MyWindow) //ui = new Ui:MyWindow
{
    //i = 4;
    ui->setupUi(this);
    qDebug()<<"构造函数被执行了!"<<endl;
}

MyWindow::~MyWindow()
{
    delete ui;
    qDebug()<<"XI构函数被执行了!"<<endl;
}
yuanzi QT自定义信号槽简单实验对比:
sutdent的 头文件和源文件:
#ifndef STUDENT_H
#define STUDENT_H

#include <QObject>

class Student : public QObject
{
    Q_OBJECT
public:
    explicit Student(QObject *parent = nullptr);

signals:
public slots://slot必须由public privte修饰
    //槽函数声明后,必须要定义
    void comBackToClass();


};

#endif // STUDENT_H
#include "student.h"
#include <QDebug>

Student::Student(QObject *parent) : QObject(parent)
{

}

void Student::comBackToClass()
{
    qDebug()<<"学生上课"<<endl;
}
School的头文件和源文件:
#ifndef SCHOOL_H
#define SCHOOL_H

#include <QObject>

class School : public QObject
{
    Q_OBJECT
public:
    explicit School(QObject *parent = nullptr);

signals: //信号可以只声明,不定义
    void sendMsges();
};

#endif // SCHOOL_H
#include "school.h"

School::School(QObject *parent) : QObject(parent)
{

}
主界面头文件和源文件:
#ifndef MYWINDOW_H
#define MYWINDOW_H
#include "school.h"
#include "student.h"

#include <QMainWindow>

QT_BEGIN_NAMESPACE
namespace Ui { class MyWindow; }
QT_END_NAMESPACE

class School;
class Student;

class MyWindow : public QMainWindow
{
    Q_OBJECT

public:
    MyWindow(QWidget *parent = nullptr);
    ~MyWindow();

private:
    Ui::MyWindow *ui;
    School *school;
    Student *student;
};
#endif // MYWINDOW_H
#include "mywindow.h"
#include "ui_mywindow.h"

MyWindow::MyWindow(QWidget *parent)
    : QMainWindow(parent)
    , ui(new Ui::MyWindow)
{
    ui->setupUi(this);
    school = new School(this);
    student = new Student(this);

    //连接信号槽
    connect(school,SIGNAL(sendMsges()),student,SLOT(comBackToClass()));
    emit school->sendMsges();
    //emit是不同窗口/类间的触发信号。
    //当对象改变其状态时,信号就由该对象发射 (emit) 出去,通过槽函数实现用户想要的效果。
}

MyWindow::~MyWindow()
{
    delete ui;
}
给QT文件添加资源:
选中当前项目,add new
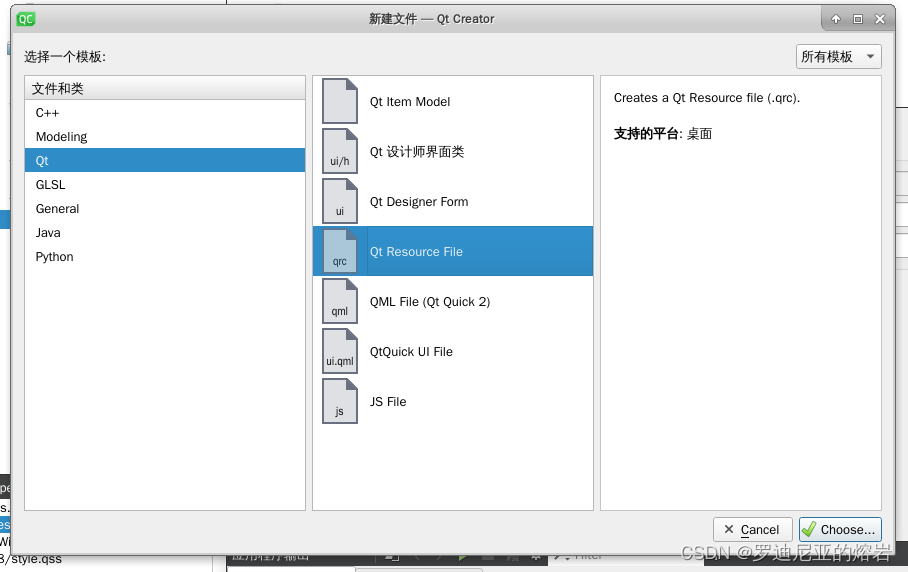
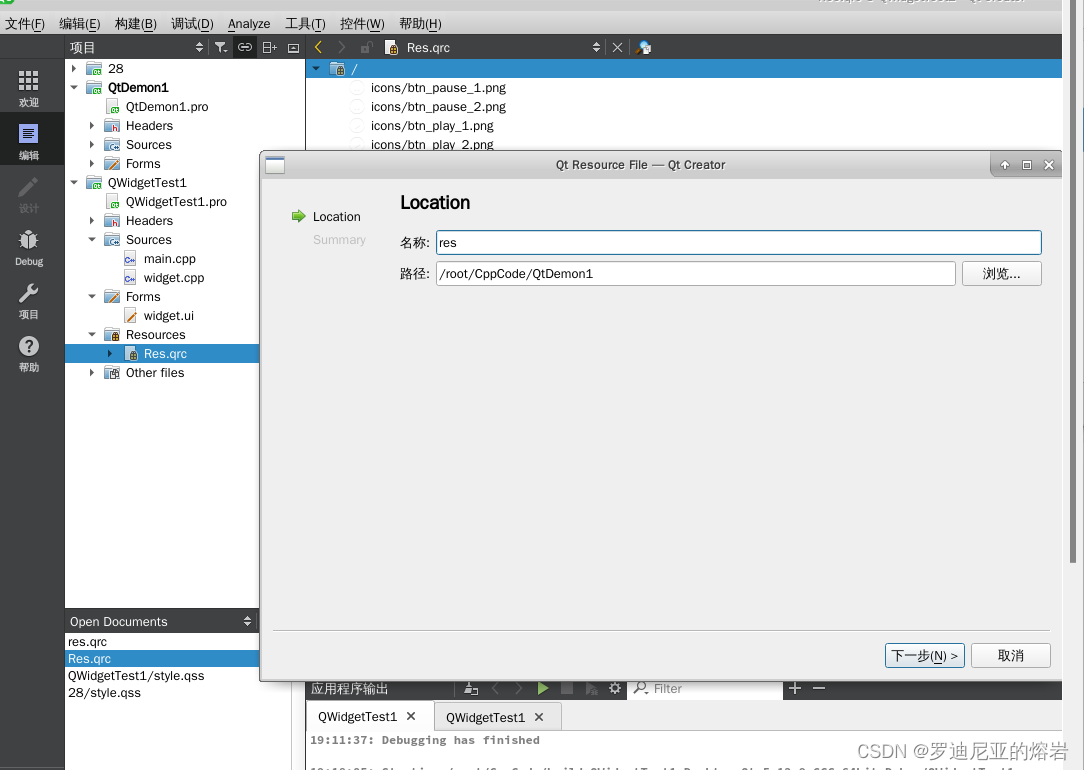
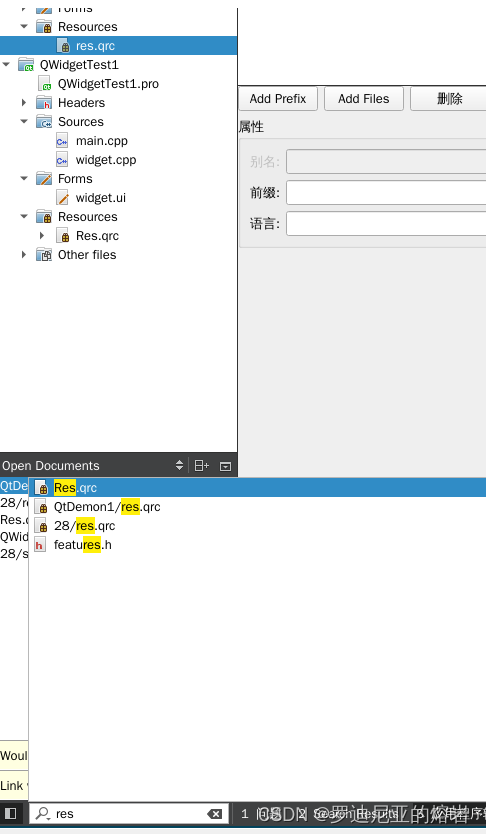
查找Res 去掉前缀
选中res.qrc 添加现有项,加入文件夹图片
选中res.qrc 新建style.qss
在主窗口.cpp中添加
#include "widget.h"
#include <QFile>
#include <QApplication>

int main(int argc, char *argv[])
{
    QApplication a(argc, argv);
    QFile file(":/style.qss");
    /* 判断文件是否存在 */
    if (file.exists() ) {
        /* 以只读的方式打开 */
        file.open(QFile::ReadOnly);
        /* 以字符串的方式保存读出的结果 */
        QString styleSheet = QLatin1String(file.readAll());
        /* 设置全局样式 */
        qApp->setStyleSheet(styleSheet);
        /* 关闭文件 */
        file.close();
    }
    Widget w;
    w.show();
    return a.exec();
}
要在 w.show()之前
QT和ubuntu的配置:
获取root
sudo passwd root

查看 IP : ifconfig -a

升级:sudo apt update

安装mysql: sudo apt install mysql-server

sudo cat /etc/mysql/debian.cnf

sudo mysql_secure_installation

https://blog.csdn.net/weixin_47872288/article/details/122281840

重启:

cd /etc/init.d

sudo service mysql stop

sudo service mysql start

显示密码:
sudo cat /etc/mysql/debian.cnf
[sudo] password for zg:
# Automatically generated for Debian scripts. DO NOT TOUCH!
[client]
host     = localhost
user     = debian-sys-maint
password = oypTduepQ8NuQX2b
socket   = /var/run/mysqld/mysqld.sock
[mysql_upgrade]
host     = localhost
user     = debian-sys-maint
password = oypTduepQ8NuQX2b
socket   = /var/run/mysqld/mysqld.sock


mysql -u debian-sys-maint -p

mysql -u root -p

通过其他用户登录MySQL
执行 cat /etc/mysql/debian.cnf

通过账号密码进行登录
mysql -u debian-sys-maint -p

选择数据库,use mysql;
并且查询数据库的用户表格
使用select查询登录数据库的用户和密码
select host, user, authentication_string, plugin from user;

其root默认的方式位auth_socket

修改其密码格式
update user set plugin='mysql_native_password' where user='root';,查询其用户select user,plugin from user;

增加root的密码
alter user 'root'@'localhost' identified by '123456';

刷新权限(一定要多刷新几次,多设置几次,因为可能一次偶尔不起作用)
flush privileges;

exit 退出登录之后要重新启动一下mysql的服务,service mysql restart或者是sudo /etc/init.d/mysql restart

mysql -u root -p


此处为设置root用户远程

mysql -uroot -p  #输入密码

use mysql;

update user set host = '%' where user = 'root';

select host, user from user;

flush privileges;

测试远程连接即可。
————————————————

原文链接:https://blog.csdn.net/wsygo/article/details/89447222


https://zhuanlan.zhihu.com/p/157867809

桌面相关:

sudo apt-get install nano

sudo nano /etc/apt/sources.list

ctrl+k把原来的全部删除,进入阿里云的官方镜像站


20镜像
deb http://mirrors.aliyun.com/ubuntu/ focal main restricted universe multiverse
deb-src http://mirrors.aliyun.com/ubuntu/ focal main restricted universe multiverse

deb http://mirrors.aliyun.com/ubuntu/ focal-security main restricted universe multiverse
deb-src http://mirrors.aliyun.com/ubuntu/ focal-security main restricted universe multiverse

deb http://mirrors.aliyun.com/ubuntu/ focal-updates main restricted universe multiverse
deb-src http://mirrors.aliyun.com/ubuntu/ focal-updates main restricted universe multiverse

# deb http://mirrors.aliyun.com/ubuntu/ focal-proposed main restricted universe multiverse
# deb-src http://mirrors.aliyun.com/ubuntu/ focal-proposed main restricted universe multiverse

deb http://mirrors.aliyun.com/ubuntu/ focal-backports main restricted universe multiverse
deb-src http://mirrors.aliyun.com/ubuntu/ focal-backports main restricted universe multiverse

18镜像

deb http://mirrors.aliyun.com/ubuntu/ bionic main restricted universe multiverse
deb-src http://mirrors.aliyun.com/ubuntu/ bionic main restricted universe multiverse

deb http://mirrors.aliyun.com/ubuntu/ bionic-security main restricted universe multiverse
deb-src http://mirrors.aliyun.com/ubuntu/ bionic-security main restricted universe multiverse

deb http://mirrors.aliyun.com/ubuntu/ bionic-updates main restricted universe multiverse
deb-src http://mirrors.aliyun.com/ubuntu/ bionic-updates main restricted universe multiverse

# deb http://mirrors.aliyun.com/ubuntu/ bionic-proposed main restricted universe multiverse
# deb-src http://mirrors.aliyun.com/ubuntu/ bionic-proposed main restricted universe multiverse

deb http://mirrors.aliyun.com/ubuntu/ bionic-backports main restricted universe multiverse
deb-src http://mirrors.aliyun.com/ubuntu/ bionic-backports main restricted universe multiverse

然后

sudo apt-get update

sudo apt-get upgrade


安装桌面:
sudo apt install tasksel

执行结束后,你就可以用

来安装桌面环境(也叫 DE)了。

你可能知道有 很多可用的桌面环境。你可以选择自己喜欢的一个。有些桌面环境对系统资源占用得多(像 GNOME),有些占用得少(像 Xfce、MATE 等等)。

你可以自己决定使用哪个 DE。我会安装 GNOME 桌面,因为它是 Ubuntu 默认的桌面。之后我也会介绍其他桌面的安装。

如果你使用的是

,执行下面这条命令:

sudo tasksel install ubuntu-desktop

sudo apt install xrdp

sudo apt install xfce4 xfce4-goodies

sudo vim /etc/xrdp/xrdp.ini

echo xfce4-session > ~/.xsession

sudo vim /etc/xrdp/startwm.sh

注释最后两行 加一行
startxfce4
保存退出
wq!
启动桌面
sudo /etc/init.d/xrdp start


中文乱码
sudo apt install language-pack-zh-hans

sudo vim /etc/environment

//默认字体
sudo dpkg-reconfigure locales

追加
LANG="zh_CN.UTF-8"
LANGUAGE="zh_CN:zh:en_US:en"

修改
sudo vim /var/lib/locales/supported.d/local
追加
en_US.UTF-8 UTF-8
zh_CN.UTF-8 UTF-8
zh_CN.GBK GBK
zh_CN GB2312

sudo locale-gen

修改
sudo vim ~/.vimrc

set fileencodings=utf-8,ucs-bom,gb18030,gbk,gb2312,cp936
set termencoding=utf-8
set encoding=utf-8


安装QT,复制到OPT下

cd /opt
chmod +x qt-opensource-linux-x64-5.12.9.run
ls qt-opensource-linux-x64-5.12.9.run

apt-get update

apt-get install libxkbcommon-x11-0

sudo ./qt-opensource-linux-x64-5.12.9.run 不行就手动安装

//QT调试:
sudo apt-get install gdb

浏览器乱码:

第一种方式
1.安装wqy-zenhei字体
apt-get install ttf-wqy-zenhei
2.修改系统字体配置文件/etc/fonts/conf.d/49-sansserif.conf
打开/etc/fonts/conf.d/49-sansserif.conf这个文件:
vim /etc/fonts/conf.d/49-sansserif.conf
然后修改倒数第四行的字体为WenQuanYi Zen Hei,如下:


<?xml version="1.0"?>
<!DOCTYPE fontconfig SYSTEM "fonts.dtd">
<fontconfig>
<!--
If the font still has no generic name, add sans-serif
-->
<match target="pattern">
<test qual="all" name="family" compare="not_eq">
<string>sans-serif</string>
</test>
<test qual="all" name="family" compare="not_eq">
<string>serif</string>
</test>
<test qual="all" name="family" compare="not_eq">
<string>monospace</string>
</test>
<edit name="family" mode="append_last">
<string>WenQuanYi Zen Hei</string>
</edit>
</match>
</fontconfig>

3.重启chrome,或者火狐浏览器,即可
————————————————


 1889
1889


 被折叠的 条评论
为什么被折叠?
被折叠的 条评论
为什么被折叠?
 到【灌水乐园】发言


