


目录
简介:
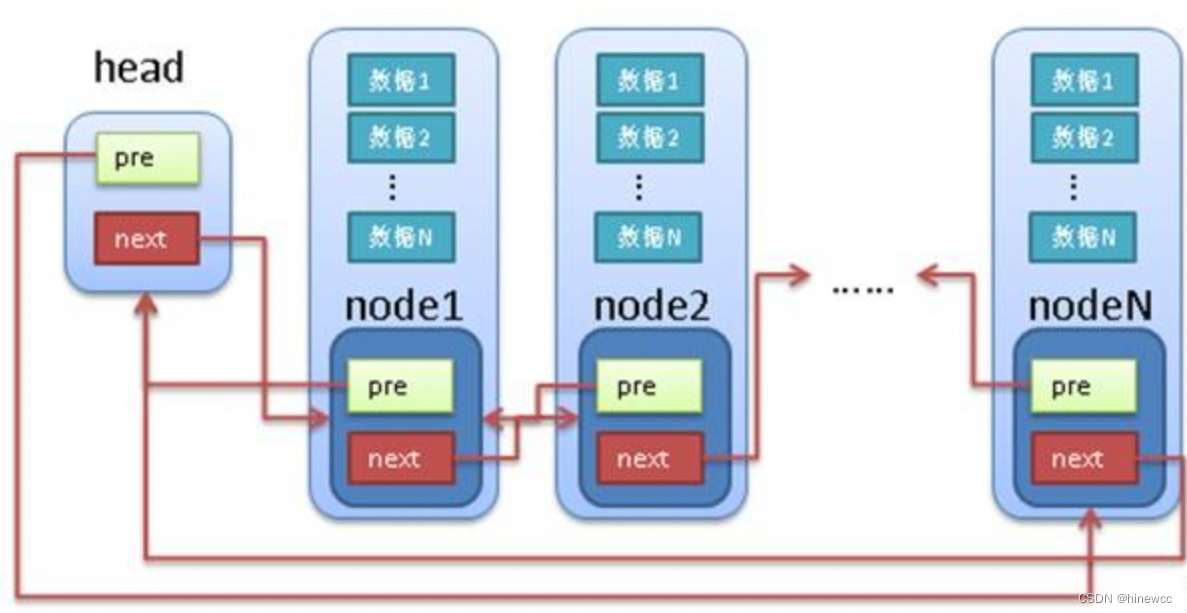
链表是linux内核中最简单,同时也是应用最广泛的数据结构。内核中定义的是双向链表。
linux的链表不是将用户数据保存在链表节点中,而是将链表节点保存在用户数据中。linux的链表节点只有2个指针(pre和next),这样的话,链表的节点将独立于用户数据之外,便于实现链表的共同操作。
一、链表函数介绍
Linux内核链表源码路径: include/linux/list.h
常用函数、宏介绍:
| 宏 | 函数 | 作用 | 备注 | |
| 初始化 | LIST_HEAD_INIT | INTI_LIST_HEAD | 初始化链表头 | 常用 |
| LIST_HEAD | ||||
| 添加 | list_add | 头部添加 | 常用 | |
| list_add_tail | 尾部添加 | |||
| 删除 | list_del | 删除节点,指向特定的位置 | 常用 | |
| list_del_init | 删除节点后,反初始化 | |||
| 遍历 | list_entry | 根据list倒推宿主结构体的首地址 | 常用 | |
| list_for_each | 正向遍历获取list | |||
| list_for_each_entry | 正向遍历,获取list数组结构 | |||
| list_for_each_prev | 反向遍历获取list | |||
| list_for_each_entry_reverse | 反向遍历,获取list数组结构 | |||
| 搬移 | list_move | 将链表的某个节点插入到新的链表上 | ||
| list_move_tail | ||||
| 合并 | list_splice | 将2条链表合并 | ||
| list_splice_init | 合并后原有的list反初始化 | |||
| list_splice_tail | ||||
| list_splice_tail_init | ||||
| 替换 | list_replace | 将新节点和链表上某位置的节点替换 | ||
| list_replace_init | 将新节点和链表上某位置的节点替换,替换后将旧节点反初始化 |
定义链表结构体:
struct list_head {
	struct list_head *next, *prev;
};
1、初始化
1.1 创建链表头 并用 INIT_LIST_HEAD 初始化
struct list_head listHead;

static inline void INIT_LIST_HEAD(struct list_head *list)
{
	list->next = list;
	list->prev = list;
}
1.2 也可以直接用 LIST_HEAD 创建并初始化链表头
/* 初始化 */
#define LIST_HEAD_INIT(name) { &(name), &(name) }

#define LIST_HEAD(name) \
	struct list_head name = LIST_HEAD_INIT(name)
2、添加
2.1 list_add
list_add(struct list_head *new, struct list_head *head)功能:将new添加到链表头head的下一个位置
参数:
- new:添加的链表节点
- head:链表头
2.2 list_add_tail
list_add_tail(struct list_head *new, struct list_head *head)功能:将new添加到链表头head的尾部
参数:
- new:添加的链表节点
- head:链表头
函数定义:
/* 添加 */
static inline void __list_add(struct list_head *new,
                              struct list_head *prev,
                              struct list_head *next)
{
	next->prev = new;
	new->next = next;
	new->prev = prev;
	prev->next = new;
}

static inline void list_add(struct list_head *new, struct list_head *head)
{
	__list_add(new, head, head->next);
}

static inline void list_add_tail(struct list_head *new, struct list_head *head)
{
	__list_add(new, head->prev, head);
}
3、删除
3.1 list_del
list_del(struct list_head *entry)功能:删除某节点
参数:
- entry:entry所在的链表头中将entry节点删除
3.2 list_del_init
函数定义:
/* 删除 */
static inline void __list_del(struct list_head *prev, struct list_head *next)
{
	next->prev = prev;
	prev->next = next;
}

static inline void __list_del_entry(struct list_head *entry)
{
	__list_del(entry->prev, entry->next);
}

static inline void list_del(struct list_head *entry)
{
	__list_del(entry->prev, entry->next);
	entry->next = NULL;
	entry->prev = NULL;
}

static inline void list_del_init(struct list_head *entry)
{
	__list_del_entry(entry);
	INIT_LIST_HEAD(entry);
}
4、遍历
list.h文件中,最复杂的就是获取用户数据的宏定义list_entry,它其实就是 container_of 宏,其功能是根据结构体中已知的list链表成员变量的地址,来倒推宿主结构体的首地址。
#define list_entry(ptr, type, member) \
    container_of(ptr, type, member)
4.1 container_of 解析
container_of 宏定义如下:
#define container_of(ptr, type, member) ({          \
    const typeof(((type *)0)->member)*__mptr = (ptr);    \
             (type *)((char *)__mptr - offsetof(type, member)); })
分析一下container_of宏
// 步骤1:将数字0强制转型为type*,然后取得其中的member元素
((type *)0)->member  // 相当于((struct student *)0)->list

// 步骤2:定义一个临时变量__mptr,并将其也指向ptr所指向的链表节点
const typeof(((type *)0)->member)*__mptr = (ptr);

// 步骤3:计算member字段距离type中第一个字段的距离,也就是type地址和member地址之间的差
// offset(type, member)也是一个宏,定义如下:
#define offsetof(TYPE, MEMBER) ((size_t) &((TYPE *)0)->MEMBER)

// 步骤4:将__mptr的地址 - type地址和member地址之间的差
// 其实也就是获取type的地址
4.2 container_of 使用方法
1)container_of 参数介绍
container_of(ptr, type, member)功能:根据结构体中的成员变量的地址,来倒推宿主结构体的首地址
参数:
- ptr:结构体中的成员变量地址;
- type:结构体的类型;
- member:成员变量在结构体中的命名;
返回值:返回结构体首地址;
2)container_of 使用示例
#include <stdio.h>
#include <string.h>

#define offsetof(TYPE, MEMBER) ((size_t) &((TYPE *)0)->MEMBER)
#define container_of(ptr, type, member) ({ \
        const typeof( ((type *)0)->member ) *__mptr = (ptr); \
        (type *)( (char *)__mptr - offsetof(type,member) );})

typedef struct{
    char name[8];
    int age;
    int class;
}STUDENT_T;

int main()
{
    STUDENT_T stStudent;
    int *pAge;
    STUDENT_T *pstAddr = NULL;

    pAge = &stStudent.age;      //结构体成员地址

    /* 传参: 结构体成员的地址, 结构体类型, 结构体成员的名称 */
    pstAddr = container_of(pAge, STUDENT_T, age);

    printf("pstAddr = %p\r\n", pstAddr);        //container_of返回的结构体首地址
    printf("stStudent = %p\r\n", &stStudent);   //结构体首地址

    return 0;
}
结果可以看到, container_of 倒推得到的宿主结构体首地址,和实际首地址是相等的

4.3 遍历宏原型
/* 遍历 */
#define list_entry(ptr, type, member) \
	container_of(ptr, type, member)    //根据结构体中的已知的成员变量的地址,来寻求该结构体的首地址

#define list_for_each(pos, head) \
	for (pos = (head)->next; pos != (head); pos = pos->next)

#define list_for_each_safe(pos, n, head) \
	for (pos = (head)->next, n = pos->next; pos != (head); \
		pos = n, n = pos->next)

#define list_for_each_entry(pos, head, member)				\
	for (pos = list_first_entry(head, typeof(*pos), member);	\
	     &pos->member != (head);					\
	     pos = list_next_entry(pos, member))

#define list_for_each_prev(pos, head) \
	for (pos = (head)->prev; pos != (head); pos = pos->prev)

#define list_for_each_entry_reverse(pos, head, member)			\
	for (pos = list_last_entry(head, typeof(*pos), member);		\
	     &pos->member != (head); 					\
	     pos = list_prev_entry(pos, member))
list_for_each 和 list_for_each_safe 差异:
list_for_each_safe 可防止删除链表条目。如:list_for_each执行的for循环中,如果删除条目会导致段错误"Segmentation fault (core dumped)"报错。而 list_for_each_safe就可以解决此问题。
5、判断链表为空
- list_empty
static inline int list_empty(const struct list_head *head)
{
	return head->next == head;
}
二、Linux链表使用方法
链表数据结构在内核态和用户态都能使用,使用方法如下:
(1) 定义 struct list_head 链表头 head
(2) 初始化 LIST_HEAD(head)
(3) 添加entry到链表 list_add_tail(&entry, &head)
(4) 遍历链表头
struct list_head *cursor, *next;

list_for_each_safe(cursor, next, &tx_req_list) {
    stpHead_Addr = list_entry(cursor, struct ipcl_req, list);        //根据我们结构体中的已知的成员变量的地址,来寻求该结构体的首地址

    ...        //我们自己定义功能

    list_del_init(cursor);                //链表删除cursor,并初始化 cursor
}
链表示例:
代码下载路径:https://download.csdn.net/download/hinewcc/89522091
#include <stdio.h>
#include <stdlib.h>
#include <string.h>
#include "list.h"

struct list_head listHead;      //定义链表头

//LIST_HEAD(listHead);

/* 含链表的结构体 */
struct list_member {
    char name[32];
    struct list_head entry;
};

#define MEMBER_NUM  5

int main(int argc, char **argv)
{
	int i;

	if (argc != 2) {
		printf("usage: ./app name");
		return -1;
	}

    printf("search name: %s\n", argv[1]);

/* 1.初始化listHead链表 */
    INIT_LIST_HEAD(&listHead);

    struct list_member stMember[MEMBER_NUM] = {0};
    struct list_head *cursor, *next;

/* 2.listHead链表添加 */
    for (i = 0; i < MEMBER_NUM; i++) {
        printf("addr[%d]: %p\n", i, &stMember[i]);
        sprintf(stMember[i].name, "name%d", i);
        list_add_tail(&stMember[i].entry, &listHead);          //listHead链表添加成员
    }

/* 3.listHead链表轮询并比较 */
    list_for_each_safe(cursor, next, &listHead) {              //轮询listHead链表头
        /*
            功能:根据结构体中的已知的 entry 成员变量的地址,来寻求该结构体的首地址
            参数1: entry成员指针
            参数2: 结构体类型
            参数3: 结构体中entry的成员名
        */
        struct list_member *member = list_entry(cursor, struct list_member, entry);

        if (strcmp(member->name, argv[1]) == 0) {           //比较
            printf("search OK: addr: %p\n", member);
            break;
        }
    }

/* 4.测试 list_del 删除, list_empty 检测链表空 */
    list_for_each_safe(cursor, next, &listHead) {
        struct list_member *member = list_entry(cursor, struct list_member, entry);
        printf("del %s\n", member->name);
        list_del(cursor);

        if (list_empty(&listHead)) {
            printf("list empty!!!\n");
        }
    }

	return -1;
}编译:$ gcc -o test_app -I ./ main.c
运行:
$ ./test_app name1


 1383
1383

 被折叠的 条评论
为什么被折叠?
被折叠的 条评论
为什么被折叠?
 到【灌水乐园】发言


