


0.4.0版教程。
20191126更新:添加了关于CopySlices backwar函数的讨论。
- 创建一个Tensor时,使用requires_grad参数指定是否记录对其的操作,以便之后利用backward()方法进行梯度求解。
- 一个Tensor的requires_grad成员保存该Tensor是否记录操作用于计算梯度。
- 可利用requires_grad_()方法修改Tensor的requires_grad属性(in place)。
- 通过运算创建的Tensor,会自动被赋值grad_fn属性。该属性表示梯度函数。
- 最后得到的Tensor执行自身的backward()函数,此时之前参与运算并生成当前Tensor的叶子(leaf)Tensor将会保存其梯度在叶子Tensor的grad属性中。backward()函数接受参数,表示在特定位置求梯度值,该参数应和调用backward()函数的Tensor的维度相同,或者是可broadcast的维度。默认为torch.tensor(1),也就是在当前梯度为标量1的位置求叶子Tensor的梯度。
- 默认同一个运算得到的Tensor仅能进行一次backward()。再次运算得到的Tesnor,可以再次进行backward()。
- 当多个Tensor从相同的源Tensor运算得到,这些运算得到的Tensor的backwards()方法将向源Tensor的grad属性中进行数值累加。
上述关于梯度方面PyTorch提供的功能,感觉上都是针对神经网络的需求设计的,文档中给出的定义和解释很抽象,需要实例加以说明。
首先说一下叶子Tensor,这是我为了方便理解起的名字。例如我们的模型是这样的:
- 首先创建Tensor x1,w1和w2。
- x2 = x1 * w1。
- y = x2 * w2。
- L = Y - y。
只要维度相协调,上述各个Tensor目前不必指定维度。实际上上述模型可以看做一个非常简单的神经网络,如下图所示。
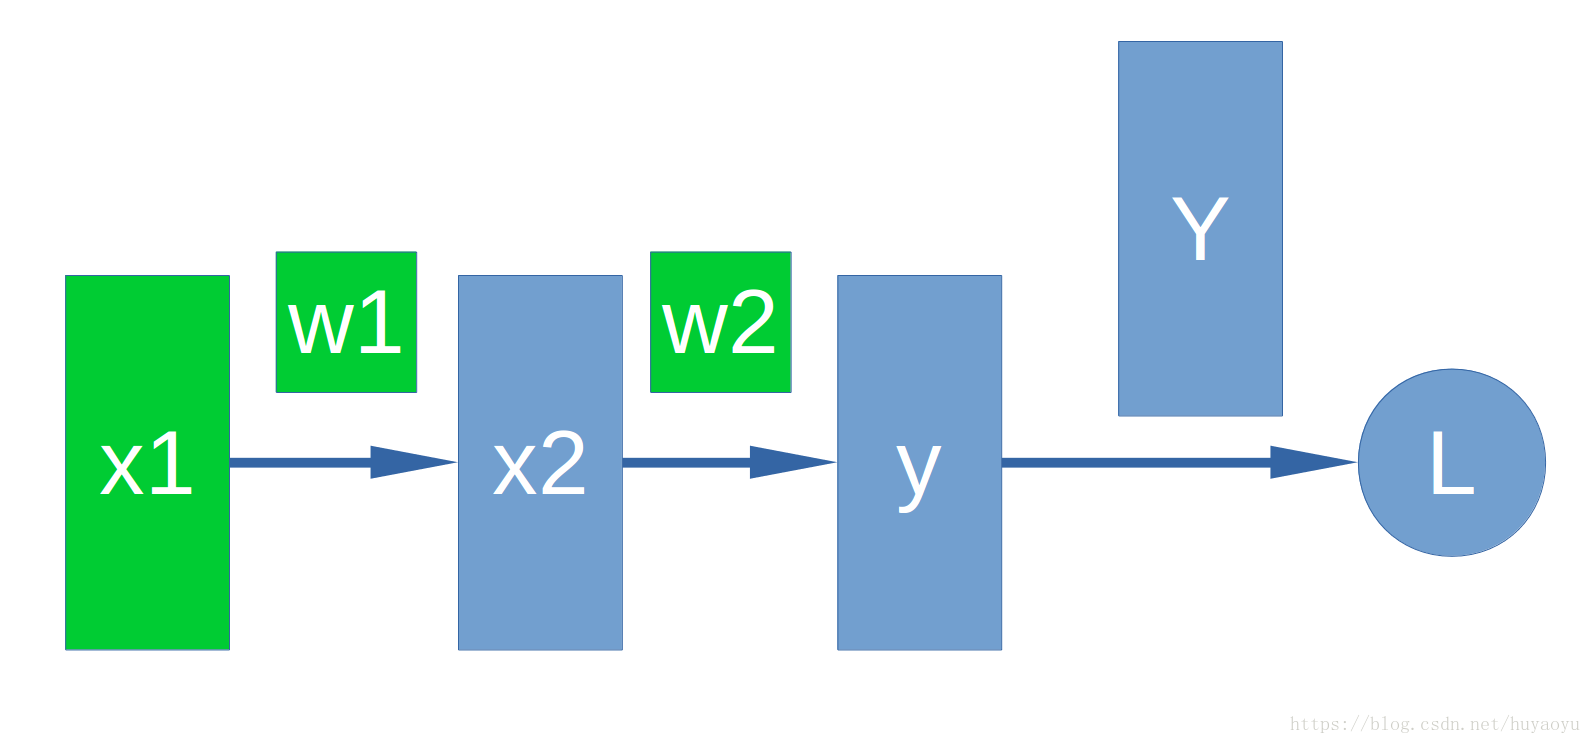
x1,x2是神经网络的中间层,y是我们的输出层,Y是真值,L是我们的loss。w1和w2是对应于x1和x2的weight。通常我们会把x1,x2,y,w1和w2使用PyTorch的Tensor进行表示。L也可以用Tensor表示,可能与其他Tensor的维度都不同。在上述模型中,x1,w1和w2就是我所谓的叶子Tensor。
在PyTorch中,我们把上述模型描述出来。
import torch
import numpy as np

x1 = torch.from_numpy( 2*np.ones((2, 2), dtype=np.float32) )
x1.requires_grad_(True)
w1 = torch.from_numpy( 5*np.ones((2, 2), dtype=np.float32) )
w1.requires_grad_(True)
print("x1 =", x1)
print("w1 =", w1)

x2 = x1 * w1
w2 = torch.from_numpy( 6*np.ones((2,2), dtype=np.float32) )
w2.requires_grad_(True)
print("x2 =", x2)
print("w2 =", w2)

y = x2 * w2
Y = torch.from_numpy( 10*np.ones((2,2), dtype=np.float32) )
print("y =", y)
print("Y =", Y)

L = Y - y
print("L =", L)
为了更明确说明BP的过程,写出该模型的数学表达式和梯度表达式
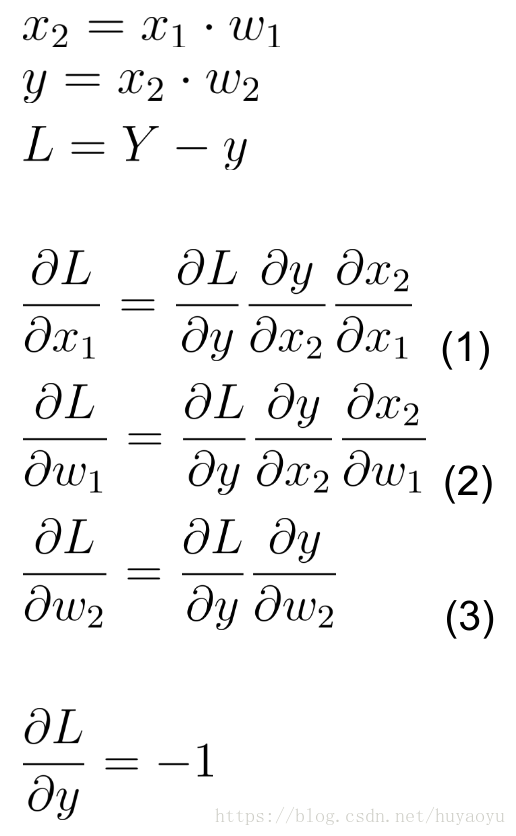
事实上Tensor应当写成加粗直体,我这里简化为都是不加粗斜体了,请各位海涵。
式(1), (2)和(3)即是我们关心的梯度,在PyTorch的帮助下,这一求解过程变为
L.backward(torch.ones(2, 2, dtype=torch.float))
当然,此时backward()函数可不提供任何参数。
计算得出的梯度值分别为x1.grad,w1.grad和w2.grad。其他Tensor的grad属性是None。
此时直接再次调用L的backward()方法将导致错误,需要重新计算L,才能再次调用它的backward()方法。
backward()函数的第一个参数,在PyTorch的文档上解释的比较晦涩。该参数名为gradient,我理解这个参数在我上述的模型上表示

也就是element全为1的Tensor。为何这样设计,这样设计的意图可以理解为当我们不知道L关于y的函数表示,但知道L关于y的梯度时,我们可以通过
y.backward(-1 * torch.ones(2, 2, dtype=torch.float))
来完成BP过程。注意,y.backward()的第一个参数,即是L关于y的梯度的值。
通常情况下对于L为标量的情况,使用L.backward()时,不指定任何参数,PyTorch会使用维度相协调的全1Tensor作为参数。对于L为高于1维的情况,需要明确指定backward()的第一个参数。
执行完L.backward()函数后,x1,w1和w2的grad属性会得到更新。更新是“累加”的。所谓累加,举例说明,即当有另外一种定义好的L2是通过对x1的运算得到的,那么L2.backward()执行后梯度结果将累加到x1.grad中。
对于叶子Tensor的定义,实例中使用的古怪定义方法是有原因的。为了获得可以计算梯度的x1,需要在定义x1时就使其成为叶子,否则对于非叶子的x1执行L.backwar()后,x1.grad将为None。例如将实例中的x1定义改为
x1 = 2 * torch.ones(2, 2, requires_grad=True, dtype=torch.float)
那么,x1则不是一个叶子。应为在创建x1时,表达式中的torch.ones()的返回值才是叶子。
另外需要注意使用NumPy创建Torch的Tensor时,各自默认的数据格式(dtype)和程序打算使用的数据格式要统一好,否则Torch会报错。参考torch.dtype。利用NumPy创建好Tensor后,要对需要计算梯度的叶子调用它们的requires_grad_()方法以将它们的requires_grad属性配置好。
完整的实例代码如下
import torch
import numpy as np

x1 = torch.from_numpy( 2*np.ones((2, 2), dtype=np.float32) )
x1.requires_grad_(True)
w1 = torch.from_numpy( 5*np.ones((2, 2), dtype=np.float32) )
w1.requires_grad_(True)
print("x1 =", x1)
print("w1 =", w1)

x2 = x1 * w1
w2 = torch.from_numpy( 6*np.ones((2,2), dtype=np.float32) )
w2.requires_grad_(True)
print("x2 =", x2)
print("w2 =", w2)

y = x2 * w2
Y = torch.from_numpy( 10*np.ones((2,2), dtype=np.float32) )
print("y =", y)
print("Y =", Y)

L = Y - y
print("L =", L)

L.backward(torch.ones(2, 2, dtype=torch.float))

print("x1.grad =", x1.grad)
print("w1.grad =", w1.grad)
print("w2.grad =", w2.grad)

L2 = x1 * x1

L2.backward(torch.ones(2, 2, dtype=torch.float))
print("x1.grad =", x1.grad)
20191126更新
添加一个细节。在PyTorch中对Tensor元素直接赋值会产生CopySlices backward函数,也就是说,对Tensor元素的赋值操作也是可以BP的,但是有一定条件。请参考下面代码,注意,当前PyTorch版本已经更新至1.3.0。
import torch

def trigger_error():
    print("trigger_error")

    # Tensors.
    a = torch.tensor([1.0], requires_grad=True)
    b = torch.zeros((2), requires_grad=True)

    # CopySlices.
    b[0] = a*2
    b[1] = a*3

    print("b.grad_fn = {}. ".format(b.grad_fn))

    # Trigger an error.
    b.backward(torch.ones((2)))

    print("a.grad = {}. ".format( a.grad ))

if __name__ == "__main__":
    trigger_error()
运行上述代码,将会触发如下错误
trigger_error
b.grad_fn = <CopySlices object at 0x7f07121dceb8>.
Traceback (most recent call last):
  File "BackwardError.py", line 60, in <module>
    trigger_error()
  File "BackwardError.py", line 17, in trigger_error
    b.backward(torch.ones((2)))
  File "/home/yaoyu/p3pt/lib/python3.6/site-packages/torch/tensor.py", line 118, in backward
    torch.autograd.backward(self, gradient, retain_graph, create_graph)
  File "/home/yaoyu/p3pt/lib/python3.6/site-packages/torch/autograd/__init__.py", line 93, in backward
    allow_unreachable=True)  # allow_unreachable flag
RuntimeError: leaf variable has been moved into the graph interior
这表示leaf节点没有出现在computation graph的正确位置,原因是我们在创建b时,使其requires_grad = True。这样在进行诸如b[0] = a * 2 这样的操作时,b不再是leaf了。修正方法有两种,第一种如果我们只有确定个数的元素需要组成一个新的tensor,可以使用torch.cat()函数,例如
def concatenate():
    print("concatenate")

    # A tensor.
    a = torch.tensor([1.0], requires_grad=True)

    # Concatenate.
    b = torch.cat((a*2, a*3))

    print("b.grad_fn = {}. ".format(b.grad_fn))

    # Trigger an error.
    b.backward(torch.ones((2)))

    print("a.grad = {}. ".format( a.grad ))
第二种是当我们不知道元素个数,或者元素个数太多手写cat太累,可以在创建b时指定requires_grad = False。例如
def not_requires_grad():
    print("not_requires_grad")

    # Tensors.
    a = torch.tensor([1.0], requires_grad=True)
    b = torch.zeros((2), requires_grad=False)

    # CopySlices.
    b[0] = a*2
    b[1] = a*3

    print("b.grad_fn = {}. ".format(b.grad_fn))

    # Trigger an error.
    b.backward(torch.ones((2)))

    print("a.grad = {}. ".format( a.grad ))
运行上述两个函数,将得到正确的结果。结果如下:
concatenate
b.grad_fn = <CatBackward object at 0x7f07121dceb8>.
a.grad = tensor([5.]).
===
not_requires_grad
b.grad_fn = <CopySlices object at 0x7f07121dceb8>.
a.grad = tensor([5.]).
参考文献:https://discuss.pytorch.org/t/leaf-variable-has-been-moved-into-the-graph-interior/18679


 11万+
11万+


 被折叠的 条评论
为什么被折叠?
被折叠的 条评论
为什么被折叠?
 到【灌水乐园】发言


