


引言
目前网上的双目测距代码有很多,然而存在的问题是要么结构很乱要么收费。我在参考了免费和付费代码之后,自己写了个结构简单,效果还算不错的代码。另外,为了追求高性能,使用的是c++。如果想使用python版本的可以直接使用该项目。本文章代码参考了该项目的SGBM(C++)版本,但做了较大改动,层次更加清晰。
1. 相机参数
双目相机的标定就不再多说,网上的教程很多,这里推荐使用matlab标定。或者一些其他新研究的标定方法提高标定精度(本人也正在摸索,有知道的小伙伴请求在评论区分享!)。
标定和参数获取可参考b站手把手教程:
https://www.bilibili.com/video/BV1hT411G7Fr/?spm_id_from=333.999.0.0
https://www.bilibili.com/video/BV1GP41157Ti/?spm_id_from=333.999.0.0&vd_source=b307be513f33ff6b6d81f66d7deb2dcb
2. 视差、深度图获取
2.1 填写相机参数
为了方便修改相机标定参数,我将相机的参数放到一个头文件里camyam.h:
#pragma once
#include <opencv2/opencv.hpp>
#include <iostream>
#include <math.h>
using namespace std;
using namespace cv;
#if 1
//左相机内参
Mat cameraMatrixL = (Mat_<double>(3, 3) << 1451.73220410575, 0.839133946247200, 763.610538936110, 0, 1453.81070302911, 827.584931129856, 0, 0, 1.);

Mat distCoeffL = (Mat_<double>(5, 1) << 0.182443880946308, -0.195122608186901,-0.008630511394867, -0.005196883566766, 0);

//右相机内参
Mat cameraMatrixR = (Mat_<double>(3, 3) << 1449.76313696488, 2.05272240435916, 767.041126016306, 0, 1451.24044238048, 852.624171255670, 0, 0, 1);

Mat distCoeffR = (Mat_<double>(5, 1) << 0.180829213913782, -0.207535076203726, -0.005480959667936, -0.005666861422054, 0);

//平移和旋转矩阵
Mat T = (Mat_<double>(3, 1) << 67.785617915389480, -0.949442280198707, -0.649464662210000);//T平移向量

Mat rec = (Mat_<double>(3, 3) << 0.999977212523040, 0.00453115922868024, -0.00500430121950064,
	-0.00453323836579796, 0.999989643130397, -0.000404205220562187,
	0.00500241787239002, 0.000426881700027316, 0.999987396714301);


#else
Mat cameraMatrixL = (Mat_<double>(3, 3) <<
	683.43211363, 0.2685, 341.7021,
	0, 689.5182,249.5791,
	0, 0, 1.);

Mat distCoeffL = (Mat_<double>(5, 1) << 0.294986387267759, -1.56241031831885, -0.0109967167400239, 0.00537728512702428, 0);

//右相机内参
Mat cameraMatrixR = (Mat_<double>(3, 3) << 684.4022, -0.1417, 332.2183,
	0, 682.4334, 225.8373,
	0, 0, 1);

Mat distCoeffR = (Mat_<double>(5, 1) << 0.297893930074460, -1.71357221830573, -0.00482305212589282, -0.00162506936990272, 0);

//平移和旋转矩阵
Mat T = (Mat_<double>(3, 1) << -40.5179, -0.0189, 0.0405);//T平移向量

Mat rec = (Mat_<double>(3, 3) << 0.99985761, 0.00316856, 0.01657488,
	-0.00324187, 0.99998508, 0.0043977,
	-0.0165607, -0.00445081, 0.99985296);
#endif
这是我的两个相机的两套参数,修改#if 1或者#if 0可以更改选择哪一套相机的参数,如果只用一个双目相机则只需要把相应的相机参数矩阵修改成自己的。注意:在标定完成后,其中的两个相机的内参和旋转矩阵需要转置。
2.2 深度图获取
#if 1
#include <opencv2/opencv.hpp>
#include <iostream>
#include <math.h>
#include "camyam.h"
using namespace std;
using namespace cv;
struct CallbackParams {
bool selectObject;
Rect selection;
Mat xyz;
Mat rectifyImageL;
Mat rectifyImageR;
Mat Q;
int blockSize=6;
int n=10;
};
static void clickMouse(int event, int x, int y, int, void* data)
{
CallbackParams* params = static_cast<CallbackParams*>(data);
static Point origin;
if (params->selectObject)
{
params->selection.x = MIN(x, origin.x);
params->selection.y = MIN(y, origin.y);
params->selection.width = std::abs(x - origin.x);
params->selection.height = std::abs(y - origin.y);
}
float d;
Vec3f point3;
switch (event)
{
case EVENT_LBUTTONDOWN: //鼠标左按钮按下的事件
origin = Point(x, y);
params->selection = Rect(x, y, 0, 0);
params->selectObject = true;
//cout << origin << "in world coordinate is: " << xyz.at<Vec3f>(origin) << endl;
//Mat xyz;
point3 = params->xyz.at<Vec3f>(origin);
//point3[0];
cout << "像素坐标: " << origin << endl;
//cout << "point3[0]:" << point3[0] << "point3[1]:" << point3[1] << "point3[2]:" << point3[2]<<endl;
cout << "世界坐标:" << "x: " << point3[0] << " y: " << point3[1] << " z: " << point3[2] << endl;
d = point3[0] * point3[0] + point3[1] * point3[1] + point3[2] * point3[2];
d = sqrt(d); //mm
// cout << "距离是:" << d << "mm" << endl;
//d = d / 10.0; //cm
//cout << "距离:" << d << "cm" << endl;
d = d / 1000.0; //m
cout << "距离是:" << d << "m" << endl;
break;
case EVENT_LBUTTONUP: //鼠标左按钮释放的事件
params->selectObject = false;
if (params->selection.width > 0 && params->selection.height > 0)
break;
}
}
void get_depth(int , void* data) {
CallbackParams* params = static_cast<CallbackParams*>(data);
//创建sgbm对象
int n = getTrackbarPos("NumDisparities:\n", "depth");
int blockSize = getTrackbarPos("BlockSize:\n", "depth");
Ptr<cv::StereoSGBM> sgbm = cv::StereoSGBM::create(0, 16 * n, blockSize);
//SGBM参数设置
{
int P1 = 8 * 3 * blockSize * blockSize;
int P2 = 32 * 3 * blockSize * blockSize;
sgbm->setP1(P1);
sgbm->setP2(P2);
sgbm->setPreFilterCap(1);
sgbm->setUniquenessRatio(10);
sgbm->setSpeckleRange(100);
sgbm->setSpeckleWindowSize(100);
sgbm->setDisp12MaxDiff(-1);
//sgbm->setNumDisparities(1);
sgbm->setMode(cv::StereoSGBM::MODE_HH);
}
//计算视差
Mat disp, disp8, disColor, disColorMap;
sgbm->compute(params->rectifyImageL, params->rectifyImageR, disp);//输入灰度图,输出视差
disColor = Mat(disp.rows, disp.cols, CV_8UC1);
normalize(disp, disColor, 0, 255, NORM_MINMAX, CV_8U);
applyColorMap(disColor, disColorMap, COLORMAP_JET);
reprojectImageTo3D(disp, params->xyz, params->Q, true);
params->xyz *= 16;
//显示深度图
imshow("depth", disColorMap);
}
int main() {
//单个摄像头的分辨率
const int imageWidth = 1520;
const int imageHeight = 1520;
//单个相机的分辨率
Size imageSize = Size(imageWidth, imageHeight);
Mat rgbImageL, grayImageL;//彩色、灰色左视图
Mat rgbImageR, grayImageR;
Mat rectifyImageL, rectifyImageR;//校正后左右视图
//定义切割区域
Rect m_l_select;
Rect m_r_select;
//图像校正之后,会对图像进行裁剪,这里的validROI就是指裁剪之后的区域
Rect validROIL;
Rect validROIR;
//映射表
Mat mapLx, mapLy, mapRx, mapRy;
//校正旋转矩阵R,投影矩阵P 重投影矩阵Q
Mat Rl, Rr, Pl, Pr, Q;
Mat R;//R 旋转矩阵
//立体校正参数计算
Rodrigues(rec, R);
stereoRectify(cameraMatrixL, distCoeffL, cameraMatrixR, distCoeffR, imageSize, R, T, Rl, Rr, Pl, Pr, Q, CALIB_ZERO_DISPARITY, -1, imageSize, &validROIL, &validROIR);//-1为默认自由缩放参数;参数解释:https://baike.baidu.com/item/stereoRectify/1594417?fr=ge_ala
initUndistortRectifyMap(cameraMatrixL, distCoeffL, Rl, Pl, imageSize, CV_16SC2, mapLx, mapLy);
initUndistortRectifyMap(cameraMatrixR, distCoeffR, Rr, Pr, imageSize, CV_16SC2, mapRx, mapRy);
//获取左右图像
m_l_select = Rect(0, 0, imageWidth, imageHeight);
m_r_select = Rect(imageWidth, 0, imageWidth, imageHeight);
VideoCapture cap(1);//打开摄像头(输入摄像头的索引)
cap.set(CAP_PROP_FRAME_WIDTH, imageWidth*2);
cap.set(CAP_PROP_FRAME_HEIGHT, imageHeight);
if (!cap.isOpened()) {
cout << "Error: Could not open the camera." << endl;
return -1;
}
CallbackParams params;
params.selectObject = false;
params.Q = Q;
namedWindow("depth", WINDOW_AUTOSIZE);
while (true)
{
Mat frame;
cap.read(frame);
//获取左右图像
Mat frameL, frameR;
frameL = frame(m_l_select);
frameR = frame(m_r_select);
if (frameL.empty() || frameR.empty()) {
cout << "Error: Could not grab a frame." << endl;
break;
}
// 转换为灰度图
cvtColor(frameL, grayImageL, COLOR_BGR2GRAY);
cvtColor(frameR, grayImageR, COLOR_BGR2GRAY);
//imshow("ref", grayImageR);
//remap矫正
remap(grayImageL, rectifyImageL, mapLx, mapLy, INTER_LINEAR);
remap(grayImageR, rectifyImageR, mapRx, mapRy, INTER_LINEAR);
//rectifyImageL = rectifyImageL(validROIL);
//rectifyImageR = rectifyImageR(validROIR);
//Mat rgbRectifyImageL;
//cvtColor(rectifyImageL, rgbRectifyImageL, COLOR_GRAY2BGR);
imshow("ref", rectifyImageR);
params.rectifyImageL = rectifyImageL;
params.rectifyImageR = rectifyImageR;
//通过视差获取深度图
//Size windows_size = Size (960, 960);
//resizeWindow("depth", windows_size);
//创建滑动调参窗口
createTrackbar("BlockSize:\n", "depth", ¶ms.blockSize, 10, get_depth,¶ms);
createTrackbar("NumDisparities:\n", "depth", ¶ms.n, 10, get_depth, ¶ms);
setMouseCallback("depth", clickMouse, ¶ms);
get_depth(0, ¶ms);
if (waitKey(30) >= 0) break;
}
}
#endif
2.2.1 输出深度图结果:
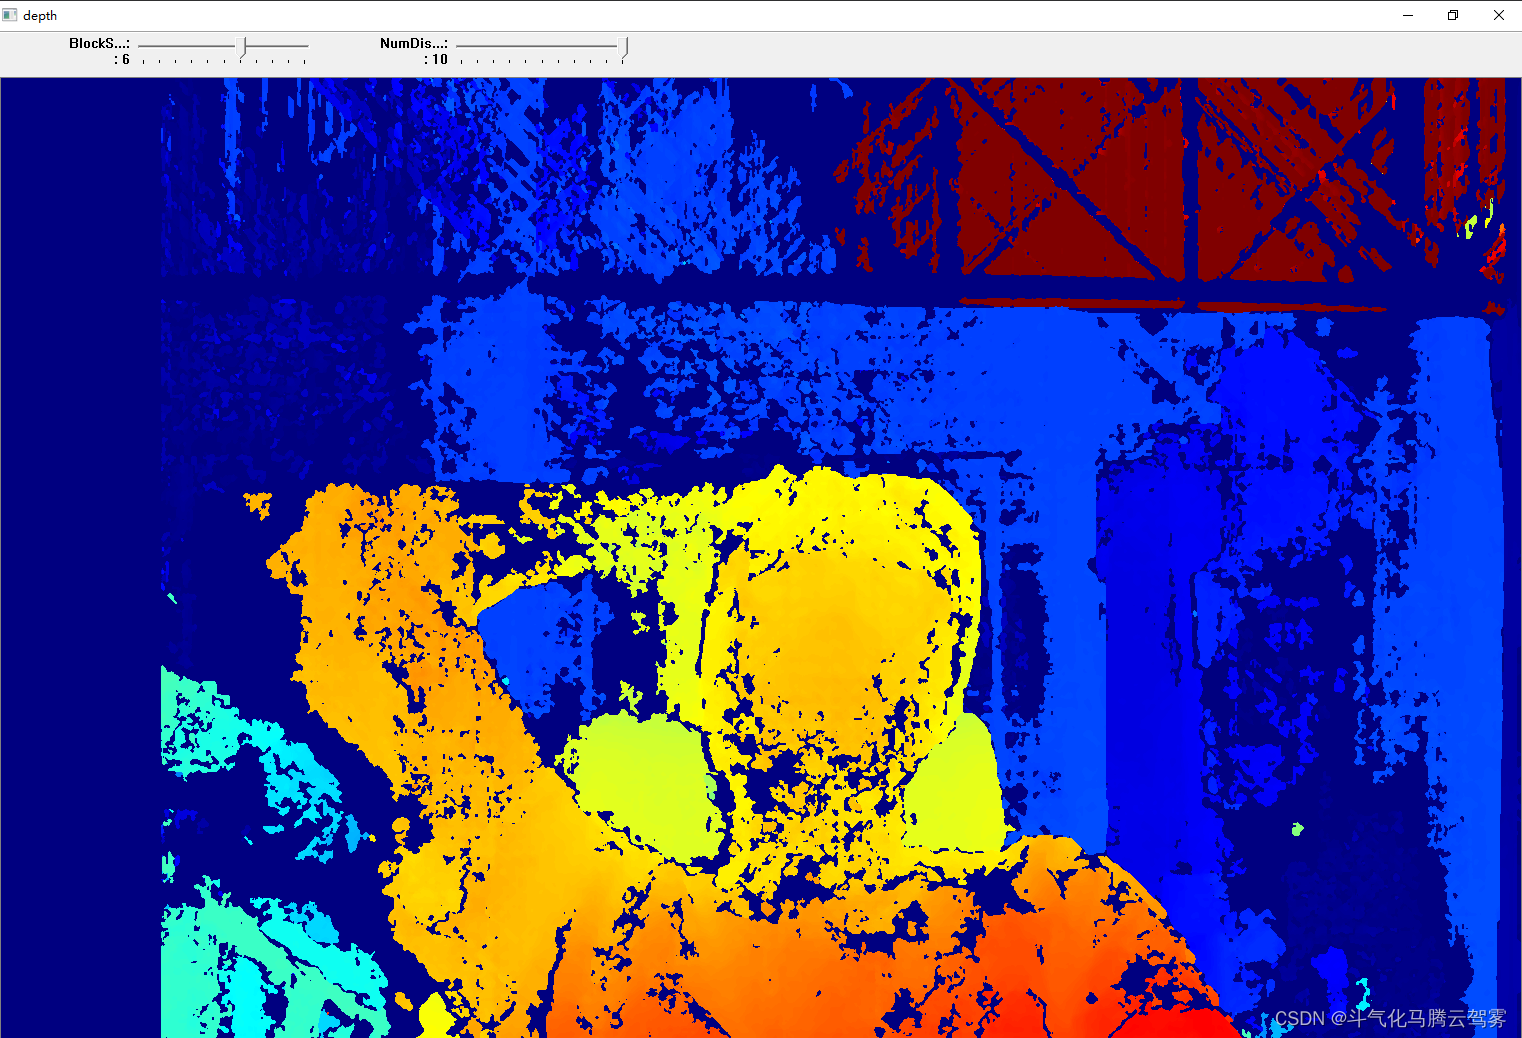
2.2.2点击深度图窗口输出距离和坐标信息,在标定距离内,精度在1cm以内。


 4492
4492


 被折叠的 条评论
为什么被折叠?
被折叠的 条评论
为什么被折叠?
 到【灌水乐园】发言


