This series of articles are the study notes of "Interfacing with the Arduino", by Prof. Harris, Department of Computer Science, University of California, Irvine. This article is the notes of week 4, lessen 2.
2. Lesson 2
2.1 Lecture 2.1 - Ethernet Client
Typically, the Internet is used in this client-server relationship, not always, but that's what we're assuming here. So client-server relationship, what this means is that the server sits there, and waits for connections, right. Like a web server, it sits there, and has some kind of service it's providing. Like a web server, it provides a web page.
So it sits there on the network, listening and waiting for connections, for people to request something. Then a client does the requesting. So a client connects to the server and request some service. Like request a web page, please give me a web page or something like that. So we're assuming this client server relationship.
2.1.1 Arduino Client
(1) Arduino can act as a client, create a client object
Our Ethernet shield can act as a client or a server. So right now we are going to talk about using the Ethernet shield as a client. When you do that, first thing you do is you have to create a client object, okay. So Ethernet Client is the name of this class. You say EthernetClient client, and that creates a client object. You need that if you wanna act as a client.
(2) Needs to connect to a server
- result = client.connect(ip,port); or result = client.connect(domain,port);
So you create the client object, then you need to connect to a server, right. If you're a client, you're going to connect to a server to get some service from. So you can do that, we're showing two ways of doing it; basically you're calling this function called client.connect. Now client.connect, it takes two arguments. The first argument, well actually we showed two calls right here. The first call, its two arguments are IP address and a port. So you gotta give the IP address and the port number as its two arguments and then it knows what machine to talk to. Or you can pass the two arguments of the domain name and the port. And, remember, using Domain Name Service, DNS, and the domain name can automatically be translated into an IP address. So either way is fine. client.connect you can call it, give it an IP address and a port number and it makes a connection with a server.
(3) Returns 1 if connection is made, 0 if it is not
Now notice that line of code says result equals client.connect, result equals. So what that means is that client.connect is gonna return either a zero or a one. True or false. It returns a one if a connection is successfully made with a server. It returns a zero if it's not.
And so then in your code you can say if result then da da da, right. So you can check to see if a connection was successfully made before you go on and start communicating.
(4) client.stop(); ends connection
2.1.2 Sending and Receiving Data
client.print(data); and client.println(data); send data
println() adds a carriage return data is a string or an array of bytes
client.write(value); sends a raw byte
data = client.read(); reads the next byte
result =client.available(); returns 1 if data is wating
2.2 Lecture 2.2 - Client Examples
2.2.1 Client Sends Data
byte mac[] = {0xDE,0xAD,0xBE,0xEF,0x12,0x34};
char server[] = “testdomain.edu”;
EthernetClient client;
void setup() {
	Ethernet.begin(mac);
        If (client.connect(server,80)){
	client.println(“GET index.html HTTP/1.1”);
	client.stop();
    }
}
- Sends a GET request to a web server
- Port 80 used for the web
Defining a MAC address
So let's show a little bit of code that uses the ethernet shield as a client. Just show how some of these functions would be used. So if we look at the code, the top, first thing we're doing is defining a MAC address. Remember a MAC address is six bytes. And these bytes are specified in hexadecimal. They don't have to be, but that is extremely common and it's always done for MAC addresses. Notice that each byte starts off with an 0x. 0x this, 0x, 0x, 0x. So 0x stands for hexadecimal in C. So 0xde, that's a hexadecimal byte. Because each bit, each hexadecimal digit is four bits, so de, that's four and four, eight bits all together. So that's a MAC address that we've made up.
char server[] = “testdomain.edu”;
Then, next we're naming the server, char server we're naming a string, making a string called server, which is going to be the domain name of the server that we want to communicate with. So we'll just call that server, testdomain.edu, which as far as I know is not a real domain but we're using that.
EthernetClient client
Then, this ethernet, we wanna act as a client, so we create a client object,
EthernetClient client. So we've made our client object.
Ethernet.begin(mac)
Then inside our set-up, this is still doing our sketch, so it's set up in a loop. In our set-up, we say Ethernet.begin to initialize the ethernet shield. Ethernet.begin(mac), we have to pass it the MAC address, that's required, which we define up at the top. We don't pass an IP address. So what that means is we're assuming DHCP is working in our network and DHCP is used to generate an IP address. So we get an IP address, but we don't explicitly give one in our code.
client.connect(server, 80)
Then, if client.connect, so now we're trying to make the connection from the client to that server, test do main.edu. If (client.connect(server, 80)), so server is the name of the server and 80 is the port we're talking on. Now port 80 is devoted to HTTP traffic, meaning web traffic. So we're trying to talk to a web server clearly. So we try to connect and the client.connect returns a 1 or returns a true if it makes the connection.
client.println(“GET index.html HTTP/1.1”);
So if it does make the connection, then it goes into the if statement, client.println and it sends that message: “Get index.html HTTP/1.1”. Now it turns out that message is the HTTP format for a GET message. So what that does is, it request of a web server that's saying give me this index.html, give me this file. Which should be a webpage, right, index.html. So, that's actually making a request. So we send that string to, calling that print line is sending that string to the server.
client.stop();
And then call client.stop to stop communication, which by the way would be a silly thing to do. Because we wouldn't wanna stop the communication immediately, we'd wanna wait until we received the answer back. But we could do that. In this instance, we're just sending this one string requesting some information and then we stop communication. So this is a typical client sending data to a server.
2.2.2 Client Receives Data
void loop() {
	if (client.available())
	Serial.print(client.read());
}
- Receives the response from the web server
- Sends to the serial monitor
Now here's another tiny program where the client's receiving data. Now we're putting this in the loop this time. All we're doing here is we're having the client receive bytes as they're available. So when a byte is available from the server, it takes the byte and it call, it prints it to the serial monitor let's say. So if you look at the loop, if client.available meaning if there's a byte available. Serial.print, client.read, client.read returns the byte, the first byte available. And Serial.print will take it and print it to the serial monitor. And then it just, this is loop, so it just continues in that fashion. Every time a byte is available, if clients available, then it just takes it, reads it and prints it, and that's it. So that's a client receiving data from the server. And printing it to the screen. So it receives response and sends it to the serial monitor.
2.3 Lecture 2.3 - Ethernet Server
So we're talking about how an Ethernet shield can act as client. The Ethernet shield can act as a server, too. Now let's talk about how it can act as a server.
Remember that the goal of a server is to sit listen for connection from clients, for requests from clients. So it's gotta sit at some IP address, listen to a port, and when the request comes in on that port, it services the request, so it receives data, or whatever the request is, and then sends data satisfying the request.
2.3.1 Ethernet Server
(1) Arduino can act as a server, create a server object
The Ethernet shield can act as a server, too, so let's look at how that works. First thing you want to do is create a server object, so remember with the client, we had the Ethernet client object, so, now we've got Ethernet server, we create a server object. And in order to make that server, you've gotta explicitly call EthernetServer.
(2) EthernetServer server = EthernetServer(port);
-
Port argument is the port that the server listens to
A function called EthernetServer which is its constructor. And you pass an argument called that is the port. So this creates a server. So, server is now equal to a server object that is listening on whatever port it is that you specified, right? So if you're making a web server you would listen on port 80 and so forth.
(3) To start listening, server must create a client object
To start listening, we have to create a client object. Now this sounds a little counter intuitive. You might say well look, I'm a server, why do I need to create a client object? But you need to create a client object because that client object is gonna represent the client that you're talking too, that you're communicating with.
EthernetClient client = server.available();
So you say EthernetClient client = server.available(); So you're calling this function server.available() and that returns a client if a client is waiting. If a client is waiting to talk to the server then server.available() will return that client and so now client will equal what ever server it is you want to talk to.
(4) Client object will be false (0) if client is not available
The server data available will return false if there's no client available. But if there is a client available, then client's going to equal a client object which refers to the client you are talking to, not yourself, but the one you're talking to.
(6) client.stop(); will close connection with client.
And then client.stop can be called from the server to cancel the communication with the clients, to end it.
(7) Use client.print() and client.write() to send data
Now in order to
send data to the client and receive data from the client you just call the same functions we called before, client.print and client.write. client.print will send the data, client.write will send bytes and individual raw data.
(8) Use client.read() to read data
And you can do client.read to read data.
So you can send and receive data, communicate with the client using client.print or client.read or also client.print line if you want to put a character in there or client.read does the reading.
2.3.2 Server Receives Data
EthernetServer server = EthernetServer(80);
void setup() {
	Ethernet.begin(mac,ip,gateway,subnet);
	server.begin();
}
void loop() {
	EthernetClient client = server.available();
	If (client) {
		Serial.print(client.read());
    }
}
Here's a little example of a maybe a little silly piece of code but that's okay it fit on the slide. So we started off at the top.
EthernetServer server = EthernetServer(80);
Make a server. Ethernet server, we create the server, we call the Ethernet server with an 80 as its argument. So the server is going to be listening to port 80.
Ethernet.begin();
Now, in our setup, we call Ethernet.begin. You are going to call Ethernet.begin to begin to initialize the server, to initialize the Ethernet shield. Now notice that this time we pass it a MAC address, I don't know, I didn't define them in here. But suppose we had some MAC address. This time we give it an IP address, a gateway, and a subnet. The IP address is the most important here. We are going to give it an IP address because now we're acting as a server. And typically when you act as a server, you need your IP address to be static, to be known. And using, so when somebody does a domain saver, DNS look up for your name, they've got this consistent IP address so they can find you. So, it is common when you're creating a server that you don't rely on DHCP to give you an IP address. You specify an IP address. Now I don't know what that IP address is but we could have defined it to be whatever we want. But we have to give it a MAC address and we also give it an IP address. Then we also give it the optional gateway and subnet, but that's not necessary.
server.begin();
Then we call server.begin. server.begin actually evokes the server and starts it listening.
server.available();
Now then in the loop, we say, okay, let's see if there's a client that wants to connect to us. So we call server.available to return an EthernetClient If a client is available. So server.available will return 0 if a client's not available.
if (client)
And then when we get to the next line, if client it will be false and we won't do anything. But if client is available then client's going to equal that client. Equal an object which refers to that client. So then we get to the line if client.
serial.print(client.read);
We say okay, if there is a client that was ready to talk to us, then serial.print client.read. So we just read something from the client and print it to the serial monitor and that's that. So that's all this does is it connects to a client waiting and wherever a client sends it, it prints the serial monitor assuming the client is sending something. Now, by the way we could write this code, but to be safer, a better way to write this code is, and that, before we do the serial.print client.read, before we call client.read, we shouldn't call client.read before we know the date is available. So we should check for availability first before we call client.read. I didn't do it here, but probably should have. So it receives data on port 80 and just prints it.
2.4 Lecture 2.4 - Ethernet Shield Demo
Next we're going to look at the Ethernet shield on the Arduino. And we'll go through an example, an Ethernet web server example. So first of all, we'll just look through the code, see what the code's going to do. And then we'll actually try it out and see how it works.
2.4.1 Example Code
So let's first look at the code. We're going to look at a sketch, on one of the example sketches. So go to file, examples, Ethernet two, because my shield is an Ethernet two shield. Ethernet two. And Web server. So, that's the example we'll look at.
#include <SPI.h>
#include <Ethernet.h>

// Enter a MAC address and IP address for your controller below.
// The IP address will be dependent on your local network:
byte mac[] = {
  0xDE, 0xAD, 0xBE, 0xEF, 0xFE, 0xED
};
IPAddress ip(192, 168, 1, 177);

// Initialize the Ethernet server library
// with the IP address and port you want to use
// (port 80 is default for HTTP):
EthernetServer server(80);

void setup() {
  // Open serial communications and wait for port to open:
  Serial.begin(9600);
  while (!Serial) {
    ; // wait for serial port to connect. Needed for Leonardo only
  }


  // start the Ethernet connection and the server:
  Ethernet.begin(mac, ip);
  server.begin();
  Serial.print("server is at ");
  Serial.println(Ethernet.localIP());
}

void loop() {
  // listen for incoming clients
  EthernetClient client = server.available();
  if (client) {
    Serial.println("new client");
    // an http request ends with a blank line
    boolean currentLineIsBlank = true;
    while (client.connected()) {
      if (client.available()) {
        char c = client.read();
        Serial.write(c);
        // if you've gotten to the end of the line (received a newline
        // character) and the line is blank, the http request has ended,
        // so you can send a reply
        if (c == '\n' && currentLineIsBlank) {
          // send a standard http response header
          client.println("HTTP/1.1 200 OK");
          client.println("Content-Type: text/html");
          client.println("Connection: close");  // the connection will be closed after completion of the response
          client.println("Refresh: 5");  // refresh the page automatically every 5 sec
          client.println();
          client.println("<!DOCTYPE HTML>");
          client.println("<html>");
          // output the value of each analog input pin
          for (int analogChannel = 0; analogChannel < 6; analogChannel++) {
            int sensorReading = analogRead(analogChannel);
            client.print("analog input ");
            client.print(analogChannel);
            client.print(" is ");
            client.print(sensorReading);
            client.println("<br />");
          }
          client.println("</html>");
          break;
        }
        if (c == '\n') {
          // you're starting a new line
          currentLineIsBlank = true;
        }
        else if (c != '\r') {
          // you've gotten a character on the current line
          currentLineIsBlank = false;
        }
      }
    }
    // give the web browser time to receive the data
    delay(1);
    // close the connection:
    client.stop();
    Serial.println("client disconnected");
  }
}
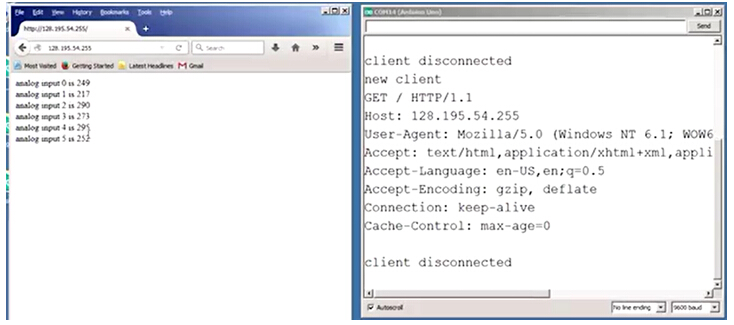
So I should be able to take a web client, basically a web browser, and point it to the IP address on my shield. And I should see a webpage, and in this case the webpage will contain six numbers that are the readings, the analog readings on the analog inputs, A0 through A5 That's not particularly of interest to us, but that's what you will see on the web site when you go to it. So our Arduino should act like a web server.


 4042
4042

 被折叠的 条评论
为什么被折叠?
被折叠的 条评论
为什么被折叠?
 到【灌水乐园】发言


