


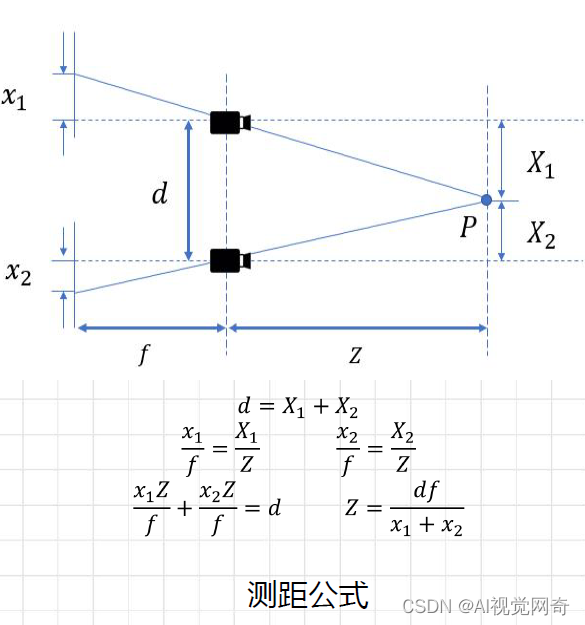
测距公式:
这篇博文也比较详细:
通过matlab标定得到相机参数放到stereoconfig.py
import numpy as np
import cv2

#双目相机参数
class stereoCameral(object):
    def __init__(self):

        #左相机内参数
        self.cam_matrix_left = np.array([[249.82379, 0., 156.38459], [0., 249.07678, 122.46872], [0., 0., 1.]])
        #右相机内参数
        self.cam_matrix_right = np.array([[242.77875, 0., 153.22330], [0., 242.27426, 117.63536], [0., 0., 1.]])

        #左右相机畸变系数:[k1, k2, p1, p2, k3]
        self.distortion_l = np.array([[-0.02712, -0.03795, -0.00409, 0.00526, 0.00000]])
        self.distortion_r = np.array([[-0.03348, 0.08901, -0.00327, 0.00330, 0.00000]])

        #旋转矩阵
        om = np.array([-0.00320, -0.00163, -0.00069])
        self.R = cv2.Rodrigues(om)[0]  # 使用Rodrigues变换将om变换为R
        #平移矩阵
        self.T = np.array([-90.24602, 3.17981, -19.44558])
视差图及三维坐标
import cv2
import numpy as np
import stereoconfig
def getRectifyTransform(height, width, config):
#读取矩阵参数
left_K = config.cam_matrix_left
right_K = config.cam_matrix_right
left_distortion = config.distortion_l
right_distortion = config.distortion_r
R = config.R
T = config.T
#计算校正变换
if type(height) != "int" or type(width) != "int":
height = int(height)
width = int(width)
R1, R2, P1, P2, Q, roi1, roi2 = cv2.stereoRectify(left_K, left_distortion, right_K, right_distortion,
(width, height), R, T, alpha=0)
map1x, map1y = cv2.initUndistortRectifyMap(left_K, left_distortion, R1, P1, (width, height), cv2.CV_32FC1)
map2x, map2y = cv2.initUndistortRectifyMap(right_K, right_distortion, R2, P2, (width, height), cv2.CV_32FC1)
return map1x, map1y, map2x, map2y, Q
# 畸变校正和立体校正
def rectifyImage(image1, image2, map1x, map1y, map2x, map2y):
rectifyed_img1 = cv2.remap(image1, map1x, map1y, cv2.INTER_AREA)
rectifyed_img2 = cv2.remap(image2, map2x, map2y, cv2.INTER_AREA)
return rectifyed_img1, rectifyed_img2
#视差计算
def sgbm(imgL, imgR):
#SGBM参数设置
blockSize = 8
img_channels = 3
stereo = cv2.StereoSGBM_create(minDisparity = 1,
numDisparities = 64,
blockSize = blockSize,
P1 = 8 * img_channels * blockSize * blockSize,
P2 = 32 * img_channels * blockSize * blockSize,
disp12MaxDiff = -1,
preFilterCap = 1,
uniquenessRatio = 10,
speckleWindowSize = 100,
speckleRange = 100,
mode = cv2.STEREO_SGBM_MODE_HH)
# 计算视差图
disp = stereo.compute(imgL, imgR)
disp = np.divide(disp.astype(np.float32), 16.)#除以16得到真实视差图
return disp
#计算三维坐标,并删除错误点
def threeD(disp, Q):
# 计算像素点的3D坐标(左相机坐标系下)
points_3d = cv2.reprojectImageTo3D(disp, Q)
points_3d = points_3d.reshape(points_3d.shape[0] * points_3d.shape[1], 3)
X = points_3d[:, 0]
Y = points_3d[:, 1]
Z = points_3d[:, 2]
#选择并删除错误的点
remove_idx1 = np.where(Z <= 0)
remove_idx2 = np.where(Z > 15000)
remove_idx3 = np.where(X > 10000)
remove_idx4 = np.where(X < -10000)
remove_idx5 = np.where(Y > 10000)
remove_idx6 = np.where(Y < -10000)
remove_idx = np.hstack(
(remove_idx1[0], remove_idx2[0], remove_idx3[0], remove_idx4[0], remove_idx5[0], remove_idx6[0]))
points_3d = np.delete(points_3d, remove_idx, 0)
#计算目标点(这里我选择的是目标区域的中位数,可根据实际情况选取)
if points_3d.any():
x = np.median(points_3d[:, 0])
y = np.median(points_3d[:, 1])
z = np.median(points_3d[:, 2])
targetPoint = [x, y, z]
else:
targetPoint = [0, 0, -1]#无法识别目标区域
return targetPoint
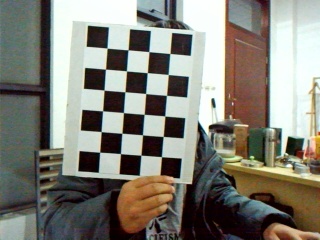
imgL = cv2.imread("_left.jpg")
imgR = cv2.imread("_right.jpg")
height, width = imgL.shape[0:2]
# 读取相机内参和外参
config = stereoconfig.stereoCameral()
map1x, map1y, map2x, map2y, Q = getRectifyTransform(height, width, config)
iml_rectified, imr_rectified = rectifyImage(imgL, imgR, map1x, map1y, map2x, map2y)
disp = sgbm(iml_rectified, imr_rectified)
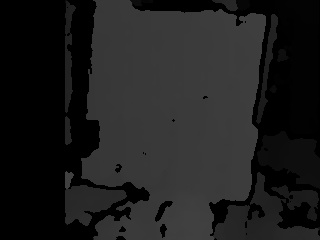
cv2.imshow("disp", disp)
target_point = threeD(disp, Q)#计算目标点的3D坐标(左相机坐标系下)
print(target_point)
结果:


 11万+
11万+


 被折叠的 条评论
为什么被折叠?
被折叠的 条评论
为什么被折叠?
 到【灌水乐园】发言


