


文章目录
一、Jetpack 库是什么
Jetpack 是一个由多个库组成的套件,可帮助开发者遵循最佳做法、减少样板代码并编写可在各种 Android 版本和设备中一致运行的代码,让开发者可将精力集中于真正重要的编码工作。
Jetpack 的构成,如下图所示:

Jetpact 库由如下4个方面构成:
- Arch(架构组件):
- Data Bingding(数据绑定)
- Room(数据库)
- WorkManager(后台任务管家)
- Lifecycle(生命周期)
- Navigation(导航)
- Paging(分页)
- Data Binding(数据绑定)
- LiveData(底层数据通知更改视图)
- ViewModel(以注重生命周期的方式管理界面的相关数据)
- Foundation(基础)
- AppCompat(向后兼容)
- Android KTX(编写更加简洁的 Kotlin 代码)
- Multidex (dex的多处理)
- Test(测试)
- Behavior(行为)
- Download manager(下载管理器)
- Media & playback(媒体和播放)
- Notifications(通知)
- Permissions(权限)
- Preferences(偏好设置)
- Sharing(共享)
- Slices (切片)
- UI (视觉交互)
- Animation & transitions(动画和过渡)
- Auto(Auto组件)
- Emoji(标签)
- Fragment(Fragment 布局)
- Layout(布局)
- Palette(调色板)
- TV(TV)
- Wear OS by Google(穿戴设备)
Jetpack 库的 import 路径都是 androidx.xxx,例如下例的appcompact、recyclerview等库:
dependencies {
    debugImplementation 'com.guolindev.glance:glance:1.1.0'
    implementation 'androidx.core:core-ktx:1.7.0'
    implementation 'androidx.appcompat:appcompat:1.4.2'
    implementation 'com.google.android.material:material:1.6.1'
    implementation 'androidx.constraintlayout:constraintlayout:2.1.4'
    implementation 'androidx.lifecycle:lifecycle-extensions:2.2.0'
    implementation 'androidx.recyclerview:recyclerview:1.2.1'
    implementation 'androidx.room:room-runtime:2.4.3'
    kapt 'androidx.room:room-compiler:2.4.3'
    testImplementation 'junit:junit:4.13.2'
    androidTestImplementation 'androidx.test.ext:junit:1.1.3'
    androidTestImplementation 'androidx.test.espresso:espresso-core:3.4.0'
}
用 Android Studio 新建项目时,默认就会使用 Jetpack 库。可以在项目的 gradle.properties 文件中确认包含了 android.useAndroidX=true 的话,则说明已启用此功能。
二、LifeCycle 库
对于 Activity、Fragment、Service、Application 等组件,我们希望其自己实现自己的 onCreate()、onDestroy() 回调函数,然后在其生命周期的不同阶段,这些回调函数被 Android 系统调用。LifeCycle 库通过这种回调的方式,更好的管理生命周期。
例如,如果我们希望 App 启动后,自动通过蓝牙配对耳机,不使用 LifeCycle 库的话就会和 Activity 或 Fragment 的声明周期耦合,如下代码就是未使用 LifeCycle 库的例子,本节就会对此代码做改造:
package com.bignerdranch.android.jetpacktest

import android.os.Bundle
import androidx.appcompat.app.AppCompatActivity
import android.util.Log

class MainActivity : AppCompatActivity() {
    override fun onCreate(savedInstanceState: Bundle?) {
        super.onCreate(savedInstanceState)
        setContentView(R.layout.activity_main)
        Log.d("Init BlueTooth")
    }

    override fun onResume() {
        super.onResume()
        Log.d("Start BlueTooth")
    }

    override fun onPause() {
        super.onPause()
        Log.d("Stop BlueTooth")
    }
}
2.1 用 LifeCycle 监听 Acrtivity 和 Fragment 的生命周期
2.1.1 ComponentActivity 类、LifecycleOwner 和 LifeCycleObserve 源码分析
首先,androidx 的 lifecycle 库的源码如下:
package androidx.lifecycle;

import androidx.annotation.NonNull;

/**
 * A class that has an Android lifecycle. These events can be used by custom components to
 * handle lifecycle changes without implementing any code inside the Activity or the Fragment.
 *
 * @see Lifecycle
 * @see ViewTreeLifecycleOwner
 */
@SuppressWarnings({"WeakerAccess", "unused"})
public interface LifecycleOwner {
    /**
     * Returns the Lifecycle of the provider.
     *
     * @return The lifecycle of the provider.
     */
    @NonNull
    Lifecycle getLifecycle();
}
其次,很多类都实现了 getLifecycle() 方法,其中就包括 ComponentActivity 类,如下图所示:
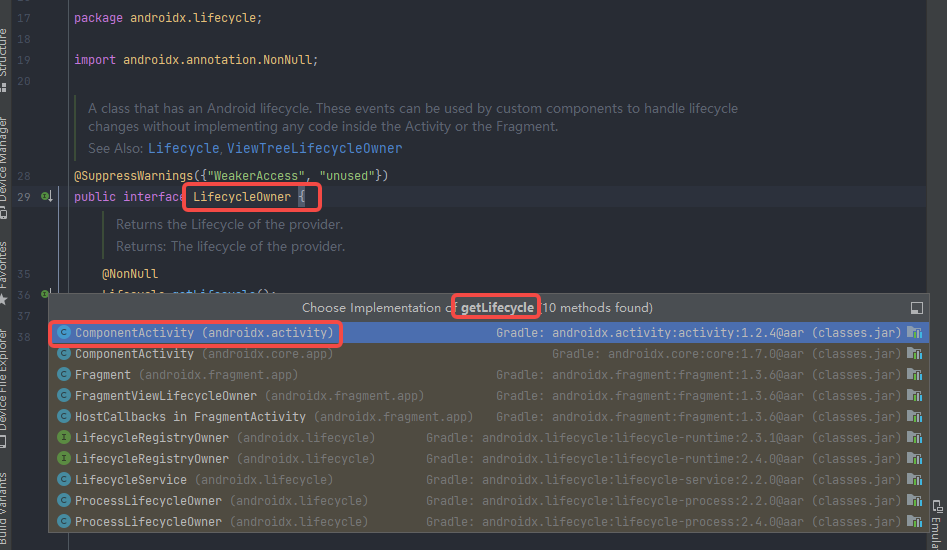
接下来,我们看 ComponentActivity 的源码,可知 ComponentActivity 实现了 LifecyeleOwner 接口(实现了该接口的 getLifecycle() 函数),其源码如下:
public class ComponentActivity extends androidx.core.app.ComponentActivity implements
        ContextAware,
        LifecycleOwner,
        ViewModelStoreOwner,
        HasDefaultViewModelProviderFactory,
        SavedStateRegistryOwner,
        OnBackPressedDispatcherOwner,
        ActivityResultRegistryOwner,
        ActivityResultCaller {
    private final LifecycleRegistry mLifecycleRegistry = new LifecycleRegistry(this);
    public Lifecycle getLifecycle() {
        return mLifecycleRegistry;
    }
    protected void onSaveInstanceState(@NonNull Bundle outState) {
        Lifecycle lifecycle = getLifecycle();
        if (lifecycle instanceof LifecycleRegistry) {
            ((LifecycleRegistry) lifecycle).setCurrentState(Lifecycle.State.CREATED);
        }
        super.onSaveInstanceState(outState);
        mSavedStateRegistryController.performSave(outState);
    }
}
而 LifecycleObserver 是一个空 interface,其源码如下:
package androidx.lifecycle;

/**
 * Marks a class as a LifecycleObserver. Don't use this interface directly. Instead implement either
 * {@link DefaultLifecycleObserver} or {@link LifecycleEventObserver} to be notified about
 * lifecycle events.
 *
 * @see Lifecycle Lifecycle - for samples and usage patterns.
 */
@SuppressWarnings("WeakerAccess")
public interface LifecycleObserver {

}
所以,ComponentActivity 类,同时实现了 LifecycleOwner 和 LifeCycleObserver 两个 interface,可以实现观察者模式。
2.1.2 用 LifeCycle 将功能和 Activity 解耦
现在,用 LifeCycle 改写上述蓝牙需求,将蓝牙功能,从 Activity 中拆分出来,既能解耦,又能实现对生命周期的监听。
首先,新建 MyBlueToothListener 类的自定义组件,让其实现 LifecycleObserver 接口,此类负责所有蓝牙的管理。对于组件中,需要在页面生命周期变化时得到通知的方法,我们需要在这些方法上用 `@OnLifecycleEvent(Lifecycle.Event.ON_XXX) 标签来标识,这样当页面生命周期变化时,即会自动调用这些标识过的方法,代码如下:
package com.bignerdranch.android.jetpacktest

import android.app.Activity
import android.util.Log
import androidx.lifecycle.Lifecycle
import androidx.lifecycle.LifecycleObserver
import androidx.lifecycle.OnLifecycleEvent

private const val TAG = "MyBlueToothListener"

class MyBlueToothListener(context: Activity?, onBlueToothChangeListener: OnBlueToothChangeListener) : LifecycleObserver {
    init {
        Log.d(TAG, "Init BlueTooth()")
    }

    @OnLifecycleEvent(Lifecycle.Event.ON_RESUME)
    private fun startBlueTooth() {
        Log.d(TAG, "Start BlueTooth()")
    }

    @OnLifecycleEvent(Lifecycle.Event.ON_PAUSE)
    private fun stopBlueTooth() {
        Log.d(TAG, "Stop BlueTooth()")
    }

    interface OnBlueToothChangeListener {
        fun onChanged(latitude: Double, longitude: Double)
    }
}
其次,在 MainActivity 中,只需新建 myBlueToothListener 变量,并通过 getLifeCycle().addObserver() 将观察者和被观察者绑定起来,代码如下:
package com.bignerdranch.android.jetpacktest

import android.os.Bundle
import android.util.Log
import androidx.appcompat.app.AppCompatActivity

private const val TAG = "MainActivity"

class MainActivity : AppCompatActivity() {
    private lateinit var myBlueToothListener: MyBlueToothListener
    override fun onCreate(savedInstanceState: Bundle?) {
        super.onCreate(savedInstanceState)
        setContentView(R.layout.activity_main)
        myBlueToothListener = MyBlueToothListener(this, object : MyBlueToothListener.OnBlueToothChangeListener {
            override fun onChanged(latitude: Double, longitude: Double) {
                Log.d(TAG, "on MyBlueToothListener Changed")
            }
        })
        lifecycle.addObserver(myBlueToothListener)
    }
}
运行后,日志会打印如下:现在已经避免了 MyBlueTooth 类,对 Activity 页面 生命周期的依赖问题,使组件可以自己管理自己的生命周期,而无需在 Activity 页面中管理,从而实现了解耦:
2022-09-25 08:04:55.717 25451-25451/? D/MyBlueToothListener: Init BlueTooth()
2022-09-25 08:04:55.729 25451-25451/? D/MyBlueToothListener: Start BlueTooth()
2022-09-25 08:05:39.485 25556-25556/com.bignerdranch.android.jetpacktest D/MyBlueToothListener: Init BlueTooth()
2022-09-25 08:05:39.493 25556-25556/com.bignerdranch.android.jetpacktest D/MyBlueToothListener: Start BlueTooth()
2.1.3 用 LifeCycle 将功能和 Fragment 解耦
同理,Fragment 的用法和上文中 Activity 的用法相同。Fragment 的源码中生命周期的部分如下:
package androidx.fragment.app;

public class Fragment implements ComponentCallbacks, OnCreateContextMenuListener, LifecycleOwner,
        ViewModelStoreOwner, HasDefaultViewModelProviderFactory, SavedStateRegistryOwner,
        ActivityResultCaller {
    LifecycleRegistry mLifecycleRegistry;
    public Lifecycle getLifecycle() {
        return mLifecycleRegistry;
    }
}
2.2 用 LifeCycleService 监听 Service 的生命周期
添加 implementation 'androidx.lifecycle:lifecycle-extensions:2.2.0' 的依赖后,即可使用 LifecycleService 类。
其继承自 Service,实现了 LifecyclerOwner 接口,和 Activity、Fragment 类似,也提供了 getLifeCycle() 方法,其源码如下:
/*
 * Copyright (C) 2017 The Android Open Source Project
 *
 * Licensed under the Apache License, Version 2.0 (the "License");
 * you may not use this file except in compliance with the License.
 * You may obtain a copy of the License at
 *
 *      http://www.apache.org/licenses/LICENSE-2.0
 *
 * Unless required by applicable law or agreed to in writing, software
 * distributed under the License is distributed on an "AS IS" BASIS,
 * WITHOUT WARRANTIES OR CONDITIONS OF ANY KIND, either express or implied.
 * See the License for the specific language governing permissions and
 * limitations under the License.
 */

package androidx.lifecycle;

import android.app.Service;
import android.content.Intent;
import android.os.IBinder;

import androidx.annotation.CallSuper;
import androidx.annotation.NonNull;
import androidx.annotation.Nullable;

/**
 * A Service that is also a {@link LifecycleOwner}.
 */
public class LifecycleService extends Service implements LifecycleOwner {

    private final ServiceLifecycleDispatcher mDispatcher = new ServiceLifecycleDispatcher(this);

    @CallSuper
    @Override
    public void onCreate() {
        mDispatcher.onServicePreSuperOnCreate();
        super.onCreate();
    }

    @CallSuper
    @Nullable
    @Override
    public IBinder onBind(@NonNull Intent intent) {
        mDispatcher.onServicePreSuperOnBind();
        return null;
    }

    @SuppressWarnings("deprecation")
    @CallSuper
    @Override
    public void onStart(@Nullable Intent intent, int startId) {
        mDispatcher.onServicePreSuperOnStart();
        super.onStart(intent, startId);
    }

    // this method is added only to annotate it with @CallSuper.
    // In usual service super.onStartCommand is no-op, but in LifecycleService
    // it results in mDispatcher.onServicePreSuperOnStart() call, because
    // super.onStartCommand calls onStart().
    @CallSuper
    @Override
    public int onStartCommand(@Nullable Intent intent, int flags, int startId) {
        return super.onStartCommand(intent, flags, startId);
    }

    @CallSuper
    @Override
    public void onDestroy() {
        mDispatcher.onServicePreSuperOnDestroy();
        super.onDestroy();
    }

    @Override
    @NonNull
    public Lifecycle getLifecycle() {
        return mDispatcher.getLifecycle();
    }
}
首先,新建一个 MyService 类,让其继承 LifecycleService 类,代码如下:
package com.bignerdranch.android.jetpacktest

import androidx.lifecycle.LifecycleService

class MyService:LifecycleService() {
    private var myServiceObserver :MyServiceObserver = MyServiceObserver()
    init {
        lifecycle.addObserver(myServiceObserver)
    }
}
其次,新建 MyServiceObserver 类,在其中写2个回调函数,代码如下:
package com.bignerdranch.android.jetpacktest

import android.util.Log
import androidx.lifecycle.Lifecycle
import androidx.lifecycle.LifecycleObserver
import androidx.lifecycle.OnLifecycleEvent

class MyServiceObserver : LifecycleObserver {
    private val TAG = "MyServiceObserver"

    // 当 Service 的 onCreate() 被调用时,此方法会被调用
    @OnLifecycleEvent(Lifecycle.Event.ON_CREATE)
    private fun startBlueTooth() {
        Log.d(TAG, "start BlueTooth()")
    }

    // 当 Service 的 onDestroy() 被调用时,此方法会被调用
    @OnLifecycleEvent(Lifecycle.Event.ON_DESTROY)
    private fun stopBlueTooth() {
        Log.d(TAG, "stop BlueTooth()")
    }
}
然后,在 AndroidManifest.xml 中通过 <service android:name=".MyService"/> 注册 Service,代码如下:
<?xml version="1.0" encoding="utf-8"?>
<manifest xmlns:android="http://schemas.android.com/apk/res/android"
    xmlns:tools="http://schemas.android.com/tools"
    package="com.bignerdranch.android.jetpacktest">

    <application
        android:allowBackup="true"
        android:dataExtractionRules="@xml/data_extraction_rules"
        android:fullBackupContent="@xml/backup_rules"
        android:icon="@mipmap/ic_launcher"
        android:label="@string/app_name"
        android:roundIcon="@mipmap/ic_launcher_round"
        android:supportsRtl="true"
        android:theme="@style/Theme.JetpackTest"
        tools:targetApi="31">
        <activity
            android:name=".MainActivity"
            android:exported="true">
            <intent-filter>
                <action android:name="android.intent.action.MAIN" />

                <category android:name="android.intent.category.LAUNCHER" />
            </intent-filter>
        </activity>
        <service android:name=".MyService"/>
    </application>

</manifest>
最后,在 activity_main.xml 布局添加2个Button,控制 Service 的启动和停止,布局如下:
<?xml version="1.0" encoding="utf-8"?>
<androidx.constraintlayout.widget.ConstraintLayout xmlns:android="http://schemas.android.com/apk/res/android"
    xmlns:app="http://schemas.android.com/apk/res-auto"
    xmlns:tools="http://schemas.android.com/tools"
    android:layout_width="match_parent"
    android:layout_height="match_parent"
    tools:context=".MainActivity">

    <TextView
        android:layout_width="wrap_content"
        android:layout_height="wrap_content"
        android:text="Hello World!"
        app:layout_constraintBottom_toBottomOf="parent"
        app:layout_constraintEnd_toEndOf="parent"
        app:layout_constraintStart_toStartOf="parent"
        app:layout_constraintTop_toTopOf="parent" />

    <Button
        android:id="@+id/start_service_button"
        android:layout_width="match_parent"
        android:layout_height="wrap_content"
        android:text="start service"
        app:layout_constraintTop_toTopOf="parent"
        tools:layout_editor_absoluteX="30dp" />

    <Button
        android:id="@+id/stop_service_button"
        android:layout_width="match_parent"
        android:layout_height="wrap_content"
        android:text="stop service"
        app:layout_constraintTop_toBottomOf="@+id/start_service_button"
        tools:layout_editor_absoluteX="28dp" />
</androidx.constraintlayout.widget.ConstraintLayout>
布局效果如下:

然后,在 MainActivity.kt 中设置2个 Button 的监听函数,代码如下:
运行后,当点击 start_button 则会启动 MyService 即会调用 MyServiceObserver类的 startBlueTooth() 回调方法,当点击 stop_button 则会启动 MyService 即会调用 MyServiceObserver类的 startBlueTooth() 回调方法,日志如下:
2022-09-25 13:59:16.460 29147-29147/com.bignerdranch.android.jetpacktest D/MyServiceObserver: start BlueTooth()
2022-09-25 13:59:17.953 29147-29147/com.bignerdranch.android.jetpacktest D/MyServiceObserver: stop BlueTooth()
即通过 LifecycleService 库,可以当 Service 生命周期变化时,不再需要主动对组件通知,组件就可在其内部管理 Service 生命周期所带来的变化,即实现了组件和Service的解耦。
2.3 用 ProcessLifeCycleOwner 监听 Application 的生命周期
为了监听当前 App 处在前台还是后台,可通过 ProcessLifecycleOwner 类来监听整个 Application 的生命周期。
首先,在 build.gradle 添加 implementation 'androidx.lifecycle:lifecycle-extensions:2.2.0' 依赖。
然后,在 AndroidManifest.xml 中通过 android:name=".MyApplication" 注册 Application,代码如下:
<?xml version="1.0" encoding="utf-8"?>
<manifest xmlns:android="http://schemas.android.com/apk/res/android"
    xmlns:tools="http://schemas.android.com/tools"
    package="com.bignerdranch.android.jetpacktest">

    <application
        android:name=".MyApplication"
        android:allowBackup="true"
        android:dataExtractionRules="@xml/data_extraction_rules"
        android:fullBackupContent="@xml/backup_rules"
        android:icon="@mipmap/ic_launcher"
        android:label="@string/app_name"
        android:roundIcon="@mipmap/ic_launcher_round"
        android:supportsRtl="true"
        android:theme="@style/Theme.JetpackTest"
        tools:targetApi="31">
        <activity
            android:name=".MainActivity"
            android:exported="true">
            <intent-filter>
                <action android:name="android.intent.action.MAIN" />

                <category android:name="android.intent.category.LAUNCHER" />
            </intent-filter>
        </activity>
        <service android:name=".MyService" />
    </application>

</manifest>
然后,新建 MyApplication 类,代码如下:
package com.bignerdranch.android.jetpacktest

import android.app.Application
import androidx.lifecycle.ProcessLifecycleOwner

class MyApplication:Application() {
    override fun onCreate() {
        super.onCreate()
        ProcessLifecycleOwner.get().lifecycle.addObserver(ApplicationObServer())
    }
}
其次,新建 ApplicationObserver 类,代码如下:
package com.bignerdranch.android.jetpacktest

import android.util.Log
import androidx.lifecycle.Lifecycle
import androidx.lifecycle.LifecycleObserver
import androidx.lifecycle.OnLifecycleEvent

class ApplicationObserver : LifecycleObserver {
    private val TAG = "ApplicationObserver"

    // 在 App 的整个生命周期只会调用一次
    @OnLifecycleEvent(Lifecycle.Event.ON_CREATE)
    fun onCreate() {
        Log.d(TAG, "Lifecycle.Event.ON_CREATE")
    }

    // 当 App 在前台时,会被调用
    @OnLifecycleEvent(Lifecycle.Event.ON_START)
    fun onStart() {
        Log.d(TAG, "Lifecycle.Event.ON_START")
    }

    // 当 App 在前台时,会被调用
    @OnLifecycleEvent(Lifecycle.Event.ON_RESUME)
    fun onResume() {
        Log.d(TAG, "Lifecycle.Event.ON_RESUME")
    }

    // 当 App 在后台时,会被调用
    @OnLifecycleEvent(Lifecycle.Event.ON_PAUSE)
    fun onPause() {
        Log.d(TAG, "Lifecycle.Event.ON_PAUSE")
    }

    // 当 App 在后台时,会被调用
    @OnLifecycleEvent(Lifecycle.Event.ON_STOP)
    fun onStop() {
        Log.d(TAG, "Lifecycle.Event.ON_STOP")
    }

    // 永远不会调用,因为系统不会分发调用 ON_DESTROY 事件
    @OnLifecycleEvent(Lifecycle.Event.ON_DESTROY)
    fun onDestroy() {
        Log.d(TAG, "Lifecycle.Event.ON_DESTROY")
    }
}
对 Applicaiton 的监听是指,无论只有一个 Activity 还是 有多个 Activity,都会监听。
运行后,打印了 ProcessLifeCycleOwner 的回调函数,日志如下:
// 启动后,打印如下日志:
2022-09-25 14:37:02.870 29613-29613/com.bignerdranch.android.jetpacktest D/ApplicationObserver: Lifecycle.Event.ON_CREATE
2022-09-25 14:37:02.996 29613-29613/com.bignerdranch.android.jetpacktest D/ApplicationObserver: Lifecycle.Event.ON_START
2022-09-25 14:37:03.001 29613-29613/com.bignerdranch.android.jetpacktest D/ApplicationObserver: Lifecycle.Event.ON_RESUME
// 按 Home 键后,打印如下日志:
2022-09-25 14:38:51.164 29613-29613/com.bignerdranch.android.jetpacktest D/ApplicationObserver: Lifecycle.Event.ON_PAUSE
2022-09-25 14:38:51.164 29613-29613/com.bignerdranch.android.jetpacktest D/ApplicationObserver: Lifecycle.Event.ON_STOP


 353
353


 被折叠的 条评论
为什么被折叠?
被折叠的 条评论
为什么被折叠?
 到【灌水乐园】发言


