


一、网络API
微信小程序处理的数据通常从后台服务器获取,再将处理过的结果保存到后台服务器这就要求微信小程序要有与后台进行交互的能力。微信原生API接口或第三方API提供了各类接口实现前后端交互。
网络API可以帮助开发者实现网络URL访问调用,文件的上传和下载、网络套接字的使用等功能处理。微信开发团队提供了10个网络API接口。
wx. request(Object)接口 用于发起HTTPS请求。
wx. uploadFile(Object)接口 用于将本地资源上传到后台服务器。
wx.downloadFile(Object)接口 用于下载文件资源到本地。
wx.connectSocket(Object)接口 用于创建一个WebSocket连接。
wx.sendSocketMessage(Object)接口 用于实现通过WebSocket连接发送数据。
wx.closeSocket(Object)接口 用于关闭WebSocket连接。
wx. onSocketOpen(CallBack)接口 用于监听 WebSocket连接打开事件。
wx. onSocketError(CallBack)接口 用于监听 WebSocket错误。
wx. onSocketMessage(CallBack)接口 用于实现监听WebSocket接收到服务器的消息事件。
wx. onSocketClose(CallBack)接口 用于实现监听WebSocket关闭。
在本节,我们将介绍常用的3个网络API。
1、发起网络请求
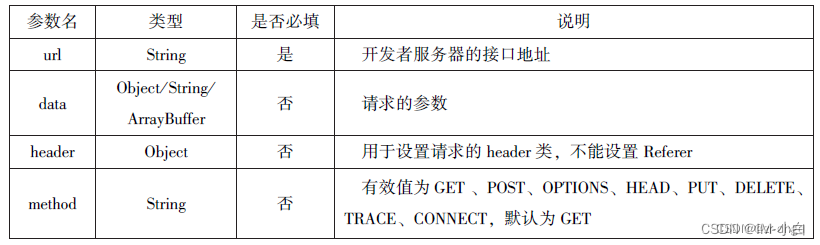
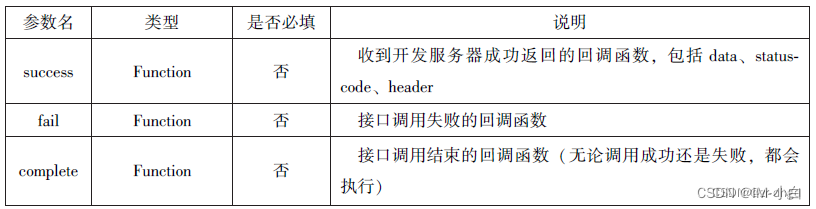
wx. request(Object) 实现向服务器发送请求、获取数据等各种网络交互操作,其相关参
数如表所示。一个微信小程序同时只能有5个网络请求连接,并且是HTIPS 请求。
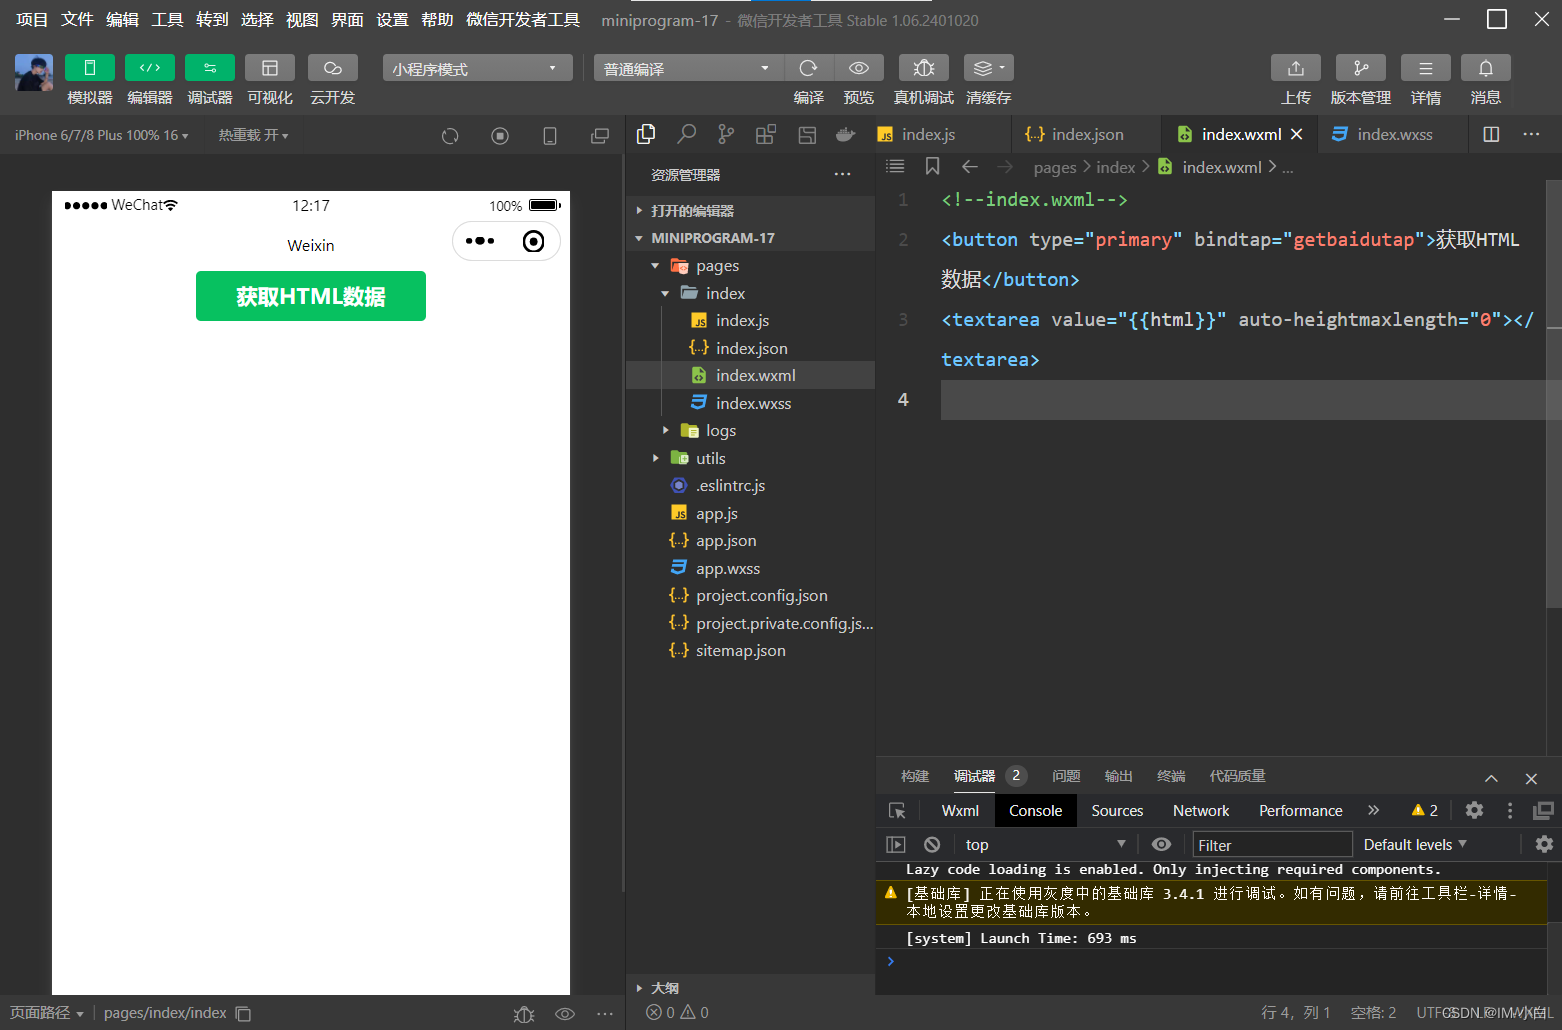
通过w. request(Objet) 获取百度(httpe:// www.baidu.com)首页的数据。(需要
在微信公众平台小程序服务器配置中的 request 合法城名中添加 “https:// www.baidu.com"。)
执行代码
wxml
<!--index.wxml-->
<button type="primary" bindtap="getbaidutap">获取HTML数据</button>
<textarea value="{{html}}" auto-heightmaxlength="0"></textarea>
js
// index.js
Page({
  data:{
    html:"",
  },
  getbaidutap:function(){
    var that=this;
    wx.request({
      url:'https://www.baidu.com',
      data:{},
      header:{'Content-Type':'application/json'},
      success:function(res){
        console.log(res);
        that.setData({
          html:res.data
        })
      }
    })
  }
})
效果图
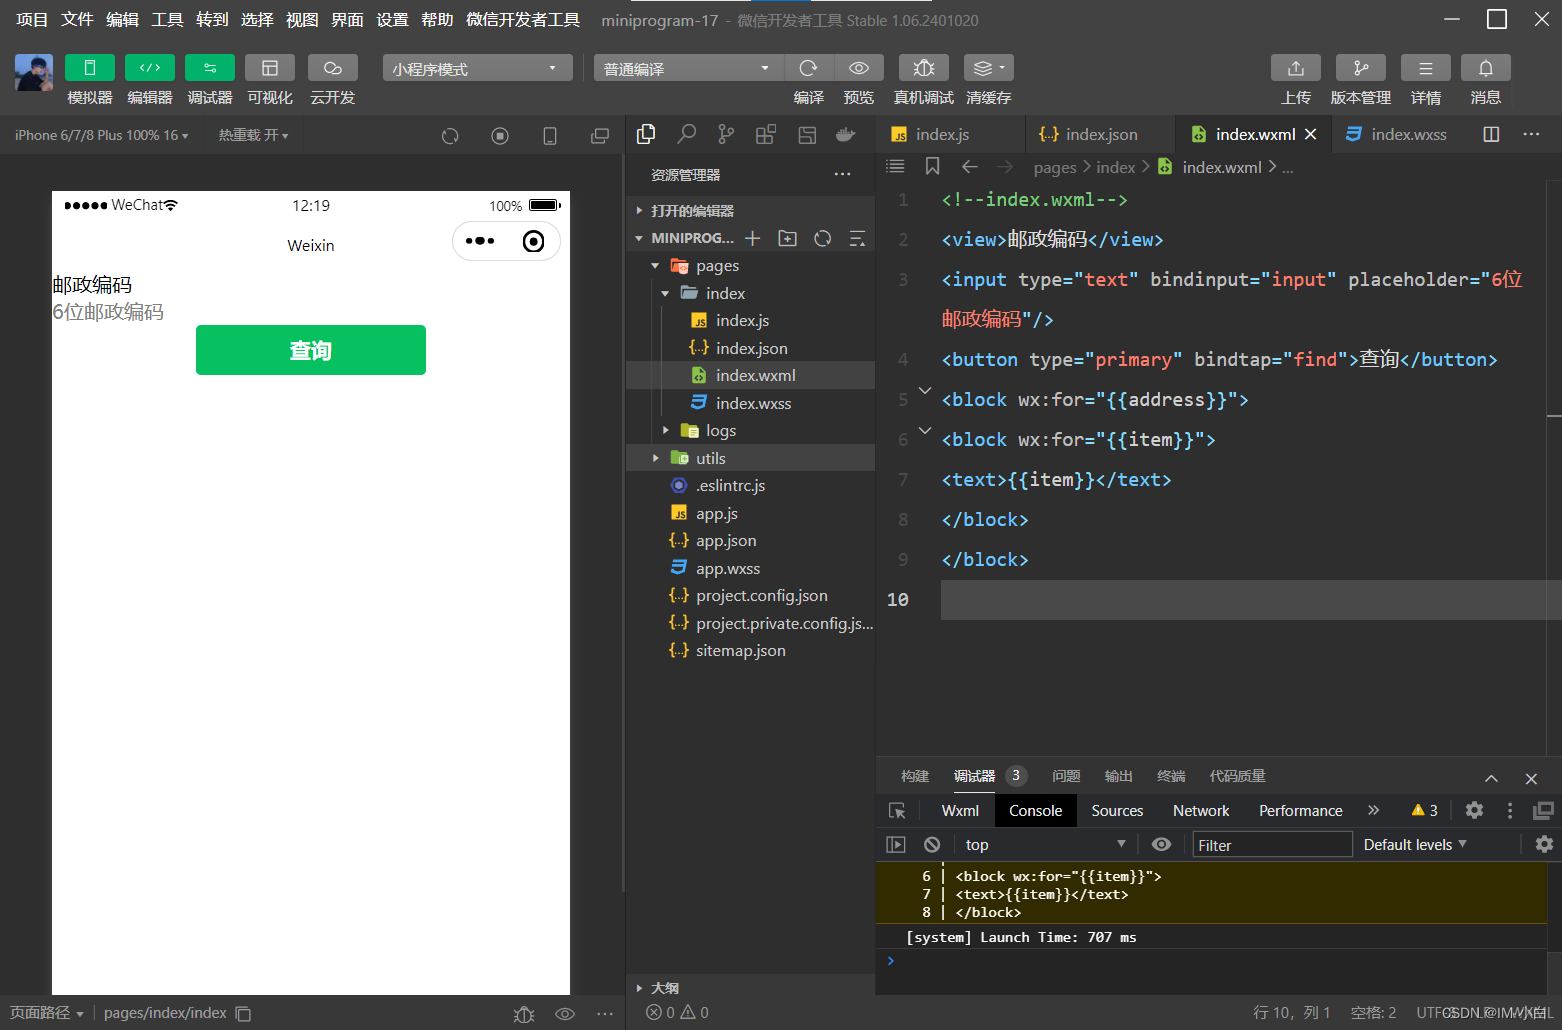
通过 wx.request(Object) 的 CET方法获取邮政编码对应的地址信息。
执行代码
wxml
<!--index.wxml-->
<view>邮政编码</view>
<input type="text" bindinput="input" placeholder="6位邮政编码"/>
<button type="primary" bindtap="find">查询</button>
<block wx:for="{{address}}">
<block wx:for="{{item}}">
<text>{{item}}</text>
</block>
</block>
js
// index.js
Page({
  data: {
    postcode:"",
    appress:[],
    errMsg:"",
    error_code:-1
  },
  input:function(e){
    this.setData({
      postcode:e.detail.value,
    })
    console.log(e.detail.value)
  },
  find:function(){
    var postcode=this.data.postcode;
    if(postcode!=null&&postcode!=""){
      var self=this;
      wx.showToast({
        title: '正在查询,请稍后....',
        icon:'loading',
        duration:10000
      });
      wx.request({
        url: 'https://v.juhe.cn/postcode/query',
        data:{
          'postcode':postcode,
          'key':'0ff9bfccdf147476e067de994eb5496e'
        },
        header:{
          'Content-Type':'application/json'
        },
        method:'GET',
        success:function(res){
          wx.hideToast();
          if(res.data.error_code==0){
            console.log(res);
            self.setData({
              errMsg:"",
              error_code:res.data.error_code,
              address:res.data.result.list
            })
          }
          else{
            self.setData({
              errMsg:res.data.reason||res.data.reason,
              error_code:res.data.error_code
            })
          }
        }
      })
    }
  }
})
效果图
通过 ww.request(Object) 的POST 方法获取邮政编码对应的地址信息。
执行代码
wxml
<!--index.wxml-->
<view>邮政编码</view>
<input type="text" bindinput="input" placeholder="6位邮政编码"/>
<button type="primary" bindtap="find">查询</button>
<block wx:for="{{address}}">
<block wx:for="{{item}}">
<text>{{item}}</text>
</block>
</block>
js
// index.js
Page({
  data: {
    postcode:"",
    appress:[],
    errMsg:"",
    error_code:-1
  },
  input:function(e){
    this.setData({
      postcode:e.detail.value,
    })
    console.log(e.detail.value)
  },
  find:function(){
    var postcode=this.data.postcode;
    if(postcode!=null&&postcode!=""){
      var self=this;
      wx.showToast({
        title: '正在查询,请稍后....',
        icon:'loading',
        duration:10000
      });
      wx.request({
        url: 'https://v.juhe.cn/postcode/query',
        data:{
          'postcode':postcode,
          'key':'0ff9bfccdf147476e067de994eb5496e'
        },
        header:{
          'content-type':'application/x-www-form-urlencoded'
        },
        method:'POST',
        success:function(res){
          wx.hideToast();
          if(res.data.error_code==0){
            console.log(res);
            self.setData({
              errMsg:"",
              error_code:res.data.error_code,
              address:res.data.result.list
            })
          }
          else{
            self.setData({
              errMsg:res.data.reason||res.data.reason,
              error_code:res.data.error_code
            })
          }
        }
      })
    }
  }
})
效果图
2、上传文件
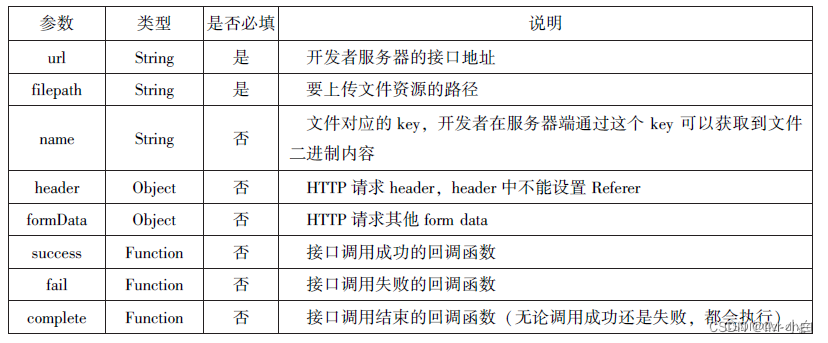
wx.wploadFile(Objecl)接口用于将本地资源上传到开发者服务器,并在客户端发起一个HTTPS POST 请求、其相关参数如表所示。
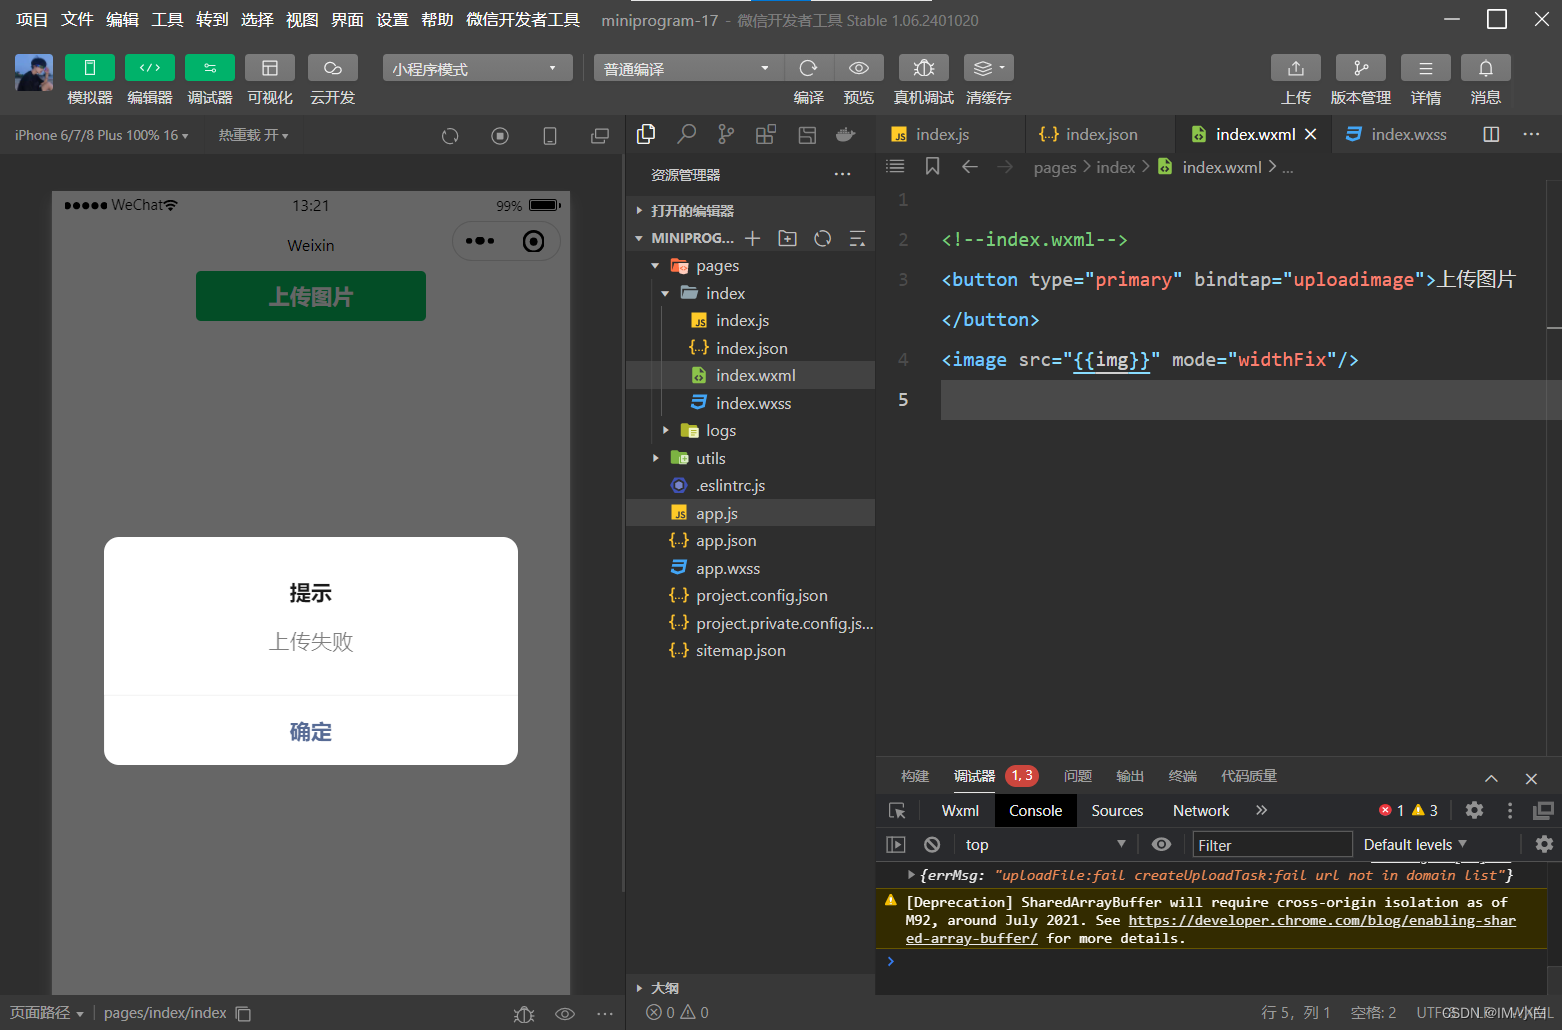
通过 wx. uploadFile(Object),可以将图片上传到服务器并显示。
执行代码
wxml
<!--index.wxml-->
<button type="primary" bindtap="uploadimage">上传图片</button>
<image src="{{img}}" mode="widthFix"/>
js
// index.js
Page({
  data: {
   img:null,
  },
  uploadimage:function(){
    var that=this;
  wx.chooseImage({
    success:function(res){
      var tempFilePaths=res.tempFilePaths
      upload(that,tempFilePaths);
    }
  })
  function upload(page,path){
    wx.showToast({
      icon:"loading",
      title:"正在上传"
    }),
    wx.uploadFile({
      url:"http://localhost/",
      filePath: path[0],
      name: 'file',
      success:function(res){
        console.log(res);
        if(res.statusCode!=200){
          wx.showModal({
            title: '提示',
            content: '上传失败',
            showCancel:false
          })
          return;
        }
        var data=res.data
        page.setData({
          ing:path[0]
        })
      },
      fail:function(e){
        console.log(e);
        wx.showModal({
          title: '提示',
          content: '上传失败',
          showCancel:false
        })
      },
      complete:function(){
        wx.hideToast();
      }
    })
  }
}
})
效果图
3、下载文件
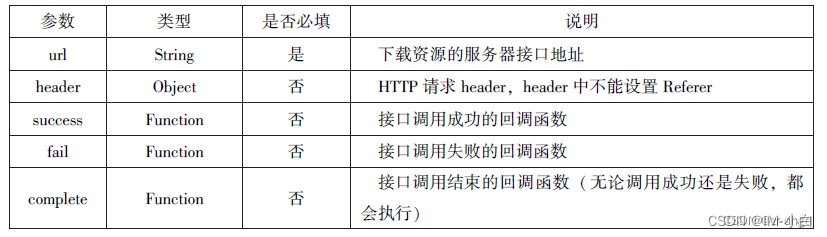
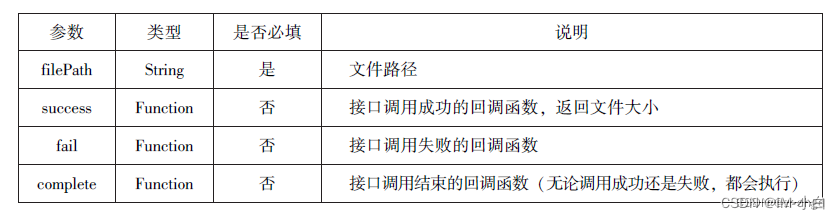
wx.downloadFile(Objcel)接口用于实现从开发者服务器下载文件资源到本地,在客户端
直接发起一个 HITIP GEr请求,返回文件的本地临时路径。其相关参数如表所示。
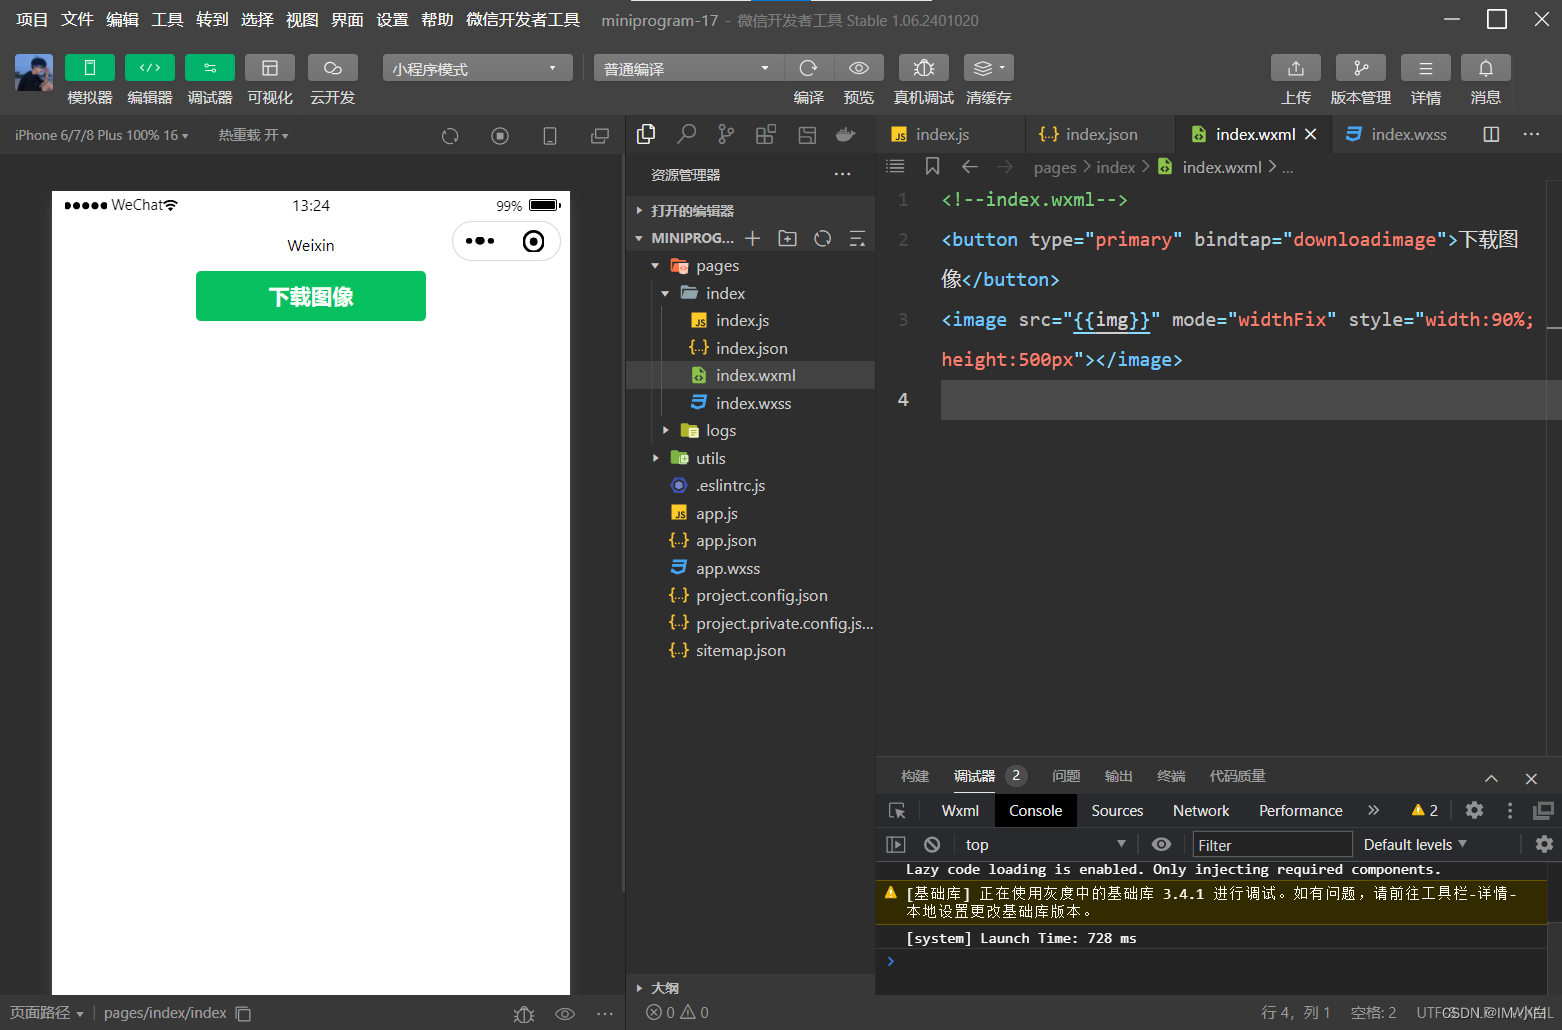
通过wx.downloadFile(Object)实现从服务器中下载图片,后台服务采用WAMP软件在本机搭建。
执行代码
wxml
<!--index.wxml-->
<button type="primary" bindtap="downloadimage">下载图像</button>
<image src="{{img}}" mode="widthFix" style="width:90%;height:500px"></image>
js
// index.js
Page({
  data: {
    img:null
  },
  downloadimage:function(){
    var that=this;
    wx.downloadFile({
      url: "http://localhost//1.jpg",
      success:function(res){
        console.log(res)
        that.setData({
          img:res.tempFilePath
        })
      }
    })
  }
})
效果图
二、多媒体API
多媒体API主要包括图片 API、录音API、音频播放控制API、音乐播放控制API等,其目的是丰富小程序的页面功能
1、图片API
图片API实现对相机拍照图片或本地相册图片进行处理,主要包括以下4个API接口: wx.chooseImage(Object)接口用于从本地相册选择图片或使用相机拍照。
wx. previewImage(Object)接口 用于预览图片。
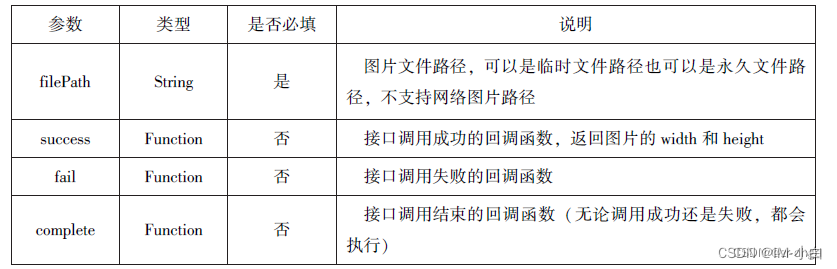
wx. getImageInfo(Object)接口 用于获取图片信息。
wx. saveImageToPhotosAlbum(Object)接口 用于保存图片到系统相册。
1.选择图片或拍照
wx.chooseImage(Object)接口用于从本地相册选择图片或使用相机拍照。拍照时产生的临时路径在小程序本次启动期间可以正常使用,若要持久保存,则需要调用wx.saveFile 保存图片到本地。其相关参数如表所示。


若调用成功,则返回 tempFilePaths和tempFiles,tempFilePaths表示图片在本地临时文件
路径列表。tempFiles表示图片的本地文件列表,包括path和size。
执行代码
wx.chooseImage({
  count:2,
  sizerype:['original','compressed'],
  sourceType:['album','camera'],
  success:function(res){
  var tempFilePaths =res.tempFilePaths
  var tempFiles=res.tempFiles;
  console.log(tempFilePaths)
  console.log(tempFiles)
  }
})
2.预览图片
wx.previewImage(Object)接口主要用于预览图片,其相关参数如表所示。
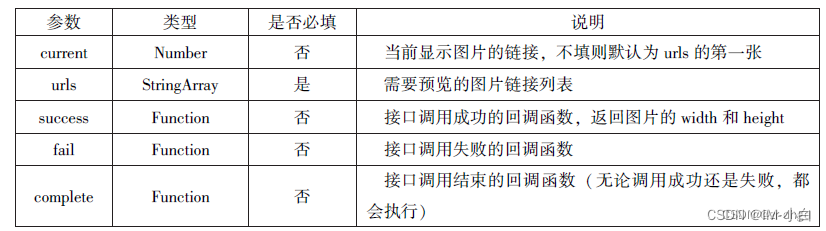
执行代码
wx.previewImage({
  current:"http://bmob-cdn-16488.b0.upaiyun.com/2018/02/05/2.png",
  urls: ["http://bmob-cdn-16488.b0.upaiyun,com/2018/02/05/1.png",
  "http://bmob-cdn-16488.b0.upaiyun.com/2018/02/05/2.png",
  "http://bmob-cdn-16488.b0.upaiyun.com/2018/02/05/3.jpg"]
})
4.保存图片到系统相册
wx.saveImageToPhotosAlbum(Object)接口用于保存图片到系统相册,需要得到用户授权
scope.writePhotosAlbum。其相关参数如表所示。
执行代码
wx.chooseImage({
  success:function(res){
  wx.saveImageToPhotosAlbum({
    filePath:res.tempFilePaths[0],
  success:function(e){
  console.log(e)
  }
})
  },
})
2、录音API
录音 API提供了语音录制的功能 主要包括以下两个API接口:
wx.startRecord(Object)接口 用于实现开始录音。
wx. stopRecord(Object)接口 用于实现主动调用停止录音。
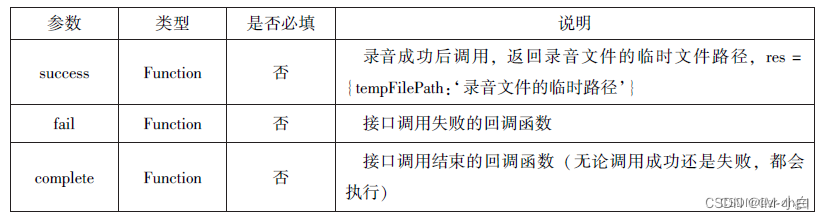
1.开始录音
wx.startRecord(Obiect)接口用于实现开始录音。当主动调用 wx.stopRecord(Object)接口或者录音超过1分钟时,系统自动结束录音,并返回录音文件的临时文件路径。若要持久保存,则需要调用wx.saveFile()接口。其相关参数如表6-8所示。
2.停止录音
wx. stopRecord(Object)接口用于实现主动调用停止录音。
执行代码
wx.startRecord({
success:function(res){
var tempFilePath =res.tempFilePath
},
fail:function(res){}
})
setTimeout(function(){
wx.stopRecord()
},10000)
3、音频播放控制API
音频播放控制 API主要用于对语音媒体文件的控制,包括播放、暂停、停止及audio组件的控制,主要包括以下3个API:
wx.playVoice(Object)接口 用于实现开始播放语音。
wx. pauseVoice(Object)接口 用于实现暂停正在播放的语音。
wx. stopVoice(Object)接口 用于结束播放语音。
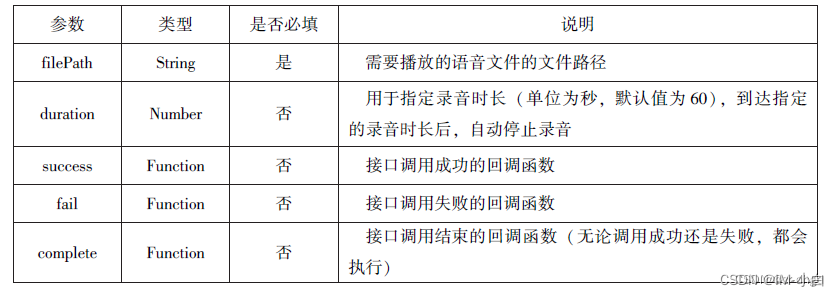
1.播放语音
wx.playVoice(Object)接口用于开始播放语音,同时只允许一个语音文件播放,如果前一个语音文件还未播放完,则中断前一个语音文件的播放。其相关参数如表所示。
执行代码
wx.startReCord({
  success:function(res){
    var tempFilePath =res.tempFilePath
    wx.playVoice({
      filePath:temprilePath,
      complete:function(){}
    })
  }
})
2.暂停播放
wx.pauseVoice(Object)用于暂停正在播放的语音。再次调用wx.playVoice(Object)播放同一个文件时,会从暂停处开始播放。如果想从头开始播放,则需要先调用wx.stopVoice(Object)。
执行代码
wx.startRecord({
  suCcess:function(res){
    var tempFilePath=res.tempFilePath
    wx.playVoice({
      filePath:tempFilePath
    })
      setTimeout(function(){
        wx.pauseVoice()
      },5000)
    }
  })
3.结束播放
wx. stopVoice(Object)用于结束播放语音
执行代码
wx.startRecord({
  success:function(res){
  var tempFilePath=res.tempFilePath
  wx.playVoice({
  filePath:tempFilePath
  })
  setTimeout(function(){
    wx.stopVoice()
  },5000)
}
})
4、音乐播放控制API
音乐播放控制API主要用于实现对背景音乐的控制,音乐文件只能是网络流媒体,不能是本地音乐文件。音乐播放控制API主要包括以下8个API:
wx. playBackgroundAudio(Object)接口 用于播放音乐。
wx.getBackgroundAudioPlayerState(Object)接口 用于获取音乐播放状态。wx. seekBackgroundAudio(Object)接口 用于定位音乐播放进度。
wx.pauseBackgroundAudio()接口 用于实现暂停播放音乐。
wx.stopBackgroundAudio()接口 用于实现停止播放音乐。
wx.onBackgroundAudioPlay(CallBack)接口 用于实现监听音乐播放。
wx.onBackgroundAudioPause(CallBack)接口 用于实现监听音乐暂停
wx.onBackgroundAudioStop(CallBack)接口用于实现监听音乐停止
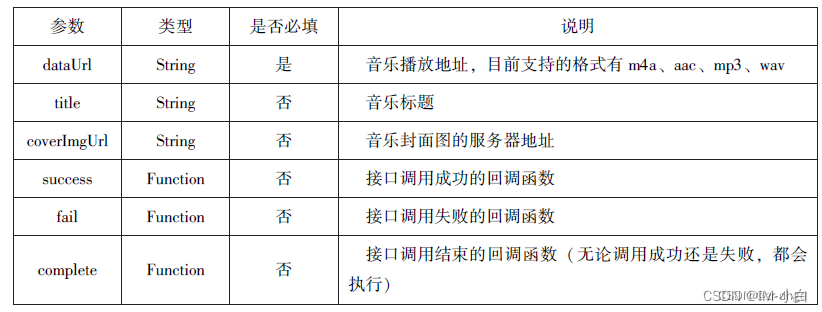
1.播放音乐
wx.playBackgroundAudio(Object)用于播放音乐,同一时间只能有一首音乐处于播放状态,其相关参数如表所示
2.获取音乐播放状态
wx.getBackgroundAudioPlayerState(Object)接口用于获取音乐播放状态,其相关参数如
表所示。

接口调用成功后返回的参数如表所示。

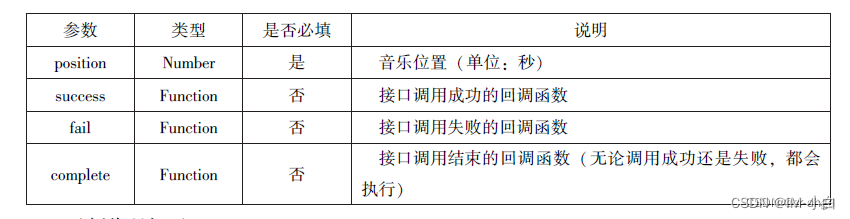
3.控制音乐播放进度
wx.seekBackgroundAudio(Object)接口用于控制音乐播放进度,其相关参数如表所示。
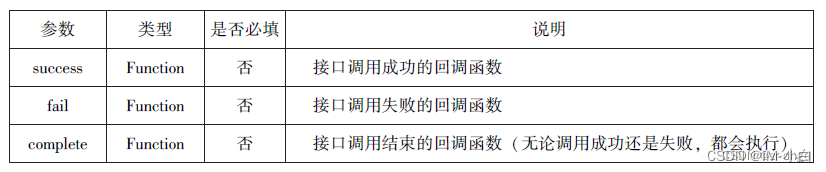
4.暂停播放音乐
wx. pauseBackgroundAudio() 接口用于暂停播放音乐。
5.停止播放音乐
wx. stopBackgroundAudio() 接口用于停止播放音乐
6.监听音乐播放
wx.onBackgroundAudioPlay(CallBack)接口用于实现监听音乐播放,通常被wx.playBack-
groundAudio(Object)方法触发,在CallBack中可改变播放图标。
7.监听音乐暂停
wx.onBackgroundAudioPause(CallBack)接口用于实现监听音乐暂停,通常被wx.pause.
BackgroundAudio()方法触发。在CallBack中可以改变播放图标。
8.监听音乐停止
wx.onBackgroundAudioStop(CallBack)接口用于实现监听音乐停止,通常被音乐自然播放停止或wx.seekBackgroundAudio(Object)方法导致播放位置等于音乐总时长时触发。在CallBack中可以改变播放图标。
三、文件API
从网络上下载或录音的文件都是临时保存的,若要持久保存,需要用到文件API。文件API提供了打开、保存、删除等操作本地文件的能力,主要包括以下5个API接口:
wx.saveFile(Object)接口 用于保存文件到本地。
wx.getSavedFileList(Object)接口 用于获取本地已保存的文件列表。
wx.getSaveFileInfo(Object)、接口用于获取本地文件的文件信息。
wx. removeSaveFile(Object)接口 用于删除本地存储的文件。
wx.openDocument(Object)接口 用于新开页面打开文档,支持格式:doc、xls、ppt、pdf、docx、xlsx、ppts。
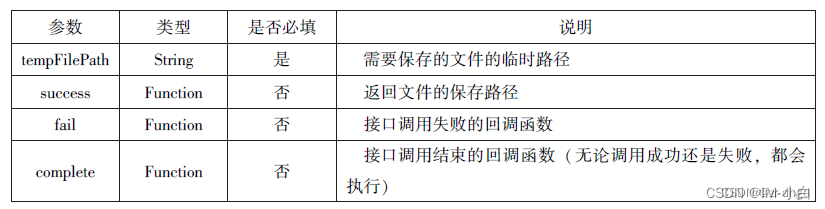
1.保存文件
wx.saveFile(Object)用于保存文件到本地,其相关参数如表所示
执行代码
seveImg:function(){
  wx.chooseImage({
    count:1,
    sizeType:['original','compressed'],
    sourceType:['album','camera'],
    success:function(res){
      var tempFilePaths =res.temprilePaths[0]
      wx.saveFile({
        tempFilePath:tempFilePaths,
        success:function(res){
          var saveFilePath =res.savedFilePath;console.log(saveFilePath)
        }
      })
    }
  })
}
2.获取本地文件列表
wx.getSavedFileList(Object)接口用于获取本地已保存的文件列表,如果调用成功,则
返回文件的本地路径、文件大小和文件保存时的时间戳(从1970/01/0108:00:00到当前
时间的秒数)文件列表。其相关参数如表所示
执行代码
wx.getSavedFileList({
  success:function(res){
    that.setData({
      fileList:res.fileList
    })
  }
})
3.获取本地文件的文件信息
wx.getSaveFileInfo(Object)接口用于获取本地文件的文件信息,此接口只能用于获取已保存到本地的文件,若需要获取临时文件信息,则使用wx.getFileInfo(Object)接口。其相关参数如表所示。
执行代码
wx.chooseImage({
  count:1,
  sizeType:['original','compressed'],
  sourcerype:['album','camera'],
  success:function(res){
    var tempFilePaths =res.tempFilePaths[0]
    wx.saveFile({
     tempFilePath:tempFilePaths,
     success:function(res){
    var saveFilePath =res.savedFilePath;
    wx.getSavedFileInfo({
     filePath:saveFilePath,
     success:function(res){
    console.log(res.size)
   }
   })
   }
   })
  }
})
4.删除本地文件
wx.removeSaveFile(Object)接口用于删除本地存储的文件,其相关参数如表所示。

执行代码
wx.getSavedFileList({
  success:function(res){
    if(res.fileList.length >0){
      wx.removeSavedFile({
        filePath:res.fileList[0].filePath,complete:function(res){
          console.log(res)
        }
      })
    }
  }
})
5.打开文档
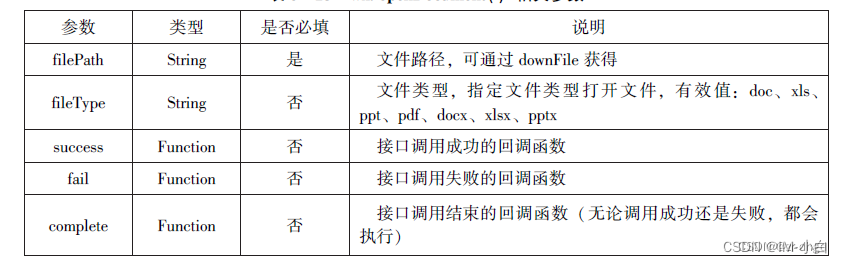
wx.openDocument(Object)接口用于新开页面打开文档,支持格式有doe、xls、ppt、pdf、
docx、xlsx、pptx,其相关参数如表所示
执行代码
wx.downloadFile({
  url:"http://localhost/fm2.pdf",
  success:function(res){
    var tempFilePath=res.tempFilePath;
    wx.openDocument({
      filePath,tempFilePath,
      success:function(res){
        console.log("打开成功")
      }
    })
  }
})
四、本地数据及缓存API
小程序提供了以键值对的形式进行本地数据缓存功能,并且是永久存储的,但最大不超过10MB,其目的是提高加载速度。数据缓存的接口主要有4个;
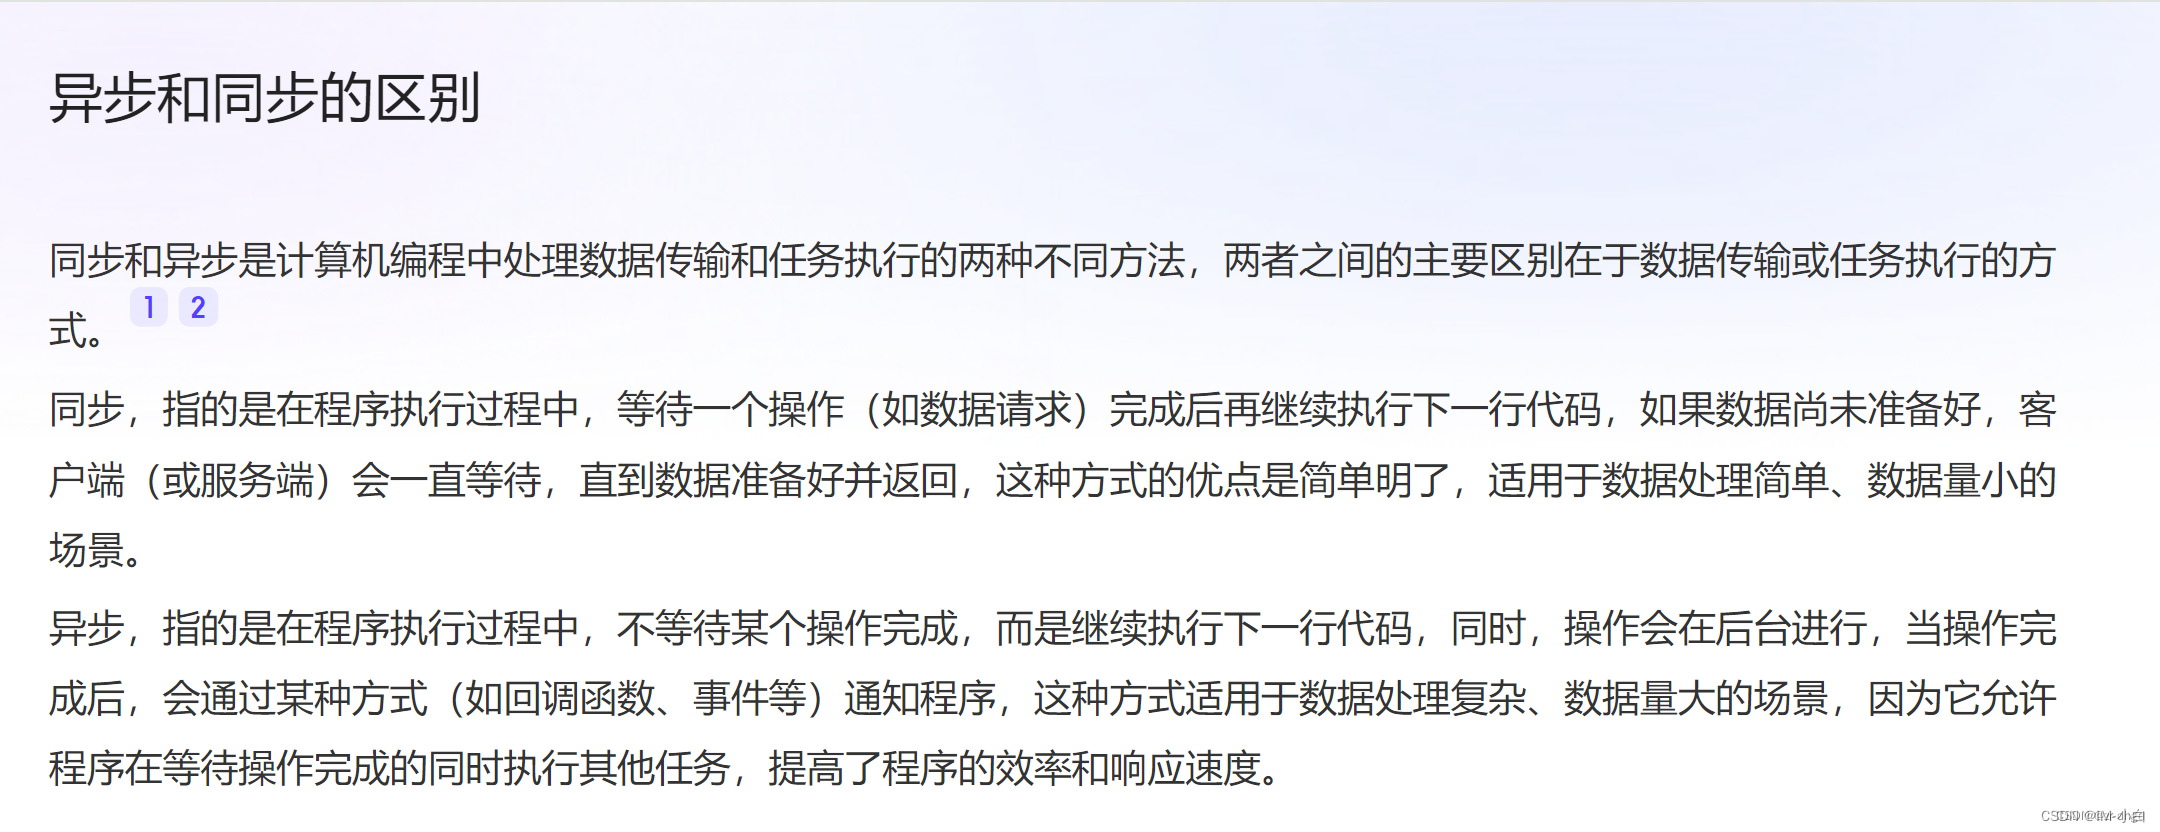
wx.setStorage(Object)或wx.setStorageSync(key,data)接口用于设置缓存数据。wx.getStorage(Object)或wx.getStorageSync(key)接口用于获取缓存数据。wx.removeStorage(Object)或wx.removeStorageSync(key)接口用于删除指定缓存数据。wx.clearStorage()或wx.clearStorageSync()接口用于清除缓存数据。其中,带Sync后缀的为同步接口,不带Sync后缀的为异步接口。
1、保存数据
1.wx.setStorage
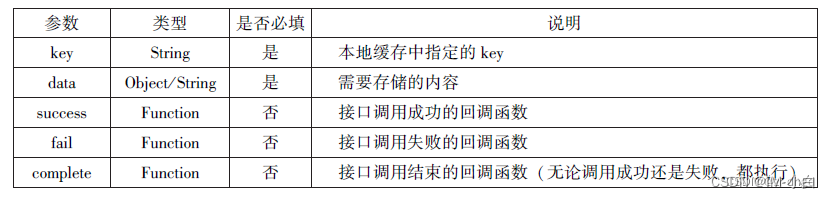
wx.setStorage(Object)接口将数据存储到本地缓存接口指定的key中,接口执行后会覆盖原来 key对应的内容
执行代码
wx.setStorage({
  kay:'name',
  data:'sdy',
  success:function(res){
    console.log(res)
  }
})
2.wx.setStorageSync(key,datd)
wx. setStorageSync(key, data)是同步接口,其参数只有 key 和 dala
执行代码
wx. setStorageSync('age','25')2、获取数据
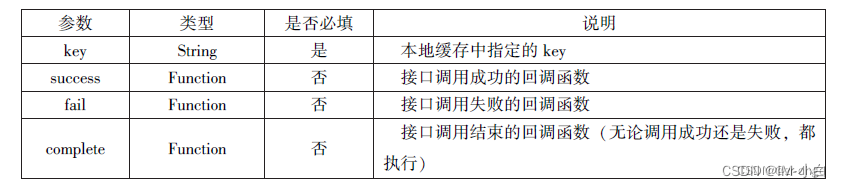
1.wx.getStorage(Object)
wx.getStorage(Object)接口是从本地缓存中异步获取指定key对应的内容。其相关参数如表所示
执行代码
wx.getStorage({
  key:'name',
  success:function(res){
    console.log(res.data)
  },
})
2.wx. getStorageSync(key)
wx. getStorageSync(key)从本地缓存中同步获取指定key对应的内容。其参数只有key
try{
  var value=getStorageSync('age')
  if(value){
    console.log("获取成功"+value)
  }
}catch(e){
  console.log("获取失败")
}
3、删除数据
1.wx. removeStorage(Object)
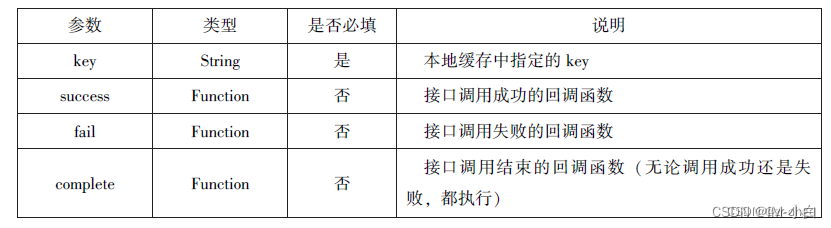
wx.removeStorage(Object)接口用于从本地缓存中异步移除指定key。其相关参数如表所示
wx.removeStorage({
  key:'name',
  success:function(res){
    console.log("删除成功")
  },
  fail:function(){
    console.log("删除失败")
  }
})
2.wx.removeStorageSync(key)
wx.removeStorageSync(key)接口用于从本地缓存中同步删除指定key对应的内容。其参数只有key
执行代码
try{
  wx.removeStorageSync('name')
}catch(e){
  //Do something when catch error
}
4、清空数据
1.wx.clearStorage()
wx.clearStorage()接口用于异步清理本地数据缓存,没有参数
执行代码
wx.getStorage({
  key:'name',
  success:function(res){
    wx.clearStorage()
  },
})
2.wx.clearStroageSync()
wx.clearStroageSyne()接口用于同步清理本地数据缓存
执行代码
try{
  wx.clearStroageSyne()
}catch(e){
}
五、位置信息API
小程序可以通过位置信息API来获取或显示本地位置信息,小程序支持WGS84和GCi02标准,WGS84标准为地球坐标系,是国际上通用的坐标系;GCj02标准是中国国家测绘局制定的地理信息系统的坐标系统,是由WGS84坐标系经加密后的坐标系,又称为火星坐标系。默认为WGS84标准,若要查看位置需要使用GCj02标准。主要包括以下3个API接口:
wx.getLocation(Object)接口用于获取位置信息。
wx.chooseLocation(Object)接口用于选择位置信息。
wx.openLocation(Object)接口用于通过地图显示位置
1、获取位置信息
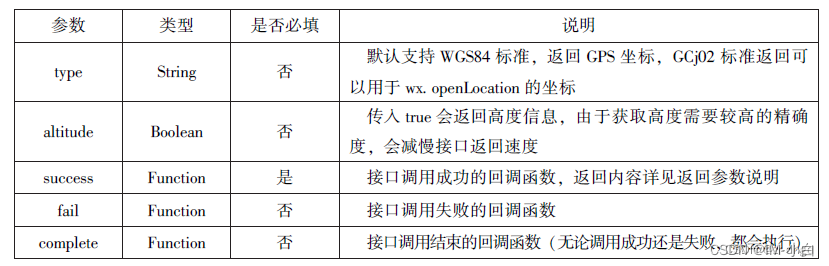
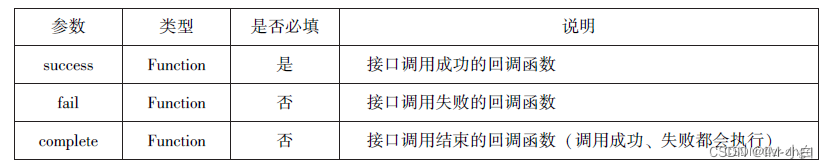
wx.getLocation(Object)接口用于获取当前用户的地理位置、速度,需要用户开启定位功能,当用户离开小程序后,无法获取当前的地理位置及速度,当用户点击“显示在聊天顶部”时,可以获取到定位信息,其相关参数如表所示
wx.getLocation(Object)调用成功后,返回的参数如表所示

执行代码
wx.getLocation({
    type:'wg84',
    success:function(res){
      console.log("经度"+res.longitude);
      console.log("纬度"+res.longitude);
      console.log("速度"+res.longitude);
      console.log("位置的精确度"+res.accuracy);
      console.log("水平精确度"+res.horizontalAccuracy);
      console.log("垂直精确度"+res.verticalAccuracy);
    },
})
2、选择位置信息
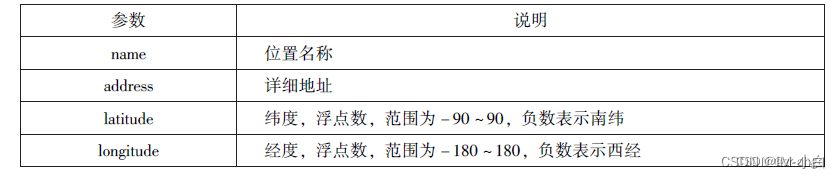
wx.chooseLocation(Object)接口用于在打开的地图中选择位置,用户选择位置后可返回当前位置的名称、地址、经纬度信息

wx.chooseLocation(Object)调用成功后,返回的参数如表所示
 执行代码
执行代码
wx.chooseLocation({
    success:function(res){
      console.log("位置的名称"+res.name)
      console.log("位置的地址"+res.address)
      console.log("位置的经度"+res.longitude)
      console.log("位置的纬度"+res.latitude)
    }
})
3、显示位置信息
wx.openLocation(Object)接口用于在微信内置地图中显示位置信息,其相关参数如表所示
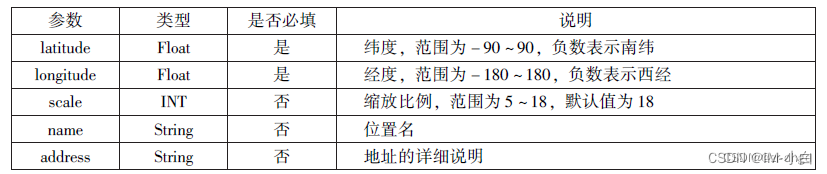

执行代码
wx.getLocation({
  type:"gcj02",
    success:function(res){
      var latitude=res.latitude
      var longitude=res.longitude
      wx.openLocation({
        latitude:latitude,
        longitude:longitude,
        scale:10,
        name:'智慧国际酒店',
        address:'西安市长安区西长安区300号'
      })
    }
})
六、设备相关API
设备相关的接口用于获取设备相关信息,主要包括系统信息、网络状态、拨打电话及扫码等。主要包括以下5个接口API:
wx.getSystemInfo(Object)接口、wx.getSystemInfoSync()接口 用于获取系统信息。
wx. getNetworkType(Object)接口 用于获取网络类型。
wx.onNetworkStatusChange(CallBack)接口 用于监测网络状态改变。
wx.makePhoneCall(Object)接口 用于拨打电话。
wx. scanCode(Object)接口 用于扫描二维码。
1、获取系统信息
wx.getSystemInfo(Object)接口,wx.getSystemInfoSync()接口分别用于异步和同步获取系统信息。其相关参数如表所示。
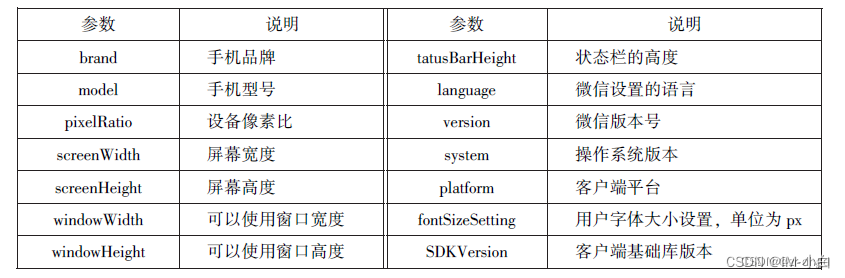
wx.getSystemInfo()接口或wx.getSystemInfoSync()接口调用成功后,返回系统相关信息,如表所示
 执行代码
执行代码
wx.getSystemInfo({
  success:function(res){
    console.log("手机型号:"+rees.model)
    console.log("设备像素比:"+res.pixelRatio)
    console.log("窗口的宽度:"+res.windowWidth)
    console.log("窗口的高度:"+res.windowHeight)
    console.log("微信的版本号:"+res.varsion)
    console.log("操作系统版本:"+res.system)
    console.log("客户端平台:"+res.pixelRatio)
  }
})
2、网络状态
1.获取网络状态
wx.getNetworkType(Object)用于获取网络类型,其相关参数如表所示

如果wx.getNetworkType()接口被成功调用,则返回网络类型包,有wifi、2G、3G、4G、unknown(Android下不常见的网络类型)、none(无网络)
wx.getNetworkType({
  success:function(res){
    console.log(res.networkType)
  },
})
2.监听网络状态变化
wx.onNetworkStatusChange(CallBack)接口用于监听网络状态变化,当网络状态变化时,返回当前网络状态类型及是否有网络连接。
执行代码
wx.onNetworkStatusChange(function(res){
  console.log("网络是否连接"+res.isConnected)
  console.log("变化后的网络类型"+res.networkType)
})
3、拨打电话
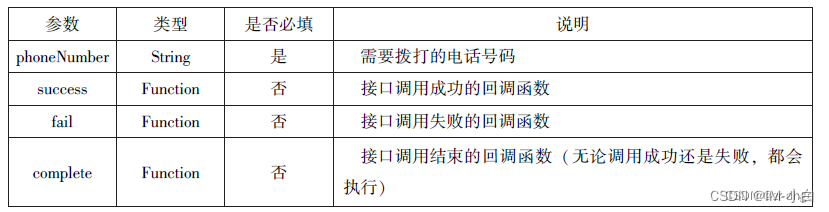
wx.makePhoneCall(Object)接口用于实现调用手机拨打电话,其相关参数如表所示
执行代码
wx.makePhoneCall({
  phoneNumber:'18092588093'
})
4、扫描二维码
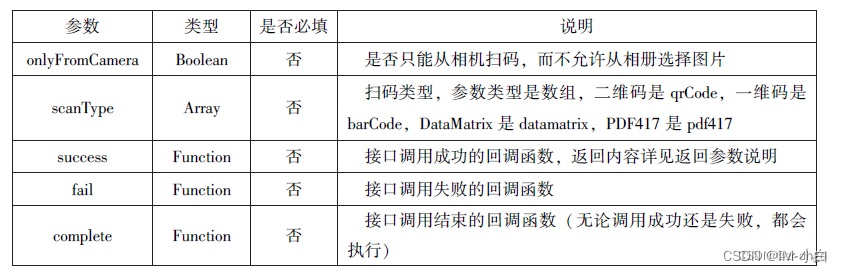
wx.scanCode(Object)接口用于调起客户端扫码界面,扫码成功后返回相应的内容,其相
关参数如表所示
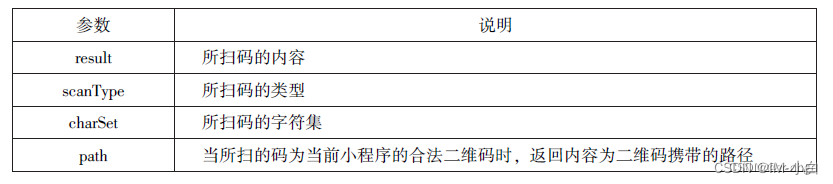
扫码成功后,返回的数据如表所示
 执行代码
执行代码
wx.scanCode({
  success:(res)=>{
    console.log(res.result)
    console.log(res.scanType)
    console.log(res.charSet)
    console.log(res.path)
  }
})
wx.scanCode({
  onlyFromCamera:true,
  success:(res)=>{
    console.log(res)
  }
})


 143
143


 被折叠的 条评论
为什么被折叠?
被折叠的 条评论
为什么被折叠?
 到【灌水乐园】发言


