


一、树莓派系统远程连接、安装工具
1.连接树莓派5的两种方式:
1.1远程连接
通过raspberry imager 安装镜像(通过自定义系统配置wifi 开启ssh),上电就能连上wifi了。这时还无法vnc连接,通过windows终端开启vnc。
ssh pi@pi0.local   #(pi0为自己树莓派的主机名)
sudo raspi-config  #进入配置界面 在interface中开启vnc
1.2网线连接
此方法无需wifi配置,但需要开启ssh(secure shell).开启后方法如上,但目前只能在windows终端控制树莓派。方便windows和rasp系统之间的代码粘贴,但存在链接一段时间后自动断开问题,本人尚未解决。
1.3电脑终端连接树莓派如果报错:
Add correct host key in C:\\Users\\ASUS/.ssh/known_hosts to get rid of this message.
Offending ECDSA key in C:\\Users\\ASUS/.ssh/known_hosts:3
Host key for pi0.local has changed and you have requested strict checking.
Host key verification failed.
这是你第二次刷系统,指纹不匹配。
ssh-Keygen -R pi0.local #pi0为你的主机名,重置指纹2.安装软件
sudo apt-get update
sudo apt-get install util-linux procps hostapd iproute2 iw haveged dnsmasq
sudo apt-get install network-manager
安装失败的,配置镜像源。参考
debian | 镜像站使用帮助 | 清华大学开源软件镜像站 | Tsinghua Open Source Mirror
查看dns状态,一般是active
systemctl status dnsmasq.service
安装create_ap
sudo git clone https://github.com/oblique/create_ap
cd create_ap
sudo make install
下载失败的 在windows下好了通过bitvise ssh传输过来。
二、配置热点详细过程
无显示屏操作。
1.查看配置
sudo nano /etc/create_ap.conf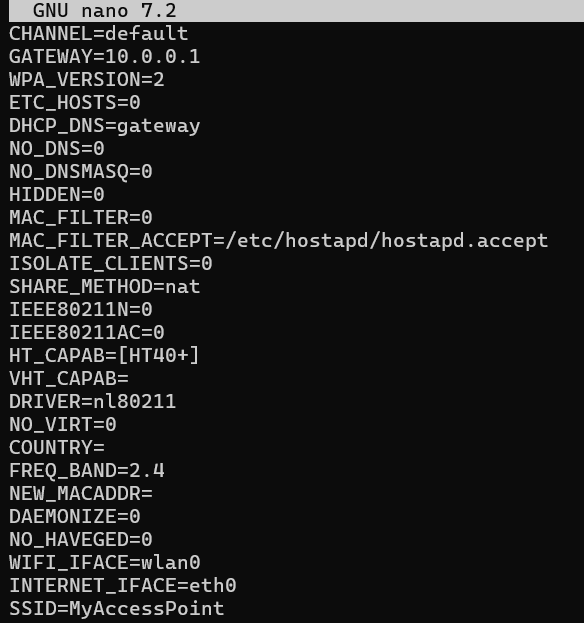
ssid如上,默认密码12345678(安装了create_ap就会有这个配置)
网关10.0.0.1(后面开启热点后,就通过此地址远程连接)
2.配置热点脚本
通过远程无屏幕的话,需要通过脚本一次性实现关闭wifi和开启热点过程,否则后面只能通过网线连接了(显示屏更不用说)。
重要!!!
创建脚本。
sudo nano start_hotspot.sh #!/bin/bash
sudo ifconfig wlan0 down # close wifi
sudo systemctl enable create_ap.service #make raspi as AP
sudo systemctl start create_ap.service
sudo systemctl enable hostapd #hostapd
sudo systemctl start hostapd
#sudo systemctl enable NetworkManager #usually in open,wouldn't conflict with wifi
#sudo systemctl start NetworkManager
sudo systemctl enable dnsmasq.service
sudo systemctl start dnsmasq.service
sudo create_ap wlan0 eth0 start_hotspot 12345678
sudo reboot给脚本添加权限:
chmod +x ~/start_hotspot.sh执行脚本
sudo ./start_hotspot.sh 现在就可以连热点。
P1:/usr/bin/create_ap: line 1760: iptables: command not found
这个问题安装工具就行。
sudo apt install iptables -yP2如果执行脚本报错
没事,还是会开启热点,等一会就好。如下图:
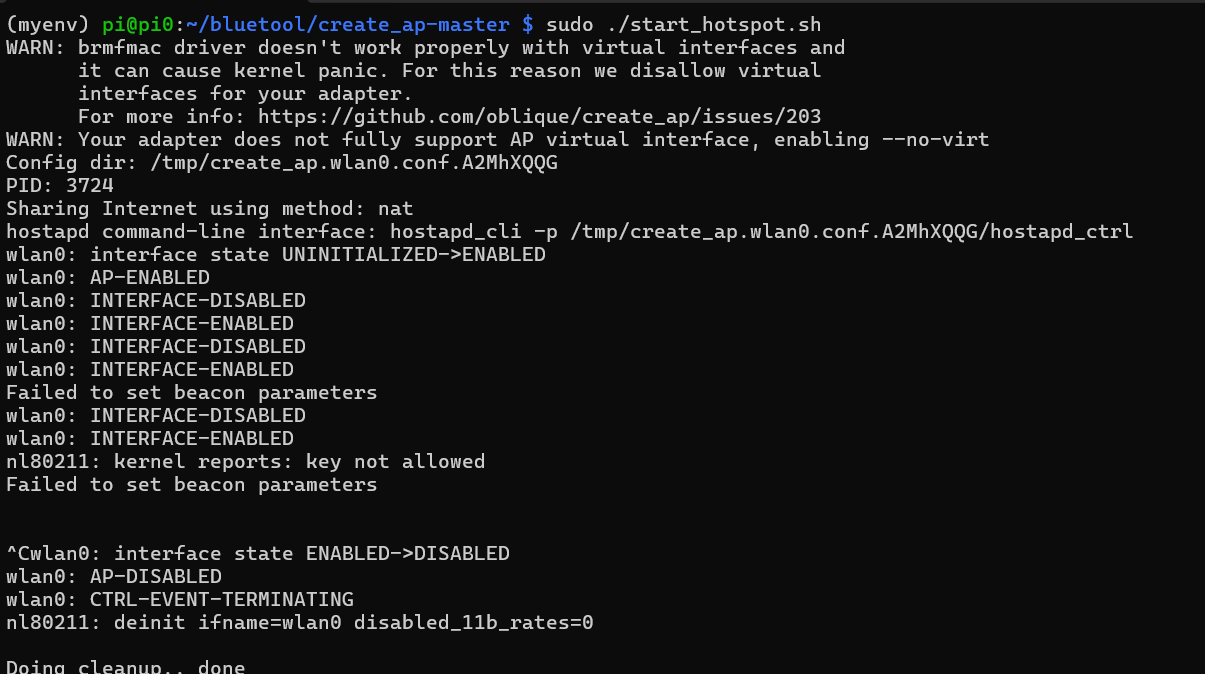
P3:Job for createap.service failed because the control process exited with error code.
See "systemctl status createap.service" and "journalctl -xeu createap.service" for details.
这个问题可能是你的密码位数太短,8-63位。
3.关闭热点,开启wifi
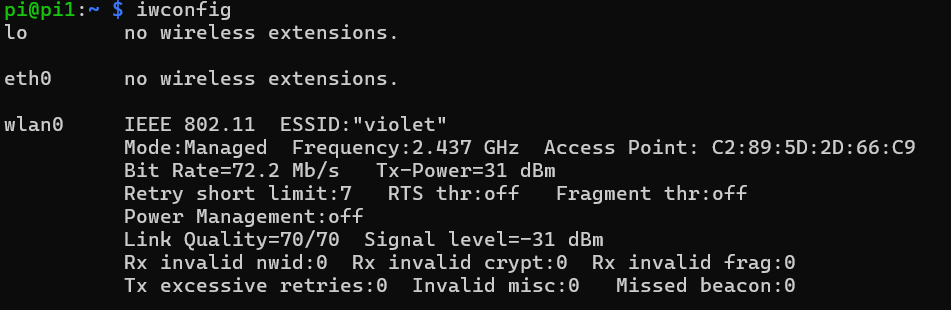
通过iwconfig命令,查看当前网络情况。以上为成功连接wifi后的截图。
注意到:Power Management:off。
树莓派默认wifi省电模式,这可能导致wifi连接失败。
关闭wifi省电,重启生效:
sudo nano /etc/rc.local#!/bin/bash
# rc.local - 开机自启动脚本<关闭wifi省电模式>
iwconfig wlan0 power off
exit 0此外,我们需要让树莓派开机自动寻找wifi并连接,如果开启热点后,仅仅关闭热点、打开wifi,是无法连接成功的。本人猜测可能开启热点过程破坏了原本烧入的开机自动连接wifi程序,导致需要添加脚本。
sudo nano /etc/systemd/system/wifi-autoconnect.service#!/bin/bash
[Unit]
Description=Auto Connect WiFi on Boot
After=network.target
[Service]
Type=oneshot
ExecStart=/sbin/wpa_supplicant -B -i wlan0 -c /etc/wpa_supplicant/wpa_supplicant.conf
ExecStartPost=/sbin/dhclient wlan0
RemainAfterExit=yes
[Install]
WantedBy=multi-user.target上面的脚本相当于在终端执行了
sudo wpa_supplicant -B -i wlan0 -c /etc/wpa_supplicant/wpa_supplicant.conf
sudo dhclient wlan0
这两条命令。通过wpa_supplicant.conf文件中的wifi配置,在后台连接wifi;通过 DHCP 获取 IP 地址。
再将这个脚本激活:
sudo systemctl daemon-reload
sudo systemctl enable wifi-autoconnect
sudo systemctl start wifi-autoconnect
sudo systemctl status wifi-autoconnect查看脚本状态,确认为激活状态后,进行第二个脚本配置。
创建这个脚本,添加权限并执行。
sudo nano wifi.sh#!/bin/bash
# 停止并禁用 create_ap 服务
sudo systemctl stop create_ap.service
sudo systemctl disable create_ap.service
sudo ifconfig wlan0 up
# 确保 NetworkManager 服务已启用(多数系统默认已启用)
#sudo systemctl enable NetworkManager --now
# 可选:重启网络相关服务(如果遇到连接问题)
#sudo systemctl restart NetworkManager
sudo reboot该脚本通关闭热点模式并打开wifi。重启后就能连上wifi了。
三、Debug收获
1.虚拟机挂载树莓派
手动在虚拟机的USB设置中选择sd卡
sudo fdisk -l #查看挂载设备一般有sda1 sd2 sd3 ,通常只能挂载sda1(我的是树莓派的etc文件夹),往往没什么卵用。
sudo mkdir -p /mnt/sdroot
sudo umount /mnt/sdroot           # 先卸载(如果已挂载)
sudo mount /dev/sda1 /mnt/sdroot  # 挂载ext4分区
2.rc.local开机运行脚本
sudo systemctl status rc-local  #查看状态
sudo nano etc/re.local          #编辑开机自启动脚本
在这里面,可以添加开机自动运行的脚步,比如你一般需要在某一个特定的环境里工作,那就可以通过脚本实现自动进入这个环境,免去每次都要输入一遍指令。
3.windows访问树莓派文件进行读写操作
惊奇的发现有一个叫做Linux File Systems for Windows by Paragon Software的软件可以在windows下对树莓派文件进行读写。虽然树莓派挂掉后,没能通过这种途径连接树莓派。
参考博客:
1、树莓派4B设置热点,一步步细心来_树莓派4b热点配置修改-CSDN博客【树莓派初始化】教你从0开始搭建树莓派的使用环境-CSDN博客1、树莓派4B设置热点,一步步细心来_树莓派4b热点配置修改-CSDN博客


 1590
1590

 被折叠的 条评论
为什么被折叠?
被折叠的 条评论
为什么被折叠?
 到【灌水乐园】发言


