


The Unreal 3 Editor is a powerful game development tool that ships free with most Unreal 3 games (Unreal Tournament, Gears of War, Roboblitz). It's quickly becoming a standard tool in the game development industry and is known for putting a lot of power directly in the artist's hands, particularly through it's node-based material editor.
This tutorial offers an introduction to Unreal's material editor and assumes no prior knowledge of the tool, or the presence of any other tools but the editor itself. Through the creation of a 'flickering monitor' material (or “shader”), this tutorial will demonstrate some of the powerful things that are capable with the material editor.
This tutorial was created using the version of the Unreal Editor that shipped with Unreal Tournament 3, but is likely to work with other versions of the editor.
Final Effect Preview
Step 1
First you need to get the files we'll be using to create our shader. You can retrieve them using the download link below. You will need both the Text.tga and the Panner.tga files, as we're going to use these to create an old fashioned 'computer screen' shader (complete with pulsing and a blinking red warning).
Texture Files
download
Step 2
Launch the Unreal Editor by first launching the Unreal Frontend, located in the “Binaries” folder of any Unreal-based game you own (you might have to search for UnrealFrontend.exe). Run the UnrealFrontend.exe, and then click the 'editor' button to launch the editor.

Step 3
The Unreal Editor is a complex tool, but we're only focusing on a small section of it. Once it opens click on the 'Generic Browser' button to open the 'Generic Browser', which is Unreal's asset management tool.

Step 4
In the 'Generic Browser', click "File>Import". Navigate to where you saved the source images from Step 1 and select Text.tga. After a moment an Import options dialog will appear. All of the defaults are fine except one; where the dialog asks for the name of a 'Package', type 'Monitor". Do these same steps for Panner.tga as well. Unreal organizes assets into 'Packages', and now both our source images should be imported into a package called 'Monitor' (see second image).


Step 5
Now that we have our source images imported, we can set up our shader. To do this "Right Click" on the grey background of the 'Generic Browser' and choose 'New Material'. In the next dialog give the material a name like 'Screen'. When you click ok, the 'Material Editor' will open up.

Step 6
Now is where things get fun! There are four major areas in the 'Material Editor': The big area of grey in the center is the workspace, and it contains inputs into the major channels of the shader, the dark area to the left is a 3d preview of the material, the space along the bottom of the screen are the material options, and the column along the right side is a list of all the material expressions (nodes) you can use to build your material.
Scroll through that list until you find one named 'Texture Sample'. "Drag and Drop" Texture Sample onto the workspace (using the left mouse button), and a 'Texture Sample' node will be created. You can move the node around by clicking it to select it, and then "ctr l+ left click" and dragging around. You can navigate the workspace by right clicking the grey background and dragging.

Step 7
Move the 'Material Editor' out of the way for a moment, so you can see the 'Generic Browser' again. Click on the 'Text' source image we imported earlier to select it. Immediately return to the 'Material Editor', and select the texture sample node. Under the options there should be a line that says “Texture: None”. Click the green arrow, on the right side of that line, to link the selection from the 'Generic Browser' with the 'Texture Sample'.

Step 8
Add another 'Texture Sample' node, and link that one to the “Panner” source image, the same way you linked the 'Text' image. We're not going to use this quite yet, but we will eventually. You should have something like the image below.

Step 9
Although we've placed our source images into the workspace, we have yet to 'wire' them into the material's inputs. Click and drag on the BLACK square to the left of the named 'Text' Texture Sample. This is an 'output'. Outputs are always on the left of a node. A wire should appear, following your cursor as you drag. Let go of the cursor on the shader's “Emissive” input channel.
The green "text image" should appear on the preview object to the left. By default the preview object is a sphere, but you might find a cylinder or cube to be better. There are buttons on the top of the preview window toggle between preview objects.

Step 10
Click the first of the three check marks. This applies your changes to the material. Congratulations, you've built a shader in Unreal! Unfortunately it's very boring, so the rest of this tutorial will be about spicing it up. Now is a good time to save your package back in the 'Generic Browser'.

Step 11
For starters, let's assume that we're trying to create an older monitor screen—like something you'd see in a cold-war military base. Giving the screen some 'flickering' is a good way to introduce some life into the material. One of the easiest ways to do this is to quickly shift between two versions of our 'Text' image.
Right click on the BLACK output tab of the 'Text' Texture Sample, and choose 'Break Link'. From the 'Material Expression' list, click and drag one node of each of the following: Multiply, Constant, Linear Interpolation, Time, and Sine. Try and arrange them similar to the image below.

Step 12
Now connect the 'Text' Texture Sample to one of the inputs of the multiply. Connect the 'Constant' node to the other input of the multiply. Remember, inputs are always on the right side of a node, and outputs are on the left. Unreal's 'Material Editor' always flows right to left. After you've connected the 'Constant' and the 'Text' texture sample, click on the 'Constant' node. In the options at the bottom of the editor you should see a type-in-box labeled 'R'. You can change the value of the constant there. Change it to '1.2'. This gives us a brighter version of our 'Text' image coming out of the multiply node.

Step 13
The 'Linear Interpolate' node allows you to fade from one image to another, or in our case, between our original 'Text' image and our new brighter version of it. Hook up the nodes as shown in the image below.
The only thing we're missing now is an alpha to drive how the two versions of our 'Text' image mix. The 'alpha' input of the 'Linear Interpolate' node requires special care—not just anything can go into it. It's limited to a single 'channel' of information. We'll get into that more later.

Step 14
'Sine' and 'Time' are a common node combination that give you a value that constantly oscillates between '0' and '1' (well, technically '-1', but that's not a big deal). It's important to note that Unreal will see a value of '0' as the color black. A value of '1' will be white. So set up the 'Sine' and 'Time' nodes like below, and then connect the 'Linear Interpolate' to the 'Emissive' input of the material, and you'll get a material that has a nice pulse to it. If the effect is not exaggerated enough for you, then you can crank the constant up to a higher number. Experiment to see what you get!

Step 15
This effect is great for a pulsing screen, but to make it appear as though the screen is flickering, we need to ramp up the speed of the pulse. Click on the 'Sine' node and change it's 'Period' from '1.0' to '0.1'. Now it really should look like an old CRT monitor with a bad flicker.

Step 16
To tidy things up a bit, hold "Alt+Control" and click in the top left, above all our nodes. Drag to the bottom right, and you'll create a selection box. When you let go, all the nodes you boxed in will be selected. Hit the 'c' key to create a comment box, and name the box 'Flickering'. Now when you click on the name 'Flickering' you'll be able to move the entire group (hold the control key and drag). Move the 'Flickering' group a little to the right to give yourself some more room.

Step 17
Now let's use the 'Panner' Texture Sample we added earlier to make our monitor shader look like it has a refresh/ scanline problem. Do do this, we'll make a horizontal bar scroll through the image.
Go to the 'Material Expressions' list and add a 'Panner' node. This node lets you scroll a texture sample node. Hook the 'Panner' node up with our 'Panner' Texture Sample, and then hook that up to the material's 'Emissive' input. By default the 'Panner' node has a speed of '0', so click on it and change it's 'Speed Y' to '-0.2'. The only problem with it now is that it's a white scroll, and we need to mix it into our green flickering.

Step 18
From the 'Material Expressions' list, drag in an 'Add' node and a 'Component Mask' node, and hook them up like the following image (all color images in Unreal are composed of three grayscale, 8-bit channels: a red, a green and a blue). The 'Component Mask' node allows us to select only a single channel and isolate it. Select the 'Component Mask' node, and in its options, check off the box beside 'G' (for green). Wire the 'Component Mask' node to the 'Add' node, along with our 'Panning' Texture Sample, but don't use the BLACK output from the Texture Sample, use the GREEN one instead. I'll get more into why later.

Now we have our two effects overlaid, but it's ALL white. That's ok. This is what our final 'Green' channel will look like. We'll recreate a full color result in the end.
Step 19
Select the 'Component Mask', 'Sine', 'Add', 'Panner', and our 'Panner' Texture Sample nodes, and hit 'C'. Give their group the name 'Horizontal Bar' and then drag your two groups around to neaten them up a bit.
You may have noticed that the word 'Fail' in the original 'Text' image doesn't show up in the material preview window anymore. That is because it was entirely RED in the original 'Text' image, and since we're using the GREEN channel only right now, we won't see it. We'll isolate the RED channel from the 'Text' Texture Sample, and do our final effect on that.

Step 20
By now you should know almost enough to create the following image from scratch. It's very similar to the combination we used to create the flickering effect. You can right click on the earlier 'Text' Texture Sample, and choose 'Duplicate' to create a second copy to use here.
There are three major differences between this combination and the 'Flickering' set up.
- The 'Constant' node is set to '6', which means the image will much much brighter.
- The 'Sine' node's 'Period' was left at '1', the default.
- This set up uses the RED output from the 'Text' Texture Sample, instead of the BLACK output (the BLACK output is a combination of the RED, GREEN, and BLUE channels, but we only want the RED channel this time).
If you look at material preview window, we have a grayscale version of the word 'Fail' pulsing. This is a black and white representation of whatever will be red in our final material. Group these nodes and call them 'PulsingRedFail'

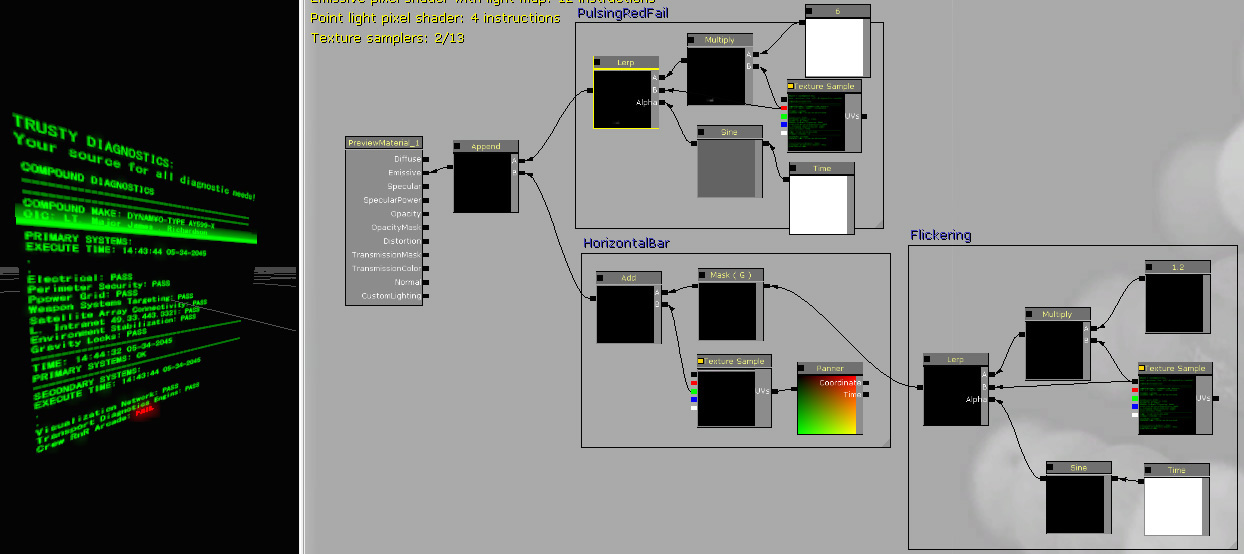
Step 21
To combine all our work into a single full color result, use an 'Append' node from the 'Material Expression' list. This lets you recreate a multi-channel image out of separate 8 bit channels. You should have a nice 'early 1990's' looking green screen with a flashing red warning at the bottom.
If you see a teal screen, then check to make sure your 'Horizontal Bar' group is set up correctly (and you're only using the Green channel from the 'Panner' Texture Sample.

Final Results
Here's the final material, and an how it looks applied to the model.


 1385
1385


 被折叠的 条评论
为什么被折叠?
被折叠的 条评论
为什么被折叠?
 到【灌水乐园】发言


