


简介
从图像中提取出局部特征,用LBP这种方式提取出的特征具有较低的维度。会发现图像的表达不收光照变化的影响。局部二值模式的基本思想是通过比较像素和它的邻域归纳出图像的局部构成。原理
以一个像素为中心,与其邻域进行比较。如果中心像素的灰度值大于它的邻域,则将其赋值为1,否则为0.由此,每一个像素点最终会得到一个二进制数,例如11001111。因此,一个8邻域的像素,最终会有2^8种组合,叫做局部二值模式。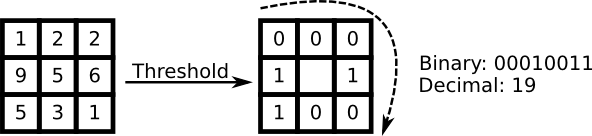
\( LBP(x_c, y_c) = \sum_{p=0}^{p-1} 2^p s(i_n - i_c)\)
其中s为符号函数:
\( s(x) = \left\{\begin{matrix} 1 & if \,\, x>=0\\ 0 & else \end{matrix}\right. \)
这种描述使您能够捕获到非常细小的纹理细节。事实上这个能够与纹理分类最先进的成果一较高下。当这种计算方式发表以后,发现一个固定的邻域不能用来对不同尺度的邻域进行编码。因此这种方法也得以推广,思想是将任意个领域点排列在一个半径可变的圆上,由此可以得到如下图所示的邻域:
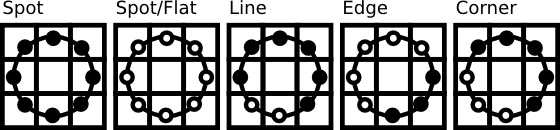
对于一个给点的点\((x_c, y_c)\),其邻域点为\((x_p, y_p),p\in P\)可以通过下式计算:
\(x_p = x_c + R*cos(\frac{2\pi p}{P})\)
\(y_p = y_c - R*sin(\frac{2\pi p}{P})\)
其中R为圆的半径,P为采样点的个数。
这种计算是一种扩展的LBP编码方式,有时候叫做Extended LBP(Circle LBP)。如果圆上一个点的坐标与图像不一致,可以通过插值计算得到。计算机科学中有诸多灵活的插值算法,OpenCV中则采用双线性插值算法;
\( f(x, y) = \begin{bmatrix} 1-x & x \end{bmatrix} \begin{bmatrix} f(0,0) & f(0,1)\\ f(1,0) & f(1,1) \end{bmatrix} \begin{bmatrix} 1-y \\ y \end{bmatrix}\)
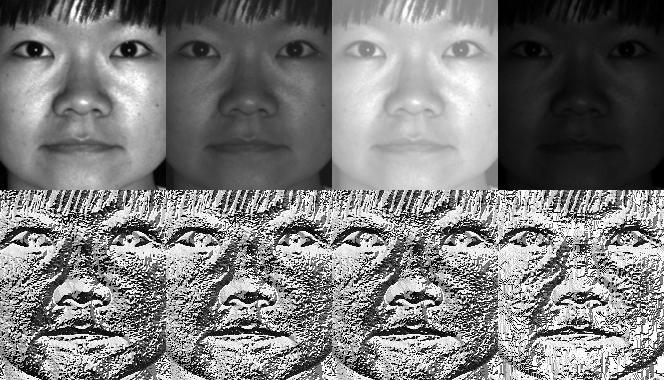
这样的定义的LBP相对比较健壮足以排除单调灰度转换的影响。通过观察下面人工修改图像的LBP图,我们可以得到简单的验证。
static void read_csv(const string& filename, vector<Mat>& images, vector<int>& labels, char separator = ';') {
	std::ifstream file(filename.c_str(), ifstream::in);
	if (!file) {
		string error_message = "No valid input file was given, please check the given filename.";
		CV_Error(CV_StsBadArg, error_message);
	}
	string line, path, classlabel;
	while (getline(file, line)) {
		stringstream liness(line);
		getline(liness, path, separator);
		getline(liness, classlabel);
		if(!path.empty() && !classlabel.empty()) {
			images.push_back(imread(path, 0));
			labels.push_back(atoi(classlabel.c_str()));
		}
	}
}

int lbp_hist(const char *argv1) {
	// Check for valid command line arguments, print usage
	// if no arguments were given.
	int argc = 2;
/*
	if (argc != 2) {
		cout << "usage: " << argv[0] << " <csv.ext>" << endl;
		exit(1);
	}
*/
	// Get the path to your CSV.
	string fn_csv = string(argv1);
	// These vectors hold the images and corresponding labels.
	vector<Mat> images;
	vector<int> labels;
	// Read in the data. This can fail if no valid
	// input filename is given.
	try {
		read_csv(fn_csv, images, labels);
	} catch (cv::Exception& e) {
		cerr << "Error opening file \"" << fn_csv << "\". Reason: " << e.msg << endl;
		// nothing more we can do
		exit(1);
	}
	// Quit if there are not enough images for this demo.
	if(images.size() <= 1) {
		string error_message = "This demo needs at least 2 images to work. Please add more images to your data set!";
		CV_Error(CV_StsError, error_message);
	}
	// Get the height from the first image. We'll need this
	// later in code to reshape the images to their original
	// size:
	int height = images[0].rows;
	// The following lines simply get the last images from
	// your dataset and remove it from the vector. This is
	// done, so that the training data (which we learn the
	// cv::FaceRecognizer on) and the test data we test
	// the model with, do not overlap.
	Mat testSample = images[images.size() - 1];
	int testLabel = labels[labels.size() - 1];
	images.pop_back();
	labels.pop_back();
	// The following lines create an LBPH model for
	// face recognition and train it with the images and
	// labels read from the given CSV file.
	//
	// The LBPHFaceRecognizer uses Extended Local Binary Patterns
	// (it's probably configurable with other operators at a later
	// point), and has the following default values
	//
	//      radius = 1
	//      neighbors = 8
	//      grid_x = 8
	//      grid_y = 8
	//
	// So if you want a LBPH FaceRecognizer using a radius of
	// 2 and 16 neighbors, call the factory method with:
	//
	//      cv::createLBPHFaceRecognizer(2, 16);
	//
	// And if you want a threshold (e.g. 123.0) call it with its default values:
	//
	//      cv::createLBPHFaceRecognizer(1,8,8,8,123.0)
	//
	Ptr<FaceRecognizer> model = createLBPHFaceRecognizer();
	model->train(images, labels);
	// The following line predicts the label of a given
	// test image:
	int predictedLabel = model->predict(testSample);
	//
	// To get the confidence of a prediction call the model with:
	//
	//      int predictedLabel = -1;
	//      double confidence = 0.0;
	//      model->predict(testSample, predictedLabel, confidence);
	//
	string result_message = format("Predicted class = %d / Actual class = %d.", predictedLabel, testLabel);
	cout << result_message << endl;
	// Sometimes you'll need to get/set internal model data,
	// which isn't exposed by the public cv::FaceRecognizer.
	// Since each cv::FaceRecognizer is derived from a
	// cv::Algorithm, you can query the data.
	//
	// First we'll use it to set the threshold of the FaceRecognizer
	// to 0.0 without retraining the model. This can be useful if
	// you are evaluating the model:
	//
	model->set("threshold", 0.0);
	// Now the threshold of this model is set to 0.0. A prediction
	// now returns -1, as it's impossible to have a distance below
	// it
	predictedLabel = model->predict(testSample);
	cout << "Predicted class = " << predictedLabel << endl;
	// Show some informations about the model, as there's no cool
	// Model data to display as in Eigenfaces/Fisherfaces.
	// Due to efficiency reasons the LBP images are not stored
	// within the model:
	cout << "Model Information:" << endl;
	string model_info = format("\tLBPH(radius=%i, neighbors=%i, grid_x=%i, grid_y=%i, threshold=%.2f)",
		model->getInt("radius"),
		model->getInt("neighbors"),
		model->getInt("grid_x"),
		model->getInt("grid_y"),
		model->getDouble("threshold"));
	cout << model_info << endl;
	// We could get the histograms for example:
	vector<Mat> histograms = model->getMatVector("histograms");
	// But should I really visualize it? Probably the length is interesting:
	cout << "Size of the histograms: " << histograms[0].total() << endl;
	return 0;
}
Reference:
[1] http://docs.opencv.org/2.4/modules/contrib/doc/facerec/facerec_tutorial.html


 4698
4698

 被折叠的 条评论
为什么被折叠?
被折叠的 条评论
为什么被折叠?
 到【灌水乐园】发言


