


在卷积神经网络中,我们经常会碰到池化操作,而池化层往往在卷积层后面,通过池化来降低卷积层输出的特征向量,同时改善结果(不易出现过拟合)。
为什么可以通过降低维度呢?
因为图像具有一种“静态性”的属性,这也就意味着在一个图像区域有用的特征极有可能在另一个区域同样适用。因此,为了描述大的图像,一个很自然的想法就是对不同位置的特征进行聚合统计,例如,人们可以计算图像一个区域上的某个特定特征的平均值 (或最大值)来代表这个区域的特征。[1]
1. 一般池化(General Pooling)
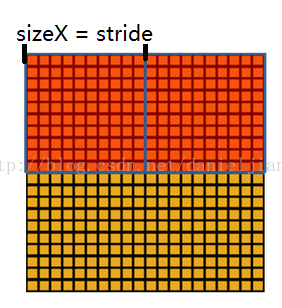
池化作用于图像中不重合的区域(这与卷积操作不同),过程如下图。

我们定义池化窗口的大小为sizeX,即下图中红色正方形的边长,定义两个相邻池化窗口的水平位移/竖直位移为stride。一般池化由于每一池化窗口都是不重复的,所以sizeX=stride。
最常见的池化操作为平均池化mean pooling和最大池化max pooling:
平均池化:计算图像区域的平均值作为该区域池化后的值。
最大池化:选图像区域的最大值作为该区域池化后的值。
2. 重叠池化(OverlappingPooling)[2]
重叠池化正如其名字所说的,相邻池化窗口之间会有重叠区域,此时sizeX>stride。论文中[2]中,作者使用了重叠池化,其他的设置都不变的情况下, top-1和top-5 的错误率分别减少了0.4% 和0.3%。
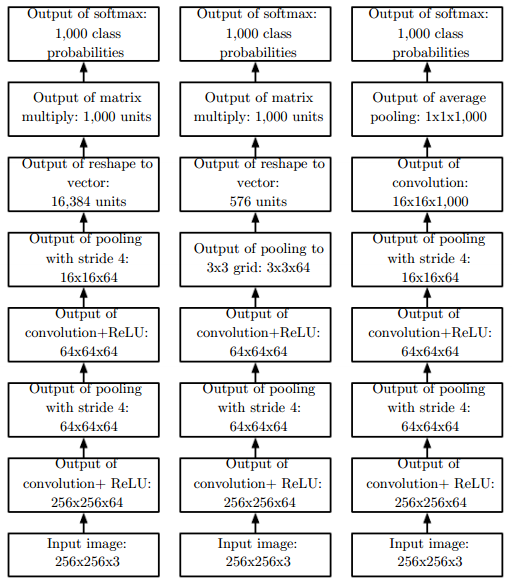
3. 空金字塔池化(Spatial Pyramid Pooling)[3]
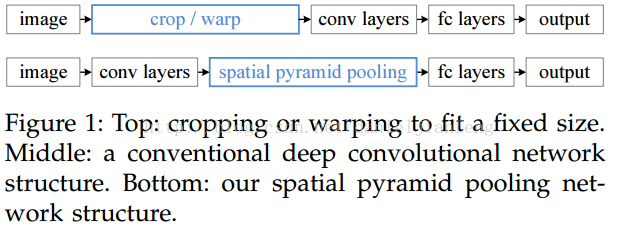
空间金字塔池化可以把任何尺度的图像的卷积特征转化成相同维度,这不仅可以让CNN处理任意尺度的图像,还能避免cropping和warping操作,导致一些信息的丢失,具有非常重要的意义。
一般的CNN都需要输入图像的大小是固定的,这是因为全连接层的输入需要固定输入维度,但在卷积操作是没有对图像尺度有限制,所有作者提出了空间金字塔池化,先让图像进行卷积操作,然后转化成维度相同的特征输入到全连接层,这个可以把CNN扩展到任意大小的图像。
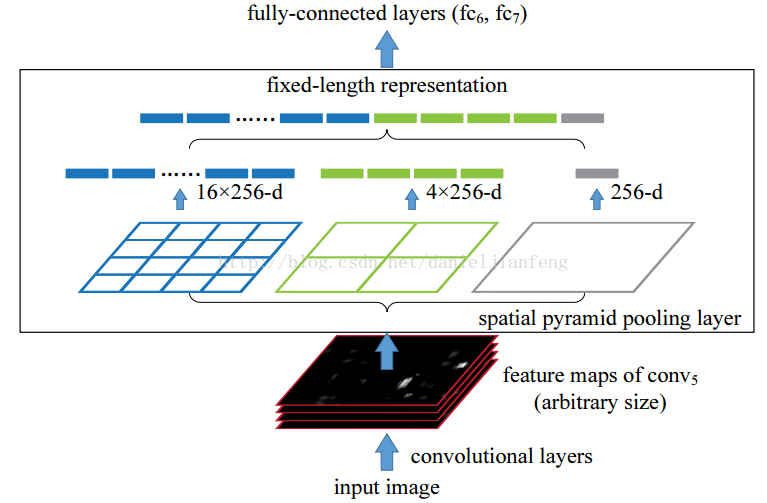
空间金字塔池化的思想来自于Spatial Pyramid Model,它一个pooling变成了多个scale的pooling。用不同大小池化窗口作用于卷积特征,我们可以得到1X1,2X2,4X4的池化结果,由于conv5中共有256个过滤器,所以得到1个256维的特征,4个256个特征,以及16个256维的特征,然后把这21个256维特征链接起来输入全连接层,通过这种方式把不同大小的图像转化成相同维度的特征。
对于不同的图像要得到相同大小的pooling结果,就需要根据图像的大小动态的计算池化窗口的大小和步长。假设conv5输出的大小为a*a,需要得到n*n大小的池化结果,可以让窗口大小sizeX为

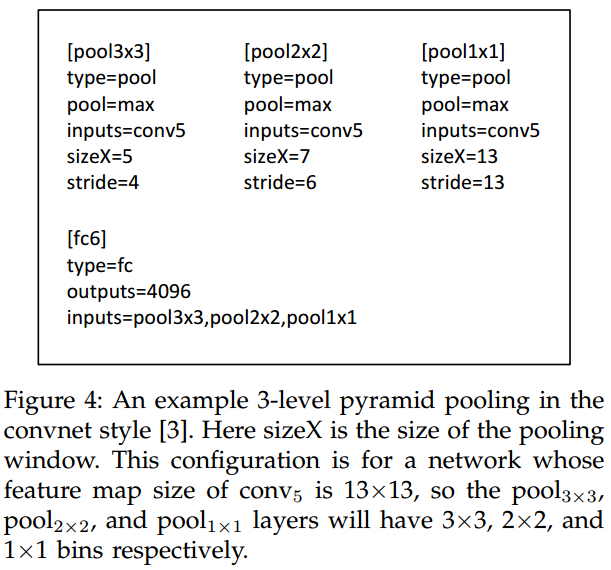
疑问:如果conv5输出的大小为14*14,[pool1*1]的sizeX=stride=14,[pool2*2]的sizeX=stride=7,这些都没有问题,但是,[pool4*4]的sizeX=5,stride=4,最后一列和最后一行特征没有被池化操作计算在内。
SPP其实就是一种多个scale的pooling,可以获取图像中的多尺度信息;在CNN中加入SPP后,可以让CNN处理任意大小的输入,这让模型变得更加的flexible。
4. Reference
[1] UFLDL_Tutorial
[2] Krizhevsky, I. Sutskever, andG. Hinton, “Imagenet classification with deep convolutional neural networks,”in NIPS,2012.
[3] Kaiming He, Xiangyu Zhang, Shaoqing Ren, Jian Su,Spatial Pyramid Pooling in Deep Convolutional Networks for Visual Recognition,LSVRC-2014 contest
版权声明:本文为博主原创文章,未经博主允许不得转载。
图像大小与参数个数:
前面几章都是针对小图像块处理的,这一章则是针对大图像进行处理的。两者在这的区别还是很明显的,小图像(如8*8,MINIST的28*28)可以采用全连接的方式(即输入层和隐含层直接相连)。但是大图像,这个将会变得很耗时:比如96*96的图像,若采用全连接方式,需要96*96个输入单元,然后如果要训练100个特征,只这一层就需要96*96*100个参数(W,b),训练时间将是前面的几百或者上万倍。所以这里用到了部分联通网络。对于图像来说,每个隐含单元仅仅连接输入图像的一小片相邻区域。
这样就引出了一个卷积的方法:
convolution:
自然图像有其固有特性,也就是说,图像的一部分的统计特性与其他部分是一样的。这也意味着我们在这一部分学习的特征也能用在另一部分上,所以对于这个图像上的所有位置,我们都能使用同样的学习特征。
对于图像,当从一个大尺寸图像中随机选取一小块,比如说8x8作为样本,并且从这个小块样本中学习到了一些特征,这时我们可以把从这个8x8样本中学习到的特征作为探测器,应用到这个图像的任意地方中去。特别是,我们可以用从8x8样本中所学习到的特征跟原本的大尺寸图像作卷积,从而对这个大尺寸图像上的任一位置获得一个不同特征的激活值。
讲义中举得具体例子,还是看例子容易理解:
假设你已经从一个96x96的图像中学习到了它的一个8x8的样本所具有的特征,假设这是由有100个隐含单元的自编码完成的。为了得到卷积特征,需要对96x96的图像的每个8x8的小块图像区域都进行卷积运算。也就是说,抽取8x8的小块区域,并且从起始坐标开始依次标记为(1,1),(1,2),...,一直到(89,89),然后对抽取的区域逐个运行训练过的稀疏自编码来得到特征的激活值。在这个例子里,显然可以得到100个集合,每个集合含有89x89个卷积特征。讲义中那个gif图更形象,这里不知道怎么添加进来...
最后,总结下convolution的处理过程:
假设给定了r * c的大尺寸图像,将其定义为xlarge。首先通过从大尺寸图像中抽取的a * b的小尺寸图像样本xsmall训练稀疏自编码,得到了k个特征(k为隐含层神经元数量),然后对于xlarge中的每个a*b大小的块,求激活值fs,然后对这些fs进行卷积。这样得到(r-a+1)*(c-b+1)*k个卷积后的特征矩阵。
pooling:
在通过卷积获得了特征(features)之后,下一步我们希望利用这些特征去做分类。理论上讲,人们可以把所有解析出来的特征关联到一个分类器,例如softmax分类器,但计算量非常大。例如:对于一个96X96像素的图像,假设我们已经通过8X8个输入学习得到了400个特征。而每一个卷积都会得到一个(96 − 8 + 1) * (96 − 8 + 1) = 7921的结果集,由于已经得到了400个特征,所以对于每个样例(example)结果集的大小就将达到892 * 400 = 3,168,400 个特征。这样学习一个拥有超过3百万特征的输入的分类器是相当不明智的,并且极易出现过度拟合(over-fitting).
所以就有了pooling这个方法,翻译作“池化”?感觉pooling这个英语单词还是挺形象的,翻译“作池”化就没那么形象了。其实也就是把特征图像区域的一部分求个均值或者最大值,用来代表这部分区域。如果是求均值就是mean pooling,求最大值就是max pooling。讲义中那个gif图也很形象,只是不知道这里怎么放gif图....
至于pooling为什么可以这样做,是因为:我们之所以决定使用卷积后的特征是因为图像具有一种“静态性”的属性,这也就意味着在一个图像区域有用的特征极有可能在另一个区域同样适用。因此,为了描述大的图像,一个很自然的想法就是对不同位置的特征进行聚合统计。这个均值或者最大值就是一种聚合统计的方法。
另外,如果人们选择图像中的连续范围作为池化区域,并且只是池化相同(重复)的隐藏单元产生的特征,那么,这些池化单元就具有平移不变性(translation invariant)。这就意味着即使图像经历了一个小的平移之后,依然会产生相同的(池化的)特征(这里有个小小的疑问,既然这样,是不是只能保证在池化大小的这块区域内具有平移不变性?)。在很多任务中(例如物体检测、声音识别),我们都更希望得到具有平移不变性的特征,因为即使图像经过了平移,样例(图像)的标记仍然保持不变。例如,如果你处理一个MNIST数据集的数字,把它向左侧或右侧平移,那么不论最终的位置在哪里,你都会期望你的分类器仍然能够精确地将其分类为相同的数字。
练习:
下面是讲义中的练习。用到了上一章的练习的结构(即在convolution过程中的第一步,用稀疏自编码对xsmall求k个特征)。
以下是主要程序:
主程序cnnExercise.m

%% CS294A/CS294W Convolutional Neural Networks Exercise

%  Instructions
%  ------------
%
%  This file contains code that helps you get started on the
%  convolutional neural networks exercise. In this exercise, you will only
%  need to modify cnnConvolve.m and cnnPool.m. You will not need to modify
%  this file.

%%======================================================================
%% STEP 0: Initialization
%  Here we initialize some parameters used for the exercise.

imageDim = 64;         % image dimension
imageChannels = 3;     % number of channels (rgb, so 3)

patchDim = 8;          % patch dimension
numPatches = 50000;    % number of patches

visibleSize = patchDim * patchDim * imageChannels;  % number of input units
outputSize = visibleSize;   % number of output units
hiddenSize = 400;           % number of hidden units

epsilon = 0.1;           % epsilon for ZCA whitening

poolDim = 19;          % dimension of pooling region

%%======================================================================
%% STEP 1: Train a sparse autoencoder (with a linear decoder) to learn
%  features from color patches. If you have completed the linear decoder
%  execise, use the features that you have obtained from that exercise,
%  loading them into optTheta. Recall that we have to keep around the
%  parameters used in whitening (i.e., the ZCA whitening matrix and the
%  meanPatch)

% --------------------------- YOUR CODE HERE --------------------------
% Train the sparse autoencoder and fill the following variables with
% the optimal parameters:

%optTheta =  zeros(2*hiddenSize*visibleSize+hiddenSize+visibleSize, 1);
%ZCAWhite =  zeros(visibleSize, visibleSize);
%meanPatch = zeros(visibleSize, 1);
load STL10Features.mat;


% --------------------------------------------------------------------

% Display and check to see that the features look good
W = reshape(optTheta(1:visibleSize * hiddenSize), hiddenSize, visibleSize);
b = optTheta(2*hiddenSize*visibleSize+1:2*hiddenSize*visibleSize+hiddenSize);

displayColorNetwork( (W*ZCAWhite)');

%%======================================================================
%% STEP 2: Implement and test convolution and pooling
%  In this step, you will implement convolution and pooling, and test them
%  on a small part of the data set to ensure that you have implemented
%  these two functions correctly. In the next step, you will actually
%  convolve and pool the features with the STL10 images.

%% STEP 2a: Implement convolution
%  Implement convolution in the function cnnConvolve in cnnConvolve.m

% Note that we have to preprocess the images in the exact same way
% we preprocessed the patches before we can obtain the feature activations.

load stlTrainSubset.mat % loads numTrainImages, trainImages, trainLabels

%% Use only the first 8 images for testing
convImages = trainImages(:, :, :, 1:8);

% NOTE: Implement cnnConvolve in cnnConvolve.m first!
convolvedFeatures = cnnConvolve(patchDim, hiddenSize, convImages, W, b, ZCAWhite, meanPatch);

%% STEP 2b: Checking your convolution
%  To ensure that you have convolved the features correctly, we have
%  provided some code to compare the results of your convolution with
%  activations from the sparse autoencoder

% For 1000 random points
for i = 1:1000
    featureNum = randi([1, hiddenSize]);
    imageNum = randi([1, 8]);
    imageRow = randi([1, imageDim - patchDim + 1]);
    imageCol = randi([1, imageDim - patchDim + 1]);

    patch = convImages(imageRow:imageRow + patchDim - 1, imageCol:imageCol + patchDim - 1, :, imageNum);
    patch = patch(:);
    patch = patch - meanPatch;
    patch = ZCAWhite * patch;

    features = feedForwardAutoencoder(optTheta, hiddenSize, visibleSize, patch);

    if abs(features(featureNum, 1) - convolvedFeatures(featureNum, imageNum, imageRow, imageCol)) > 1e-9
        fprintf('Convolved feature does not match activation from autoencoder\n');
        fprintf('Feature Number    : %d\n', featureNum);
        fprintf('Image Number      : %d\n', imageNum);
        fprintf('Image Row         : %d\n', imageRow);
        fprintf('Image Column      : %d\n', imageCol);
        fprintf('Convolved feature : %0.5f\n', convolvedFeatures(featureNum, imageNum, imageRow, imageCol));
        fprintf('Sparse AE feature : %0.5f\n', features(featureNum, 1));
        error('Convolved feature does not match activation from autoencoder');
    end
end

disp('Congratulations! Your convolution code passed the test.');

%% STEP 2c: Implement pooling
%  Implement pooling in the function cnnPool in cnnPool.m

% NOTE: Implement cnnPool in cnnPool.m first!
pooledFeatures = cnnPool(poolDim, convolvedFeatures);

%% STEP 2d: Checking your pooling
%  To ensure that you have implemented pooling, we will use your pooling
%  function to pool over a test matrix and check the results.

testMatrix = reshape(1:64, 8, 8);
expectedMatrix = [mean(mean(testMatrix(1:4, 1:4))) mean(mean(testMatrix(1:4, 5:8))); ...
                  mean(mean(testMatrix(5:8, 1:4))) mean(mean(testMatrix(5:8, 5:8))); ];

testMatrix = reshape(testMatrix, 1, 1, 8, 8);

pooledFeatures = squeeze(cnnPool(4, testMatrix));

if ~isequal(pooledFeatures, expectedMatrix)
    disp('Pooling incorrect');
    disp('Expected');
    disp(expectedMatrix);
    disp('Got');
    disp(pooledFeatures);
else
    disp('Congratulations! Your pooling code passed the test.');
end

%%======================================================================
%% STEP 3: Convolve and pool with the dataset
%  In this step, you will convolve each of the features you learned with
%  the full large images to obtain the convolved features. You will then
%  pool the convolved features to obtain the pooled features for
%  classification.
%
%  Because the convolved features matrix is very large, we will do the
%  convolution and pooling 50 features at a time to avoid running out of
%  memory. Reduce this number if necessary

stepSize = 50;
assert(mod(hiddenSize, stepSize) == 0, 'stepSize should divide hiddenSize');

load stlTrainSubset.mat % loads numTrainImages, trainImages, trainLabels
load stlTestSubset.mat  % loads numTestImages,  testImages,  testLabels

pooledFeaturesTrain = zeros(hiddenSize, numTrainImages, ...
    floor((imageDim - patchDim + 1) / poolDim), ...
    floor((imageDim - patchDim + 1) / poolDim) );
pooledFeaturesTest = zeros(hiddenSize, numTestImages, ...
    floor((imageDim - patchDim + 1) / poolDim), ...
    floor((imageDim - patchDim + 1) / poolDim) );

tic();

for convPart = 1:(hiddenSize / stepSize)

    featureStart = (convPart - 1) * stepSize + 1;
    featureEnd = convPart * stepSize;

    fprintf('Step %d: features %d to %d\n', convPart, featureStart, featureEnd);
    Wt = W(featureStart:featureEnd, :);
    bt = b(featureStart:featureEnd);

    fprintf('Convolving and pooling train images\n');
    convolvedFeaturesThis = cnnConvolve(patchDim, stepSize, ...
        trainImages, Wt, bt, ZCAWhite, meanPatch);
    pooledFeaturesThis = cnnPool(poolDim, convolvedFeaturesThis);
    pooledFeaturesTrain(featureStart:featureEnd, :, :, :) = pooledFeaturesThis;
    toc();
    clear convolvedFeaturesThis pooledFeaturesThis;

    fprintf('Convolving and pooling test images\n');
    convolvedFeaturesThis = cnnConvolve(patchDim, stepSize, ...
        testImages, Wt, bt, ZCAWhite, meanPatch);
    pooledFeaturesThis = cnnPool(poolDim, convolvedFeaturesThis);
    pooledFeaturesTest(featureStart:featureEnd, :, :, :) = pooledFeaturesThis;
    toc();

    clear convolvedFeaturesThis pooledFeaturesThis;

end


% You might want to save the pooled features since convolution and pooling takes a long time
save('cnnPooledFeatures.mat', 'pooledFeaturesTrain', 'pooledFeaturesTest');
toc();

%%======================================================================
%% STEP 4: Use pooled features for classification
%  Now, you will use your pooled features to train a softmax classifier,
%  using softmaxTrain from the softmax exercise.
%  Training the softmax classifer for 1000 iterations should take less than
%  10 minutes.

% Add the path to your softmax solution, if necessary
% addpath /path/to/solution/

% Setup parameters for softmax
softmaxLambda = 1e-4;
numClasses = 4;
% Reshape the pooledFeatures to form an input vector for softmax
softmaxX = permute(pooledFeaturesTrain, [1 3 4 2]);
softmaxX = reshape(softmaxX, numel(pooledFeaturesTrain) / numTrainImages,...
    numTrainImages);
softmaxY = trainLabels;

options = struct;
options.maxIter = 200;
softmaxModel = softmaxTrain(numel(pooledFeaturesTrain) / numTrainImages,...
    numClasses, softmaxLambda, softmaxX, softmaxY, options);

%%======================================================================
%% STEP 5: Test classifer
%  Now you will test your trained classifer against the test images

softmaxX = permute(pooledFeaturesTest, [1 3 4 2]);
softmaxX = reshape(softmaxX, numel(pooledFeaturesTest) / numTestImages, numTestImages);
softmaxY = testLabels;

[pred] = softmaxPredict(softmaxModel, softmaxX);
acc = (pred(:) == softmaxY(:));
acc = sum(acc) / size(acc, 1);
fprintf('Accuracy: %2.3f%%\n', acc * 100);

% You should expect to get an accuracy of around 80% on the test images.
cnnConvolve.m
function convolvedFeatures = cnnConvolve(patchDim, numFeatures, images, W, b, ZCAWhite, meanPatch)
%cnnConvolve Returns the convolution of the features given by W and b with
%the given images
%
% Parameters:
%  patchDim - patch (feature) dimension
%  numFeatures - number of features
%  images - large images to convolve with, matrix in the form
%           images(r, c, channel, image number)
%  W, b - W, b for features from the sparse autoencoder
%  ZCAWhite, meanPatch - ZCAWhitening and meanPatch matrices used for
%                        preprocessing
%
% Returns:
%  convolvedFeatures - matrix of convolved features in the form
%                      convolvedFeatures(featureNum, imageNum, imageRow, imageCol)
patchSize = patchDim*patchDim;
numImages = size(images, 4);
imageDim = size(images, 1);
imageChannels = size(images, 3);

convolvedFeatures = zeros(numFeatures, numImages, imageDim - patchDim + 1, imageDim - patchDim + 1);

% Instructions:
%   Convolve every feature with every large image here to produce the
%   numFeatures x numImages x (imageDim - patchDim + 1) x (imageDim - patchDim + 1)
%   matrix convolvedFeatures, such that
%   convolvedFeatures(featureNum, imageNum, imageRow, imageCol) is the
%   value of the convolved featureNum feature for the imageNum image over
%   the region (imageRow, imageCol) to (imageRow + patchDim - 1, imageCol + patchDim - 1)
%
% Expected running times:
%   Convolving with 100 images should take less than 3 minutes
%   Convolving with 5000 images should take around an hour
%   (So to save time when testing, you should convolve with less images, as
%   described earlier)

% -------------------- YOUR CODE HERE --------------------
% Precompute the matrices that will be used during the convolution. Recall
% that you need to take into account the whitening and mean subtraction
% steps
WT = W*ZCAWhite;
bT = b-WT*meanPatch;
% --------------------------------------------------------

convolvedFeatures = zeros(numFeatures, numImages, imageDim - patchDim + 1, imageDim - patchDim + 1);
for imageNum = 1:numImages
  for featureNum = 1:numFeatures

    % convolution of image with feature matrix for each channel
    convolvedImage = zeros(imageDim - patchDim + 1, imageDim - patchDim + 1);
    for channel = 1:3

      % Obtain the feature (patchDim x patchDim) needed during the convolution
      % ---- YOUR CODE HERE ----
      %feature = zeros(8,8); % You should replace this
      offset = (channel-1)*patchSize;
      feature = reshape(WT(featureNum,(offset+1):(offset+patchSize)),patchDim,patchDim);

      % ------------------------

      % Flip the feature matrix because of the definition of convolution, as explained later
      feature = flipud(fliplr(squeeze(feature)));

      % Obtain the image
      im = squeeze(images(:, :, channel, imageNum));

      % Convolve "feature" with "im", adding the result to convolvedImage
      % be sure to do a 'valid' convolution
      % ---- YOUR CODE HERE ----
       convolveThisChannel = conv2(im,feature,'valid');
       convolvedImage = convolvedImage + convolveThisChannel;            %三个通道加起来,应该是指三个通道同时用来做判断标准。

      % ------------------------

    end

    % Subtract the bias unit (correcting for the mean subtraction as well)
    % Then, apply the sigmoid function to get the hidden activation
    % ---- YOUR CODE HERE ----
    convolvedImage = sigmoid(convolvedImage + bT(featureNum));

    % ------------------------

    % The convolved feature is the sum of the convolved values for all channels
    convolvedFeatures(featureNum, imageNum, :, :) = convolvedImage;
  end
end

function sigm = sigmoid(x)

    sigm = 1 ./ (1 + exp(-x));
end

end
cnnPool.m
function pooledFeatures = cnnPool(poolDim, convolvedFeatures)
%cnnPool Pools the given convolved features
%
% Parameters:
%  poolDim - dimension of pooling region
%  convolvedFeatures - convolved features to pool (as given by cnnConvolve)
%                      convolvedFeatures(featureNum, imageNum, imageRow, imageCol)
%
% Returns:
%  pooledFeatures - matrix of pooled features in the form
%                   pooledFeatures(featureNum, imageNum, poolRow, poolCol)
%

numImages = size(convolvedFeatures, 2);
numFeatures = size(convolvedFeatures, 1);
convolvedDim = size(convolvedFeatures, 3);

pooledFeatures = zeros(numFeatures, numImages, floor(convolvedDim / poolDim), floor(convolvedDim / poolDim));

% -------------------- YOUR CODE HERE --------------------
% Instructions:
%   Now pool the convolved features in regions of poolDim x poolDim,
%   to obtain the
%   numFeatures x numImages x (convolvedDim/poolDim) x (convolvedDim/poolDim)
%   matrix pooledFeatures, such that
%   pooledFeatures(featureNum, imageNum, poolRow, poolCol) is the
%   value of the featureNum feature for the imageNum image pooled over the
%   corresponding (poolRow, poolCol) pooling region
%   (see http://ufldl/wiki/index.php/Pooling )
%
%   Use mean pooling here.
% -------------------- YOUR CODE HERE --------------------
numBlocks = floor(convolvedDim/poolDim);             %每个维度总共分成多少块(57/19),这里对于不同维数的数据,poolDim要选择能刚好除尽的?
for featureNum = 1:numFeatures
    for imageNum=1:numImages
        for poolRow = 1:numBlocks
            for poolCol = 1:numBlocks
                features = convolvedFeatures(featureNum,imageNum,(poolRow-1)*poolDim+1:poolRow*poolDim,(poolCol-1)*poolDim+1:poolCol*poolDim);
                pooledFeatures(featureNum,imageNum,poolRow,poolCol) = mean(features(:));
            end
        end
    end
end
end
结果:
Accuracy: 78.938%
与讲义提到的80%左右差不多。
ps:讲义地址:
http://deeplearning.stanford.edu/wiki/index.PHP/Feature_extraction_using_convolution
http://deeplearning.stanford.edu/wiki/index.php/Pooling
http://deeplearning.stanford.edu/wiki/index.php/Exercise:Convolution_and_Pooling
=====================================================================================================
-
深度学习之CNN一 卷积与池化
1 卷积
连续:
一维卷积: s(t)=(x∗w)(t)=∫x(a)w(t−a)dt
二维卷积: S(t)=(K∗I)(i,j)=∫∫I(i,j)K(i−m,j−n)dmdn
离散:
一维卷积: s(t)=(x∗w)(t)=∑ax(a)w(t−a)
二维卷积: S(i,j)=(K∗I)(i,j)=∑m∑nI(i,j)K(i−m,j−n)卷积具有交换性,即
(K∗I)(i,j)=(I∗K)(i,j)
∑m∑nI(i,j)K(i−m,j−n)=∑m∑nI(i−m,j−n)K(i,j)编程实现中:
二维卷积: S(t)=(K∗I)(i,j)=∑m∑nI(i+m,j+n)K(i,j)
这个定义就不具有交换性上面的 w,K 称为核, s(t),S(i,j) 有时候称为特征映射。
2 卷积神经网络
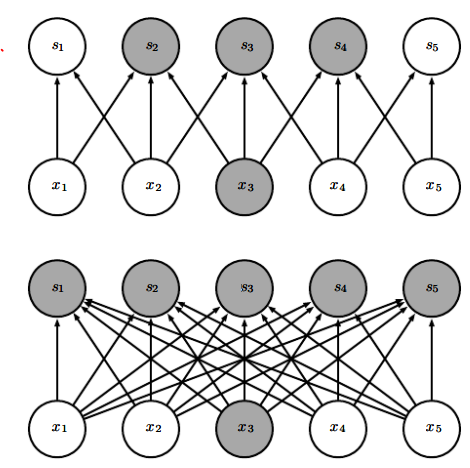
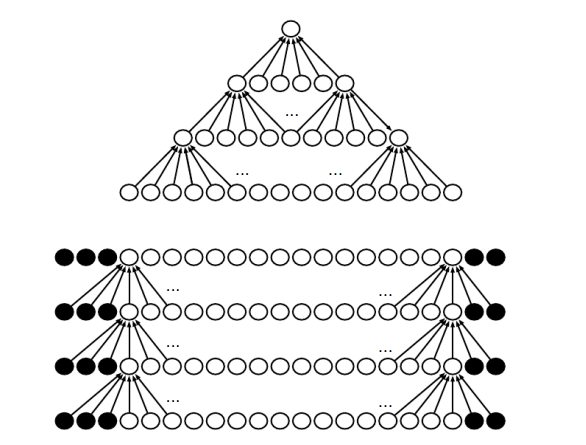
卷积神经网络主要利用3个思想:稀疏连接、参数共享、平移不变性。
- 稀疏连接
一个神经元的感知视野是指能够影响该神经元的其他神经元。如上图中 x3 的感知视野是 s2,s3,s4 。深度卷经网络中,深层单元的感知视野比浅层单元的大。
- 参数共享
稀疏连接和参数共享都能显著减少参数。 - 平移不变性
参数共享会导致平移不变性。称 f(x) 对 g(x) 是不变的,如果 f(g(x))=g(f(x)) 。例如 I(x,y) 是一张图像, g(I)=I(x−1,y) ,则 (g(I)∗K)=g((I∗K)) 。
池化(pooling)
池化输出的是邻近区域的概括统计量,一般是矩形区域。池化有最大池化、平均池化、滑动平均池化、 L2 范数池化等。
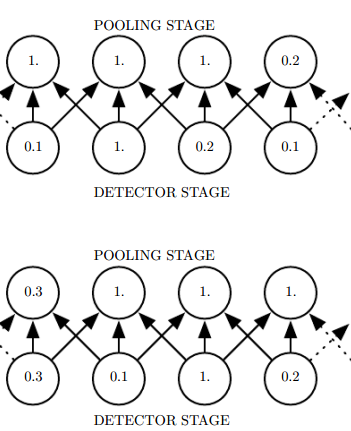
池化能使特征获得平移不变性。如果我们只关心某些特征是否存在而不是在哪里时,平移不变性就很有用了。卷积也会产生平移不变性,注意区分,卷积对输入平移是不变的,池化对特征平移是不变的。
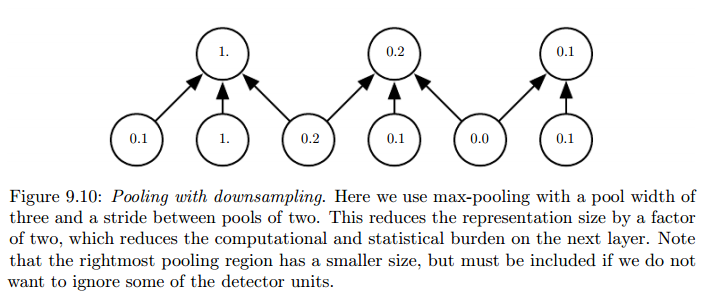
池化能显著地减少参数,若滑动距离stride大小为 k ,则参数量减少 k 倍
池化能解决不同规格的输入的问题。如下图池化时,将图片区域四等分,不管图片的大小。
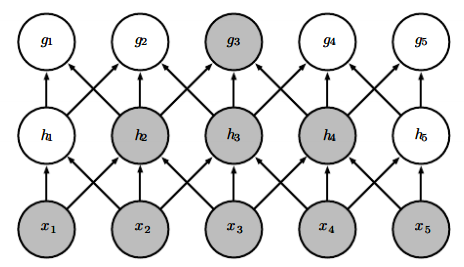
完整的CNN结构:

由上面的两幅图可以看到,为了提取不同的特征,每个卷积层都有多种卷积(通道, channel)。
一般来说,输入并不只是一张灰度图,更多的是彩图,这样输入就是一个三维张量(tensor) Vi,j,k ,表示第 i 个通道的 j 行 k 列的值。则通过卷积得到的特征 S 可表示为: Si,j,k=∑l,m,nVl,j+m−1,k+n−1Ki,l,m,n
其中 K 是一个四维张量, Ki,l,m,n 表示卷积层的第 i 个通道与输入的第 l 个通道在行偏 m 、列偏 n 时的权重系数。式子中-1是因为C和Python中 下标是从0开始的。
滑动长度为 s 的卷积 Si,j,k=∑l,m,nVl,(j−1)s+m,(k−1)+nKi,l,m,n神经网络在实现中还要注意输入的补零方式。如果不补零的话,由于卷积核的关系,特征的大小(size)总是小于输入的大小,致使整个网络的深度是有限的。
如上图所示,补零的方式有两种:
valid:也就是不补零。
same:在图像边缘补零,使得输入和输出大小相同。 - 稀疏连接

版权声明:本文为博主原创文章,未经博主允许不得转载。


 1万+
1万+


 被折叠的 条评论
为什么被折叠?
被折叠的 条评论
为什么被折叠?
 到【灌水乐园】发言


