


Qt QML 模块提供了一组 API,用于通过 C++ 扩展扩展 QML。可以编写扩展来添加 QML 类型、扩展现有的 Qt 类型或调用无法从普通 QML 代码访问的 C/C++ 函数。
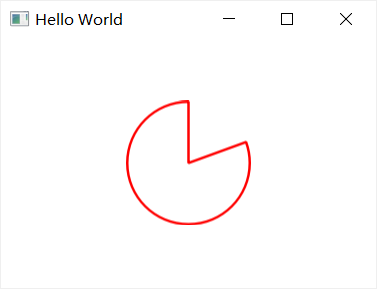
在本教程中,将展示如何使用 Qt Quick 模块中的 C++ 类来扩展 QML。最终结果将是一个简单的饼图显示,由多个自定义 QML 类型通过 QML 功能(如绑定和信号)连接在一起实现,并通过插件提供给 QML 运行时。
一、创建新类型
扩展 QML 时的一个常见任务是提供一种新的 QML 类型,该类型支持某些自定义功能,超出了内置 Qt Quick 类型所提供的功能。例如,这可以实现特定的数据模型,或提供具有自定义绘画和绘图功能的类型,或访问系统功能,如无法通过内置 QML 功能访问的网络编程。
首先,创建一个名为“PieChart”的新 QML 类型,它具有两个属性:名称和颜色。将使其在一个名为“Charts”的可导入类型命名空间中可用,版本为 1.0。
希望这个 PieChart 类型最终可以像这样从 QML 中使用:
import Charts 1.0

PieChart
{
    width: 100; height: 100
    name: "A simple pie chart"
    color: "red"
}
为此,需要一个 C++ 类来封装此 PieChart 类型及其两个属性。由于 QML 广泛使用 Qt 的元对象系统,这个新类必须:
- 从 QObject 继承
- 使用 Q_PROPERTY 宏声明其属性
定义 PieChart 类:
#ifndef PIECHART_H
#define PIECHART_H

#include <QtQuick/QQuickPaintedItem>
#include <QColor>

class PieChart : public QQuickPaintedItem
{
    Q_OBJECT
    Q_PROPERTY(QString name READ name WRITE setName NOTIFY nameChanged)
    Q_PROPERTY(QColor color READ color WRITE setColor NOTIFY colorChanged)
    QML_ELEMENT

public:
    PieChart(QQuickItem *parent = 0);
    void paint(QPainter *painter);

    const QString &name() const;
    void setName(const QString &newName);

    const QColor &color() const;
    void setColor(const QColor &newColor);

signals:
    void nameChanged();
    void colorChanged();

private:
    QString m_name;
    QColor m_color;
};

#endif // PIECHART_H
#include "piechart.h"
#include <QPainter>
PieChart::PieChart(QQuickItem *parent)
: QQuickPaintedItem(parent)
{
}
void PieChart::paint(QPainter *painter)
{
QPen pen(m_color, 2);
painter->setPen(pen);
painter->setRenderHints(QPainter::Antialiasing, true);
painter->drawPie(boundingRect().adjusted(1, 1, -1, -1), 90 * 16, 290 * 16);
}
const QString &PieChart::name() const
{
return m_name;
}
void PieChart::setName(const QString &newName)
{
if (m_name == newName)
return;
m_name = newName;
emit nameChanged();
}
const QColor &PieChart::color() const
{
return m_color;
}
void PieChart::setColor(const QColor &newColor)
{
if (m_color == newColor)
return;
m_color = newColor;
emit colorChanged();
}选择基类的原则:
- 需要执行绘图操作,选择 QQuickPaintedItem。
- 只是表示某种数据类型而不需要显示的项目,选择 QObject。
- 想扩展现有的基于 QObject 的类的功能,选择 QObject。
- 想创建一个不需要使用 QPainter API 执行绘图操作的可视项,选择 QQuickItem。
PieChart 类使用 Q_PROPERTY 宏定义了名称和颜色这两个属性,并覆盖了 QQuickPaintedItem::paint()。PieChart 类是使用 QML_ELEMENT 宏注册的,以允许从 QML 使用它。如果不注册该类,app.qml 将无法创建 PieChart。
为了使注册生效,在 .pro 文件的 CONFIG 中添加了qmltypes选项,并给出了QML_IMPORT_NAME 和 QML_IMPORT_MAJOR_VERSION:
CONFIG += qmltypes
QML_IMPORT_NAME = Charts
QML_IMPORT_MAJOR_VERSION = 1
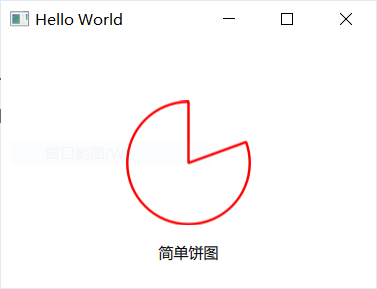
现在可在QML中使用了:
import QtQuick 2.14
import QtQuick.Window 2.14
import Charts 1.0

Window
{
    visible: true
    title: qsTr("Hello World")
    width: 300; height: 200

    PieChart
    {
        id: aPieChart
        anchors.centerIn: parent
        width: 100; height: 100
        name: "简单饼图"
        color: "red"
    }

    Text
    {
        anchors
        {
            bottom: parent.bottom
            horizontalCenter: parent.horizontalCenter
            bottomMargin: 20
        }
        text: aPieChart.name
    }
}
二、连接到 C++ 方法和信号
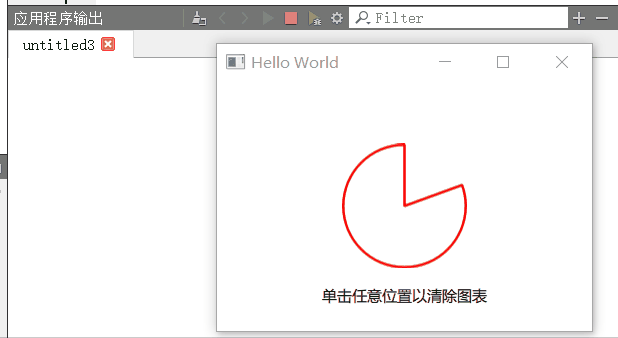
假设希望 PieChart 有一个“clearChart()”方法来擦除图表然后发出“chartCleared”信号。app.qml 将能够调用 clearChart() 并接收像这样的 chartCleared() 信号:
import QtQuick 2.14
import QtQuick.Window 2.14
import Charts 1.0

Window
{
    visible: true
    title: qsTr("Hello World")
    width: 300; height: 200

    PieChart
    {
        id: aPieChart
        anchors.centerIn: parent
        width: 100; height: 100
        name: "简单饼图"
        color: "red"

        onChartCleared: console.log("饼图已被清除")
    }

    MouseArea
    {
        anchors.fill: parent
        onClicked: aPieChart.clearChart()
    }

    Text
    {
        anchors
        {
            bottom: parent.bottom
            horizontalCenter: parent.horizontalCenter
            bottomMargin: 20
        }
        text: "单击任意位置以清除图表"
    }
}
为此,向 C++ 类添加 clearChart() 方法和 chartCleared() 信号:
class PieChart : public QQuickPaintedItem
{
    ...
public:
    ...
    Q_INVOKABLE void clearChart();

signals:
    void chartCleared();
    ...
};
void PieChart::clearChart()
{
setColor(QColor(Qt::transparent));
update();
emit chartCleared();
}Q_INVOKABLE 使得 clearChart() 方法可用于 Qt 元对象系统,进而可用于 QML。请注意,它可以被声明为 Qt 槽函数而不是使用 Q_INVOKABLE,因为槽函数也可以从 QML 调用。这两种方法都是有效的。
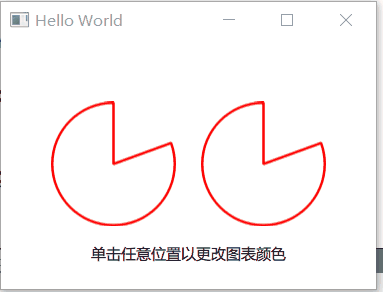
三、添加属性绑定
属性绑定是 QML 的一个强大功能,它允许自动同步不同类型的值。 当属性值更改时,它使用信号来通知和更新其他类型的值。
为 color 属性启用属性绑定。这意味着如果有这样的代码:
import QtQuick 2.14
import QtQuick.Window 2.14
import Charts 1.0

Window
{
    visible: true
    title: qsTr("Hello World")
    width: 300; height: 200

    Row
    {
        anchors.centerIn: parent
        spacing: 20

        PieChart
        {
            id: chartA
            width: 100; height: 100
            color: "red"
        }

        PieChart
        {
            id: chartB
            width: 100; height: 100
            color: chartA.color
        }
    }

    MouseArea
    {
        anchors.fill: parent
        onClicked: { chartA.color = "blue" }
    }

    Text
    {
        anchors
        {
            bottom: parent.bottom;
            horizontalCenter: parent.horizontalCenter;
            bottomMargin: 20
        }
        text: "单击任意位置以更改图表颜色"
    }
}
“color: chartA.color” 语句将chartB的颜色值绑定到chartA的颜色。每当 chartA 的颜色值发生变化时,chartB 的颜色值就会更新为相同的值。
为 color 属性启用属性绑定很容易。在它的 Q_PROPERTY() 声明中添加了一个 NOTIFY 功能,以指示每当值发生变化时都会发出“colorChanged”信号。
class PieChart : public QQuickPaintedItem
{
    ...
    Q_PROPERTY(QColor color READ color WRITE setColor NOTIFY colorChanged)
public:
    ...
signals:
    void colorChanged();
    ...
};
然后,在 setPieSlice() 中发出这个信号:
void PieChart::setColor(const QColor &newColor)
{
    if (m_color == newColor)
        return;
    m_color = newColor;
    update();
    emit colorChanged();
}
setColor() 在发出 colorChanged() 之前检查颜色值是否实际更改很重要。这可以确保信号不会被不必要地发出,并且还可以防止在其他类型响应值更改时出现循环。
绑定的使用对 QML 至关重要。如果可能应该始终为属性添加 NOTIFY 信号,以便属性可以在绑定中使用。不能绑定的属性不能自动更新,不能灵活使用。此外,由于绑定经常被调用并依赖于 QML 使用,如果未实现绑定,自定义 QML 类型的用户可能会有意外行为。
四、使用自定义属性类型
如果想创建一个QML默认不支持类型的属性,需要向QML引擎注册该类型。
例如,将属性的使用替换为具有颜色属性的名为“PieSlice”的类型。没有分配颜色,而是分配一个 PieSlice 值,它本身包含一种颜色:
import QtQuick 2.14
import QtQuick.Window 2.14
import Charts 1.0

Window
{
    visible: true
    title: qsTr("Hello World")
    width: 300; height: 200

    PieChart
    {
        id: chart
        anchors.centerIn: parent
        width: 100; height: 100

        pieSlice: PieSlice
        {
            anchors.fill: parent
            color: "red"
        }
    }

    Component.onCompleted: console.log("馅饼是彩色的:" + chart.pieSlice.color)
}
与 PieChart 一样,这个新的 PieSlice 类型继承自 QQuickPaintedItem 并使用 Q_PROPERTY() 声明其属性:
class PieSlice : public QQuickPaintedItem
{
    Q_OBJECT
    Q_PROPERTY(QColor color READ color WRITE setColor NOTIFY colorChanged)
    QML_ELEMENT

public:
    PieSlice(QQuickItem *parent = 0);
    void paint(QPainter *painter);

    const QColor &color() const;
    void setColor(const QColor &newColor);

signals:
    void colorChanged();

private:
    QColor m_color;
};
PieSlice::PieSlice(QQuickItem *parent)
: QQuickPaintedItem(parent)
{
}
void PieSlice::paint(QPainter *painter)
{
QPen pen(m_color, 2);
painter->setPen(pen);
painter->setRenderHints(QPainter::Antialiasing, true);
painter->drawPie(boundingRect().adjusted(1, 1, -1, -1), 90 * 16, 290 * 16);
}
const QColor &PieSlice::color() const
{
return m_color;
}
void PieSlice::setColor(const QColor &newColor)
{
if (m_color == newColor)
return;
m_color = newColor;
update();
emit colorChanged();
}绘制饼图和颜色属性都放到PieSlice里面,那么其父类就不要绘制了,即其基类可改成 QQuickItem:
class PieChart : public QQuickItem
{
    Q_OBJECT
    Q_PROPERTY(PieSlice * pieSlice READ pieSlice WRITE setPieSlice NOTIFY pieSliceChanged)
    QML_ELEMENT

public:
    PieChart(QQuickItem *parent = 0);

    PieSlice *pieSlice() const;
    void setPieSlice(PieSlice *newPieSlice);

signals:
    void pieSliceChanged();

private:
    PieSlice * m_pieSlice;
};
PieChart::PieChart(QQuickItem *parent) :
m_pieSlice(new PieSlice)
{
}
PieSlice *PieChart::pieSlice() const
{
return m_pieSlice;
}
void PieChart::setPieSlice(PieSlice *newPieSlice)
{
if (m_pieSlice == newPieSlice)
return;
m_pieSlice = newPieSlice;
m_pieSlice->setParentItem(this);
emit pieSliceChanged();
}在实现 setPieSlice() 时需要注意一点,PieSlice 是一个可视项,因此必须使用 QQuickItem::setParentItem() 将其设置为 PieChart 的子项,以便 PieChart 在绘制其内容时知道要绘制此子项。
效果:
五、使用列表属性类型
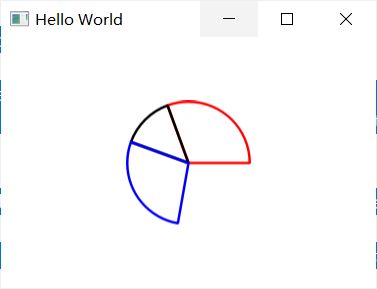
上面的 PieChart 只能有一个 PieSlice。实际上图表应具有多个切片,具有不同的颜色和大小。 为此,可以有一个 slices 属性来接受 PieSlice 项目列表:
import QtQuick 2.14
import QtQuick.Window 2.14
import Charts 1.0

Window
{
    visible: true
    title: qsTr("Hello World")
    width: 300; height: 200

    PieChart
    {
        anchors.centerIn: parent
        width: 100; height: 100

        slices:
        [
            PieSlice
            {
                anchors.fill: parent
                color: "red"
                fromAngle: 0; angleSpan: 110
            },
            PieSlice
            {
                anchors.fill: parent
                color: "black"
                fromAngle: 110; angleSpan: 50
            },
            PieSlice
            {
                anchors.fill: parent
                color: "blue"
                fromAngle: 160; angleSpan: 100
            }
        ]
    }
}
为此,将 PieChart 中的 pieSlice 属性替换为 slices 属性,声明为 QQmlListProperty 类型。 QQmlListProperty 类允许在 QML 扩展中创建列表属性。
class PieSlice : public QQuickPaintedItem
{
    Q_OBJECT
    Q_PROPERTY(QColor color READ color WRITE setColor NOTIFY colorChanged)
    Q_PROPERTY(int fromAngle READ getFromAngle WRITE setFromAngle NOTIFY fromAngleChanged)
    Q_PROPERTY(int angleSpan READ getAngleSpan WRITE setAngleSpan NOTIFY angleSpanChanged)
    QML_ELEMENT

public:
    PieSlice(QQuickItem *parent = 0);
    void paint(QPainter *painter);

    const QColor &color() const;
    void setColor(const QColor &newColor);

    int getFromAngle() const;
    void setFromAngle(int newFromAngle);

    int getAngleSpan() const;
    void setAngleSpan(int newAngleSpan);

signals:
    void colorChanged();
    void fromAngleChanged();
    void angleSpanChanged();

private:
    QColor m_color;
    int fromAngle;
    int angleSpan;
};
PieSlice::PieSlice(QQuickItem *parent)
: QQuickPaintedItem(parent)
{
}
void PieSlice::paint(QPainter *painter)
{
QPen pen(m_color, 2);
painter->setPen(pen);
painter->setRenderHints(QPainter::Antialiasing, true);
painter->drawPie(boundingRect().adjusted(1, 1, -1, -1), fromAngle * 16, angleSpan * 16);
}
const QColor &PieSlice::color() const
{
return m_color;
}
void PieSlice::setColor(const QColor &newColor)
{
if (m_color == newColor)
return;
m_color = newColor;
update();
emit colorChanged();
}
int PieSlice::getFromAngle() const
{
return fromAngle;
}
void PieSlice::setFromAngle(int newFromAngle)
{
if (fromAngle == newFromAngle)
return;
fromAngle = newFromAngle;
update();
emit fromAngleChanged();
}
int PieSlice::getAngleSpan() const
{
return angleSpan;
}
void PieSlice::setAngleSpan(int newAngleSpan)
{
if (angleSpan == newAngleSpan)
return;
angleSpan = newAngleSpan;
update();
emit angleSpanChanged();
}class PieChart : public QQuickItem
{
Q_OBJECT
Q_PROPERTY(QQmlListProperty<PieSlice> slices READ slices)
QML_ELEMENT
public:
PieChart(QQuickItem *parent = 0);
QQmlListProperty<PieSlice> slices();
private:
static void append_slice(QQmlListProperty<PieSlice> *list, PieSlice *slice);
QList<PieSlice *> m_slices;
};PieChart::PieChart(QQuickItem *parent):
QQuickItem(parent)
{
}
QQmlListProperty<PieSlice> PieChart::slices()
{
return QQmlListProperty<PieSlice>(this, nullptr, &PieChart::append_slice, nullptr,
nullptr, nullptr, nullptr, nullptr);
}
void PieChart::append_slice(QQmlListProperty<PieSlice> *list, PieSlice *slice)
{
if (PieChart *chart = qobject_cast<PieChart *>(list->object))
{
slice->setParentItem(chart);
chart->m_slices.append(slice);
}
}效果:
六、编写扩展插件
略。


 413
413


 被折叠的 条评论
为什么被折叠?
被折叠的 条评论
为什么被折叠?
 到【灌水乐园】发言


