


一、描述
1、QPainter 类在小部件和其他绘制设备上执行低级绘制。
2、QPainter 提供了高度优化的功能来完成大多数图形GUI程序所需的工作。它可以画从简单的线条到复杂的形状。它还可以绘制对齐的文本和像素图。QPainter 可以对继承 QPaintDevice 类的任何对象进行操作。
3、QPainter 与 QPaintDevice 和 QPaintEngine 类一起构成了Qt绘制系统的基础:
- QPainter 是用于执行绘图操作的类。
- QPaintDevice 表示可以使用 QPainter 在其上绘制的设备。
- QPaintEngine 提供了一个接口,QPainter 可以使用这个接口来绘制不同类型的设备。
二、类型成员
1、QPainter::CompositionMode。图像合成支持的模式。从实用的角度来看,默认的设置是最好的设置。官方有个“Composition Modes”例子展示了各种模式的效果。
2、QPainter::PixmapFragmentHint。
- OpaqueHint。指示要绘制的 pixmap 片段是不透明的。不透明碎片可能会更快地绘制。
3、QPainter::RenderHint。指定 QPainter 的标志,绘制引擎可能会或不会遵守这些标志。
- Antialiasing:图像边缘抗锯齿。
- TextAntialiasing:文本抗锯齿。要强行禁用文本的抗锯齿功能,请不要设置:
setRenderHint(QPainter::TextAntialiasing, false);而是应该在字体的样式策略上设置:
    auto font = this->font();
font.setStyleHint(font.styleHint(),QFont::NoAntialias);- SmoothPixmapTransform:指示引擎应使用平滑 pixmap 变换算法绘制图片。
- LosslessImageRendering:尽可能使用无损图像渲染。目前,此提示仅在使用 QPainter 通过QPrinter 或 QPdfWriter 输出PDF文件时使用。
三、实用成员函数
1、QPainter(QPaintDevice *device)
构造一个立即开始绘制绘制设备的QPainter对象。此构造函数对于临时的绘制者很方便,并且应该只使用一次。
构造函数自动调用 begin(),析构函数自动调用 end()。
以下代码效果一样:
     QPainter p;
     p.begin(this);
     p.drawLine(...);
     p.end();
QPainter p(this);
p.drawLine(...);2、bool begin(QPaintDevice *device)
开始绘制绘画设备,如果成功则返回true,否则返回false。请注意,在调用 begin()时,所有绘画工具设置(setPen()、setBrush()等)都将重置为默认值。
调用此函数可能存在的错误:
 painter->begin(nullptr); //错误,绘制设备为空

 QPixmap image(0, 0);
 painter->begin(&image); //错误,图片为空

 painter->begin(myWidget);
 painter2->begin(myWidget); //错误,同一时间不能由两个QPainter绘制同一设备
注:不支持在格式为 QImage::Format_Indexed8 的 QImage 上绘制。
3、QRectF boundingRect(const QRectF &rectangle, int flags, const QString &text)
返回使用当前设置的 font() 使用指定标志在给定矩形内部绘制时显示的文本的边界矩形。
即该函数告诉您在给定相同参数的情况下 drawText() 函数将在何处绘制。如果使用指定的标志文本不适合给定的矩形,则该函数返回所需的矩形。flags 参数见下面的第30点。
void Widget::paintEvent(QPaintEvent *event)
{
    QPainter painter(this);
    painter.setPen(QPen(Qt::red,5));
    QRect rect = QRect(20,20,100,50);
    painter.drawRect(rect);
    QFont font = this->font();
    font.setPointSize(30);
    painter.setFont(font);
    painter.drawText(rect,Qt::AlignHCenter | Qt::TextWordWrap,"黄河之水天上来");
    painter.setPen(QPen(Qt::green,5));
    auto bRect = painter.boundingRect(rect,Qt::AlignHCenter | Qt::TextWordWrap,"黄河之水天上来");
    painter.drawRect(bRect);
}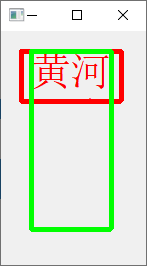
红框是设置的要绘制的矩形。不过字太大了只能绘制两个字,绿色是要绘制这句诗实际上需要的边界矩形。
4、QPoint brushOrigin()
获取绘制开始的点。
    QPainter painter(this);
    painter.setRenderHint(QPainter::Antialiasing,true);
    painter.setPen(QPen(Qt::red,5));
    painter.drawEllipse(painter.brushOrigin(),5,5);
    painter.translate(50,50);
    painter.drawEllipse(painter.brushOrigin(),5,5);
    painter.setBrushOrigin(100,100);
    painter.drawEllipse(painter.brushOrigin(),5,5);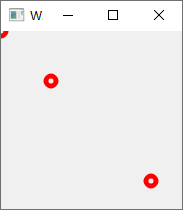
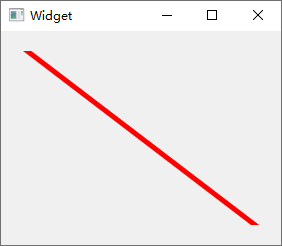
5、void setClipRect(const QRectF &rectangle, Qt::ClipOperation operation = Qt::ReplaceClip)
启用剪辑,并使用给定的剪辑操作将剪辑区域设置为给定的矩形。
裁剪操作 Qt::ClipOperation:
- Qt::NoClip:关闭裁剪。
- Qt::ReplaceClip:将当前的裁剪路径/矩形/区域替换为函数调用中提供的路径/矩形/区域。
- Qt::IntersectClip:与当前裁剪路径/矩形/区域与函数调用中提供的路径相交。
void Widget::paintEvent(QPaintEvent *event)
{
    auto rect = event->rect();
    QPainter painter(this);
    painter.setRenderHint(QPainter::Antialiasing,true);
    painter.setPen(QPen(Qt::red,5));
    painter.setClipRect(rect.adjusted(20,20,-20,-20));
    painter.drawLine(rect.topLeft(),rect.bottomRight());
}
6、void setClipPath(const QPainterPath &path, Qt::ClipOperation operation = Qt::ReplaceClip)
设置裁剪路径。
void Widget::paintEvent(QPaintEvent *event)
{
    auto rect = event->rect();
    QPainter painter(this);
    painter.setRenderHint(QPainter::Antialiasing,true);
    painter.setBrush(Qt::cyan);
    QPainterPath path;
    path.addRoundRect(rect.adjusted(20,20,-20,-20),60,60);
    painter.setClipPath(path);
    painter.drawRect(rect);
}
7、void setClipRegion(const QRegion ®ion, Qt::ClipOperation operation = Qt::ReplaceClip)
设置裁剪区域,见 QRegion详解
8、void drawArc(const QRect &rect, int startAngle, int lenAngle)
绘制圆弧。
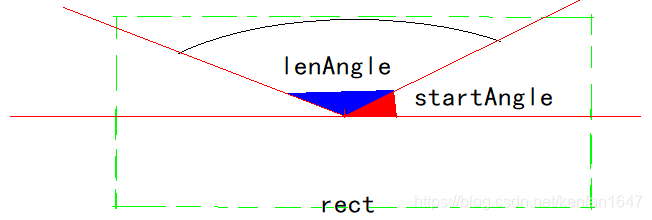
    QPainter painter(this);
    painter.setRenderHint(QPainter::Antialiasing,true);
    painter.setPen(QPen(Qt::red,5));
    QRectF rectangle(10.0, 20.0, 80.0, 60.0);
    int startAngle = 30 * 16;
    int spanAngle = 120 * 16;
    painter.drawArc(rectangle, startAngle, spanAngle);
    painter.setPen(QPen(Qt::blue,3,Qt::DotLine));
    painter.drawRect(rectangle);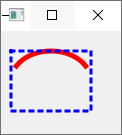
9、void drawChord(const QRectF &rectangle, int startAngle, int spanAngle)
绘制扇形,参数含义和绘制弧形一样。
painter.drawChord(rectangle, startAngle, spanAngle);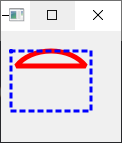
10、void drawConvexPolygon(const QPointF *points, int pointCount)
绘制凸多边形(凸多边形的内角均小于或等于180°)。第一个点隐式连接到最后一个点,并且多边形被当前的brush()填充。
    QPainter painter(this);
    painter.setRenderHint(QPainter::Antialiasing,true);
    painter.setPen(QPen(Qt::red,3));

    static const QPointF points[4] = { QPointF(10.0, 80.0),
                                       QPointF(20.0, 10.0),
                                       QPointF(80.0, 30.0),
                                       QPointF(90.0, 70.0)};
    painter.drawConvexPolygon(points, 4);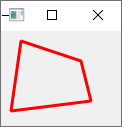
11、void drawConvexPolygon(const QPolygonF &polygon)
绘制凸多边形,重载函数。
    QPolygonF polygon;
    polygon.append(QPointF(10.0, 80.0));
    polygon.append(QPointF(20.0, 10.0));
    polygon.append(QPointF(80.0, 60.0));
    painter.drawConvexPolygon(polygon);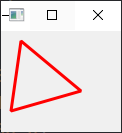
12、void drawEllipse(const QRectF &rectangle)
绘制椭圆,参数是椭圆的外切矩形。
13、void drawEllipse(const QPointF ¢er, qreal rx, qreal ry)
绘制椭圆,参数为椭圆的中心和x、y方向的半径。
14、void drawImage(const QRectF &target, const QImage &image, const QRectF &source, Qt::ImageConversionFlags flags = Qt::AutoColor)
将给定图像的矩形部分(参数3)源绘制到绘制设备中的目标矩形(参数1)中。如果图像和矩形尺寸不相同,则将图像缩放以适合矩形。
    QPainter painter(this);
    QImage img(":/D:/eee.jpg");
    QRectF r{40,40,100,200};
    painter.drawImage(r,img);
    QPainter painter(this);
    QImage img(":/D:/eee.jpg");
    QRectF r{40,40,100,200};
    painter.drawImage(r,img,QRectF(30,30,200,400));
15、void drawLine(const QLineF &line)
绘制直线。QLineF
16、void drawPath(const QPainterPath &path)
使用当前的笔绘制轮廓并使用当前的笔刷绘制路径。QPainterPath
17、void drawPie(const QRectF &rectangle, int startAngle, int spanAngle)
绘制扇形。扇形被当前的 brush()填充。必须以度的1/16来指定startAngle和spanAngle,即一个完整的圆等于5760(16 * 360)。角度的正值表示逆时针方向,而负值表示顺时针方向。参考上面的 drawArc()示意图。
    QPainter painter(this);
    QRectF rectangle(10.0, 20.0, 80.0, 60.0);
    int startAngle = 30 * 16;
    int spanAngle = 120 * 16;

    painter.setPen(QPen(Qt::red,5));
    painter.drawPie(rectangle, startAngle, spanAngle);
    painter.setPen(QPen(Qt::blue,3,Qt::DotLine));
    painter.drawRect(rectangle);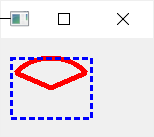
18、void drawPixmap(const QRectF &target, const QPixmap &pixmap, const QRectF &source)
将给定像素图的矩形部分源绘制到绘画设备中的给定目标中。如果像素图和矩形大小不相同,则将像素图缩放为适合矩形。
    QPainter painter(this);
    QPixmap img(":/D:/eee.jpg");
    QRectF r{40,40,100,200};
    painter.drawPixmap(r,img,QRectF(30,30,200,400));
19、void drawPixmap(const QPointF &point, const QPixmap &pixmap, const QRectF &source)
在参数1的点处开始绘制参数3指定的图片区域,不会缩放。
    QPainter painter(this);
    QPixmap img(":/D:/eee.jpg");
    painter.drawPixmap(QPointF(40,40),img,QRectF(30,30,200,400));
20、void drawPixmap(const QPointF &point, const QPixmap &pixmap)
在给定点开始绘制图片,不会缩放。
21、void drawPixmap(const QRect &rectangle, const QPixmap &pixmap)
在矩形区域绘制图片,会缩放。
22、void drawPoint(const QPointF &position)
绘制点。
    QPainter painter(this);
    painter.setRenderHint(QPainter::Antialiasing);
    painter.setPen(QPen(Qt::red,5));
    painter.drawPoint(QPointF(40,40));
    painter.setPen(QPen(Qt::red,15));
    painter.drawPoint(QPointF(60,60));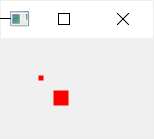
22、void drawPoints(const QPointF *points, int pointCount)
绘制数组中的点。
    QPainter painter(this);
    painter.setRenderHint(QPainter::Antialiasing);
    painter.setPen(QPen(Qt::red,5));

    static const QPointF points[4] = {
        QPointF(10.0, 80.0),
        QPointF(20.0, 10.0),
        QPointF(80.0, 30.0),
        QPointF(90.0, 70.0)
    };
    painter.drawPoints(points, 4);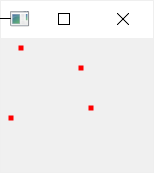
23、void drawPoints(const QPolygonF &points)
绘制多边形中的点。
24、void drawPolygon(const QPolygonF &points, Qt::FillRule fillRule = Qt::OddEvenFill)
绘制多边形。QPolygon
25、void drawPolyline(const QPointF *points, int pointCount)
绘制折线。
    QPainter painter(this);
    painter.setRenderHint(QPainter::Antialiasing);
    painter.setPen(QPen(Qt::red,5));

    static const QPointF points[3] = {
        QPointF(10.0, 80.0),
        QPointF(20.0, 10.0),
        QPointF(80.0, 30.0),
    };
    painter.drawPolyline(points, 3);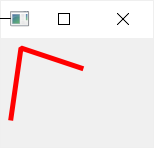
26、void drawPolyline(const QPolygonF &points)
绘制折线。
    QPainter painter(this);
    painter.setRenderHint(QPainter::Antialiasing);
    painter.setPen(QPen(Qt::red,5));
    QPolygon polygon = QPolygon();
    polygon << QPoint(22,33)<<QPoint(78,45)<<QPoint(111,233)<<QPoint(234,88)<<QPoint(34,89);
    painter.drawPolyline(polygon);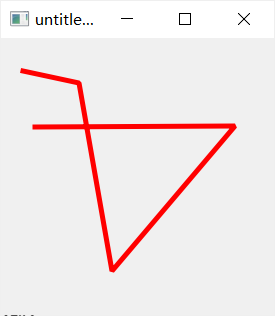
27、void drawRect(const QRectF &rectangle)
绘制矩形。QRectF
28、void drawRoundedRect(const QRectF &rect, qreal xRadius, qreal yRadius, Qt::SizeMode mode = Qt::AbsoluteSize)
绘制圆角矩形。见QPainterPath
29、void drawText(const QPointF &position, const QString &text)
从给定位置开始,以当前定义的文本方向绘制给定文本。此函数不处理换行符(\ n),因为它不能将文本分成多行,也不能显示换行符。默认情况下,QPainter绘制抗锯齿的文本。
30、void drawText(const QRectF &rectangle, int flags, const QString &text, QRectF *boundingRect = nullptr)
在提供的矩形内绘制给定的文本。矩形以及对齐标记定义了文本的锚点。
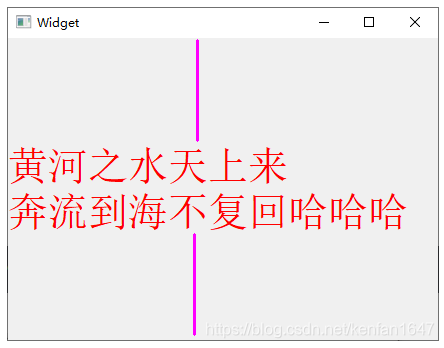
    auto rect = event->rect();
    QPainter painter(this);
    painter.setPen(QPen(Qt::red,5));
    painter.drawText(rect, Qt::AlignCenter, "黄河之水天上来\n奔流到海不复回");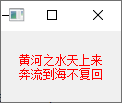
参数4是绘制的文本的外接矩形,例:
    auto rect = event->rect();
    QPainter painter(this);
    painter.setPen(QPen(Qt::red,5));
    QRectF boundingRect;
    painter.drawText(rect, Qt::AlignCenter, "黄河之水天上来\n奔流到海不复回", &boundingRect);
    painter.setPen(QPen(Qt::cyan,3,Qt::DotLine));
    painter.drawRect(boundingRect);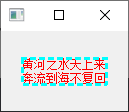
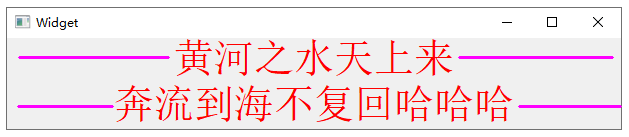
参数2文本标识单独使用时的效果:
- Qt::AlignLeft:文本靠左。
- Qt::AlignRight:文本靠右。
void Widget::paintEvent(QPaintEvent *event)
{
    auto rect = event->rect();
    QPainter painter(this);
    painter.setPen(QPen(Qt::red,5));
    QFont font;
    font.setPixelSize(40);
    painter.setFont(font);
    painter.drawText(rect,Qt::AlignRight, "黄河之水天上来\n奔流到海不复回哈哈哈");
}
- Qt::AlignHCenter:水平方向居中。
Qt::AlignJustify:两端对齐,无效,原因未知。- Qt::AlignTop:文本靠上。
- Qt::AlignBottom:文本靠下。
- Qt::AlignVCenter:垂直方向居中。
- Qt::AlignCenter:水平和垂直方向居中。
- Qt::TextSingleLine:保持文本单行,把换行符当做空格。
painter.drawText(rect,Qt::TextSingleLine, "黄河之水天上来\n奔流到海不复回哈哈哈");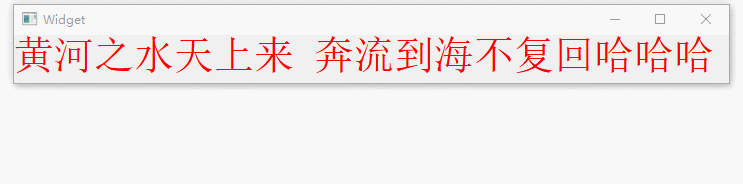
- Qt::TextExpandTabs:这个资料语焉不详,我推测作用是复制一个制表符。
void Widget::paintEvent(QPaintEvent *event)
{
    auto rect = event->rect();
    QPainter painter(this);
    painter.setPen(QPen(Qt::red,5));
    QFont font;
    font.setPixelSize(40);
    painter.setFont(font);
    QString text = "A\tA";
    painter.drawText(rect,Qt::TextExpandTabs, text);
    painter.drawText(QPointF(0,80),text);

    auto bRect = painter.boundingRect(rect,Qt::TextExpandTabs,text);
    painter.drawRect(bRect);
}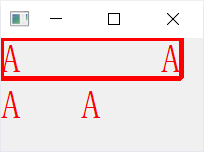
使用这个标识之后多出了一个制表符空间。
- Qt::TextShowMnemonic:将字符串“&P”显示为P。对于&号,请使用“&&”。例:
    QString text = "&ABC";
    painter.drawText(rect,Qt::TextShowMnemonic, text);
painter.drawText(QPointF(0,80),text); 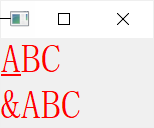
- Qt::TextWordWrap:文字自动换行。
31、void drawText(const QRectF &rectangle, const QString &text, const QTextOption &option = QTextOption())。
    QTextOption option(Qt::AlignLeft | Qt::AlignVCenter);
    option.setTextDirection(Qt::RightToLeft);
    painter.drawText(rect,"黄河之水天上来",option);
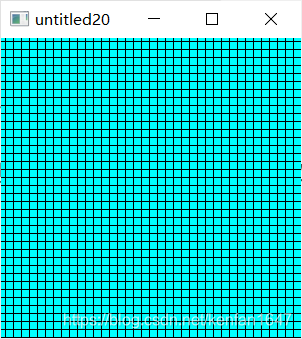
32、void drawTiledPixmap(const QRectF &rectangle, const QPixmap &pixmap, const QPointF &position = QPointF())
绘制平铺图片。绘制从图片中参数3的位置开始绘制。
    QPixmap pixmap(":/D:/666666.PNG");
    painter.drawTiledPixmap(rect,pixmap,QPointF(100,100));
33、void eraseRect(const QRectF &rectangle)
擦除区域。
相当于:
fillRect(rectangle, background());34、bool end()
结束绘画。 释放绘画时使用的所有资源。
35、void fillPath(const QPainterPath &path, const QBrush &brush)
填充路径,但不绘制轮廓。
    QPainterPath path;
    path.cubicTo(QPointF(0,0),QPointF(200,200),QPointF(150,20));
    painter.fillPath(path,Qt::cyan);
36、void fillRect(const QRect &rectangle, const QBrush &brush)
填充矩形,可用颜色、画刷、渐变、画刷类型填充。
37、bool isActive()
是否已调用 begin() 而尚未调用 end()。
38、void resetTransform()
重置使用 translate(),scale(),shear(),rotate(),setWorldTransform(),setViewport() 和setWindow() 进行的所有转换。
39、void restore()
恢复当前的QPainter状态(从堆栈弹出保存的状态)。
40、void save()
保存当前的画家状态(将状态推送到堆栈上)。 在save()之后必须有一个相应的restore()。(end()函数会展开堆栈)
41、void rotate(qreal angle)
顺时针旋转坐标系。
    QPainter painter(this);
    painter.setPen(QPen(Qt::red,5));
    painter.translate(150,150);
    painter.drawText(QPointF(0,0),"黄河之水天上来");
    painter.rotate(90);
    painter.drawText(QPointF(0,0),"黄河之水天上来");
    painter.rotate(90);
    painter.drawText(QPointF(0,0),"黄河之水天上来");
    painter.rotate(90);
    painter.drawText(QPointF(0,0),"黄河之水天上来");
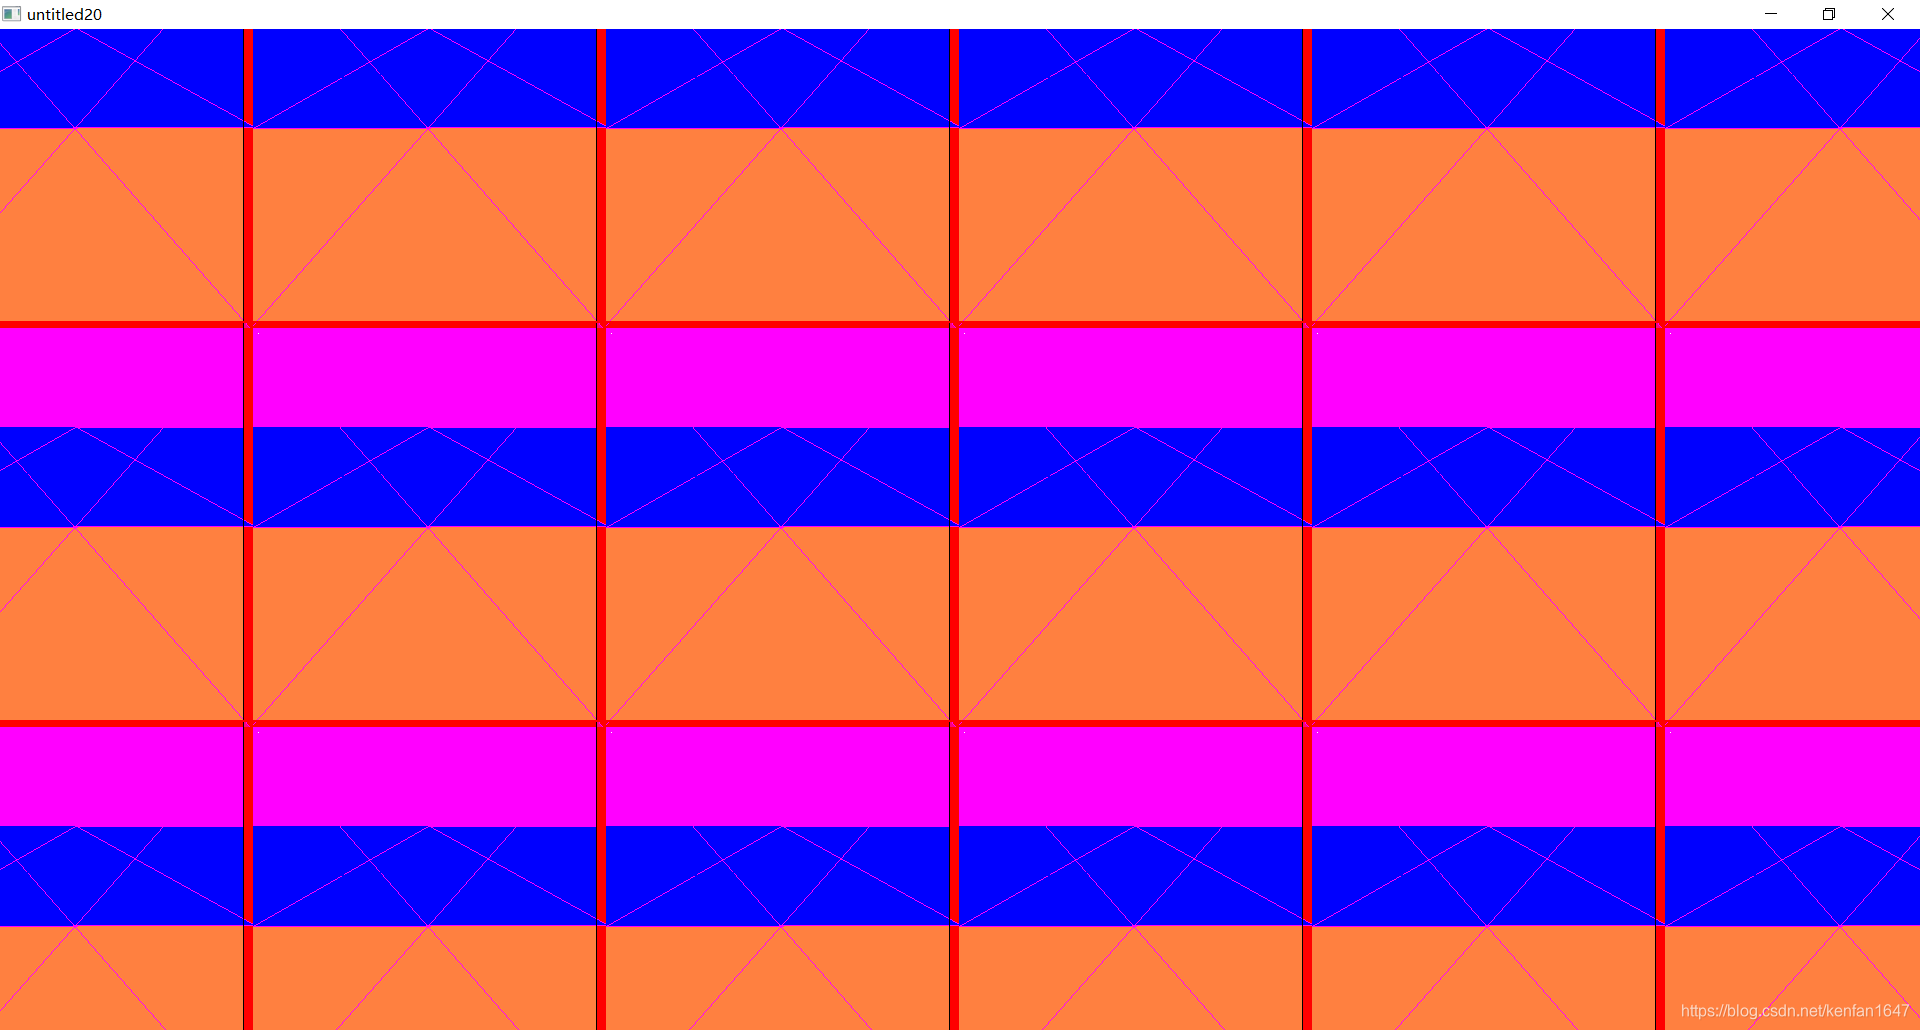
42、void scale(qreal sx, qreal sy)
坐标x、y轴缩放相应比例。
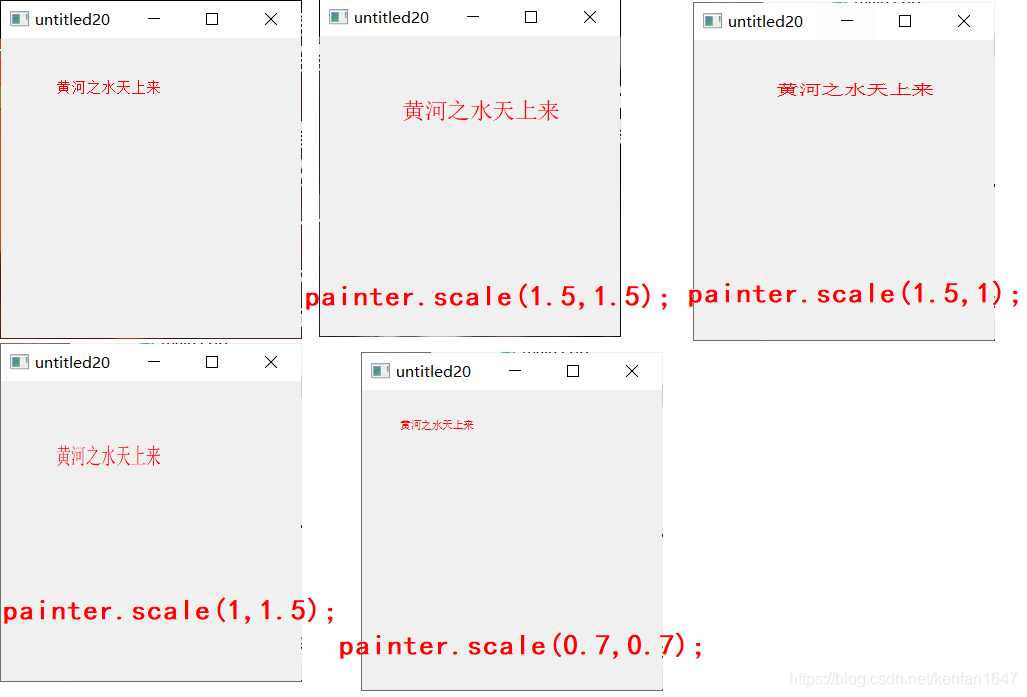
这个函数非常有用,可以看以下例子:
void Widget::paintEvent(QPaintEvent *event)
{
    auto rect = this->rect();

    QPainter painter(this);
    painter.setPen(Qt::transparent);
    painter.setRenderHint(QPainter::Antialiasing);
    painter.scale(rect.width()/1000.0, rect.height()/1000.0);

    auto radialGent = QRadialGradient(QPointF(0,0),qSqrt(2000000),QPointF(0, 0));
    radialGent.setColorAt(0, QColor(224, 224, 224));
    radialGent.setColorAt(1, QColor(28, 28, 28));

    painter.setBrush(QBrush(radialGent));
    painter.drawRoundedRect(QRect(0,0,1000,1000).adjusted(5,5,-5,-5),30,30);

    radialGent = QRadialGradient(QPointF(1000, 1000), qSqrt(2000000), QPointF(1000, 1000));
    radialGent.setColorAt(0, QColor(224, 224, 224));
    radialGent.setColorAt(1, QColor(28, 28, 28));
    painter.setBrush(QBrush(radialGent));
    painter.drawRoundedRect(QRect(0,0,1000,1000).adjusted(100,100,-100,-100),30,30);

    painter.setBrush(QBrush(Qt::red));
    painter.drawRoundedRect(QRect(0,0,1000,1000).adjusted(150,150,-150,-150),30,30);
}
painter.scale(rect.width()/1000.0, rect.height()/1000.0);这么写可以把宽度和高度都映射到1000,这样QRect(0,0,1000,1000)就表示整个窗口的区域,这样就把绘制区域限定在一个逻辑范围而不用管实际上的尺寸。
43、void setBackground(const QBrush &brush)
设置背景画刷。背景画刷是在绘制不透明文本、填充画刷样式和绘制位图时填充的画刷。背景笔刷在透明背景模式下没有效果(默认设置)。
void Widget::paintEvent(QPaintEvent *event)
{
    auto rect = event->rect();
    QPainter painter(this);
    painter.setBackgroundMode(Qt::OpaqueMode);
    painter.setBackground(Qt::cyan);
    painter.fillRect(rect,Qt::CrossPattern);
}
    QPainter painter(this);
    painter.setBackgroundMode(Qt::OpaqueMode);
    painter.setBackground(Qt::cyan);
    painter.setPen(QPen(Qt::red,5));
    painter.drawText(QPointF(55,55),"黄河之水天上来");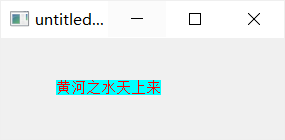
绘制位图:
    auto rect = event->rect();
    QPainter painter(this);
    painter.setBackgroundMode(Qt::OpaqueMode);
    painter.setBackground(Qt::cyan);
    QBitmap img(":/D:/qqq.jpeg");
    painter.drawPixmap(rect,img);
44、void setBackgroundMode(Qt::BGMode mode)。
设置背景模式。
Qt::BGMode:
- Qt::TransparentMode:(默认设置)绘制不透明文本、填充画刷样式和绘制位图时无需设置背景像素。
- Qt::OpaqueMode:用当前背景色填充不透明文本、画刷样式和位图的背景像素。
45、void setOpacity(qreal opacity)
设置透明度。值为0.0~1.0。
46、void setWorldTransform(const QTransform &transform, bool combine = false)
设置变换矩阵。见 QTransform。如果参数2是true,将与当前矩阵的变换效果合并,否则替换当前变换矩阵。
    QPainter painter(this);
    auto rectPoint = event->rect().center();

    QTransform transform;
    transform.translate(rectPoint.x(),rectPoint.y());
    painter.setWorldTransform(transform);

    QTransform transform2;
    transform2.rotate(45);
    painter.setWorldTransform(transform2,true);

    painter.setPen(QPen(Qt::cyan, 3, Qt::DashDotLine));
    painter.drawRect(0, 0, 100, 100);
设置了两个变换矩阵,一个效果是平移,一个效果是旋转,第一次设置平移效果,第二次设置旋转和平移效果合并,即有平移和旋转两种效果。
注:setTransform() 和 setWorldTransform()这俩没区别,查看源码发现 setTransform() 实际上就是调用 setWorldTransform():

47、void setWindow(const QRect &rectangle)
设置窗口转换矩形。见窗口-视口转换
48、void setViewTransformEnabled(bool enable)
设置是否启用窗口-视口转换。设置为 false 则相当于 setWindow() 的设置无效。
49、void setViewport(const QRect &rectangle)
设置视口。见窗口-视口转换
50、void setWorldMatrixEnabled(bool enable)
设置是否启用变换矩阵,设为 false则 相当于 setTransform() 的设置无效。
51、void shear(qreal sh, qreal sv)
剪切坐标,见 QTransform
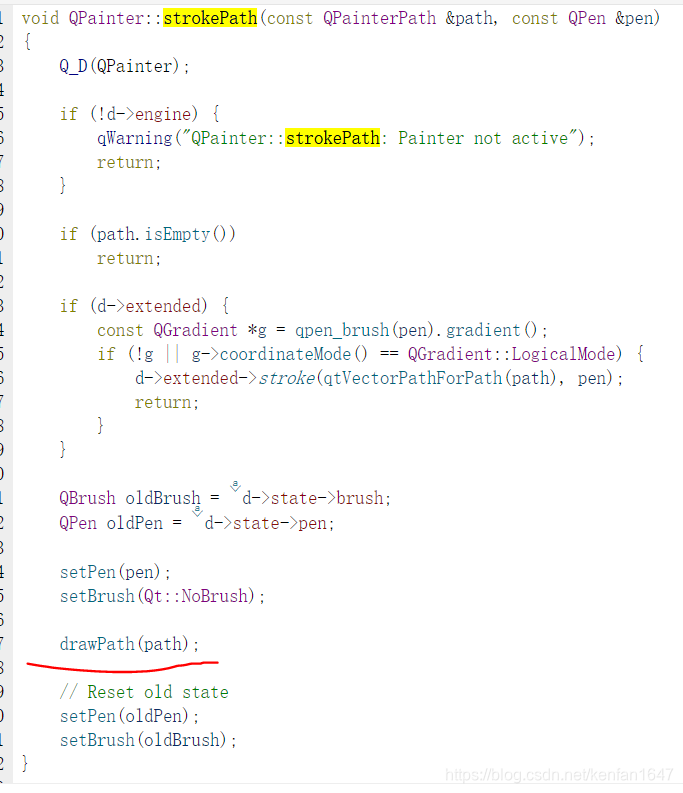
52、void strokePath(const QPainterPath &path, const QPen &pen)
使用指定的画笔描绘路径轮廓,其内部实际上是调用 drawPath()。
53、void translate(qreal dx, qreal dy)
平移绘制坐标。
    QPainter painter(this);
    painter.translate(50,50);
    painter.drawText(QPointF(0,0),"黄河之水天上来");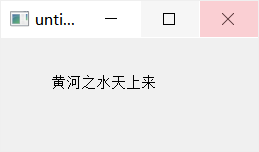


 2万+
2万+

 被折叠的 条评论
为什么被折叠?
被折叠的 条评论
为什么被折叠?
 到【灌水乐园】发言


