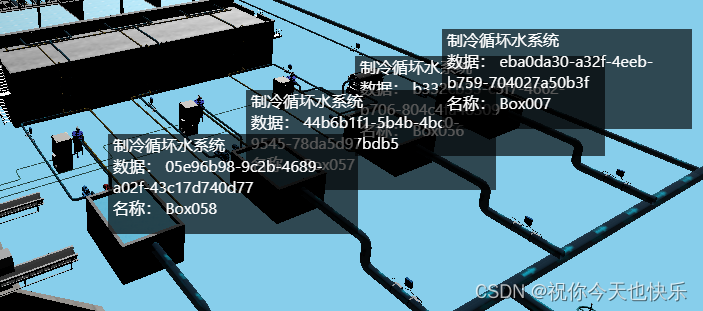
vue 中将three.js导入的3D模型给指定的元素初始化时展示tip;动态id名称和动态css;vue 中将three.js导入的3D模型中的tip随着元素位置的变化而变化

效果:

1.html部分(:id="`sign${v.uuid}`" 动态id名称)

<template>
  <div class="container">
    <div ref="canvasContainer" class="canvas-container"></div>
    <div :id="`sign${v.uuid}`" style="position: absolute;" v-for="(v, idx) in labels" :key="idx">
      <div class="sign" :uuid="v.uuid">
        <div class="name">制冷循坏水系统</div>
        <div class="data">数据: {{ v.uuid }}</div>
        <div class="name">名称: {{ v.name }}</div>
      </div>
    </div>
  </div>
</template>

2.css部分(div[id *="sign"]动态css

<style lang="scss" scoped>
.canvas-container {
  position: relative;
  width: 100%;
  height: 800px;
  border: 1px solid #ccc;
}

div[id *="sign"] {
  width: 250px;
  height: 100px;
  background: rgba(0, 0, 0, .65);

  .sign {
    div {
      color: #fff;
      text-align: left;
      padding: 0 5px;
    }
  }
}
</style>

 3.js部分

(1)在methods中定义生成方法

labelTag(camera, targePosition, targetId, innerHTML, webGLdom) {
      const { width, height } = webGLdom.getBoundingClientRect();
      let worldVector = new THREE.Vector3(targePosition.x, targePosition.y, targePosition.z);
      let vector = worldVector.project(camera);
      let halfWidth = width / 2,
        halfHeight = height / 2;
      let x = Math.round(vector.x * halfWidth + halfWidth);
      let y = Math.round(-vector.y * halfHeight + halfHeight);
      /**
       * 更新立方体元素位置
       */
      let div = document.getElementById(targetId);
      if (div&&div.style) {
        div.style.left = x + 'px';
        div.style.top = y + 'px';
      }
    }

(2)在animate方法中查询到具体的要显示tip的对象后调用上面的labelTag方法 (在这里调用就是为了tip和元素的位置一起变化)

 animate() {
      // tag初始化创建
      this.$nextTick(() => {
       //this.model = gltf.scene 这里是模型加载时候的所保存的gltf.scene对象
        this.container = document.querySelector('.canvas-container');
        this.labels = [this.model.getObjectByName('Box056'),this.model.getObjectByName('Box057'),this.model.getObjectByName('Box058'),this.model.getObjectByName('Box007')]
        this.labels.forEach((val, idx) => {
          const { x, y, z } = val.position;
          this.labelTag(this.camera, { x, y, z }, `sign${val.uuid}`, val, this.container)
        })
      })
    },

可以根据某个标识去批量加载出对应的tip 

      // tag初始化创建
      this.labels = this.model.children.filter(v => v.type == 'Mesh')
      this.$nextTick(() => {
          this.model.children.forEach((val, idx) => {
            if (val.type == 'Mesh') {
              const { x, y, z } = val.position;
              this.labelTag(this.camera, { x, y, z }, `sign${val.uuid}`, val, this.container)
           }
        })
      })


  • 0
    点赞
  • 0
    收藏
    觉得还不错? 一键收藏
  • 0
    评论
### 回答1: 在Vue加载3D模型需要使用Three.js库。首先,需要在Vue项目安装Three.js库。然后,可以使用Three.js提供的Loader加载3D模型文件,例如OBJ、FBX、GLTF等格式。加载完成后,可以将模型添加到场景进行渲染。具体的实现可以参考Three.js的官方文档和示例代码。 ### 回答2: 使用vue实现three.js3D模型加载需要以下步骤: 1. 安装three.js库 在vue项目使用three.js需要先安装three.js库。可以通过npm安装: ```npm install three --save``` 安装后,可以通过需要使用three.js的组件引入库: ```import * as THREE from 'three'``` 2. 创建场景、相机、渲染器 在vue组件内部需要先创建基本的场景、相机和渲染器组件: ```javascript mounted() { //创建场景 this.scene = new THREE.Scene(); //创建相机 this.camera = new THREE.PerspectiveCamera(50, window.innerWidth / window.innerHeight, 0.1, 1000); //创建渲染器 this.renderer = new THREE.WebGLRenderer({ antialias: true }); this.renderer.setSize(window.innerWidth, window.innerHeight); this.renderer.setClearColor('#F5F5F5', 1.0); //将渲染器添加到页面 this.$refs.box.appendChild(this.renderer.domElement); } ``` 其,mounted()生命周期函数是在vue组件加载完毕后需要去执行的函数。 3. 加载模型 加载模型需要借助于GLTFLoader库,可以通过npm安装依赖: ```npm install three-gltf-loader --save``` 加载gltf格式的模型需要加载器: ```javascript import { GLTFLoader } from 'three-gltf-loader'; mounted() { //创建GLTFloader对象 this.loader = new GLTFLoader(); //加载模型 this.loader.load(url, object => { this.scene.add(object.scene); this.animate(); }); } ``` 其,url是需要加载的模型地址,object是加载完成后的对象。 4. 更新场景 ```javascript methods: { animate() { this.renderer.render(this.scene, this.camera); //转动,可以忽略 window.requestAnimationFrame(this.animate); this.scene.rotation.y += 0.01; } } ``` 其,animate()方法是更新场景的方法。在该方法需要更新场景的内容,并进行渲染。 5. 完整代码展示 ```javascript <template> <div ref="box"></div> </template> <script> import * as THREE from 'three'; import { GLTFLoader } from 'three-gltf-loader'; export default { data() { return { scene: null, camera: null, renderer: null, loader: null } }, mounted() { //创建场景 this.scene = new THREE.Scene(); //创建相机 this.camera = new THREE.PerspectiveCamera(50, window.innerWidth / window.innerHeight, 0.1, 1000); //创建渲染器 this.renderer = new THREE.WebGLRenderer({ antialias: true }); this.renderer.setSize(window.innerWidth, window.innerHeight); this.renderer.setClearColor('#F5F5F5', 1.0); //将渲染器添加到页面 this.$refs.box.appendChild(this.renderer.domElement); //创建GLTFloader对象 this.loader = new GLTFLoader(); //加载模型 this.loader.load(url, object => { this.scene.add(object.scene); this.animate(); }); }, methods: { animate() { this.renderer.render(this.scene, this.camera); //转动,可以忽略 window.requestAnimationFrame(this.animate); this.scene.rotation.y += 0.01; } } } </script> ``` 这就是vuethree.js加载3D模型的完整教程,希望对你有所帮助。 ### 回答3: Vue是一种流行的JavaScript框架,而three.js是一个强大的WebGL库,用于创建和呈现3D图形。将Vuethree.js结合使用,可以在Vue应用程序轻松加载和处理3D模型。 要在Vue加载3D模型,首先需要安装three.js库。可以使用npm或yarn等包管理工具安装它。然后在Vue应用程序导入该库并创建一个Scene对象。场景是three.js用于呈现所有3D对象的容器。 然后需要定义一个渲染器,将场景渲染到屏幕上。在Vue,可以在组件的mounted钩子函数定义渲染器。需要将渲染器的DOM元素设置为Vue组件的$el属性。 现在就可以加载3D模型了。可以使用three.js的Loader方法加载3D模型文件。three.js支持多种3D模型格式,如OBJ、STL和GLTF。加载完成后,将3D对象添加到场景即可。 由于Vue具有响应式数据绑定的特性,可以在Vue组件轻松地控制3D模型的属性,比如位置、旋转和缩放。只需在Vue组件定义数据模型,并在模板使用数据绑定即可。 在Vue使用three.js创建3D场景需要一些基本的知识,但很容易上手。可以使用Vuethree.js创建漂亮的3D场景和模型,从而增强Vue应用程序的用户体验。

“相关推荐”对你有帮助么?

  • 非常没帮助
  • 没帮助
  • 一般
  • 有帮助
  • 非常有帮助
提交
评论
添加红包

请填写红包祝福语或标题

红包个数最小为10个

红包金额最低5元

当前余额3.43前往充值 >
需支付:10.00
成就一亿技术人!
领取后你会自动成为博主和红包主的粉丝 规则
hope_wisdom
发出的红包
实付
使用余额支付
点击重新获取
扫码支付
钱包余额 0

抵扣说明:

1.余额是钱包充值的虚拟货币,按照1:1的比例进行支付金额的抵扣。
2.余额无法直接购买下载,可以购买VIP、付费专栏及课程。

余额充值