


文章目录
📕前言
该文章主要是简述一下自己为了完成极市平台赛事过程中,使用 MMSegmentation 语义分割开源库的心得。
在学习一个新的工具之前,一定需要明白自己是用工具实现什么目标,而不是为了学工具而学,一旦有了目的会给你所作的事情带来意义,但是也要避免急于求成(人总是喜欢简单直接的事情,但是只有真正拉扯过肌肉才会成长),所以坚持不下去的时候,只要明白这是你的大脑退缩了,但你仍然想学。💪
\quad
🌳文章结构
本文章将从一下几个方面介绍如何上手 MMsegmentation,并用 MMDeploy 实现简单的部署:
- 安装 MMSegmentation
- MMSegmentation 的文件结构
- MMSegmentation 的配置文件(核心)
- 如何在 MMSegmentation 中自定义数据集
- 训练和测试
我强烈建议配合官方文档一起学习:https://mmsegmentation.readthedocs.io/zh_CN/latest/index.html
PS:如此良心的开源库还带中文文档!😭
\quad
📝正文
安装 MMSegmentation
环境准备(可选,但推荐)
一般我们为了环境隔离用 Miniconda(Anaconda) 创建一个新的 python 环境,但在某些情况下也可以不用,取决于你的习惯。
从官方网站下载并安装 Miniconda & 创建一个 conda 环境,并激活:
conda create --name openmmlab python=3.8 -y
conda activate openmmlab
\quad
安装库
-
根据官网安装 pytorch,现在更新到2.0了,但是推荐安装之前的版本(可以点击页面中下面红框的链接,授之以渔),也可以直接点击 install previous versions of PyTorch(授之以鱼)
gpu 版本(要对应自己的 cuda 版本,pip和conda 二选一)
# pip 安装
# CUDA 11.1
pip install torch==1.10.1+cu111 torchvision==0.11.2+cu111 torchaudio==0.10.1 -f https://download.pytorch.org/whl/cu111/torch_stable.html

# 或者
# conda 安装
# CUDA 11.3
conda install pytorch==1.10.1 torchvision==0.11.2 torchaudio==0.10.1 cudatoolkit=11.3 -c pytorch -c conda-forge
cpu 版本(看MMSegmentation的官方文档吧)

\quad
- 安装 MMCV(OpenMMLab 其他许多库都有这个依赖)
推荐安装方式mim,更多方式看 MMCV
pip install -U openmim
mim install mmengine
mim install "mmcv>=2.0.0"
\quad
-
安装 MMsegmentation
a. 方式一:源码安装,这个比较容易后期开发,因为能够直接修改并使用源码(本教程安装方式)git clone -b main https://github.com/open-mmlab/mmsegmentation.git cd mmsegmentation pip install -v -e . # '-v' 表示详细模式,更多的输出 # '-e' 表示以可编辑模式安装工程, # 因此对代码所做的任何修改都生效,无需重新安装b. 方式二:作为依赖库安装
pip install "mmsegmentation>=1.0.0"
\quad
验证安装是否成功
源码安装检验方式
cd mmsegmentation
python demo/image_demo.py demo/demo.png \\
configs/pspnet/pspnet_r50-d8_4xb2-40k_cityscapes-512x1024.py \\
pspnet_r50-d8_512x1024_40k_cityscapes_20200605_003338-2966598c.pth \\
--device cuda:0 --out-file result.jpg
您将在当前文件夹中看到一个新图像 result.jpg,其中所有目标都覆盖了分割 mask
其他更多安装方式见官方文档:https://mmsegmentation.readthedocs.io/zh_CN/latest/get_started.html#mmseg
\quad
MMSegmentation 的文件结构
接下来我们稍微看一下 MMsegmentation 的文件结构目录
mmsegmentation
- configs # **配置文件,是该库的核心**
	- _base_ # 基础模块文件,**但本质上还是配置文件**,包括数据集,模型,训练配置
		- datasets
		- models
		- schedules
	- else model config # 除了 _base_ 之外,其他都是通过利用 _base_ 中定义好的模块进行组合的模型文件


- mmseg # **这是库核心的实现,上面配置文件的模块都在这里定义**
	- datasets
	- models

- tools # 这里包括训练、测试、转onnx等写好了的工具,直接调用即可
	- train.py
	- test.py

- data # 放置数据集

- demo # 提供了几个小 demo(可不管)
- docker # 容器配置(可不管)
- docs # 各种说明文档(可不管)

- projects # (可不管)
- requirements # (可不管)
- tests # (可不管)
从上面可以看出,其实 MMSegmentation 做了很好的封装,如果只是使用,那是非常容易上手的。
config/base 和 mmseg 中的 datasets、models等文件有什么区别呢?
下面用 ade 数据集举一个例子(大致看一下差异,不需要弄懂):
config/_base_/datasets/ade20k.py
# dataset settings
dataset_type = 'ADE20KDataset'
data_root = 'data/ade/ADEChallengeData2016'
crop_size = (512, 512)
train_pipeline = [
    dict(type='LoadImageFromFile'),
    dict(type='LoadAnnotations', reduce_zero_label=True),
    dict(
        type='RandomResize',
        scale=(2048, 512),
        ratio_range=(0.5, 2.0),
        keep_ratio=True),
    dict(type='RandomCrop', crop_size=crop_size, cat_max_ratio=0.75),
    dict(type='RandomFlip', prob=0.5),
    dict(type='PhotoMetricDistortion'),
    dict(type='PackSegInputs')
]
test_pipeline = [
    dict(type='LoadImageFromFile'),
    dict(type='Resize', scale=(2048, 512), keep_ratio=True),
    # add loading annotation after ``Resize`` because ground truth
    # does not need to do resize data transform
    dict(type='LoadAnnotations', reduce_zero_label=True),
    dict(type='PackSegInputs')
]
img_ratios = [0.5, 0.75, 1.0, 1.25, 1.5, 1.75]
tta_pipeline = [
    dict(type='LoadImageFromFile', backend_args=None),
    dict(
        type='TestTimeAug',
        transforms=[
            [
                dict(type='Resize', scale_factor=r, keep_ratio=True)
                for r in img_ratios
            ],
            [
                dict(type='RandomFlip', prob=0., direction='horizontal'),
                dict(type='RandomFlip', prob=1., direction='horizontal')
            ], [dict(type='LoadAnnotations')], [dict(type='PackSegInputs')]
        ])
]
train_dataloader = dict(
    batch_size=4,
    num_workers=4,
    persistent_workers=True,
    sampler=dict(type='InfiniteSampler', shuffle=True),
    dataset=dict(
        type=dataset_type,
        data_root=data_root,
        data_prefix=dict(
            img_path='images/training', seg_map_path='annotations/training'),
        pipeline=train_pipeline))
val_dataloader = dict(
    batch_size=1,
    num_workers=4,
    persistent_workers=True,
    sampler=dict(type='DefaultSampler', shuffle=False),
    dataset=dict(
        type=dataset_type,
        data_root=data_root,
        data_prefix=dict(
            img_path='images/validation',
            seg_map_path='annotations/validation'),
        pipeline=test_pipeline))
test_dataloader = val_dataloader

val_evaluator = dict(type='IoUMetric', iou_metrics=['mIoU'])
test_evaluator = val_evaluator
mmseg/datasets/ade.py
# Copyright (c) OpenMMLab. All rights reserved.
from mmseg.registry import DATASETS
from .basesegdataset import BaseSegDataset


@DATASETS.register_module()
class ADE20KDataset(BaseSegDataset):
    """ADE20K dataset.

    In segmentation map annotation for ADE20K, 0 stands for background, which
    is not included in 150 categories. ``reduce_zero_label`` is fixed to True.
    The ``img_suffix`` is fixed to '.jpg' and ``seg_map_suffix`` is fixed to
    '.png'.
    """
    METAINFO = dict(
        classes=('wall', 'building', 'sky', 'floor', 'tree', 'ceiling', 'road',
                 'bed ', 'windowpane', 'grass', 'cabinet', 'sidewalk',
                 'person', 'earth', 'door', 'table', 'mountain', 'plant',
                 'curtain', 'chair', 'car', 'water', 'painting', 'sofa',
                 'shelf', 'house', 'sea', 'mirror', 'rug', 'field', 'armchair',
                 'seat', 'fence', 'desk', 'rock', 'wardrobe', 'lamp',
                 'bathtub', 'railing', 'cushion', 'base', 'box', 'column',
                 'signboard', 'chest of drawers', 'counter', 'sand', 'sink',
                 'skyscraper', 'fireplace', 'refrigerator', 'grandstand',
                 'path', 'stairs', 'runway', 'case', 'pool table', 'pillow',
                 'screen door', 'stairway', 'river', 'bridge', 'bookcase',
                 'blind', 'coffee table', 'toilet', 'flower', 'book', 'hill',
                 'bench', 'countertop', 'stove', 'palm', 'kitchen island',
                 'computer', 'swivel chair', 'boat', 'bar', 'arcade machine',
                 'hovel', 'bus', 'towel', 'light', 'truck', 'tower',
                 'chandelier', 'awning', 'streetlight', 'booth',
                 'television receiver', 'airplane', 'dirt track', 'apparel',
                 'pole', 'land', 'bannister', 'escalator', 'ottoman', 'bottle',
                 'buffet', 'poster', 'stage', 'van', 'ship', 'fountain',
                 'conveyer belt', 'canopy', 'washer', 'plaything',
                 'swimming pool', 'stool', 'barrel', 'basket', 'waterfall',
                 'tent', 'bag', 'minibike', 'cradle', 'oven', 'ball', 'food',
                 'step', 'tank', 'trade name', 'microwave', 'pot', 'animal',
                 'bicycle', 'lake', 'dishwasher', 'screen', 'blanket',
                 'sculpture', 'hood', 'sconce', 'vase', 'traffic light',
                 'tray', 'ashcan', 'fan', 'pier', 'crt screen', 'plate',
                 'monitor', 'bulletin board', 'shower', 'radiator', 'glass',
                 'clock', 'flag'),
        palette=[[120, 120, 120], [180, 120, 120], [6, 230, 230], [80, 50, 50],
                 [4, 200, 3], [120, 120, 80], [140, 140, 140], [204, 5, 255],
                 [230, 230, 230], [4, 250, 7], [224, 5, 255], [235, 255, 7],
                 [150, 5, 61], [120, 120, 70], [8, 255, 51], [255, 6, 82],
                 [143, 255, 140], [204, 255, 4], [255, 51, 7], [204, 70, 3],
                 [0, 102, 200], [61, 230, 250], [255, 6, 51], [11, 102, 255],
                 [255, 7, 71], [255, 9, 224], [9, 7, 230], [220, 220, 220],
                 [255, 9, 92], [112, 9, 255], [8, 255, 214], [7, 255, 224],
                 [255, 184, 6], [10, 255, 71], [255, 41, 10], [7, 255, 255],
                 [224, 255, 8], [102, 8, 255], [255, 61, 6], [255, 194, 7],
                 [255, 122, 8], [0, 255, 20], [255, 8, 41], [255, 5, 153],
                 [6, 51, 255], [235, 12, 255], [160, 150, 20], [0, 163, 255],
                 [140, 140, 140], [250, 10, 15], [20, 255, 0], [31, 255, 0],
                 [255, 31, 0], [255, 224, 0], [153, 255, 0], [0, 0, 255],
                 [255, 71, 0], [0, 235, 255], [0, 173, 255], [31, 0, 255],
                 [11, 200, 200], [255, 82, 0], [0, 255, 245], [0, 61, 255],
                 [0, 255, 112], [0, 255, 133], [255, 0, 0], [255, 163, 0],
                 [255, 102, 0], [194, 255, 0], [0, 143, 255], [51, 255, 0],
                 [0, 82, 255], [0, 255, 41], [0, 255, 173], [10, 0, 255],
                 [173, 255, 0], [0, 255, 153], [255, 92, 0], [255, 0, 255],
                 [255, 0, 245], [255, 0, 102], [255, 173, 0], [255, 0, 20],
                 [255, 184, 184], [0, 31, 255], [0, 255, 61], [0, 71, 255],
                 [255, 0, 204], [0, 255, 194], [0, 255, 82], [0, 10, 255],
                 [0, 112, 255], [51, 0, 255], [0, 194, 255], [0, 122, 255],
                 [0, 255, 163], [255, 153, 0], [0, 255, 10], [255, 112, 0],
                 [143, 255, 0], [82, 0, 255], [163, 255, 0], [255, 235, 0],
                 [8, 184, 170], [133, 0, 255], [0, 255, 92], [184, 0, 255],
                 [255, 0, 31], [0, 184, 255], [0, 214, 255], [255, 0, 112],
                 [92, 255, 0], [0, 224, 255], [112, 224, 255], [70, 184, 160],
                 [163, 0, 255], [153, 0, 255], [71, 255, 0], [255, 0, 163],
                 [255, 204, 0], [255, 0, 143], [0, 255, 235], [133, 255, 0],
                 [255, 0, 235], [245, 0, 255], [255, 0, 122], [255, 245, 0],
                 [10, 190, 212], [214, 255, 0], [0, 204, 255], [20, 0, 255],
                 [255, 255, 0], [0, 153, 255], [0, 41, 255], [0, 255, 204],
                 [41, 0, 255], [41, 255, 0], [173, 0, 255], [0, 245, 255],
                 [71, 0, 255], [122, 0, 255], [0, 255, 184], [0, 92, 255],
                 [184, 255, 0], [0, 133, 255], [255, 214, 0], [25, 194, 194],
                 [102, 255, 0], [92, 0, 255]])

    def __init__(self,
                 img_suffix='.jpg',
                 seg_map_suffix='.png',
                 reduce_zero_label=True,
                 **kwargs) -> None:
        super().__init__(
            img_suffix=img_suffix,
            seg_map_suffix=seg_map_suffix,
            reduce_zero_label=reduce_zero_label,
            **kwargs)
\quad
MMSegmentation 的 config 配置文件 (核心)
在使用 MMSegmentation 中的模型进行训练和测试的时候就能够看出 config 配置文件的重要性
在单GPU上训练和测试
在单GPU上训练
tools/train.py 文件提供了在单GPU上部署训练任务的方法。
基础用法如下:
python tools/train.py  ${配置文件} [可选参数]
# 关键参数:
#	config.py # 必须提供撇脂文件
# 	--work-dir ${工作路径} # 重新指定工作路径
举例 pspnet:
python tools/train.py \\
configs/pspnet/pspnet_r50-d8_4xb2-40k_cityscapes-512x1024.py \\
--work-dir logs/pspnet
configs/pspnet/pspnet_r50-d8_4xb2-40k_cityscapes-512x1024.py
该配置文件调用了_base_中定义的 models、dataset、schedules等配置文件,这种模块化方式就很容易通过重新组合来调整整体模型。
_base_ = [
    '../_base_/models/pspnet_r50-d8.py', '../_base_/datasets/cityscapes.py',
    '../_base_/default_runtime.py', '../_base_/schedules/schedule_40k.py'
]
crop_size = (512, 1024)
data_preprocessor = dict(size=crop_size)
model = dict(data_preprocessor=data_preprocessor)
其中每个模块的配置文件细节见:https://mmsegmentation.readthedocs.io/zh_CN/latest/user_guides/1_config.html#pspnet
\quad
如何在 MMSegmentation 中自定义数据集
这应该是大家比较关心的部分,重点是。我们首先看看官方对于一些常用的数据集的文件目录是怎么样的(拿 CHASE_DB1 数据集(二类别语义分割)举个例子):
mmsegmentation
├── mmseg
├── tools
├── configs
├── data
│   ├── CHASE_DB1
│   │   ├── images
│   │   │   ├── training
│   │   │   ├── validation
│   │   ├── annotations
│   │   │   ├── training
│   │   │   ├── validation
可见其中包含:
annotations:语义分割的真实 mark labelimages:待分割的RGB图像
自定义数据集
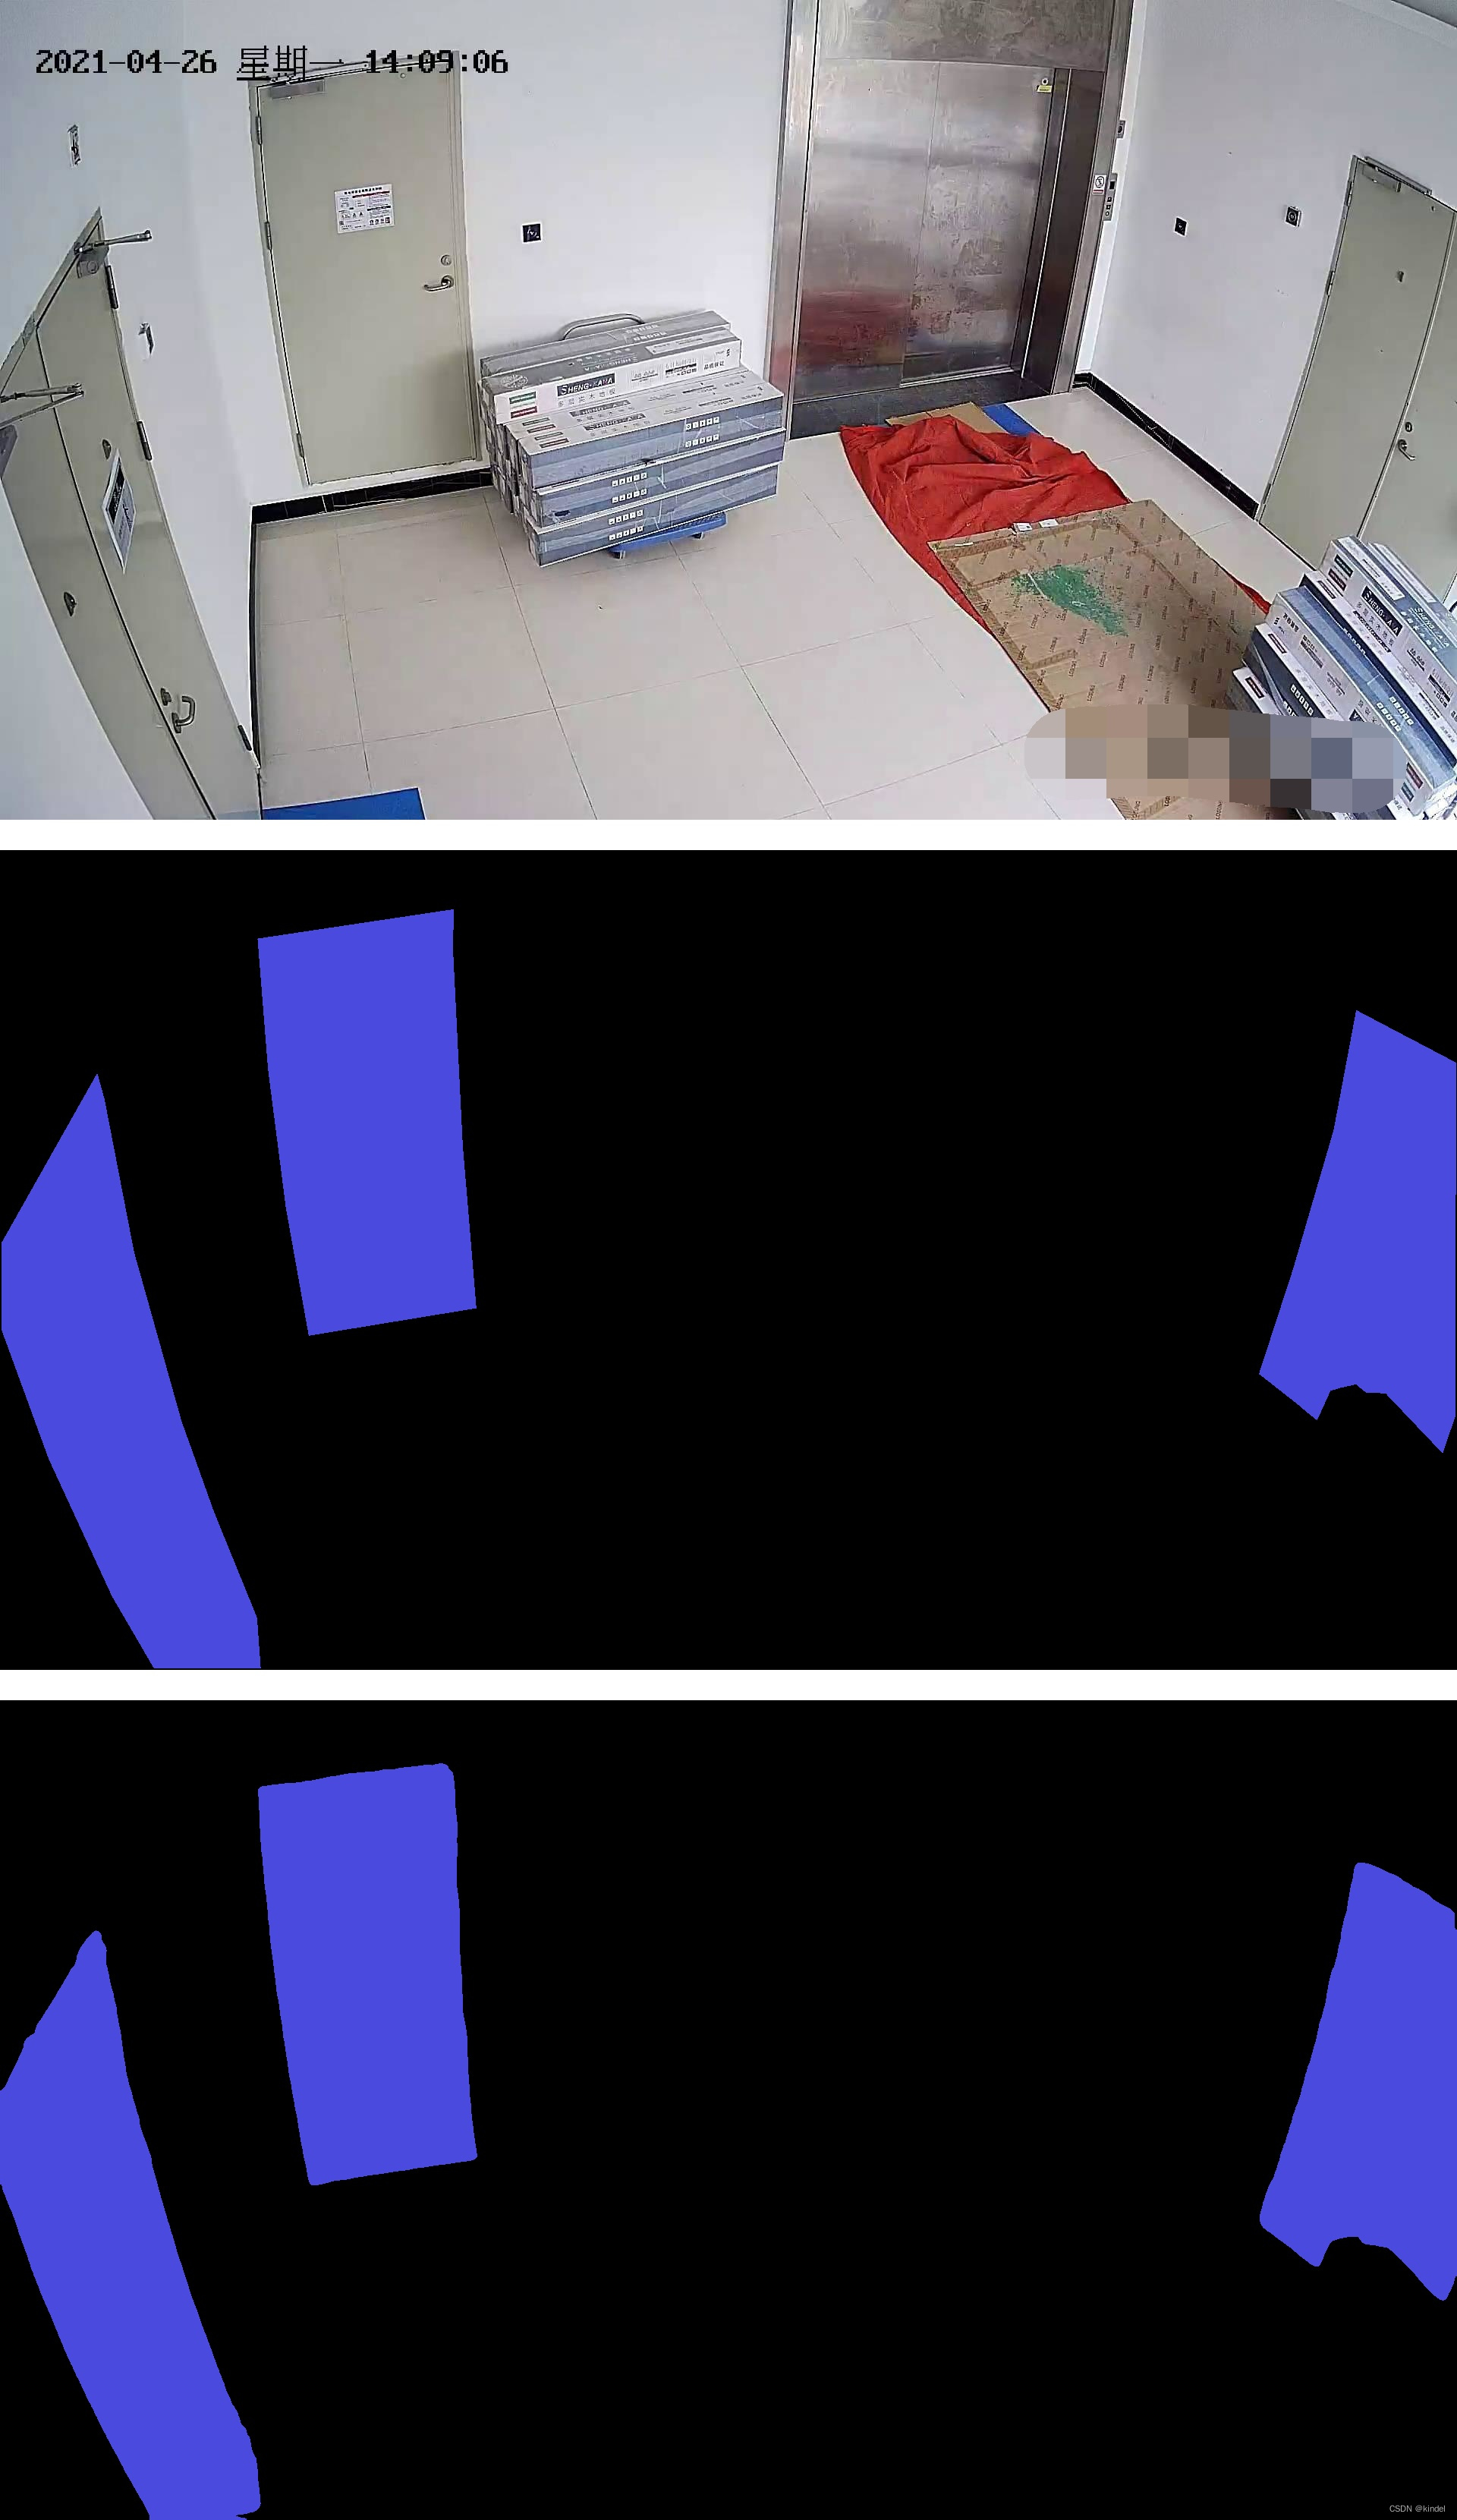
根据以上结构我们可以构建自己的数据集,这里我主要是利用极市平台写字楼消防门堵塞识别二类别语义分割任务的数据集,其中门的label是1,背景label是0
![[外链图片转存失败,源站可能有防盗链机制,建议将图片保存下来直接上传(img-4YwojjrW-1682734064668)(/img/bVc7t5o)]](https://img-blog.csdnimg.cn/5150841c8b1640f48f28fe2aac8b8fa9.png)
![[外链图片转存失败,源站可能有防盗链机制,建议将图片保存下来直接上传(img-poPjBL2A-1682734064669)(/img/bVc7t5p)]](https://img-blog.csdnimg.cn/e3629eead74945af8aadc8bb11258d3f.png)
并且将其划分为训练集和验证集,在 mmsegmentation/data 中添加以下文件:
mmsegmentation
|   data
|   | xiaofang
│   │   ├── images
│   │   │   ├── training
│   │   │   ├── validation
│   │   ├── annotations
│   │   │   ├── training
│   │   │   ├── validation
添加数据集模块
- 在
mmsegmentation/mmseg/datasets中添加一个xiaofang.py定义自己的数据类XiaoFangDataset
xiaofang.py# Copyright (c) OpenMMLab. All rights reserved. from .builder import DATASETS from .custom import CustomDataset @DATASETS.register_module() class XiaoFangDataset(CustomDataset): CLASSES = ('background', 'door') PALETTE = [[120, 120, 120], [6, 230, 230]] def __init__(self, **kwargs): super(XiaoFangDataset, self).__init__( img_suffix='.jpg', # 注意路径 seg_map_suffix='.png', reduce_zero_label=False, **kwargs) assert self.file_client.exists(self.img_dir) - 在
mmsegmentation/mmseg/datasets/__init__.py中声明自己定义的数据类XiaoFangDataset# Copyright (c) OpenMMLab. All rights reserved. from .ade import ADE20KDataset from .builder import DATASETS, PIPELINES, build_dataloader, build_dataset from .chase_db1 import ChaseDB1Dataset from .cityscapes import CityscapesDataset from .coco_stuff import COCOStuffDataset from .custom import CustomDataset from .dark_zurich import DarkZurichDataset from .dataset_wrappers import (ConcatDataset, MultiImageMixDataset, RepeatDataset) from .drive import DRIVEDataset from .face import FaceOccludedDataset from .hrf import HRFDataset from .isaid import iSAIDDataset from .isprs import ISPRSDataset from .loveda import LoveDADataset from .night_driving import NightDrivingDataset from .pascal_context import PascalContextDataset, PascalContextDataset59 from .potsdam import PotsdamDataset from .stare import STAREDataset from .voc import PascalVOCDataset from .xiaofang import XiaoFangDataset __all__ = [ 'CustomDataset', 'build_dataloader', 'ConcatDataset', 'RepeatDataset', 'DATASETS', 'build_dataset', 'PIPELINES', 'CityscapesDataset', 'PascalVOCDataset', 'ADE20KDataset', 'PascalContextDataset', 'PascalContextDataset59', 'ChaseDB1Dataset', 'DRIVEDataset', 'HRFDataset', 'STAREDataset', 'DarkZurichDataset', 'NightDrivingDataset', 'COCOStuffDataset', 'LoveDADataset', 'MultiImageMixDataset', 'iSAIDDataset', 'ISPRSDataset', 'PotsdamDataset', 'FaceOccludedDataset', 'XiaoFangDataset' ] - 在
mmsegmentation/mmseg/core/evaluation/class_names.py中声明自己的标签类别名称def xiaofang_classes(): return [ 'background','door' ] - 在
mmsegmentation/configs/_base_/datasets中添加自己数据集的配置文件xiaofang.py# dataset settings dataset_type = 'XiaoFangDataset' # 数据类名称 data_root = 'data/xiaofang' # 数据存放位置 img_norm_cfg = dict( mean=[120.4652, 123.1624, 124.3220], std=[63.5322, 60.6218, 59.2707], to_rgb=True) crop_size = (512, 512) train_pipeline = [ dict(type='LoadImageFromFile'), dict(type='LoadAnnotations'), dict(type='Resize', img_scale=(1920, 1080), ratio_range=(0.5, 2.0)), dict(type='RandomCrop', crop_size=crop_size, cat_max_ratio=0.75), dict(type='RandomFlip', prob=0.5), dict(type='PhotoMetricDistortion'), dict(type='Normalize', **img_norm_cfg), dict(type='Pad', size=crop_size, pad_val=0, seg_pad_val=255), dict(type='DefaultFormatBundle'), dict(type='Collect', keys=['img', 'gt_semantic_seg']), ] test_pipeline = [ dict(type='LoadImageFromFile'), dict( type='MultiScaleFlipAug', # img_scale=(2048, 512), img_scale=(1920, 1080), # img_scale=(960, 540), # img_ratios=[0.5, 0.75, 1.0, 1.25, 1.5, 1.75], flip=False, transforms=[ dict(type='Resize', keep_ratio=True), dict(type='RandomFlip'), dict(type='Normalize', **img_norm_cfg), dict(type='ImageToTensor', keys=['img']), dict(type='Collect', keys=['img']), ]) ] data = dict( samples_per_gpu=4, workers_per_gpu=4, train=dict( type=dataset_type, data_root=data_root, img_dir='images/training', ann_dir='annotations/training', pipeline=train_pipeline), val=dict( type=dataset_type, data_root=data_root, img_dir='images/validation', ann_dir='annotations/validation', pipeline=test_pipeline), test=dict( type=dataset_type, data_root=data_root, img_dir='images/validation', ann_dir='annotations/validation', pipeline=test_pipeline))
其中配置文件参数的细节含义仍见:https://mmsegmentation.readthedocs.io/zh_CN/latest/user_guides/1_config.html#pspnet
\quad
训练和测试
在完成了数据集配置后,就需要搭建整体模型的配置文件即可,MMSegmentation 提供了许多开源模型(下面是一部分,更多详情):
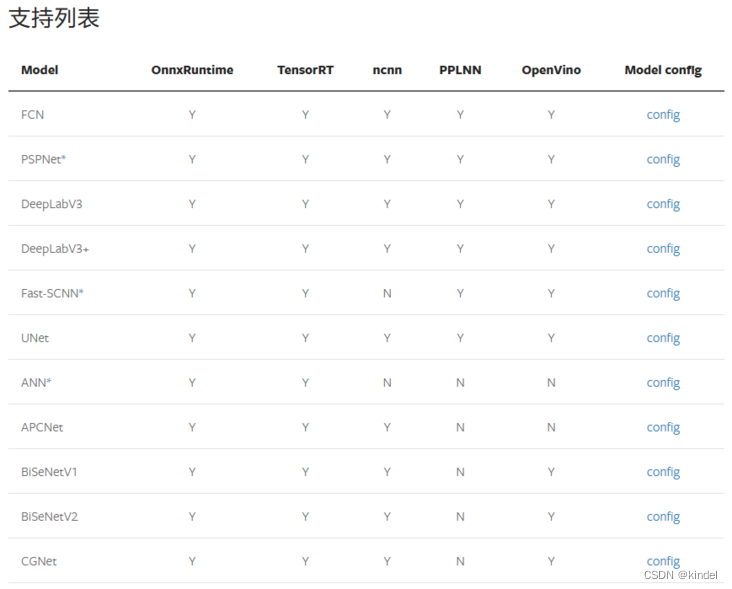
一般需要根据自己的GPU显存大小选择模型,点击上面的 config 能够看到对应模型所需要的显存大小,如这里我们举例选择一个 STDC 模型:
![[外链图片转存失败,源站可能有防盗链机制,建议将图片保存下来直接上传(img-JfIEcuv1-1682734064670)(/img/bVc7t68)]](https://img-blog.csdnimg.cn/309899111dfe4d9db9bfc43c26be87cf.png)
-
修改完整配置文件:在
mmsegmentation/configs/stdc中添加上自己的模型stdc2_512x1024_10k_xiaofang.py_base_ = ['../_base_/default_runtime.py', '../_base_/schedules/schedule_80k.py', '../_base_/datasets/xiaofang.py'] # checkpoint = 'https://download.openmmlab.com/mmsegmentation/v0.5/pretrain/stdc/stdc1_20220308-5368626c.pth' # noqa norm_cfg = dict(type='BN', requires_grad=True) model = dict( type='EncoderDecoder', pretrained=None, backbone=dict( type='STDCContextPathNet', backbone_cfg=dict( # init_cfg=dict(type='Pretrained', checkpoint=checkpoint), type='STDCNet', stdc_type='STDCNet2', in_channels=3, channels=(32, 64, 256, 512, 1024), bottleneck_type='cat', num_convs=4, norm_cfg=norm_cfg, act_cfg=dict(type='ReLU'), with_final_conv=False), last_in_channels=(1024, 512), out_channels=128, ffm_cfg=dict(in_channels=384, out_channels=256, scale_factor=4)), decode_head=dict( type='FCNHead', in_channels=256, channels=256, num_convs=1, num_classes=2, in_index=3, concat_input=False, dropout_ratio=0.1, norm_cfg=norm_cfg, align_corners=False, sampler=dict(type='OHEMPixelSampler', thresh=0.7, min_kept=10000), loss_decode=dict( type='CrossEntropyLoss', use_sigmoid=False, loss_weight=1.0)), auxiliary_head=[ dict( type='FCNHead', in_channels=128, channels=64, num_convs=1, num_classes=2, in_index=2, norm_cfg=norm_cfg, concat_input=False, align_corners=False, sampler=dict(type='OHEMPixelSampler', thresh=0.7, min_kept=10000), loss_decode=dict( type='CrossEntropyLoss', use_sigmoid=False, loss_weight=1.0)), dict( type='FCNHead', in_channels=128, channels=64, num_convs=1, num_classes=2, in_index=1, norm_cfg=norm_cfg, concat_input=False, align_corners=False, sampler=dict(type='OHEMPixelSampler', thresh=0.7, min_kept=10000), loss_decode=dict( type='CrossEntropyLoss', use_sigmoid=False, loss_weight=1.0)), dict( type='STDCHead', in_channels=256, channels=64, num_convs=1, num_classes=2, boundary_threshold=0.1, in_index=0, norm_cfg=norm_cfg, concat_input=False, align_corners=False, loss_decode=[ dict( type='CrossEntropyLoss', loss_name='loss_ce', use_sigmoid=True, loss_weight=1.0), dict(type='DiceLoss', loss_name='loss_dice', loss_weight=1.0) ]), ], # model training and testing settings train_cfg=dict(), test_cfg=dict(mode='whole')) checkpoint_config = dict( # 设置检查点钩子 (checkpoint hook) 的配置文件。执行时请参考 https://github.com/open-mmlab/mmcv/blob/master/mmcv/runner/hooks/checkpoint.py。 by_epoch=False, save_last=False, # 是否按照每个 epoch 去算 runner。 interval=2000) # 保存的间隔 evaluation = dict(interval=1000, metric='mIoU', pre_eval=True) runner = dict(type='IterBasedRunner', max_iters=10000) log_config = dict( interval=10, hooks=[ dict(type='TextLoggerHook', by_epoch=False), # dict(type='TensorboardLoggerHook') # dict(type='PaviLoggerHook') # for internal services ]) lr_config = dict(warmup='linear', warmup_iters=1000) -
训练
python tools/train.py \\ configs/stdc/stdc2_512x1024_10k_xiaofang.py \\ --work-dir logs/stdc2 -
测试结果:MIoU=0.9225,下面分别是RGB图像、真实Label、STDC模型输出


 338
338


 被折叠的 条评论
为什么被折叠?
被折叠的 条评论
为什么被折叠?
 到【灌水乐园】发言


