


调试准备
为了便于阅读代码和打印中间变量,需进行调试模式下运行代码。配置平台:Ubuntu,VSCode。在上一篇博文中,我们简单探讨过调试的设置。在该篇博文中,需要深度阅读代码,所以需要详细设置【Debug】参数,便于调试。
Debug 设置
为了保证每次只读取同样的数据样本,我们选择单卡、单进程、单线程模式进行调试【workers=1】。【Debug】参数设置如下,只需手动设置【“program”,“args”】两项,其它都是VSCode默认生成的:
# /home/slam/kxh-1/2DDection/yolov5/.vscode/launch.json
{
    // 使用 IntelliSense 了解相关属性。
    // 悬停以查看现有属性的描述。
    // 欲了解更多信息,请访问: https://go.microsoft.com/fwlink/?linkid=830387
    "version": "0.2.0",
    "configurations": [
        {
            "name": "Python: Current File",
            "type": "python",
            "request": "launch",
            "program": "train.py",
            "console": "integratedTerminal",
            "justMyCode": true,
            "args":["--data", "coco128.yaml",
                    "--cfg", "",
                    "--weights", "yolov5s.pt",
                    "--batch-size", "1",
                    "--device", "1",
                    "--epoch", "10",
                    "--workers", "1"]
        }
}
代码修改
为了保证每次只读取一个样本,修改验证集数据读取的代码【train.py L242】,具体如下(修改 if 的判断条件,见代码注释部分)。如此,先不进行验证集数据读取,只调试训练集的读取,
# Process 0
if RANK in {1, 0}:  # 调试不执行验证集数据读取:{-1,0} ---> {1, 0}
    val_loader = create_dataloader(val_path,
                                   imgsz,
                                   batch_size // WORLD_SIZE * 2,
                                   gs,
                                   single_cls,
                                   hyp=hyp,
                                   cache=None if noval else opt.cache,
                                   rect=True,
                                   rank=-1,
                                   workers=workers * 2,
                                   pad=0.5,
                                   prefix=colorstr('val: '))[0]
调试数据
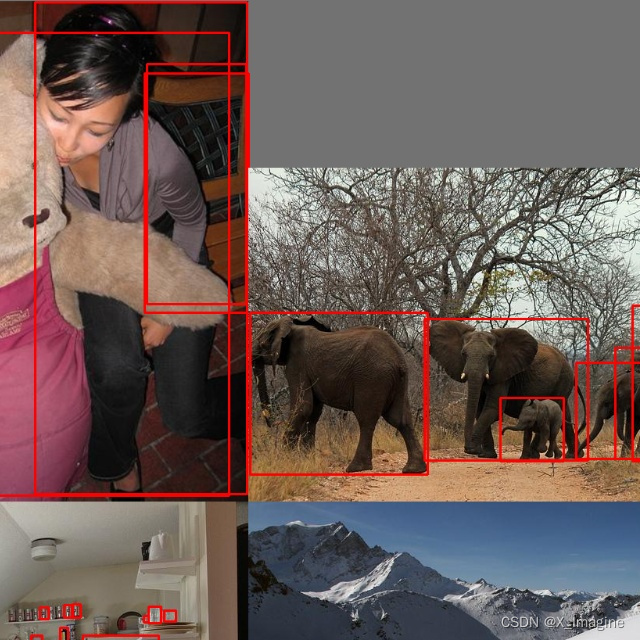
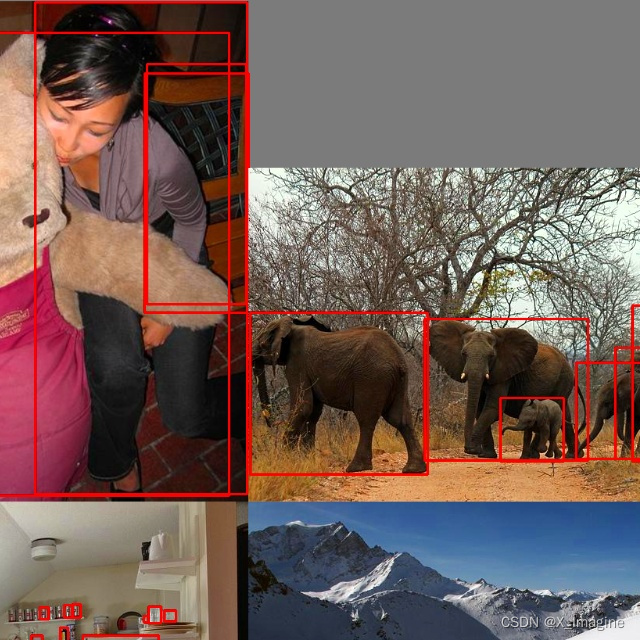
图片使用的是官方推荐的【COCO128】数据集,数据比较少,便于下载数据。图片的名字为【000000000164.jpg,000000000312.jpg,000000000382.jpg,000000000623.jpg】。将对应的标签绘制到图片上,如下图所示,


代码运行逻辑
在 YOLO-V5 中,数据加载通道主要有三部分内容:(1)类初始化:初始化数据集读取(Dataset),数据迭代器(DataLoader);(2)启动迭代器:启动迭代器开始加载数据,训练开始;(3)数据增强:训练过程中,同步进行数据增强处理。下面我们将分步讲解代码,
类初始化
-
类对象初始化,待启动迭代器后,迭代调用数据处理类
【~/yolov5/train.py,221行】,调用自定义函数,返回数据迭代器(
train_loader) 和数据预读取对象(dataset),调用代码如下,# Trainloader train_loader, dataset = create_dataloader(train_path, # 训练数据的存放路径 imgsz, # 输入图片大小(640) batch_size // WORLD_SIZE, # 批次大小//进程数量 gs, # max stride(32) single_cls, # 基本不用 hyp=hyp, # 训练相关的超参数 augment=True, # 是否数据增强 cache=None if opt.cache == 'val' else opt.cache,# 是否将图片缓存到内存(RAM) rect=opt.rect, # 训练图片尺寸的处理 rank=LOCAL_RANK, # workers=workers, # 线程数量 image_weights=opt.image_weights, # quad=opt.quad, prefix=colorstr('train: '), shuffle=True) # 是否打乱数据返回的对象:dataset(数据读取),核心函数为<utils.dataloaders.LoadImagesAndLabels >;数据迭代器(train_loader),核心函数为<utils.dataloaders.InfiniteDataLoader>,打印结果如下图所示,

-
初始化数据读取类
LoadImagesAndLabels是自定义的数据读取类,【~/yolov5/utils/dataloaders.py,114行】,返回数据读取对象dataset,具体调用接口如下,with torch_distributed_zero_first(rank): # init dataset *.cache only once if DDP dataset = LoadImagesAndLabels( path, imgsz, batch_size, augment=augment, # augmentation hyp=hyp, # hyperparameters rect=rect, # rectangular batches cache_images=cache, single_cls=single_cls, stride=int(stride), pad=pad, image_weights=image_weights, prefix=prefix)在 Pytorch中,自定义数据处理类需继承官方的 【
Dataset】类,并且LoadImagesAndLabels需重写def __getitem__(self, index):函数,用于迭代处理数据。下面的代码片段是自定义的数据读取类。为了整体、清晰认识自定义数据读取类的基本结构,特省略一些非必要代码,具体如下:class LoadImagesAndLabels(Dataset): # YOLOv5 train_loader/val_loader, loads images and labels for training and validation cache_version = 0.6 # dataset labels *.cache version rand_interp_methods = [cv2.INTER_NEAREST, cv2.INTER_LINEAR, cv2.INTER_CUBIC, cv2.INTER_AREA, cv2.INTER_LANCZOS4] def __init__(self, path, img_size=640, batch_size=16, augment=False, hyp=None, rect=False, image_weights=False, cache_images=False, single_cls=False, stride=32, pad=0.0, prefix=''): self.img_size = img_size self.augment = augment self.hyp = hyp self.image_weights = image_weights self.rect = False if image_weights else rect self.mosaic = self.augment and not self.rect # load 4 images at a time into a mosaic (only during training) """ # --- 省略代码,具体参考官方工程 主要是读训练数据和标签的内容,存入列表中,供后续类其它函数使用 """ def __len__(): return len(self.im_files) # 该函数必须重新写,用于迭代器取数据 def __getitem__(self, index): index = self.indices[index] # linear, shuffled, or image_weights """ # --- 省略代码 数据增强代码实现部分 """ -
初始化迭代器
DataLoader是Pytorch官方提供的数据迭代器,作者将该迭代器进行重新实现,具体如下,loader = DataLoader if image_weights else InfiniteDataLoader # only DataLoader allows for attribute updates return loader(dataset, batch_size=batch_size, shuffle=shuffle and sampler is None, num_workers=nw, sampler=sampler, pin_memory=True, collate_fn=LoadImagesAndLabels.collate_fn4 if quad else LoadImagesAndLabels.collate_fn), dataset在YOLO-V5中,使用的是
InfiniteDataLoader,具体定义如下:class InfiniteDataLoader(dataloader.DataLoader): """ Dataloader that reuses workers Uses same syntax as vanilla DataLoader """ def __init__(self, *args, **kwargs): super().__init__(*args, **kwargs) object.__setattr__(self, 'batch_sampler', _RepeatSampler(self.batch_sampler)) self.iterator = super().__iter__() def __len__(self): return len(self.batch_sampler.sampler) def __iter__(self): for _ in range(len(self)): yield next(self.iterator)
启动迭代器
-
构造序列:对于一个可迭代的(iterable)/可遍历的对象(如列表、字符串),enumerate 将其组成一个索引序列,利用它可以同时获得索引和值
-
进度条显示:tqdm,为了更好的显示训练时的进度;
-
迭代取数据:利用 for 循环,同时得到索引,图像数据,标签,路径等;
-
上述过程的代码片段如下,
pbar = enumerate(train_loader)
LOGGER.info(('\n' + '%10s' * 7) % ('Epoch', 'gpu_mem', 'box', 'obj', 'cls', 'labels', 'img_size'))
if RANK in {-1, 0}:
    pbar = tqdm(pbar, total=nb, bar_format='{l_bar}{bar:10}{r_bar}{bar:-10b}')  # progress bar
optimizer.zero_grad()
for i, (imgs, targets, paths, _) in pbar:  # batch -------------------------------------------------------------
    callbacks.run('on_train_batch_start')
    ni = i + nb * epoch  # number integrated batches (since train start)
    imgs = imgs.to(device, non_blocking=True).float() / 255  # uint8 to float32, 0-255 to 0.0-1.0
数据增强
YOLO-V5 中使用多种数据增强方式,具体如下,
-
mosaic
也称为 "马赛克"数据增强方式,以一个随机的位置作为四张图放置的参考点,将4张图片放到一张大图的左上,右上,左下,右下位置。基本的流程如下,(a) 首先,在大图的中心一定范围内随机生成中心位置(yc,xc)
self.mosaic_border = [-320,-320],s=640(训练的输入尺寸),则 (-x, 2 * s + x) 的范围为 (320,960)indices = [index] + random.choices(self.indices, k=3) # 生成随机的三个索引值 yc, xc = (int(random.uniform(-x, 2 * s + x)) for x in self.mosaic_border) # mosaic center x, y(b) 计算原始图片被保留的有效范围,即新的左上和右下角坐标,以及在大图的左上角和右下角坐标
以左上的图为例,
max(xc-w, 0),max(yc-h, 0):判断原图的左上角x,y坐标是否超出大图的边界,得到在大图的左上角位置;
xc,yc:以随机点为参考点,则右下角在大图的位置xc,yc;
w - (x2a - x1a), h - (y2a - y1a):原图的宽、高减去有效的原图宽、高,得到原图有效区域的左上角;
w,h:原图的右下角坐标肯定是宽、高;for i, index in enumerate(indices): # Load image img, _, (h, w) = self.load_image(index) # place img in img4 if i == 0: # top left img4 = np.full((s * 2, s * 2, img.shape[2]), 114, dtype=np.uint8) # base image with 4 tiles x1a, y1a, x2a, y2a = max(xc - w, 0), max(yc - h, 0), xc, yc # xmin, ymin, xmax, ymax (large image) x1b, y1b, x2b, y2b = w - (x2a - x1a), h - (y2a - y1a), w, h # xmin, ymin, xmax, ymax (small image) elif i == 1: # top right x1a, y1a, x2a, y2a = xc, max(yc - h, 0), min(xc + w, s * 2), yc x1b, y1b, x2b, y2b = 0, h - (y2a - y1a), min(w, x2a - x1a), h elif i == 2: # bottom left x1a, y1a, x2a, y2a = max(xc - w, 0), yc, xc, min(s * 2, yc + h) x1b, y1b, x2b, y2b = w - (x2a - x1a), 0, w, min(y2a - y1a, h) elif i == 3: # bottom right x1a, y1a, x2a, y2a = xc, yc, min(xc + w, s * 2), min(s * 2, yc + h) x1b, y1b, x2b, y2b = 0, 0, min(w, x2a - x1a), min(y2a - y1a, h) # 裁剪原图的有效区域放入大图的指定位置 img4[y1a:y2a, x1a:x2a] = img[y1b:y2b, x1b:x2b] padw = x1a - x1b padh = y1a - y1b处理完图像,还需对标签进行处理,使得标签框适应新的大图,具体代码如下:
def xywhn2xyxy(x, w=640, h=640, padw=0, padh=0):
	# Convert nx4 boxes from [x, y, w, h] normalized to [x1, y1, x2, y2]
    # where xy1=top-left, xy2=bottom-right
	y = x.clone() if isinstance(x, torch.Tensor) else np.copy(x)
	y[:, 0] = w * (x[:, 0] - x[:, 2] / 2) + padw  # top left x
	y[:, 1] = h * (x[:, 1] - x[:, 3] / 2) + padh  # top left y
	y[:, 2] = w * (x[:, 0] + x[:, 2] / 2) + padw  # bottom right x
	y[:, 3] = h * (x[:, 1] + x[:, 3] / 2) + padh  # bottom right y
	return y
(c.) 随机透视变换或者放射变换
在深度学习的数据增强中,我们经常需要对图像进行各种增强操作如:平移、翻转(flip)、缩放(Scale)、旋转(Rotation)、错切(Shear) 等,具体代码如下,def random_perspective(im, targets=(), segments=(), degrees=10, translate=.1, scale=.1, shear=10, perspective=0.0, border=(0, 0)): # torchvision.transforms.RandomAffine(degrees=(-10, 10), translate=(0.1, 0.1), scale=(0.9, 1.1), shear=(-10, 10)) # targets = [cls, xyxy] # height:640,width:640 height = im.shape[0] + border[0] * 2 # shape(h,w,c) width = im.shape[1] + border[1] * 2 # Center:图像平移 C = np.eye(3) C[0, 2] = -im.shape[1] / 2 # x translation (pixels) C[1, 2] = -im.shape[0] / 2 # y translation (pixels) # Perspective(透视变换) P = np.eye(3) P[2, 0] = random.uniform(-perspective, perspective) # x perspective (about y) P[2, 1] = random.uniform(-perspective, perspective) # y perspective (about x) # Rotation and Scale R = np.eye(3) a = random.uniform(-degrees, degrees) # a += random.choice([-180, -90, 0, 90]) # add 90deg rotations to small rotations s = random.uniform(1 - scale, 1 + scale) # s = 2 ** random.uniform(-scale, scale) R[:2] = cv2.getRotationMatrix2D(angle=a, center=(0, 0), scale=s) # Shear(裁切) S = np.eye(3) S[0, 1] = math.tan(random.uniform(-shear, shear) * math.pi / 180) # x shear (deg) S[1, 0] = math.tan(random.uniform(-shear, shear) * math.pi / 180) # y shear (deg) # Translation T = np.eye(3) T[0, 2] = random.uniform(0.5 - translate, 0.5 + translate) * width # x translation (pixels) T[1, 2] = random.uniform(0.5 - translate, 0.5 + translate) * height # y translation (pixels) # Combined rotation matrix M = T @ S @ R @ P @ C # order of operations (right to left) is IMPORTANT if (border[0] != 0) or (border[1] != 0) or (M != np.eye(3)).any(): # image changed if perspective: im = cv2.warpPerspective(im, M, dsize=(width, height), borderValue=(114, 114, 114)) else: # affine im = cv2.warpAffine(im, M[:2], dsize=(width, height), borderValue=(114, 114, 114)) # Visualize # import matplotlib.pyplot as plt # ax = plt.subplots(1, 2, figsize=(12, 6))[1].ravel() # ax[0].imshow(im[:, :, ::-1]) # base # ax[1].imshow(im2[:, :, ::-1]) # warped # Transform label coordinates n = len(targets) if n: use_segments = any(x.any() for x in segments) new = np.zeros((n, 4)) if use_segments: # warp segments segments = resample_segments(segments) # upsample for i, segment in enumerate(segments): xy = np.ones((len(segment), 3)) xy[:, :2] = segment xy = xy @ M.T # transform xy = xy[:, :2] / xy[:, 2:3] if perspective else xy[:, :2] # perspective rescale or affine else: # warp boxes xy = np.ones((n * 4, 3)) xy[:, :2] = targets[:, [1, 2, 3, 4, 1, 4, 3, 2]].reshape(n * 4, 2) # x1y1, x2y2, x1y2, x2y1 xy = xy @ M.T # transform xy = (xy[:, :2] / xy[:, 2:3] if perspective else xy[:, :2]).reshape(n, 8) # perspective rescale or affine # create new boxes x = xy[:, [0, 2, 4, 6]] y = xy[:, [1, 3, 5, 7]] new = np.concatenate((x.min(1), y.min(1), x.max(1), y.max(1))).reshape(4, n).T # clip new[:, [0, 2]] = new[:, [0, 2]].clip(0, width) new[:, [1, 3]] = new[:, [1, 3]].clip(0, height) # filter candidates i = box_candidates(box1=targets[:, 1:5].T * s, box2=new.T, area_thr=0.01 if use_segments else 0.10) targets = targets[i] targets[:, 1:5] = new[i] return im, targets(d) 处理完的效果图
第一张图是经过mosiac的结果,原图大小为【1280x1280】,第二张图是经过仿射变换的结果,并将图缩放到训练尺寸【640 x 640】

-
色彩变换
图像数据增强库,Albumentations. 该库的优点如下:(1)速度非常快;(2)支持70多种图像数据增强方法;(3)可以同步增强图像和对应的标签;(4)覆盖深度学习众多领域,比如分类,分割,目标检测,关键点检测等;(5)目前隶属于Pytorch生态;(6)接口统一,使用简单;
色彩变换用的是一个开源的图像数据增强库,使用非常简单。主要包括两步:(1)构建数据增强的类型集合,比如下面代码片段中的,T=[… …],self.transform = A.compose(T);(2)应用在输入图像和标签上。class Albumentations: # YOLOv5 Albumentations class (optional, only used if package is installed) def __init__(self): self.transform = None try: import albumentations as A check_version(A.__version__, '1.0.3', hard=True) # version requirement T = [ A.Blur(p=0.5), A.MedianBlur(p=0.5), A.ToGray(p=0.01), A.CLAHE(p=0.01), A.RandomBrightnessContrast(p=0.0), A.RandomGamma(p=0.0), A.ImageCompression(quality_lower=75, p=0.0)] # transforms self.transform = A.Compose(T, bbox_params=A.BboxParams(format='yolo', label_fields=['class_labels'])) LOGGER.info(colorstr('albumentations: ') + ', '.join(f'{x}' for x in self.transform.transforms if x.p)) except ImportError: # package not installed, skip pass except Exception as e: LOGGER.info(colorstr('albumentations: ') + f'{e}') def __call__(self, im, labels, p=1.0): if self.transform and random.random() < p: new = self.transform(image=im, bboxes=labels[:, 1:], class_labels=labels[:, 0]) # transformed im, labels = new['image'], np.array([[c, *b] for c, b in zip(new['class_labels'], new['bboxes'])]) return im, labels通过调整模糊函数【A.Blue(),A.MedianBlur()】的参数,均是【0.01—>0.5】,可以得到如下的两张图,左图是原图,右图是模糊图,

-
空间变换
在YOLO-V5的代码中,数据增强最后使用左右翻转。在【Mosaic】数据增强中,涉及了很多空间上的变换,比如旋转,错切等操作。代码片段如下,# Flip left-right if random.random() < hyp['fliplr']: img = np.fliplr(img) if nl: labels[:, 1] = 1 - labels[:, 1]运行的结果如下,左图是翻转之前的图,右图是翻转之后的图,


 2237
2237


 被折叠的 条评论
为什么被折叠?
被折叠的 条评论
为什么被折叠?
 到【灌水乐园】发言


