


数据集下载地址
百度网盘 请输入提取码提取码:tsdp
数据集制作
1.下载数据集,我下载的是2011_09_30_drive_0033_extract.zip中的视觉和激光数据 和2011_09_30_drive_0033_sync.zip中的IMU数据。为什么需要下载两个数据集,因为*_extract.zip 包含的IMU数据是100Hz, 但是视觉的数据没有去畸变,此外激光数据是以txt格式存储的,在转换为bag格式的时候非常耗时.虽然*_sync.zip数据中的IMU是10Hz, 但是视觉数据已经去畸变了,并且视觉和激光的时间戳已经同步好了,激光数据的存储格式是二进制格式bin存储的。(虽然没用到激光)
还需要下载标定文件2011_09_30_calib.zip。
2.将下载的_extract.zip 和 _sync.zip 解压,然后用*_extract/oxts文件夹把*_sync/oxt的文件夹
替换掉。
3.解决IMU时间戳问题
不改正会出现bag跑起来以后,vins总是报警告,什么throw image之类的一大堆,轨迹也各种重置。imu时间戳在oxts/timestamp.txt中。
原因KITTI提供的的原始的IMU数据的时间戳存在断续和逆序的情况,我们只能解决逆序情况,断续问题无法解决, 通过下面的程序查看断续的和逆序的IMU时间戳,并对逆序的IMU数据的时间戳进行修改。
随便在任何路径建立一个python文件,我命名为imu.py!!!注意正确输入*_sync/路径!!!!
import datetime as dt
import glob
import os
import matplotlib.pyplot as plt
import numpy as np
data_path = "/media/gl/gl-U/kittidata/2011_09_30_drive_0033_sync/2011_09_30/2011_09_30_drive_0033_sync"
def load_timestamps(data='oxts'):
"""Load timestamps from file."""
timestamp_file = os.path.join(
data_path, data, 'timestamps.txt')
# Read and parse the timestamps
timestamps = []
with open(timestamp_file, 'r') as f:
for line in f.readlines():
# NB: datetime only supports microseconds, but KITTI timestamps
# give nanoseconds, so need to truncate last 4 characters to
# get rid of \n (counts as 1) and extra 3 digits
t = dt.datetime.strptime(line[:-4], '%Y-%m-%d %H:%M:%S.%f')
t = dt.datetime.timestamp(t)
timestamps.append(t)
# Subselect the chosen range of frames, if any
return timestamps
timestamps = np.array(load_timestamps())
x = np.arange(0, len(timestamps))
last_timestamp = timestamps[:-1]
curr_timestamp = timestamps[1:]
dt = np.array(curr_timestamp - last_timestamp) #计算前后帧时间差
print("dt > 0.015: \n{}".format(dt[dt> 0.015])) # 打印前后帧时间差大于0.015的IMU index
dt = dt.tolist()
dt.append(0.01)
dt = np.array(dt)
print("dt > 0.015: \n{}".format(x[dt> 0.015])) # 打印时间差大于0.015的具体时间差
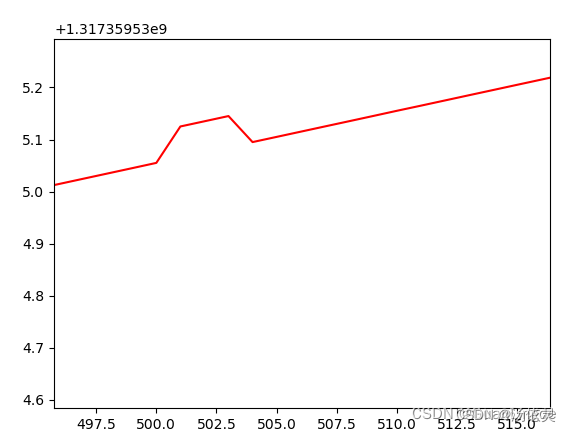
plt.plot(x, timestamps, 'r', label='imu')# 可视化IMU的时间戳
plt.show()然后在imu.py所在目录打开终端执行python3 imu.py命令
python3 imu.py终端会打印时间戳有问题的地方和弹出一个表(自行放大,可以看到跳变的地方)
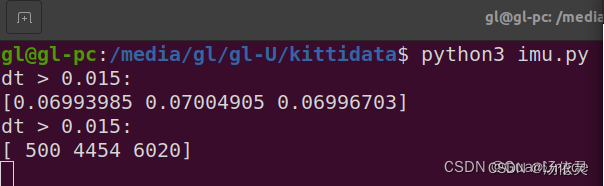
打开oxts文件夹下timstamps.txt的找到这些地方,手动把时间戳改正
4.接下来就可以制作了,可能要下在kittibag2包,有问题根据提示安装就行。
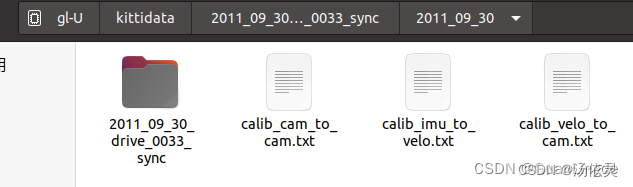
着将下载好的2011_09_30_calib.zip文件解压,将其中的三个txt文件复制到如下位置
/media/gl/gl-U/kittidata/2011_09_30_drive_0033_sync/2011_09_30
然后就可以使用kitti2bag工具将KITTI数据集转化为rosbag包
kitti2bag工具安装使用pip:
sudo pip3 install kitti2bag可能会报错:
AttributeError: module 'numpy.random' has no attribute 'BitGenerator'升级下numpy:
pip install --upgrade numpy
切换到2011_09_30文件夹所在目录
路径:/media/gl/gl-U/kittidata/2011_09_30_drive_0033_sync
执行kitti2bag命令
kitti2bag -t 2011_09_30 -r 0033 raw_synced注意:0033是第多少次drive,注意自己下载的数据集的drive
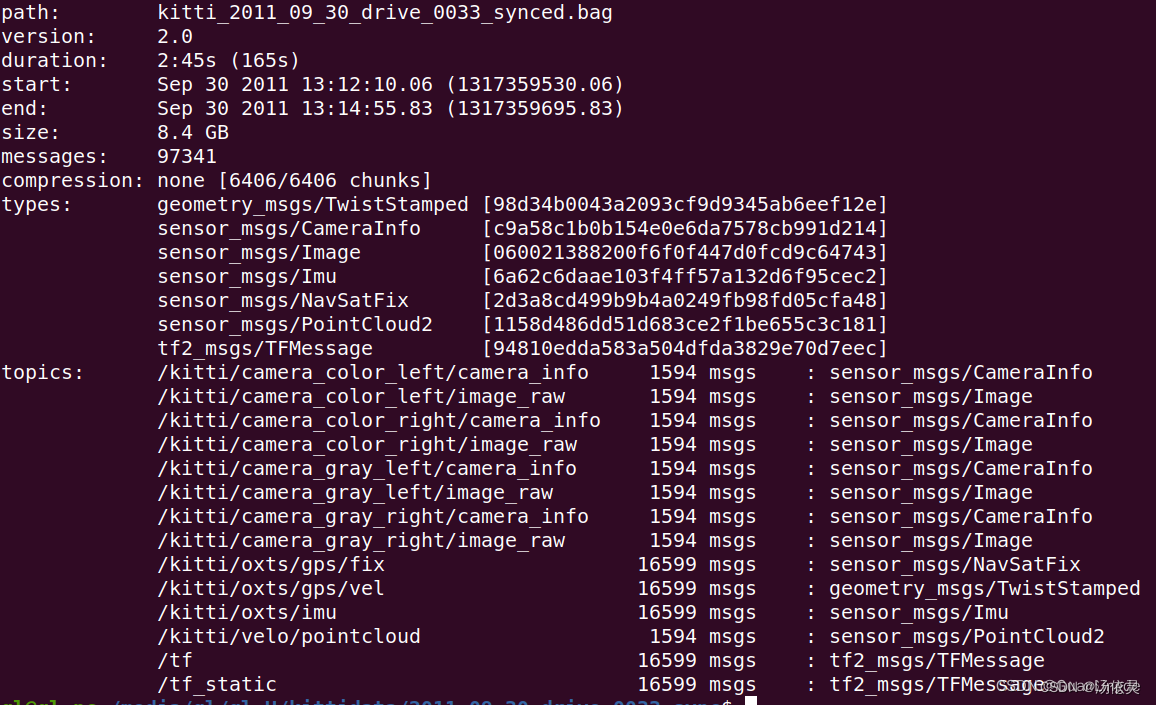
静静等待,出现以下内容,就制作好了
运行VINS-mono
改配置文件
注意订阅的相机和外参要对应,否则轨迹会重置,会漂
如果订阅的是/kitti/camera_color_left/image_raw
%YAML:1.0

#common parameters
imu_topic: "/kitti/oxts/imu"
image_topic: "/kitti/camera_color_left/image_raw"

output_path: "/home/th/output"

#camera calibration
model_type: PINHOLE
camera_name: camera
# image_width: 752
# image_height: 480
image_width: 1226
image_height: 370

distortion_parameters:
   k1: -3.725637e-01
   k2: 1.979803e-01
   p1: 1.250593e-03
   p2: -6.608481e-02
projection_parameters:
   fx: 7.070912e+02
   fy: 7.070912e+02
   cx: 6.018873e+02
   cy: 1.831104e+02


# Extrinsic parameter between IMU and Camera.
estimate_extrinsic: 0   # 0  Have an accurate extrinsic parameters. We will trust the following imu^R_cam, imu^T_cam, don't change it.
                        # 1  Have an initial guess about extrinsic parameters. We will optimize around your initial guess.
                        # 2  Don't know anything about extrinsic parameters. You don't need to give R,T. We will try to calibrate it. Do some rotation movement at beginning.

extrinsicRotation: !!opencv-matrix
   rows: 3
   cols: 3
   dt: d
   data: [3.31896123e-05, -2.08938652e-02,  9.99781574e-01,
          -9.99993095e-01,  -3.73204429e-03, -4.47975098e-05,
         3.73216568e-03, -9.99774705e-01,  -2.08938479e-02]
#Translation from camera frame to imu frame, imu^T_cam
extrinsicTranslation: !!opencv-matrix
   rows: 3
   cols: 1
   dt: d
   data: [1.07912097,-8.12737708e-01, 2.23294560e-01]


#feature traker paprameters
max_cnt: 150            # max feature number in feature tracking
min_dist: 30            # min distance between two features
freq: 10                # frequence (Hz) of publish tracking result. At least 10Hz for good estimation. If set 0, the frequence will be same as raw image
F_threshold: 1.0        # ransac threshold (pixel)
show_track: 1           # publish tracking image as topic
equalize: 1             # if image is too dark or light, trun on equalize to find enough features
fisheye: 0              # if using fisheye, trun on it. A circle mask will be loaded to remove edge noisy points

#optimization parameters
max_solver_time: 0.04  # max solver itration time (ms), to guarantee real time
max_num_iterations: 8   # max solver itrations, to guarantee real time
keyframe_parallax: 10.0 # keyframe selection threshold (pixel)

#imu parameters       The more accurate parameters you provide, the better performance
acc_n: 0.08          # accelerometer measurement noise standard deviation. #0.2   0.04
gyr_n: 0.004         # gyroscope measurement noise standard deviation.     #0.05  0.004
acc_w: 0.00004         # accelerometer bias random work noise standard deviation.  #0.02
gyr_w: 2.0e-6       # gyroscope bias random work noise standard deviation.     #4.0e-5
g_norm: 9.81007     # gravity magnitude

#loop closure parameters
loop_closure: 1                    # start loop closure
load_previous_pose_graph: 0        # load and reuse previous pose graph; load from 'pose_graph_save_path'
fast_relocalization: 0             # useful in real-time and large project
pose_graph_save_path: "/home/th/output/pose_graph/" # save and load path

#unsynchronization parameters
estimate_td: 0                      # online estimate time offset between camera and imu
td: 0.0                             # initial value of time offset. unit: s. readed image clock + td = real image clock (IMU clock)

#rolling shutter parameters
rolling_shutter: 0                  # 0: global shutter camera, 1: rolling shutter camera
rolling_shutter_tr: 0               # unit: s. rolling shutter read out time per frame (from data sheet).

#visualization parameters
save_image: 1                   # save image in pose graph for visualization prupose; you can close this function by setting 0
visualize_imu_forward: 0        # output imu forward propogation to achieve low latency and high frequence results
visualize_camera_size: 0.4      # size of camera marker in RVIZ
如果订阅左相机image_topic: "/kitti/camera_gray_left/image_raw",外参就用
body_T_cam1: !!opencv-matrix
   rows: 4
   cols: 4
   dt: d
   data: [-0.02218873, -0.01354233,  0.99989895,  1.1031531,
          -0.99989259,  0.00435299, -0.02270281, -0.85632959,
           0.03227481, -1.00072563,  0.00467743,  0.76942567,
           0.,          0.,          0.,          1.        ]
如果订阅右相机image_topic: "/kitti/camera_gray_right/image_raw",外参就用
body_T_cam0: !!opencv-matrix
   rows: 4
   cols: 4
   dt: d
   data: [ 0.00875116, -0.00479609,  0.99995027,  1.10224312,
          -0.99986428, -0.01400249,  0.00868325, -0.31907194,
           0.01396015, -0.99989044, -0.00491798,  0.74606588,
           0.,          0.,          0.,          1.        ]
相机内参
distortion_parameters:
   k1: 0
   k2: 0
   p1: 0
   p2: 0
projection_parameters:
   fx: 7.070912e+02
   fy: 7.070912e+02
   cx: 6.018873e+02
   cy: 1.831104e+02
整体就是这样
YAML:1.0

#common parameters
# imu_topic: "/imu0"
# image_topic: "/cam0/image_raw"
imu_topic: "/kitti/oxts/imu"
image_topic: "/kitti/camera_gray_left/image_raw"

output_path: "/home/th/output"

#camera calibration
model_type: PINHOLE
camera_name: camera

distortion_parameters:
   k1: 0
   k2: 0
   p1: 0
   p2: 0
projection_parameters:
   fx: 7.070912e+02
   fy: 7.070912e+02
   cx: 6.018873e+02
   cy: 1.831104e+02


# Extrinsic parameter between IMU and Camera.
estimate_extrinsic: 0   # 0  Have an accurate extrinsic parameters. We will trust the following imu^R_cam, imu^T_cam, don't change it.
                        # 1  Have an initial guess about extrinsic parameters. We will optimize around your initial guess.
                        # 2  Don't know anything about extrinsic parameters. You don't need to give R,T. We will try to calibrate it. Do some rotation movement at beginning.

extrinsicRotation: !!opencv-matrix
   rows: 3
   cols: 3
   dt: d
   data: [-0.02218873, -0.01354233,  0.99989895,
          -0.99989259,  0.00435299, -0.02270281,
         0.03227481, -1.00072563,  0.00467743]
#Translation from camera frame to imu frame, imu^T_cam
extrinsicTranslation: !!opencv-matrix
   rows: 3
   cols: 1
   dt: d
   data: [1.1031531,-0.85632959, 0.76942567]
保存,然后按照运行vins-mono的命令运行就行。


 927
927


 被折叠的 条评论
为什么被折叠?
被折叠的 条评论
为什么被折叠?
 到【灌水乐园】发言


