


一: Render-flow基本构成
从CCDirector.js中的mainLoop我们了解到 renderer.render是实际参与渲染的方法:顺着线索我们找到了RenderFlow这个类:下面是我整理的部分关键的方法和属性:
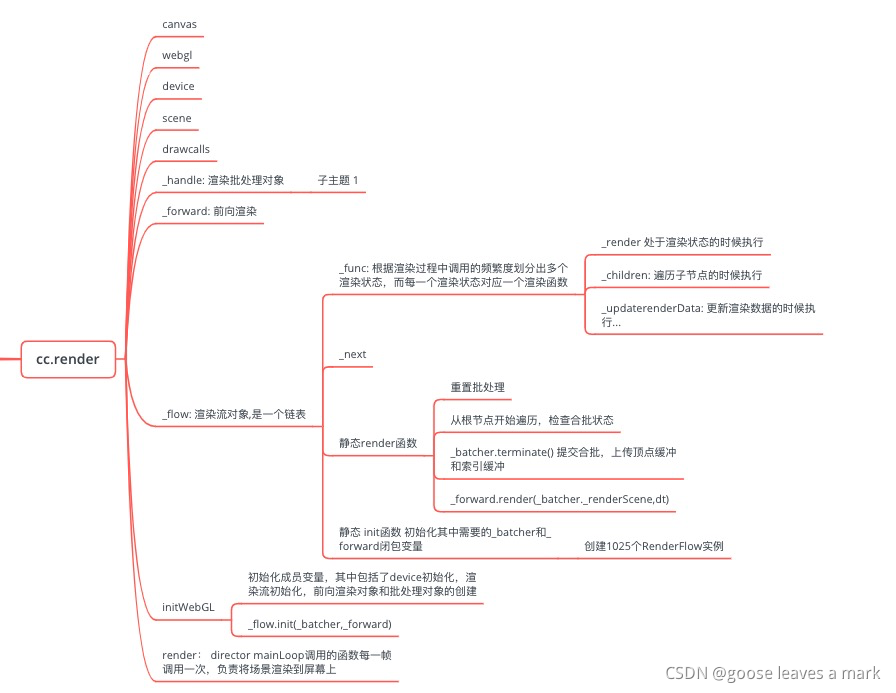
首先看一下initWebGL方法:
initWebGL (canvas, opts) {
        require('./webgl/assemblers');
        const ModelBatcher = require('./webgl/model-batcher');

        this.Texture2D = gfx.Texture2D;
        this.canvas = canvas;
        this._flow = cc.RenderFlow;

        if (CC_JSB && CC_NATIVERENDERER) {
            // native codes will create an instance of Device, so just use the global instance.
            this.device = gfx.Device.getInstance();
            this.scene = new renderer.Scene();
            let builtins = _initBuiltins(this.device);
            this._forward = new renderer.ForwardRenderer(this.device, builtins);
            let nativeFlow = new renderer.RenderFlow(this.device, this.scene, this._forward);
            this._flow.init(nativeFlow);
        }
        else {
            let Scene = require('../../renderer/scene/scene');
            let ForwardRenderer = require('../../renderer/renderers/forward-renderer');
            this.device = new gfx.Device(canvas, opts);
            this.scene = new Scene();
            let builtins = _initBuiltins(this.device);
            // 前向渲染对象负责将view视图通过device渲染都屏幕上
            this._forward = new ForwardRenderer(this.device, builtins);
            // 渲染前批处理,优化性能,降低drawcall
            this._handle = new ModelBatcher(this.device, this.scene);
            // 初始化渲染流对象依赖 前向渲染对象和批处理
            this._flow.init(this._handle, this._forward);

            console.log(`scene is `,this.scene,' and device is ',this.device,' and _flow is ',this._flow,' and _handle is ',this._handle);
        }
    },
再来看看主角方法render(scene,dt):
render (ecScene, dt) {
        /** 重置drawcall */
        this.device.resetDrawCalls();
        if (ecScene) {
            // walk entity component scene to generate models
            /** 调用渲染静态函数 */
            this._flow.render(ecScene, dt);
            this.drawCalls = this.device.getDrawCalls();
        }
    },
继续跟进看看render: 下一节着重看看这个前向渲染 _forward
RenderFlow.render = function (rootNode, dt) {
    _batcher.reset();
    _batcher.walking = true;

    /** 递归遍历根节点 */
    RenderFlow.visitRootNode(rootNode);
    // 从根节点深度遍历完毕,开始执行批处理
    _batcher.terminate();
    _batcher.walking = false;
    // 将batcher中的渲染数据渲染到屏幕 _forward渲染数据需要用到合批的渲染数据两个类有相互依赖的关系
    _forward.render(_batcher._renderScene, dt);
};
重点看看批处理的东西:model-batcher.js
terminate() {
        if (cc.dynamicAtlasManager && cc.dynamicAtlasManager.enabled) {
            cc.dynamicAtlasManager.update();
        }

        // flush current rest Model
        this._flush();

        for (let key in _buffers) {
            _buffers[key].uploadData();
        }

        this.walking = false;
    },
跟踪到此查看_flush()
/***
     *
     * 强制刷新缓冲区数据
     *
     */
    _flush() {
        let material = this.material,
            buffer = this._buffer,
            indiceCount = buffer.indiceOffset - buffer.indiceStart;
        if (!this.walking || !material || indiceCount <= 0) {
            return;
        }

        let effect = material.effect;
        if (!effect) return;

        // Generate ia
        let ia = this._iaPool.add();
        // 顶点数据缓冲区
        ia._vertexBuffer = buffer._vb;
        // 顶点索引缓冲区
        ia._indexBuffer = buffer._ib;
        // 顶点索引开始索引
        ia._start = buffer.indiceStart;
        // 顶点索引个数
        ia._count = indiceCount;

        // Generate model
        let model = this._modelPool.add();
        this._batchedModels.push(model);
        model.sortKey = this._sortKey++;
        model._cullingMask = this.cullingMask;
        model.setNode(this.node);
        model.setEffect(effect);
        model.setInputAssembler(ia);

        this._renderScene.addModel(model);
        buffer.forwardIndiceStartToOffset();
    },
关于vb和ib想必大家都知道什么意思,下面看一下一个顶点数据包含哪些数据:
var vfmtPosUvColor = new gfx.VertexFormat([
    { name: gfx.ATTR_POSITION, type: gfx.ATTR_TYPE_FLOAT32, num: 2 },
    { name: gfx.ATTR_UV0, type: gfx.ATTR_TYPE_FLOAT32, num: 2 },
    { name: gfx.ATTR_COLOR, type: gfx.ATTR_TYPE_UINT8, num: 4, normalize: true },
]); 
看看渲染流的init静态方法:
RenderFlow.init = function (batcher, forwardRenderer) {
    _batcher = batcher;
    _forward = forwardRenderer;

    // 这里flows是一个包含了1025个RenderFlow对象,而每一个对象又是一个渲染链表对象
    flows[0] = EMPTY_FLOW;
    for (let i = 1; i < FINAL; i++) {
        flows[i] = new RenderFlow();
    }
};
看看init方法:渲染流真正执行_func的时候会调用它,是根据节点的渲染标识进行创建的
function init (node) {
    // 拿到节点的渲染标识
    let flag = node._renderFlag;
    // 根据节点身上的渲染标识进行创建渲染流
    let r = flows[flag] = getFlow(flag);
    // 执行对应的渲染流函数
    r._func(node);
}
看看getFlow函数,就是在这里创建了渲染流链表:
function getFlow (flag) {
    let flow = null;
    let tFlag = FINAL;
    while (tFlag > 0) {
        if (tFlag & flag)
            // 创建渲染流 将上一个flow传入构成一个链
            flow = createFlow(tFlag, flow);
        tFlag = tFlag >> 1;
    }
    return flow;
}
每一次createFlow都会将当前的flow置为头节点
function createFlow (flag, next) {
    let flow = new RenderFlow();
    // 将当前创建的渲染流置于链表的头部
    flow._next = next || EMPTY_FLOW;

    switch (flag) {
        case DONOTHING:
            flow._func = flow._doNothing;
            break;
        case BREAK_FLOW:
            flow._func = flow._doNothing;
            break;
        case LOCAL_TRANSFORM:
            flow._func = flow._localTransform;
            break;
        case WORLD_TRANSFORM:
            flow._func = flow._worldTransform;
            break;
        case OPACITY:
            flow._func = flow._opacity;
            break;
        case COLOR:
            flow._func = flow._color;
            break;
        case UPDATE_RENDER_DATA:
            flow._func = flow._updateRenderData;
            break;
        case RENDER:
            flow._func = flow._render;
            break;
        case CHILDREN:
            flow._func = flow._children;
            break;
        case POST_RENDER:
            flow._func = flow._postRender;
            break;
    }

    return flow;
}
二:节点渲染顺序是怎样的
节点在渲染的时候的渲染顺序在CCNode.js文件里面 源码如下:
_onBatchCreated(dontSyncChildPrefab) {
        this._initProperties();

        // Fixed a bug where children and parent node groups were forced to synchronize, instead of only synchronizing `_cullingMask` value
        this._cullingMask = 1 << _getActualGroupIndex(this);
        if (CC_JSB && CC_NATIVERENDERER) {
            this._proxy && this._proxy.updateCullingMask();
        }

        if (!this._activeInHierarchy) {
            if (CC_EDITOR ? cc.director.getActionManager() : ActionManagerExist) {
                // deactivate ActionManager and EventManager by default
                cc.director.getActionManager().pauseTarget(this);
            }
            eventManager.pauseTarget(this);
        }

        let children = this._children;
        // 采用深度遍历的方式遍历子节点最后才是根节点
        for (let i = 0, len = children.length; i < len; i++) {
            let child = children[i];
            if (!dontSyncChildPrefab) {
                // sync child prefab
                let prefabInfo = child._prefab;
                if (prefabInfo && prefabInfo.sync && prefabInfo.root === child) {
                    PrefabHelper.syncWithPrefab(child);
                }
                child._updateOrderOfArrival();
            }
            child._onBatchCreated(dontSyncChildPrefab);
        }

        if (children.length > 0) {
            // 如果该节点有子节点就加一个渲染标记
            this._renderFlag |= RenderFlow.FLAG_CHILDREN;
        }

        if (CC_JSB && CC_NATIVERENDERER) {
            this._proxy.initNative();
        }
    },
我们可以清楚的看到节点遍历方式是深度遍历的方式。
这时候你应该会问这个方法在哪里调用呢:主要是两个地方调用:CCScene.js,base-node.js
CCScene.js: 这个是在编辑器环境下生效
_load: function () {
        if (!this._inited) {
            if (CC_TEST) {
                cc.assert(!this._activeInHierarchy, 'Should deactivate ActionManager and EventManager by default');
            }
            this._onBatchCreated(CC_EDITOR && this._prefabSyncedInLiveReload);
            this._inited = true;
        }
    },
base-node.js:
_instantiate (cloned, isSyncedNode) {
        if (!cloned) {
            cloned = cc.instantiate._clone(this, this);
        }

        var newPrefabInfo = cloned._prefab;
        if (CC_EDITOR && newPrefabInfo) {
            if (cloned === newPrefabInfo.root) {
                newPrefabInfo.fileId = '';
            }
            else {
                var PrefabUtils = Editor.require('scene://utils/prefab');
                PrefabUtils.unlinkPrefab(cloned);
            }
        }
        if (CC_EDITOR && cc.engine._isPlaying) {
            let syncing = newPrefabInfo && cloned === newPrefabInfo.root && newPrefabInfo.sync;
            if (!syncing) {
                cloned._name += ' (Clone)';
            }
        }

        // reset and init
        cloned._parent = null;
        cloned._onBatchCreated(isSyncedNode);

        return cloned;
    },


 737
737


 被折叠的 条评论
为什么被折叠?
被折叠的 条评论
为什么被折叠?
 到【灌水乐园】发言


