


 PuppetMaster是一款用于Unity的物理动画模拟工具,它通过混合模型和动画实现各种表现。文章详细介绍了如何创建布娃娃、配置主要参数以及优化性能的方法,包括减少迭代次数、设置碰撞阈值等。
资源地址
AssetsStore:https://assetstore.unity.com/packages/tools/physics/puppetmaster-48977
概述
PuppetMaster是一个用来做物理动画模拟的插件,简单来说就是通过在布娃娃和动画之间做混合,实现在不同需求场景下的不同表现。
使用
创建布娃娃
-
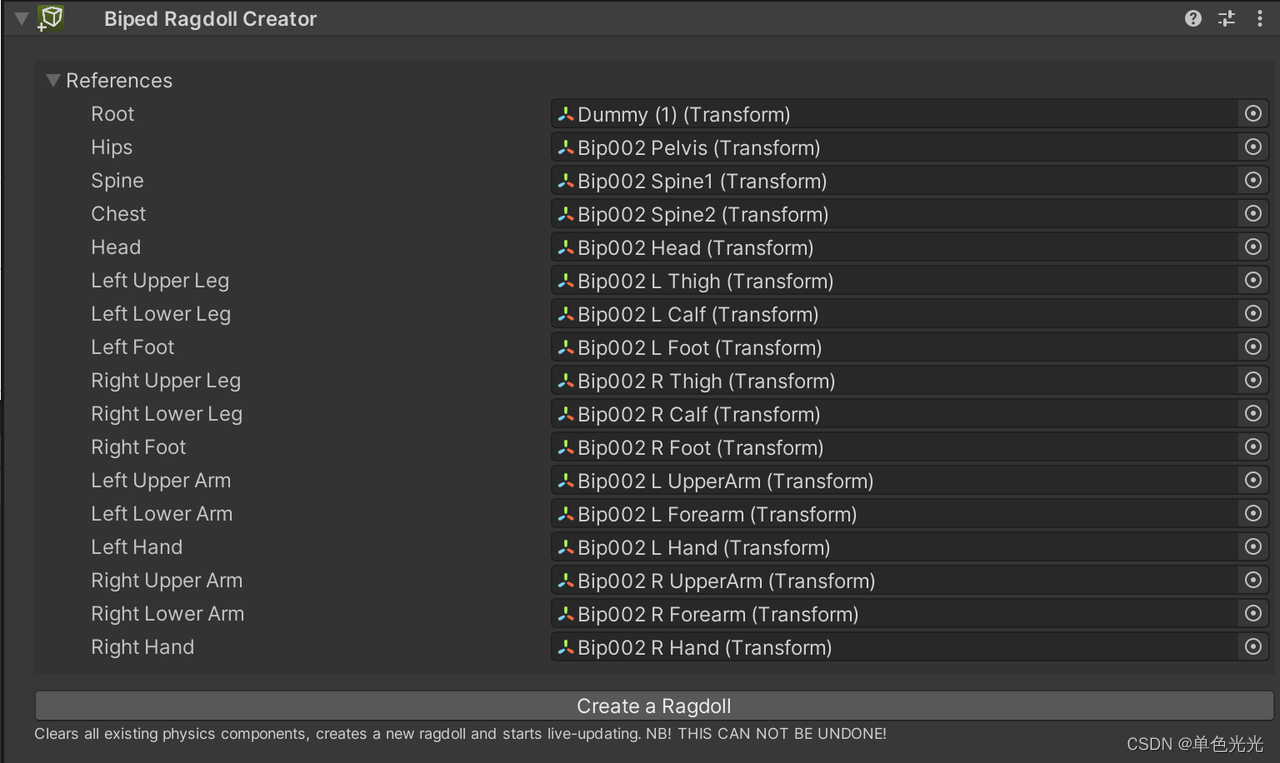
在模型上添加脚本BipedRagdollCreator脚本
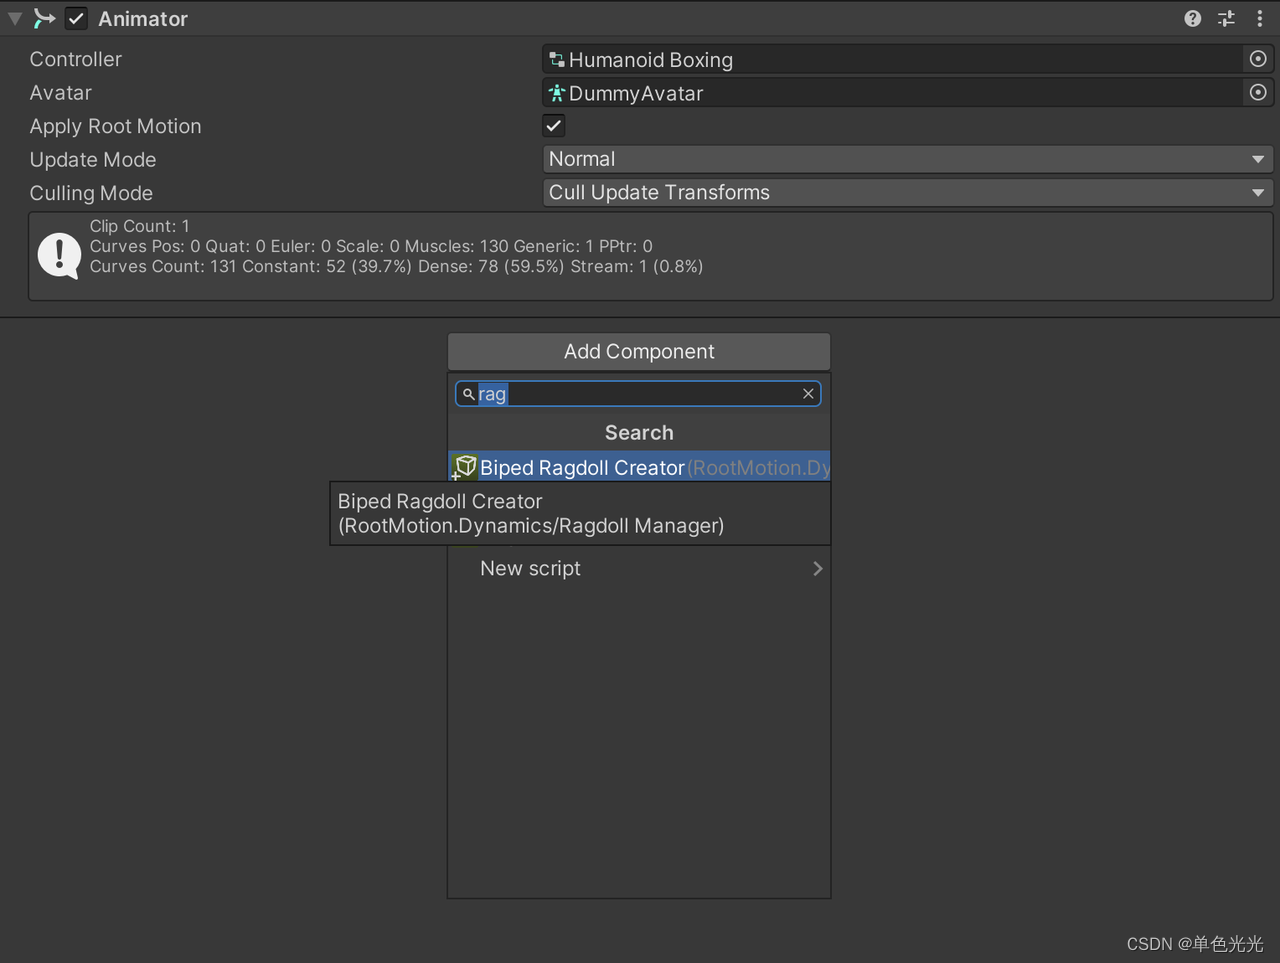
-
脚本会自动查找相关的关节点,如果需要修改可以手动替换。
-
点击"Create a Ragdoll",脚本会在关节点上创建好collider、rigidbody和joint脚本,并显示更多配置
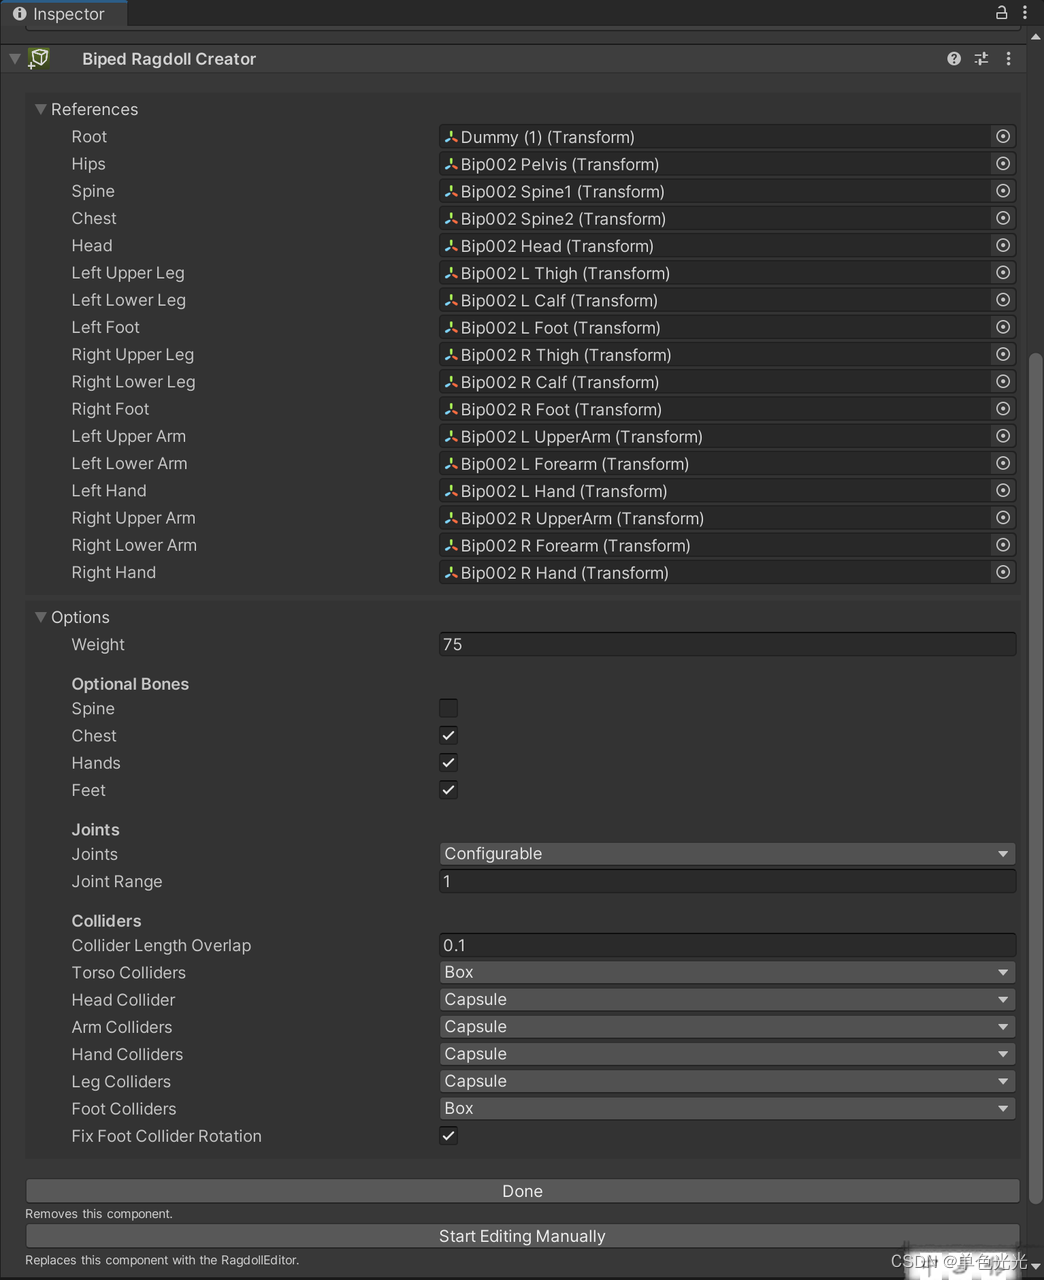
主要参数及其含义
| 名称 | 说明 |
| Weight | 总重,会根据生物学分配到各个节点上 |
| Optional Bones | 是否在对应关节上创建collider等控件,不需要的节点可以关闭节省性能 |
| Joints | 生成Joint的相关设置,只能选择Configurable |
| Collider | 对应关节生成Collider的设置 |
- 无论点击"Done"或者"Start Editing Manually"都会将Biped Ragdoll Creator脚本移除,区别是点击"Start Editing Manually"会添加一个Editor下编辑Collider的脚本。
添加PuppetMaster
如果需要布娃娃跟动画共同运行,需要添加脚本PuppetMaster脚本,脚本刚添加完成后,只有以下几个参数
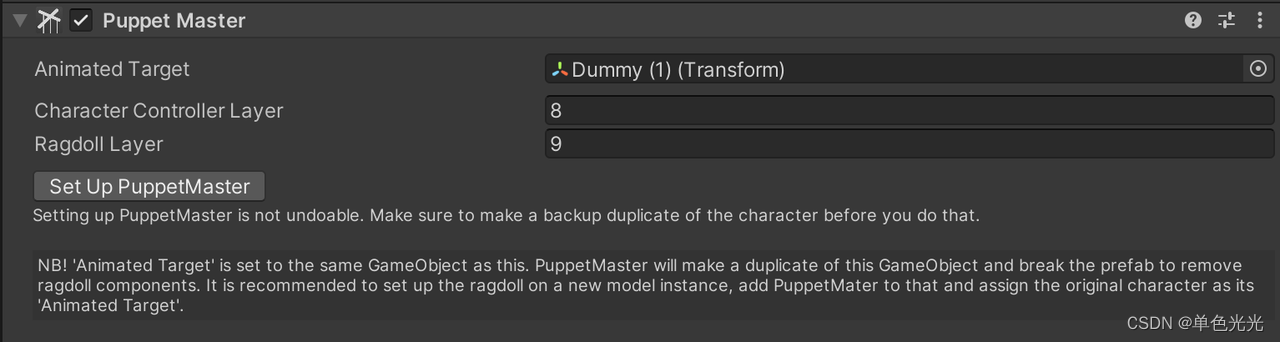
从参数名字上可以比较好理解他们的含义,配置好两个layer后点击"Set Up PupperMaster"按钮,脚本会展开为:

PuppetMaster的主要功能是使物理去追踪动画的表现,文档描述如下:
The main purpose of PuppetMaster is to make the Puppet ragdoll physically follow the motion and animation of the animated Target character. It will do so by two means, first is articulating the joints (“Muscles”), the other is pinning the rigidbodies to their targets using AddForce commands (“Pins”). The classes that control the behaviour of the Muscles and handle their strength, pinning and other properties are called “Puppet Behaviours”. The dual rig and the Behaviours will share a common parent GameObject (“Root”) that serves as a container for the PuppetMaster character rig. The kinematic Target character will be mapped to the dynamic Puppet ragdoll by the means of “Mapping”, which can also be smoothly blended in and out for the entire character or for each Muscle separately.
模型的Hierarchy结构也会在"Set Up PupperMaster"之后发生改变,结构如下:
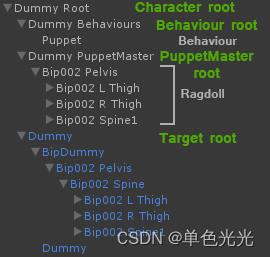
Behaviours节点下可以放置一些继承自BehaviourBase的脚本,这些脚本可以用来处理一些特定情况的用来动态控制相关权重从而影响模型的表现,插件默认提供了两个组件BehaviourPuppet和BehaviourFall,BehaviourPuppet功能比较多,比如可以当角色碰撞到障碍物时改变权重使角色呈现出布娃娃的状态以实现摔倒的表现,BehaviourFall可以处理角色下落时的表现比如说离地面较远时播放一个动画,离地比较近时的动画等,具体使用可以参考链接文档和demo。
PupperMaster节点下为根据之前的配置生成的刚体集合,主要负责物理相关的计算,这么做的原因文档上说主要是为了性能考虑。
The main advantage of using a dual rig over a single character setup is performance. It is much less expensive mostly due to not having the necessity of performing costly transformations with objects that have Colliders attached. The performance win becomes even greater when having to do IK/FK procedures on the target pose. The PuppetMaster can be smoothly blended to run in Kinematic or Disabled mode. The former will simply make the ragdoll kinematic and match it with the target, the latter will completely deactivate the ragdoll when you don’t need it.
Dummy节点就是原来模型的结构。
几个字段的含义:
- State:共有Alive, Dead和Frozen三种状态,Alive是正常状态表现为物理跟随动画,Dead表现为布娃娃的状态此时动画影响会降低,Frozen状态会停止物理效果。
- State Settings:主要是三种状态的一些设置,比如说切换过渡的时间,死亡时的肌肉权重等。
- Mode:共有Active,Kinematic和Disable三种状态。Active表示肌肉都在进行物理模拟,使用addforce等方式使其运动,Kinematic表示肌肉都是Kinematic状态,通过设置位置、角度使其运动,Disable会停止布娃娃效果。
- BlendTime:Mode切换之间的过渡时间
- FixTarget:每次循环之前都会将角色的骨骼重置为默认状态,防止出现一些奇怪的表现,只有在动画不包含所有骨骼时需要使用。
- SolverIterationCount:计算肌肉状态的迭代次数,会影响表现效果和性能。
- MappingWeight、PingWeight和MuscleWeight的效果参考动图:

可以看到当PinWeight为1时,调整MappingWeight时没有视觉上的效果,当PinWeight为0时,调整MappingWeight可以看到模型在物理骨骼和动画骨骼之间差值,PinWeight随着从0-1调整时物理骨骼会逐渐贴近动画骨骼,Muscle Weight随着调整可以看到动画幅度会受到影响。
下面的Joint和Muscle Setting包含了一些关节肌肉的统一设置,Individual Muscle Settings包含每个节点的独立设置。
Prop Muscle设置挂载点,用来实现握剑等目标。
性能
附上官方对于性能优化的使用建议
- Decrease PuppetMaster “Solver Iteration Count” (changes Rigidbody.solverIterationCount for all the muscles) to the minimum that you can work with. Less solver iterations makes the muscles weaker so you might have to increase PuppetMaster “Muscle Spring”.
- “Fix Target Transforms” should be switched off when your character is animated at all times.
- “Visualize Target Pose” costs some performance in the Editor, but not in the built game.
Leaving “Update Joint Anchors” off improves performance with the cost of simulation accuracy. - “Angular Limits” and “Internal Collisions” reduce the workload on the physics engine when disabled.
- When using BehaviourPuppet, increase PuppetMaster “Collision Threshold”. It determines how strong the collisions must be in order to be processed by the BehaviourPuppet, however, increasing the value will make the puppet’s behaviour jerkier on collision.
- Reduce the number of muscles. Do you absolutely need 3 spine muscles or the feet or hand muscles?
- Reducing “Default Contact Offset” in the Physics settings reduces expensive OnCollisionStay broadcasts when using BehaviourPuppet.
- Increase the “Fixed Timestep” in Project Settings/Time to the maximum tolerable value.
- Keep your puppets away from each other. Less collisions means much less work for both the Physics engine and the PuppetMaster.
- Set PuppetMaster mode to “Disabled” for puppets when they don’t need any physics simulation.
- Set PuppetMaster mode to “Kinematic” for puppets that only need the colliders for collision detection or raycasting.
- When you do not need to use any Puppet Behaviours nor get a call in case of collisions, comment out the OnCollisionEnter/Stay/Exit functions in MuscleCollisionBroadcaster.cs.
- PuppetMaster can also run a flat hierarchy ragdoll. Just right-click on the PuppetMaster header and select “Flatten Muscle Hierarchy” from the context menu.


 1万+
1万+

 被折叠的 条评论
为什么被折叠?
被折叠的 条评论
为什么被折叠?
 到【灌水乐园】发言


