


像素是由比特组成的数字。
例如,在256级的灰度图中,每个像素是由8比特(也就是1个字节)组成的。
代替突出灰度级范围,我们可以突出特定比特来为整个图像的外观做出贡献。
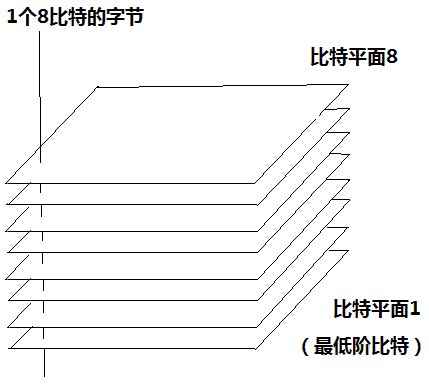
一幅8比特图像,可以认为是8个1比特的平面组成,其中平面1包含图像中所有像素的最低阶比特,而平面8包含图像中所有像素的最高阶比特。
显示一幅8比特图像的第8个比特平面并不困难,可对它进行二值化,0-127之间映射为0,128-255之间映射为1
一副8比特灰度图可考虑分层1到8个比特平面。很容易理解的是,4个高阶比特平面,特别是最后两个比特平面,包含了在视觉上很重要的大多数数据。而低阶比特平面则在图像上贡献了更精细的灰度细节。
判断该像素值在该比特面是否存在即该比特位是否为1,如果存在进行二值化给该像素值所在位赋值为255,这也是突出显示该比特的核心,否则赋值0
灰度比特平面的实现:
#include <iostream>
#include <opencv2\core\core.hpp>
#include <opencv2\highgui\highgui.hpp>
#include <opencv2\imgproc\imgproc.hpp>
#include<stdio.h>
using namespace cv;
using namespace std;
int bit[8];
void binary(int num)
{

	for (int i = 0; i < 8; i++)
	{
		bit[i] = 0;
	}

	int  i = 0;
	while (num != 0)
	{
		bit[i] = num % 2;
		num = num / 2;
		i++;
	}
}
void showMBitPlan(Mat &srcImage)
{

	int nRows = srcImage.rows;
	int nCols = srcImage.cols;

	//判断图像的连续性
	if (srcImage.isContinuous())
	{

		nCols = nCols*nRows;
		nRows = 1;
	}
	uchar *pSrcMat;
	uchar *pResultMat;

	Mat resultImage = srcImage.clone();


	for (int n = 0; n < 8; n++)
	{
		for (int j = 0; j < nRows; j++)
		{
			pSrcMat = srcImage.ptr<uchar>(j);
			pResultMat = resultImage.ptr<uchar>(j);
			for (int i = 0; i < nCols; i++)
			{
				binary(pSrcMat[i]);
				pResultMat[i] = bit[n] * 255;
			}
		}

		char windowName[20];
		sprintf_s(windowName, "bitPlane %d", n + 1);
		imshow(windowName, resultImage);
	}
}
int main()
{
	Mat srcImage = imread("lakeWater.jpg");
	if (!srcImage.data)
	{
		printf("could not load image...\n");
		return -1;
	}
	Mat srcGray;
	cvtColor(srcImage, srcGray, CV_BGR2GRAY);
	imshow("srcGray", srcGray);
	showMBitPlan(srcGray);
	waitKey(0);
	return 0;
}

八个比特平面图:


 1618
1618

 被折叠的 条评论
为什么被折叠?
被折叠的 条评论
为什么被折叠?
 到【灌水乐园】发言


